【最简OAuth2系列教程】开发认证中心模块
2021-03-03 21:58
274 查看
背景:网上很多讲配置 oauth2 ,配置方法 复杂纷繁对于初学者很不友好,让人望而却步
欢迎关注本系列博客 基于 spring cloud 最新版本 hoxton 完成oauth2 的实践
基于
SpringCloudOAuth
,用简洁的方式搭建oauth的认证中心,关于oauth2 的授权模式 请直接参考 阮一峰 OAuth 2.0 的四种方式的详细介绍
项目版本核心说明
| 名称 | 版本 |
|---|---|
| Spring Boot | 2.2.0.M5 |
| Spring Cloud | Hoxton.M2 |
| Spring Cloud OAuth2 | 2.2.0.M2 |
开始配置
maven 依赖引入
这里只需要引入web、 cloud-oauth 即可,暂不引入spring cloud 其他组件
<dependencies>
<dependency>
<groupId>org.springframework.boot</groupId>
<artifactId>spring-boot-starter-web</artifactId>
</dependency>
<dependency>
<groupId>org.springframework.cloud</groupId>
<artifactId>spring-cloud-starter-oauth2</artifactId>
</dependency>
</dependencies>
配置web安全,拦截全部的请求
获取web 上下文AuthenticationManager 注入到spring中,方便后边oauth server注入
创建UserDetailsService的内存实现,注入一个测试用户
@Configuration
@EnableWebSecurity
@EnableGlobalMethodSecurity(prePostEnabled = true)
public class WebSecurityConfiguration extends WebSecurityConfigurerAdapter {/**
* 必须注入 AuthenticationManager,不然oauth 无法处理四种授权方式
*
* @return
* @throws Exception
*/
@Bean
@Override
public AuthenticationManager authenticationManagerBean() throws Exception {return super.authenticationManagerBean();
}
/**
* 必须注入UserDetailsService ,不然oauth 密码模式等死循环问题
*
* @return
*/
@Bean
@Override
protected UserDetailsService userDetailsService() {InMemoryUserDetailsManager userDetailsManager = new InMemoryUserDetailsManager();
userDetailsManager.createUser(User.withUsername("lengleng").password("{noop}lengleng").authorities("USER").build());return userDetailsManager;
}
}
配置oauth2 认证服务器
配置clientId 信息,及其支持的授权模式,特别注意这里是五种包含一个刷新操作
@Configuration
@EnableAuthorizationServer
public class BigAuthServerConfiguration extends AuthorizationServerConfigurerAdapter {@Autowired
private AuthenticationManager authenticationManager;
@Autowired
private UserDetailsService userDetailsService;
@Override
public void configure(ClientDetailsServiceConfigurer clients) throws Exception {clients.inMemory()
.withClient("appid").secret("{noop}secret").authorizedGrantTypes("password", "authorization_code", "client_credentials", "implicit", "refresh_token").scopes("all");}
@Override
public void configure(AuthorizationServerEndpointsConfigurer endpoints) {endpoints.authenticationManager(authenticationManager)
.userDetailsService(userDetailsService);
}
}
以上完成了认证服务器的功能
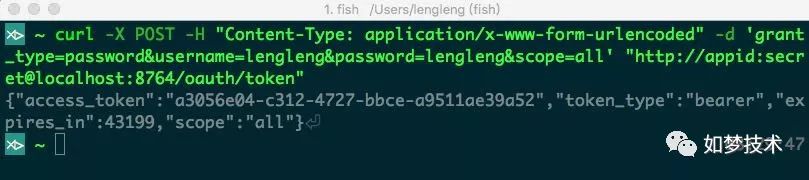
测试密码模式
curl -X POST -H "Content-Type: application/x-www-form-urlencoded" -d 'grant_type=password&username=lengleng&password=lengleng&scope=all' "http://appid:secret@localhost:8764/oauth/token"
总结
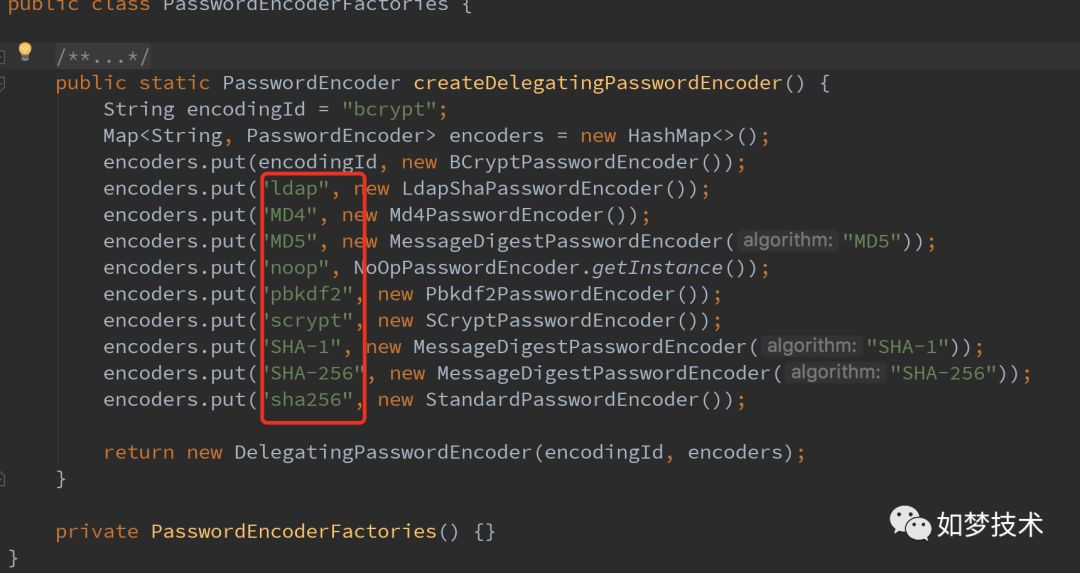
关于spring security 密码处理 {noop}密码
spring security 5 后支持密码动态加密, {noop}密码 spring security 则去找NoOpPasswordEncoder解密,不需要自定义 PasswordEncoder 保证安全性,支持如下

相关文章推荐
- 【最简OAuth 2.0 教程】开发认证中心及资源服务器接入
- 安卓Hook系列教程(一):xposed模块开发环境搭建
- 新人补钙系列教程之:webgame好友模块原型开发一
- 使用VTEditor软件快速开发网站系列教程四 模块公共属性篇
- 系列教程:DB2 9 应用开发(733)认证指南
- 使用VTEditor软件快速开发网站系列教程五 模块篇
- [转]Struts1.x系列教程(1):用MyEclipse开发第一个Struts程序
- 用AngularJS开发下一代Web应用 系列入门基础教程
- NW开发教程系列二:单表头页面
- C#开发WPF/Silverlight动画及游戏系列教程(Game Tutorial):(七)传说中的A*寻径算法
- C#开发WPF/Silverlight动画及游戏系列教程(Game Tutorial):(三十二) 雷、混、冰、毒、火、风 - 幻化中的魔法魅力!
- 视频教程-Python入门-系列游戏开发-五子棋-Python
- C#开发WPF/Silverlight动画及游戏系列教程(Game Tutorial):(十五) 精灵控件横空出世!②
- ios开发学习--文字视图(Text)效果源码分享--系列教程
- ios开发学习--音频声效(Audio)效果源码分享--系列教程
- 跨平台移动开发phonegap/cordova 3.3全系列教程-调用webservice/ajax
- [置顶] c#开发大全、系列文章、精品教程
- NW开发教程系列五:表头和表体(单表体)
- 【Android学习系列】OpenGL开发教程二
- C#开发WPF/Silverlight动画及游戏系列教程(Game Tutorial):(十六) 牵引式地图移动模式②