春江水暖Openshift 4先知-第一篇:终于实现了IaaS和PaaS的弹性统一!
前言:本文仅用于技术谈论。本实验Openshift4.0安装在AWS上。最终通过配置MachineSet实现IaaS和PaaS统一管理。也就是说,当Openshift集群性能不足的时候,自动创建aws虚拟机,并且将aws虚拟机加入到计算节点。Openshift4.1将支持基于vSphere虚拟化的弹性伸缩。
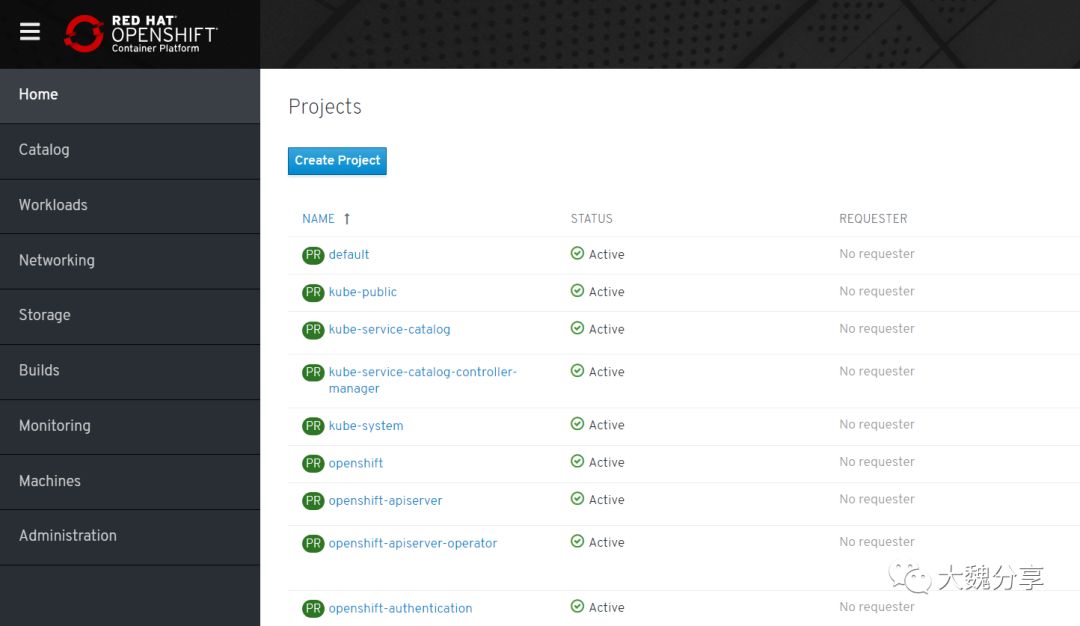
OCP4首页面:
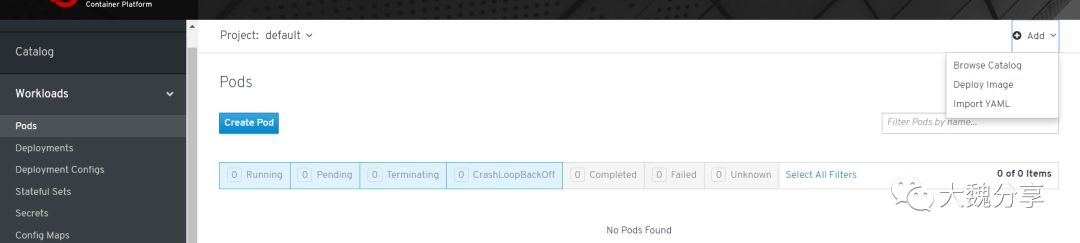
首先部署Web terminal的pod:
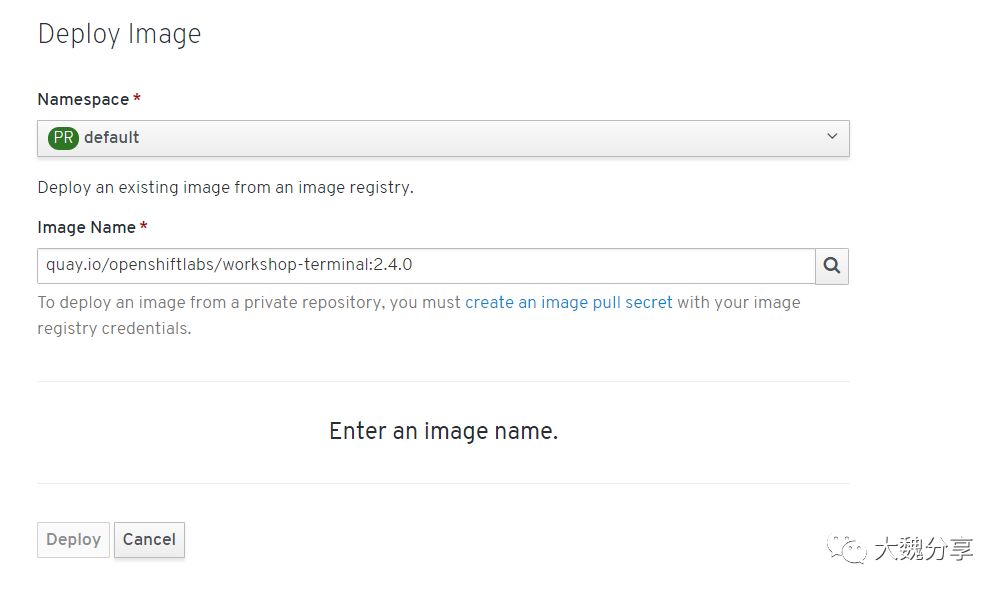
传递参数设置版本为4.0:
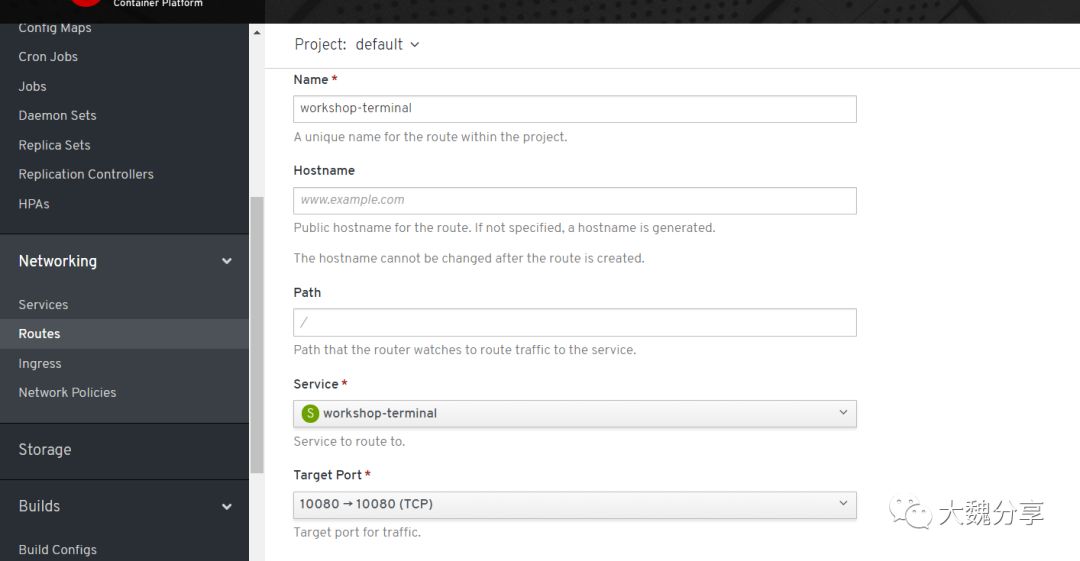
接下来我们需要创建一个路由,以便我们可以从OpenShift外部(即从互联网)访问此应用程序。在左侧菜单中,选择“网络”,然后选择“路线”。在新窗格中,选择左上角的“创建router”。 输入'workshop-terminal'作为路径名称,将主机名和路径保留为默认值,从“服务”菜单中的服务列表中选择“workshop-terminal”,然后选择“目标端口”中的唯一端口下拉(应该是端口10080 - > 10080),像这样:
在右上角,接下来,我们可以通过路由的地址访问终端:

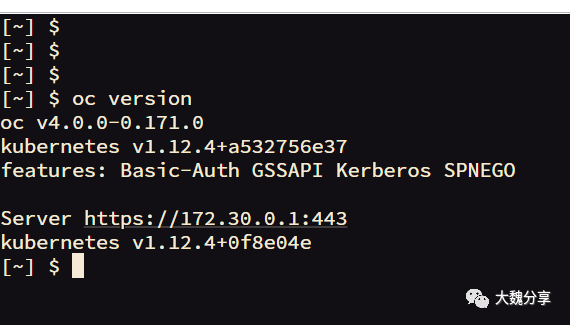
查看集群版本:

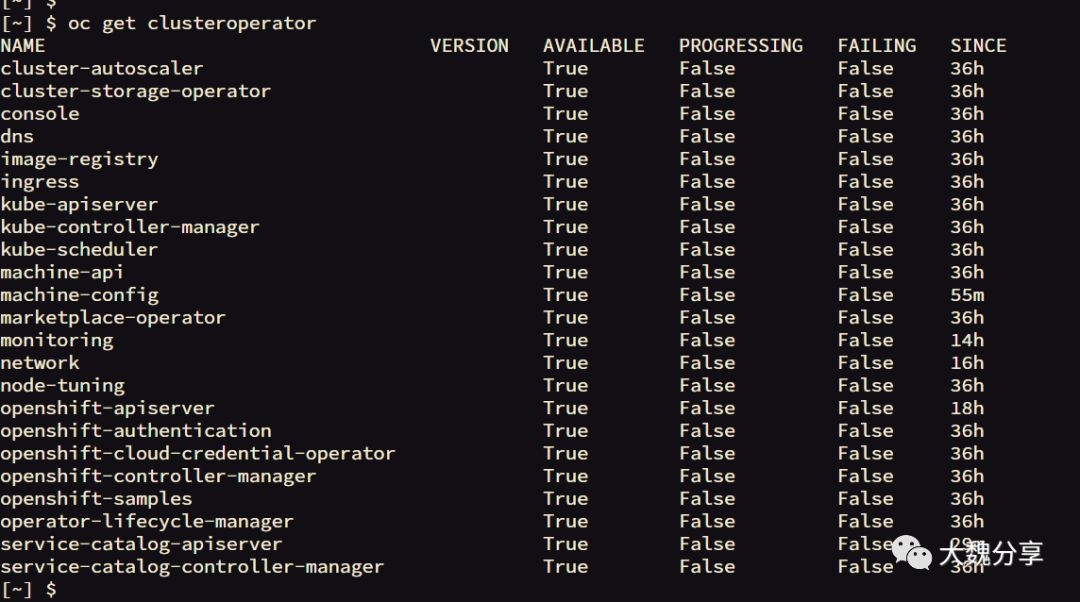
查看集群中的Operator类型:
或者更全面地获取在集群上运行的运算符列表,以及提供该功能的代码,文档和提交的链接如下:
您还可以将rsh(远程shell访问)导入正在运行的Operator,并查看与已安装的OpenShift版本相关的各种清单:
查看一个operator的具体配置:
sh-4.2# cat 0000_70_operator-marketplace_03_operatorsource.crd.yaml
apiVersion: apiextensions.k8s.io/v1beta1
kind: CustomResourceDefinition
metadata:
name: operatorsources.marketplace.redhat.com
annotations:
displayName: Operator Source
description: Represents an OperatorSource.
spec:
group: marketplace.redhat.com
names:
kind: OperatorSource
listKind: OperatorSourceList
plural: operatorsources
singular: operatorsource
shortNames:
- opsrc
scope: Namespaced
version: v1alpha1
additionalPrinterColumns:
- name: Type
type: string
description: The type of the OperatorSource
JSONPath: .spec.type
- name: Endpoint
type: string
description: The endpoint of the OperatorSource
JSONPath: .spec.endpoint
- name: Registry
type: string
description: App registry namespace
JSONPath: .spec.registryNamespace
- name: DisplayName
type: string
description: Display (pretty) name to indicate the OperatorSource's name
JSONPath: .spec.displayName
- name: Publisher
type: string
description: Publisher of the OperatorSource
JSONPath: .spec.publisher
- name: Status
type: string
description: Current status of the OperatorSource
JSONPath: .status.currentPhase.phase.name
- name: Message
type: string
description: Message associated with the current status
JSONPath: .status.currentPhase.phase.message
- name: Age
type: date
JSONPath: .metadata.creationTimestamp
validation:
openAPIV3Schema:
properties:
spec:
type: object
description: Spec for an OperatorSource.
required:
- type
- endpoint
- registryNamespace
properties:
type:
type: string
description: The type of the OperatorSource
pattern: 'appregistry'
endpoint:
type: string
description: Points to the remote app registry server from where operator manifests can be fetched.
registryNamespace:
type: string
description: |-
The namespace in app registry.
Only operator manifests under this namespace will be visible.
Please note that this is not a k8s namespace.
扩展OpenShift 4群集
使用OpenShift 4.0+,我们现在可以通过OpenShift本身动态扩展群集大小。
在本练习中,我们将手动将工作节点添加到集群:
如果您尚未登录,请转到OpenShift Web控制台并使用admin登录(如果不同,则使用您的管理员用户名)
浏览到左侧边栏上的“MachineSet”,然后单击“MachineSet”。
在Machine Sets页面上,从Project下拉列表中选择openshift-machine-api,您应该看到机器集:
通过单击名称选择列表中的一个Machine Sets,例如, “beta-190305-1-79tf5-worker-us-east-1a”
通过单击选择要扩容的节点
此时,您可以单击此计算机集显示中的计算机选项卡,然后查看已分配的计算机。 概述选项卡将通知您机器何时准备就绪。 如果再次单击左侧机器下的机器集,您还将看到集合中机器的状态:
新机器准备就绪需要几分钟。 在后台,正在配置其他EC2实例,然后注册并配置为参与群集,
您可以在Web UI控制台中以多种方式更改机器集计数,但您也可以通过使用openshift-machine-api项目中machineset上的oc edit命令通过CLI执行相同的操作 。
oc edit machineset -n openshift-machine-api


如果有指定的配置,OpenShift可以根据工作负载自动扩展基础架构。 在开始之前,请确保您的群集恢复运行三个节点:
接下来,配置MachineAutoScaler - 您需要获取以下YAML文件:
wget https://raw.githubusercontent.com/openshift/training/master/assets/machine-autoscale-example.yaml
[root@client ~]# cat machine-autoscale-example.yaml
kind: List
metadata: {}
apiVersion: v1
items:
- apiVersion: "autoscaling.openshift.io/v1alpha1"
kind: "MachineAutoscaler"
metadata:
generateName: autoscale-<aws-region-az>-
namespace: "openshift-machine-api"
spec:
minReplicas: 1
maxReplicas: 4
scaleTargetRef:
apiVersion: machine.openshift.io/v1beta1
kind: MachineSet
name: <clusterid>-worker-<aws-region-az>
[root@client ~]#
修改如下部分内容:
apiVersion: "autoscaling.openshift.io/v1alpha1"
kind: "MachineAutoscaler"
metadata:
  generateName: autoscale-us-east-1a-
  namespace: "openshift-machine-api"
spec:
  minReplicas: 1
  maxReplicas: 4
  scaleTargetRef:
    apiVersion: machine.openshift.io/v1beta1
    kind: MachineSet
    name: beta-190305-1-79tf5-worker-us-east-1a
$ export CLUSTER_NAME=$(oc get machinesets -n openshift-machine-api | awk -F'-worker-' 'NR>1{print $1;exit;}')
$ export REGION_NAME=us-east-1a

$ sed -i s/\<aws-region-az\>/$REGION_NAME/g machine-autoscale-example.yaml
$ sed -i s/\<clusterid\>/$CLUSTER_NAME/g machine-autoscale-example.yaml
您不必为每个MachineSet定义MachineAutoScaler。 每个MachineSet对应一个AWS区域/ AZ。 因此,如果没有多个MachineAutoScalers,您最终可能会在单个AZ中完全扩展集群。 如果这就是你所追求的,那很好。 但是,如果AWS在该AZ中存在问题,则存在丢失大部分群集的风险。
定义ClusterAutoscaler
接下来,我们需要定义一个ClusterAutoscaler,它为集群的自动调整方式配置一些边界和行为。 可以在以下位置找到示例定义文件:
https://raw.githubusercontent.com/openshift/training/master/assets/cluster-autoscaler.yaml
这个定义最多设定为20个worker,但我们需要通过我们的实验室来减少这种情况。 先下载该文件:
[root@client ~]# wget https://raw.githubusercontent.com/openshift/training/master/assets/cluster-autoscaler.yaml
--2019-03-20 04:12:41-- https://raw.githubusercontent.com/openshift/training/master/assets/cluster-autoscaler.yaml
Resolving raw.githubusercontent.com (raw.githubusercontent.com)... 151.101.108.133
Connecting to raw.githubusercontent.com (raw.githubusercontent.com)|151.101.108.133|:443... connected.
HTTP request sent, awaiting response... 200 OK
Length: 254 [text/plain]
Saving to: ‘cluster-autoscaler.yaml’
100%[============================================================================================================>] 254 --.-K/s in 0s
2019-03-20 04:12:41 (11.4 MB/s) - ‘cluster-autoscaler.yaml’ saved [254/254]
[root@client ~]# sed -i s/20/10/g cluster-autoscaler.yaml
[root@client ~]# oc create -f cluster-autoscaler.yaml
clusterautoscaler.autoscaling.openshift.io/default created
[root@client ~]#
定义一个worker
以下示例YAML文件定义了一个Job:
https://raw.githubusercontent.com/openshift/training/master/assets/job-work-queue.yaml
它将产生群集无法处理的大量负载,并将强制自动缩放器采取操作(最多为ClusterAutoscaler YAML中定义的maxReplicas)。
注意:如果您之前未缩小计算机,则可能有太多容量来触发自动缩放事件。 在继续之前,确保您的工人总数不超过3人。
创建一个项目来保存Job的资源,并切换到它:
[root@client ~]# oc adm new-project autoscale-example && oc project autoscale-example
Created project autoscale-example
Now using project "autoscale-example" on server "https://api.cluster-9fb8.9fb8.sandbox182.opentlc.com:6443".
指定弹性收缩
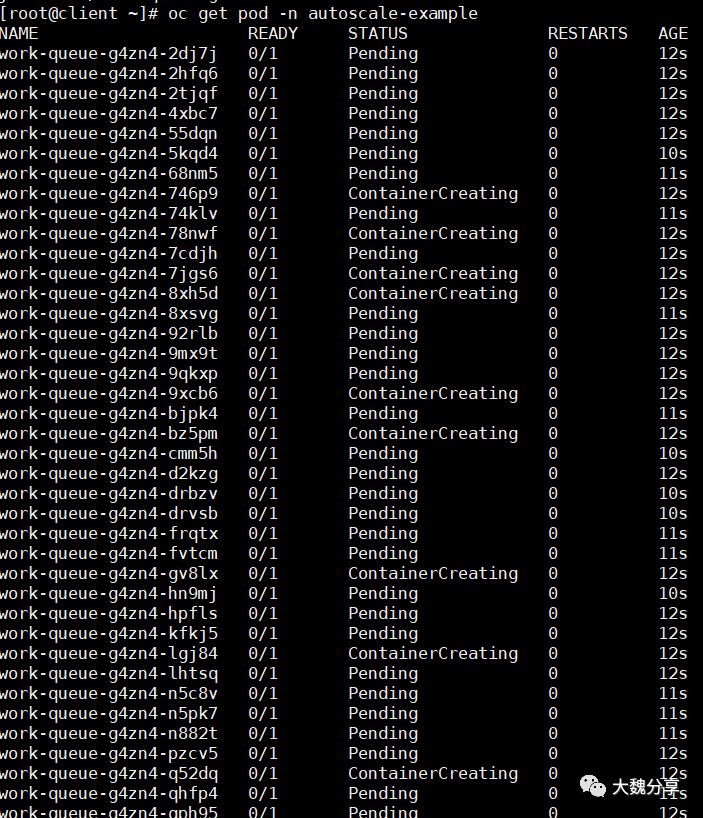
现在我们准备创建job,给系统加压:
[root@client ~]# oc create -n autoscale-example -f https://raw.githubusercontent.com/openshift/training/master/assets/job-work-queue.yaml
job.batch/work-queue-g4zn4 created

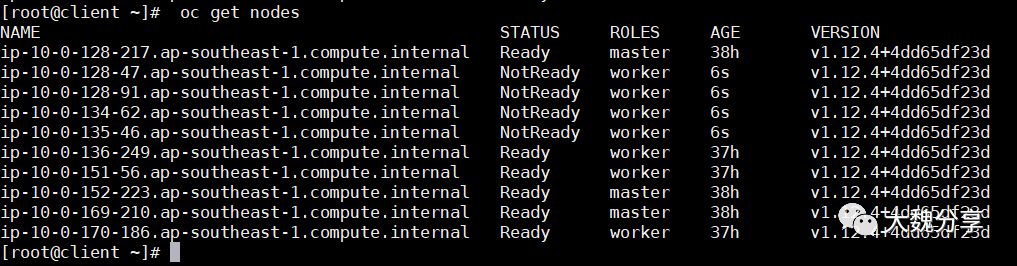
过一会,查看机器列表,计算节点已经增加了:


- IaaS云计算弹性扩展的实现以及算法
- EF架构~终于实现了Update方法的统一
- IaaS云计算弹性扩展的实现以及算法
- 如何设计 API 接口,实现统一格式返回?
- 核心统一过程EssUP——实现过程
- 如何实现像ios那样的富有弹性的ListView (上下滑动有弹性,且能恢复原状)
- 从此例中终于实现了从外部xml文件读取数据使用Flare 生成有节点有连线的Graph
- 【Java基础】采用Filter实现AOP完成统一登录验证
- 第一篇博客:ajax+ashx实现异步刷新img
- HTML简单的游戏引擎实现第一篇
- Android 实现ListView 3D效果 - 2 - 弹性滚动,Fling
- SaaS,PaaS,IaaS都是什么鬼?
- Windows Azure Cloud Service (38) 微软IaaS与PaaS比较
- Borland CaliberRM/StarTeam 2005使用LDAP实现统一用户认证(一)
- 在 MVVM 中使用 RACSubject 可以非常方便地实现统一的错误处理逻辑
- 终于实现了翻页功能
- 经过努力终于实现了远程FTP下载文件到本地的批处理
- c#第一篇 在WPF的window窗体中使用httpwebrequest实现模拟登陆网页,并在webbroser控件中显示
- BCB中的TComboBox如何显示用户选择名称所对应的映射值?------尝试好久终于想到利用定时器来间接实现
- Liferay7 BPM门户开发之11: Activiti工作流程开发的一些统一规则和实现原理(完整版)