PyTorch实现用于文本生成的循环神经网络

作者|DR. VAIBHAV KUMAR 编译|VK 来源|Analytics In Diamag
自然语言处理(NLP)有很多有趣的应用,文本生成就是其中一个有趣的应用。
当一个机器学习模型工作在诸如循环神经网络、LSTM-RNN、GRU等序列模型上时,它们可以生成输入文本的下一个序列。
PyTorch提供了一组功能强大的工具和库,这些工具和库为这些基于NLP的任务增添了动力。它不仅需要较少的预处理量,而且加快了训练过程。

在本文中,我们将在PyTorch中训练几种语言的循环神经网络(RNN)。训练成功后,RNN模型将预测属于以输入字母开头的语言的名称。
PyTorch实现
这个实现是在Google Colab中完成的,其中的数据集是从Google驱动器获取的。所以,首先,我们将用Colab Notebook安装Google驱动器。
from google.colab import drive
drive.mount('/content/gdrive')
现在,我们将导入所有必需的库。
from __future__ import unicode_literals, print_function, division
from io import open
import glob
import os
import unicodedata
import string
import torch
import torch.nn as nn
import random
import time
import math
import matplotlib.pyplot as plt
import matplotlib.ticker as ticker
下面的代码片段将读取数据集。
all_let = string.ascii_letters + " .,;'-"
n_let = len(all_let) + 1

def getFiles(path):
return glob.glob(path)

# Unicode字符串到ASCII
def unicodeToAscii(s):
return ''.join(
c for c in unicodedata.normalize('NFD', s)
if unicodedata.category(c) != 'Mn'
and c in all_let
)

# 读一个文件并分成几行
def getLines(filename):
lines = open(filename, encoding='utf-8').read().strip().split('\n')
return [unicodeToAscii(line) for line in lines]

# 建立cat_lin字典,存储每个类别的行列表
cat_lin = {}
all_ctg = []
for filename in getFiles('gdrive/My Drive/Dataset/data/data/names/*.txt'):
categ = os.path.splitext(os.path.basename(filename))[0]
all_ctg.append(category)
lines = getLines(filename)
cat_lin[categ] = lines

n_ctg = len(all_ctg)
在下一步中,我们将定义module类来生成名称。该模块将是一个循环神经网络。
class NameGeneratorModule(nn.Module):
def __init__(self, inp_size, hid_size, op_size):
super(NameGeneratorModule, self).__init__()
self.hid_size = hid_size

self.i2h = nn.Linear(n_ctg + inp_size + hid_size, hid_size)
self.i2o = nn.Linear(n_ctg + inp_size + hid_size, op_size)
self.o2o = nn.Linear(hid_size + op_size, op_size)
self.dropout = nn.Dropout(0.1)
self.softmax = nn.LogSoftmax(dim=1)

def forward(self, category, input, hidden):
inp_comb = torch.cat((category, input, hidden), 1)
hidden = self.i2h(inp_comb)
output = self.i2o(inp_comb)
op_comb = torch.cat((hidden, output), 1)
output = self.o2o(op_comb)
output = self.dropout(output)
output = self.softmax(output)
return output, hidden

def initHidden(self):
return torch.zeros(1, self.hid_size)
以下函数将用于从列表中选择随机项,从类别中选择随机行
def randChoice(l):
return l[random.randint(0, len(l) - 1)]

def randTrainPair():
category = randChoice(all_ctg)
line = randChoice(cat_lin[category])
return category, line
以下函数将数据转换为RNN模块的兼容格式。
def categ_Tensor(categ):
li = all_ctg.index(categ)
tensor = torch.zeros(1, n_ctg)
tensor[0]
以下函数将创建随机训练示例,包括类别、输入和目标张量。
#损失
criterion = nn.NLLLoss()
#学习率
lr_rate = 0.0005

def train(category_tensor, input_line_tensor, target_line_tensor):
target_line_tensor.unsqueeze_(-1)
hidden = rnn.initHidden()

rnn.zero_grad()

loss = 0

for i in range(input_line_tensor.size(0)):
output, hidden = rnn(category_tensor, input_line_tensor[i], hidden)
l = criterion(output, target_line_tensor[i])
loss += l

loss.backward()

for p in rnn.parameters():
p.data.add_(p.grad.data, alpha=-lr_rate)

return output, loss.item() / input_line_tensor.size(0)
为了显示训练期间的时间,定义以下函数。
def time_taken(since):
now = time.time()
s = now - since
m = math.floor(s / 60)
s -= m * 60
return '%dm %ds' % (m, s)
在下一步中,我们将定义RNN模型。
model = NameGenratorModule(n_let, 128, n_let)
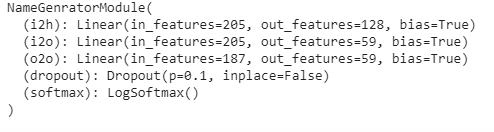
我们将看到定义的RNN模型的参数。
print(model)
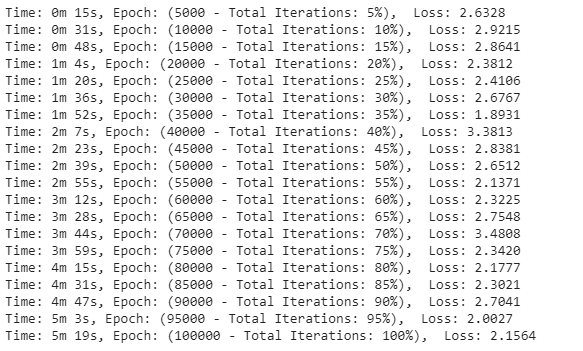
下一步,该模型将训练10000个epoch。
epochs = 100000
print_every = 5000
plot_every = 500
all_losses = []
total_loss = 0 # 每次迭代时重置

start = time.time()

for iter in range(1, epochs + 1):
output, loss = train(*rand_train_exp())
total_loss += loss

if iter % print_every == 0:
print('Time: %s, Epoch: (%d - Total Iterations: %d%%),  Loss: %.4f' % (time_taken(start), iter, iter / epochs * 100, loss))

if iter % plot_every == 0:
all_losses.append(total_loss / plot_every)
total_loss = 0
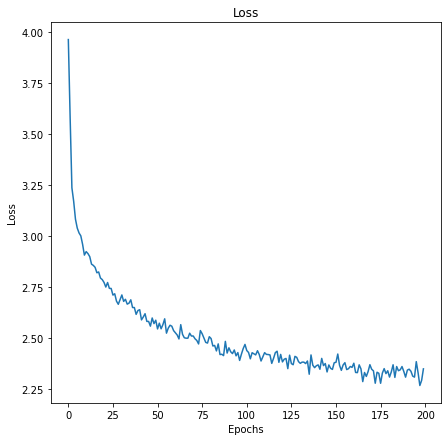
我们将可视化训练中的损失。
plt.figure(figsize=(7,7))
plt.title("Loss")
plt.plot(all_losses)
plt.xlabel("Epochs")
plt.ylabel("Loss")
plt.show()
最后,我们将对我们的模型进行测试,以测试在给定起始字母表字母时生成属于语言的名称。
max_length = 20
# 类别和起始字母中的示例
def sample_model(category, start_letter='A'):
with torch.no_grad():  # no need to track history in sampling
category_tensor = categ_Tensor(category)
input = inp_Tensor(start_letter)
hidden = NameGenratorModule.initHidden()

output_name = start_letter

for i in range(max_length):
output, hidden = NameGenratorModule(category_tensor, input[0], hidden)
topv, topi = output.topk(1)
topi = topi[0][0]
if topi == n_let - 1:
break
else:
letter = all_let[topi]
output_name += letter
input = inp_Tensor(letter)

return output_name

# 从一个类别和多个起始字母中获取多个样本
def sample_names(category, start_letters='XYZ'):
for start_letter in start_letters:
print(sample_model(category, start_letter))
现在,我们将检查样本模型,在给定语言和起始字母时生成名称。
print("Italian:-")
sample_names('Italian', 'BPRT')
print("\nKorean:-")
sample_names('Korean', 'CMRS')
print("\nRussian:-")
sample_names('Russian', 'AJLN')
print("\nVietnamese:-")
sample_names('Vietnamese', 'LMT')
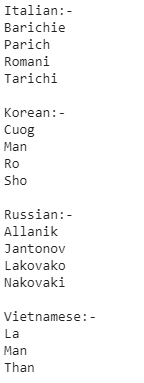
因此,正如我们在上面看到的,我们的模型已经生成了属于语言类别的名称,并从输入字母开始。
参考文献:
-
[li]Trung Tran, “Text Generation with Pytorch”.
原文链接:https://analyticsindiamag.com/recurrent-neural-network-in-pytorch-for-text-generation/
欢迎关注磐创AI博客站: http://panchuang.net/
sklearn机器学习中文官方文档: http://sklearn123.com/
欢迎关注磐创博客资源汇总站: http://docs.panchuang.net/

- RNN 扫盲:循环神经网络解读及其 PyTorch 应用实现
- Task03 循环神经网络进阶(pytorch代码实现)
- pytorch从头开始实现一个RNN(循环神经网络)
- [动手学深度学习PyTorch笔记2]文本预处理、语言模型、循环神经网络
- 花书第六章: 循环神经网络加文本生成学习笔记
- 案例带你学Pytorch系列(2)——RNN循环神经网络
- Tensorflow实现循环神经网络——基于Fashion Mnist数据集
- 基于循环神经网络(RNN)实现影评情感分类
- 深度学习d2:文本预处理、语言模型、循环神经网络基础
- 使用循环神经网络实现语言模型——源自《TensorFlow:实战Goole深度学习框架》
- Pytorch实现基于CharRNN的文本分类与生成示例
- matlab使用layrecnet实现循环神经网络rnn。
- 基本的神经网络前向传播pytorch实现
- 02深度学习_文本预处理/语言模型/循环神经网络基础
- TensorFlow练手 | 使用循环神经网络(RNN)实现影评情感分类
- 《python深度学习》学习笔记与代码实现(第六章,6.3 循环神经网络的高级用法)
- Task03-pyTorch(过拟合、欠拟合,梯度消失、爆炸,循环神经网络进阶)
- PyTorch上搭建简单神经网络实现回归和分类
- 动手学深度学习(二)——文本预处理&语言模型&循环神经网络
- 双向循环神经网络tensorflow实现