利用laravel框架实现基本的CMS
工程的创建
1.利用laragon快速创建工程
2.XDebug调试工具的环境安装
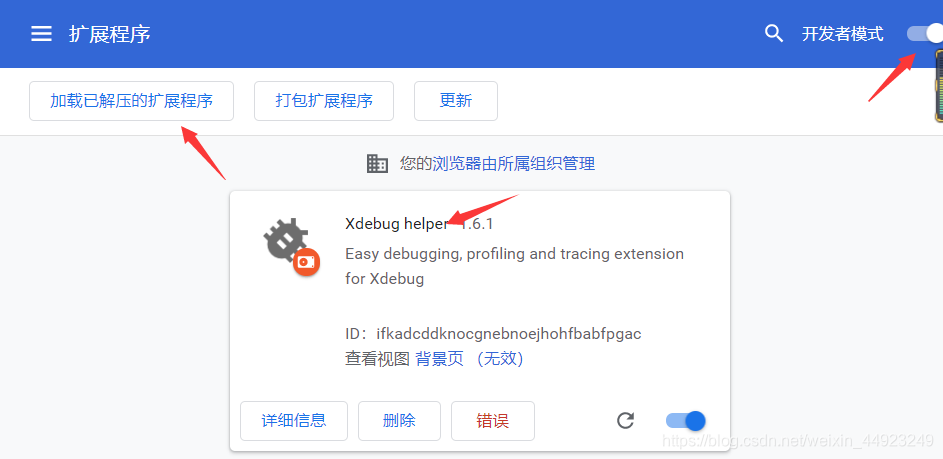
一、在chrome浏览器安装xdebug插件
插件安装:
crx的下载地址:https://www.crx4chrome.com/crx/1716/
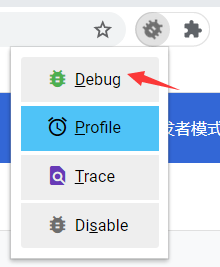
解压提取文件中的xdebug文件——打开chrom——更多工具——扩展程序——打开开发者模式——加载解压后的插件——加载成功——选择Debug,进入调试模式
二、在laragon中安装和配置xdebug扩展
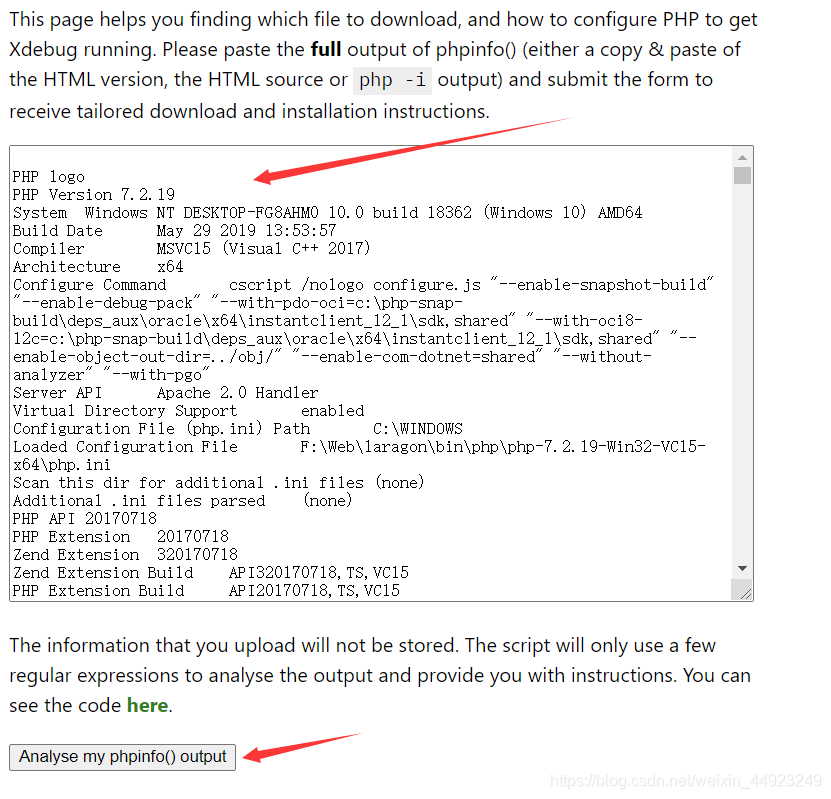
启动laragon,在浏览器中访问http://localhost/?q=info
将上述页面的内容全部拷贝下来,粘贴到https://xdebug.org/wizard的框中,点击analyse my phpinfo() output。
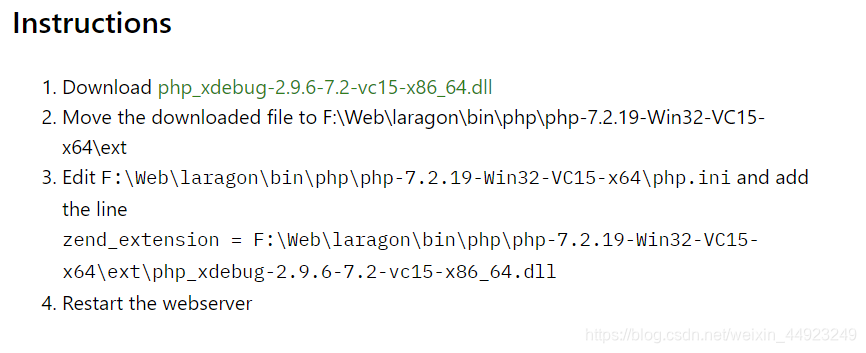
生成自己的安装步骤安装xdebug扩展(这个安装步骤是根据自己电脑环境生成的,每个人人可能不一样)
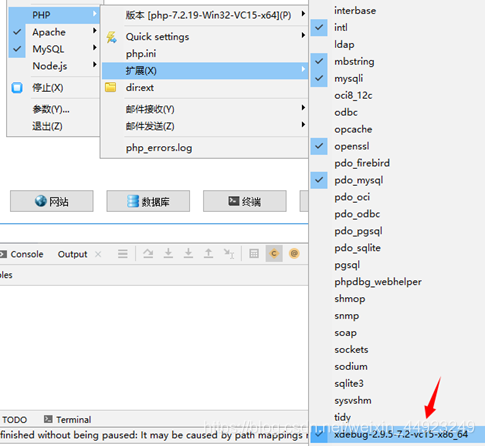
到laragon中菜单——PHP——扩展查看
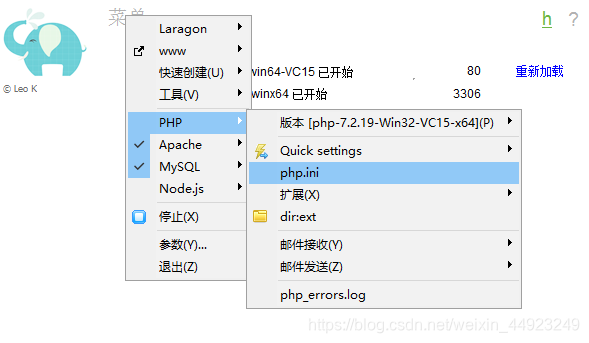
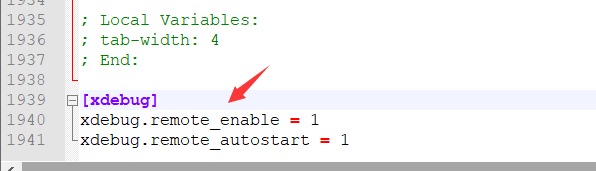
修改配置文件php.ini,保存修改,重启laragon,试一试调试结果。
工程中试一试调试结果
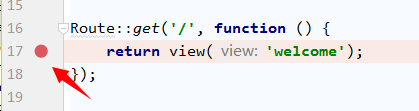
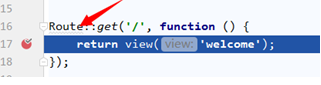
1.在web.php中点击此处打上一个断点
2.在工具栏上点击此按钮进入调试监听模式
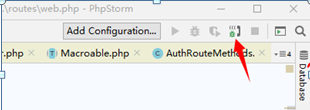
3.在浏览器中访问http://cms.test/看看断点是否能停下来
用户认证
1.在laragon终端下执行
导入依赖包:comper require laravel/ui
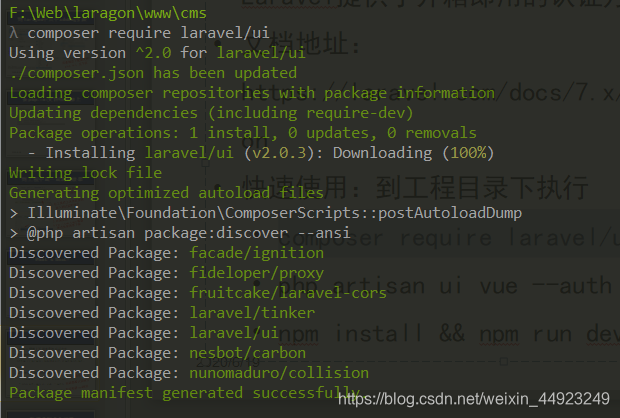
安装部署认证组件:php artisan ui vue --auth
安装部署npm组件:nmp install && nmp run dev
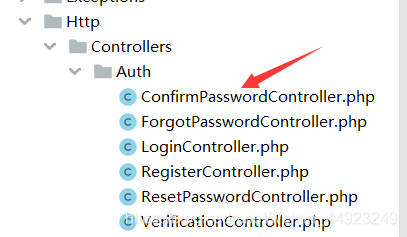
命令执行后,会自动创建相关视图以及相关控制器;在web.php中自动添加相关路由
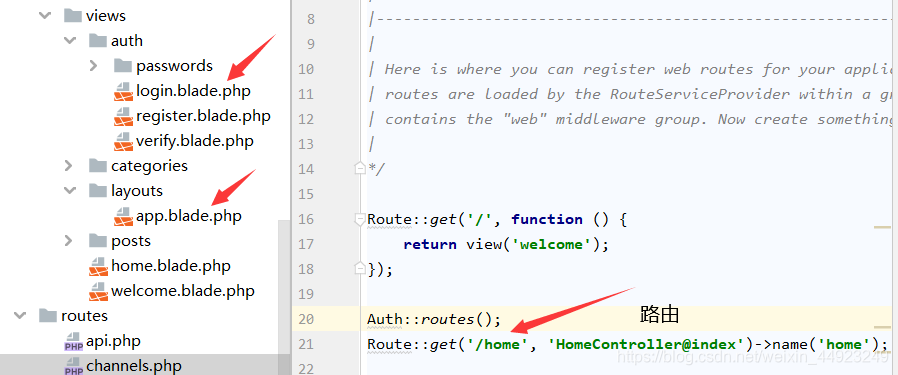
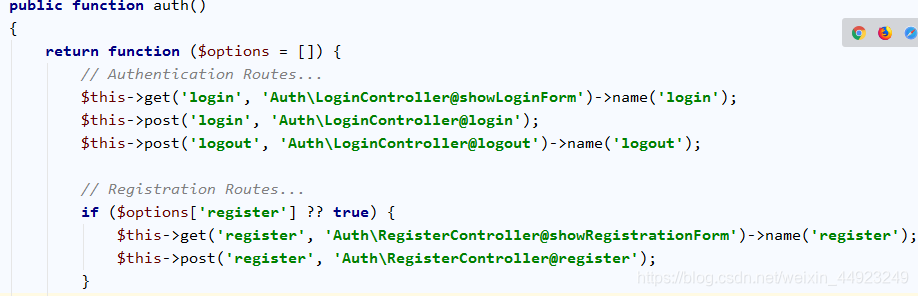
2.Auth::routes()实际注册的路由
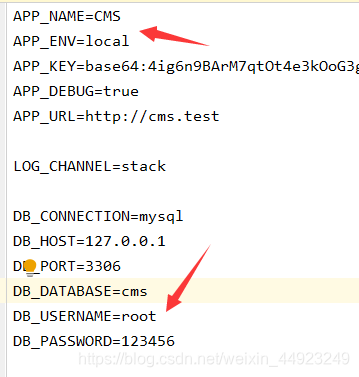
3.建立数据库
到.env中配置好数据库;修改配置项
到终端执行数据迁徙

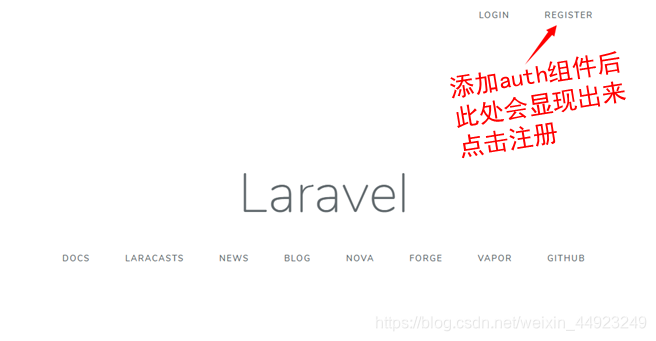
4.在浏览器中点击注册
建立控制器和设置路由
1.控制器的建立
1.php artisan make:controller CategoriesController --resource

class CategoriesController extends Controller
{
/**
* Display a listing of the resource.
*
* @return Response
*/
public function index()
{
//
$categories = Category::query()->orderByDesc(‘created_at’)->get();
return view('categories.index', compact('categories'));
}

/**
* Show the form for creating a new resource.
*
* @return Response
*/
public function create()
{
//
return view('categories.create');
}

/**
* Store a newly created resource in storage.
*
* @param StoreCategory $request
* @return Response
*/
public function store(StoreCategory $request)
{
//
$validatedData = $request->validated();
Category::create($validatedData);
$request->session()->flash('success','添加成功');
return redirect(route('categories.index'));
}

/**
* Display the specified resource.
*
* @param  int  $id
* @return Response
*/
public function show($id)
{
//
}

/**
* Show the form for editing the specified resource.
*
* @param Category $category
* @return Response
*/
public function edit(Category $category)
{
//
return view('categories.create',compact('category'));
}

/**
* Update the specified resource in storage.
*
* @param updateCategory $request
* @param Category $category
* @return void
*/
public function update(updateCategory $request, Category $category)

{
//
$category->update($request->validated());
$request->session()->flash('success','更新成功');
return redirect(route('categories.index'));
}

/**
* Remove the specified resource from storage.
*
* @param Category $category
* @return void
* @throws \Exception
*/
public function destroy(Category $category)
{
//
$category->delete();
session()->flash('success','删除成功');
return redirect(route('categories.index'));
}
}
2.php artisan make:controller PostsController --resource
class postsController extends Controller
{
/**
* Display a listing of the resource.
*
* @return \Illuminate\Contracts\View\Factory|\Illuminate\View\View
*/
public function index()
{
$posts = post::query()->orderByDesc(‘created_at’)->get();
return view(‘posts.index’,compact(‘posts’));
}
/**
* Show the form for creating a new resource.
*
* @return \Illuminate\Http\Response
*/
public function create()
{
$categories = Category::all();
return view('posts.create',compact('categories'));
}

/**
* Store a newly created resource in storage.
*
* @param  \Illuminate\Http\Request  $request
* @return false|string
*/
public function store(Request $request)
{
$image =$request->file('image')->store('posts');
post::create([
'title'=>$request->title,
'description'=>$request->description,
'content'=>$request->content,
'image' =>$image
]);

session()->flash('success','Post created successfully.');
return redirect(route('posts.index'));

}

/**
* Display the specified resource.
*
* @param  int  $id
* @return \Illuminate\Http\Response
*/
public function show($id)
{
//
}

/**
* Show the form for editing the specified resource.
*
* @param  int  $id
* @return \Illuminate\Http\Response
*/
public function edit($id)
{
//
}

/**
* Update the specified resource in storage.
*
* @param  \Illuminate\Http\Request  $request
* @param  int  $id
* @return \Illuminate\Http\Response
*/
public function update(Request $request, $id)
{
//
}

/**
* Remove the specified resource from storage.
*
* @param  int  $id
* @return \Illuminate\Http\Response
*/
public function destroy($id)
{

$post = post::withTrashed()->where('id',$id)->firstOrFail();
if ($post->trashed()){
$post->forceDelete();
}else{
$post->delete();
}

session()->flash('success','Post deleted successfully.');
return redirect(route('posts.index'));

}
/**
* Display a list of att trashed posts
*
* @param  int  $id
* @return \Illuminate\Http\Response
*/
public function trashed()
{
$trashed = post::withTrashed()->get();
return view('posts.index')->with('posts',$trashed);
}
}
3.php artisan make:controller CreatePostsRequest
2.创建模型和数据库迁徙文件(注意先后顺序,先Category后Post)
Post是CMS中后台发布文章帖子
Category是文章的分类

php artisan make:model Category -m

php artisan make:model Post -m

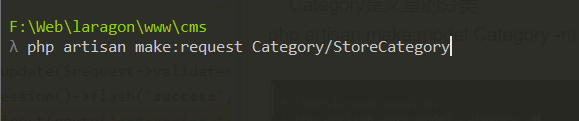
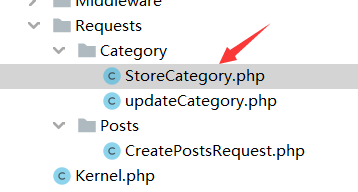
3.创建表单请求StoreCategory
php artisan make:request
Category/StoreCategory
public function rules()
{
return [
//
‘name’ => ‘required|min:3|max:20|unique:categories’
];
}
public function messages()
{
return [
‘required’ => ‘:attribute 必填’,
‘name.min’ => ‘名称不能太短’,
‘name.max’ => ‘名称长度不能超过:max字符’,
‘unique’ => ‘名称:input已经存在’,
];
}
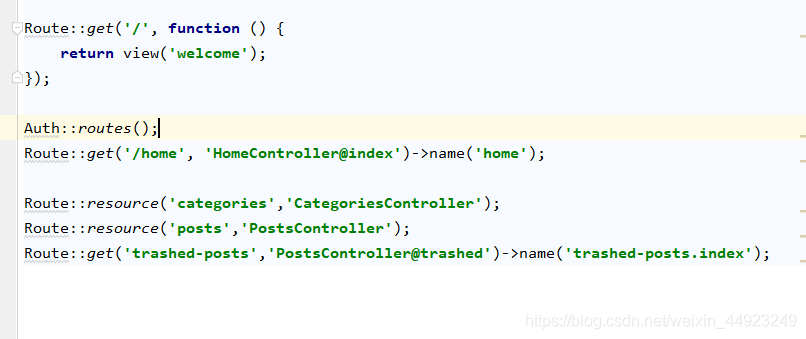
4.设置路由
视图布局
在views中创建categories文件夹和posts文件夹
各在两个文件夹中创建create.blade.php和index.blade.php
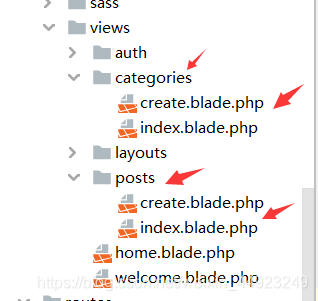
categories文件夹
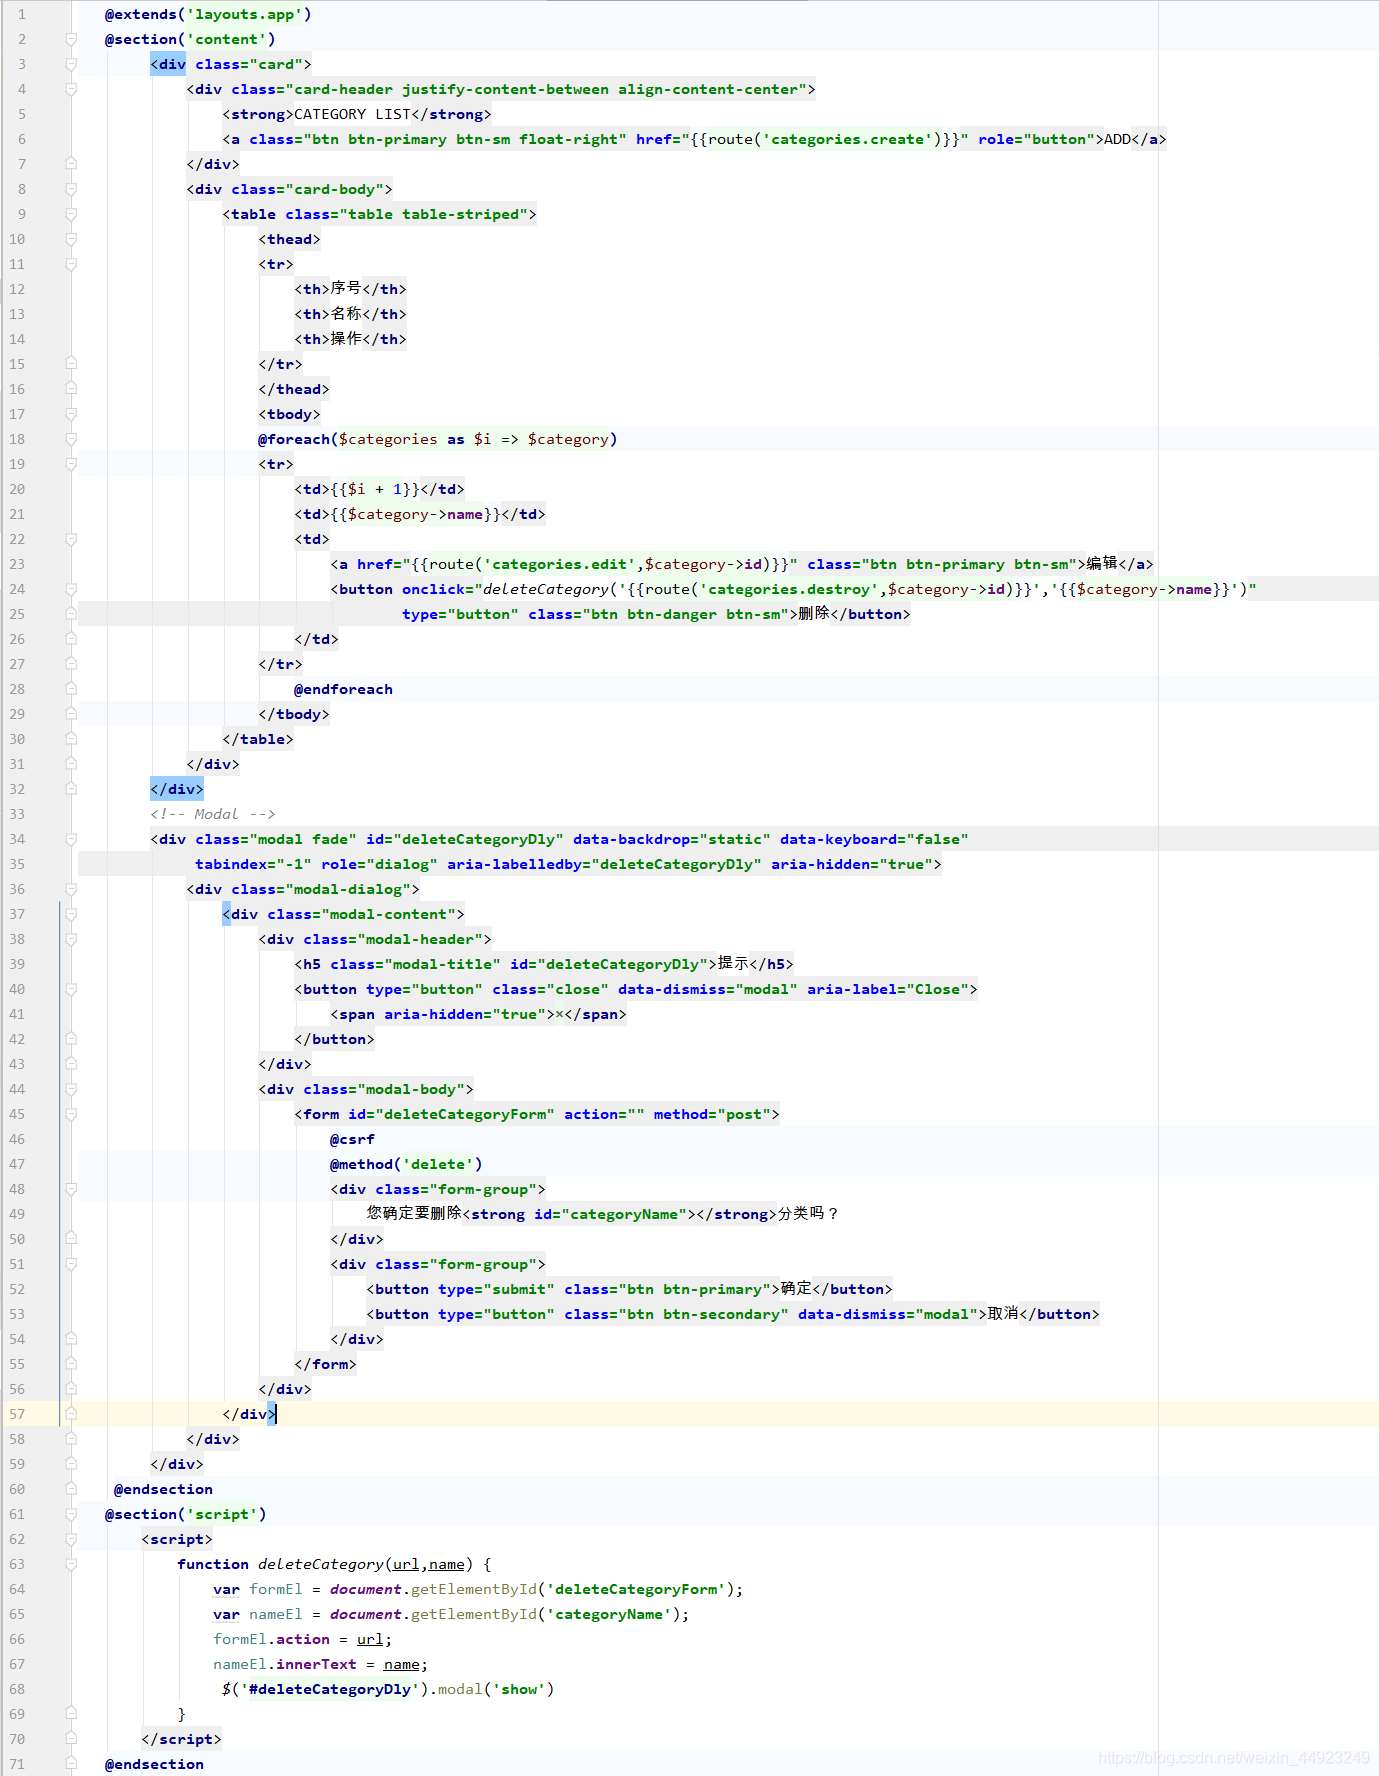
1.create.blade.php
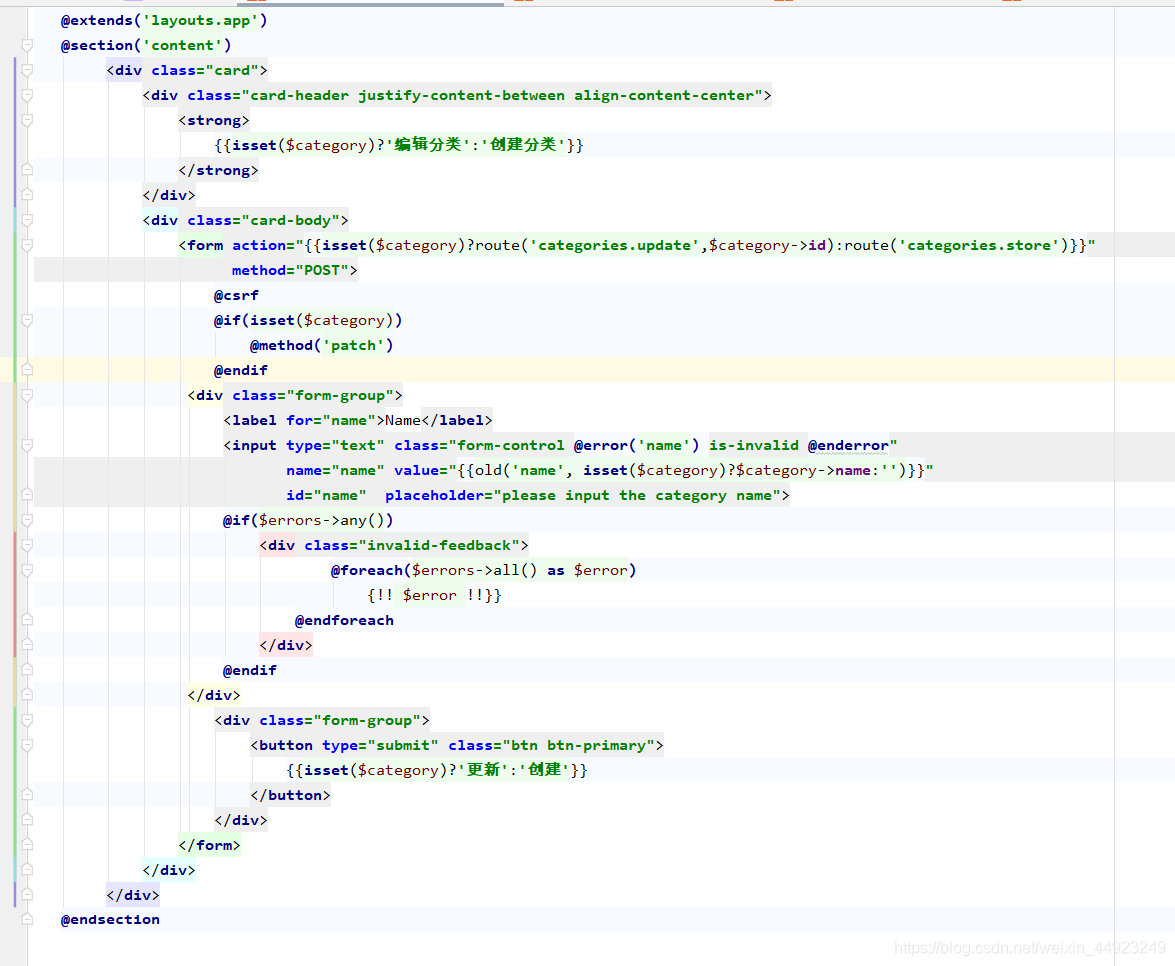
2.index.blade.php
posts文件夹
1.create.blade.php
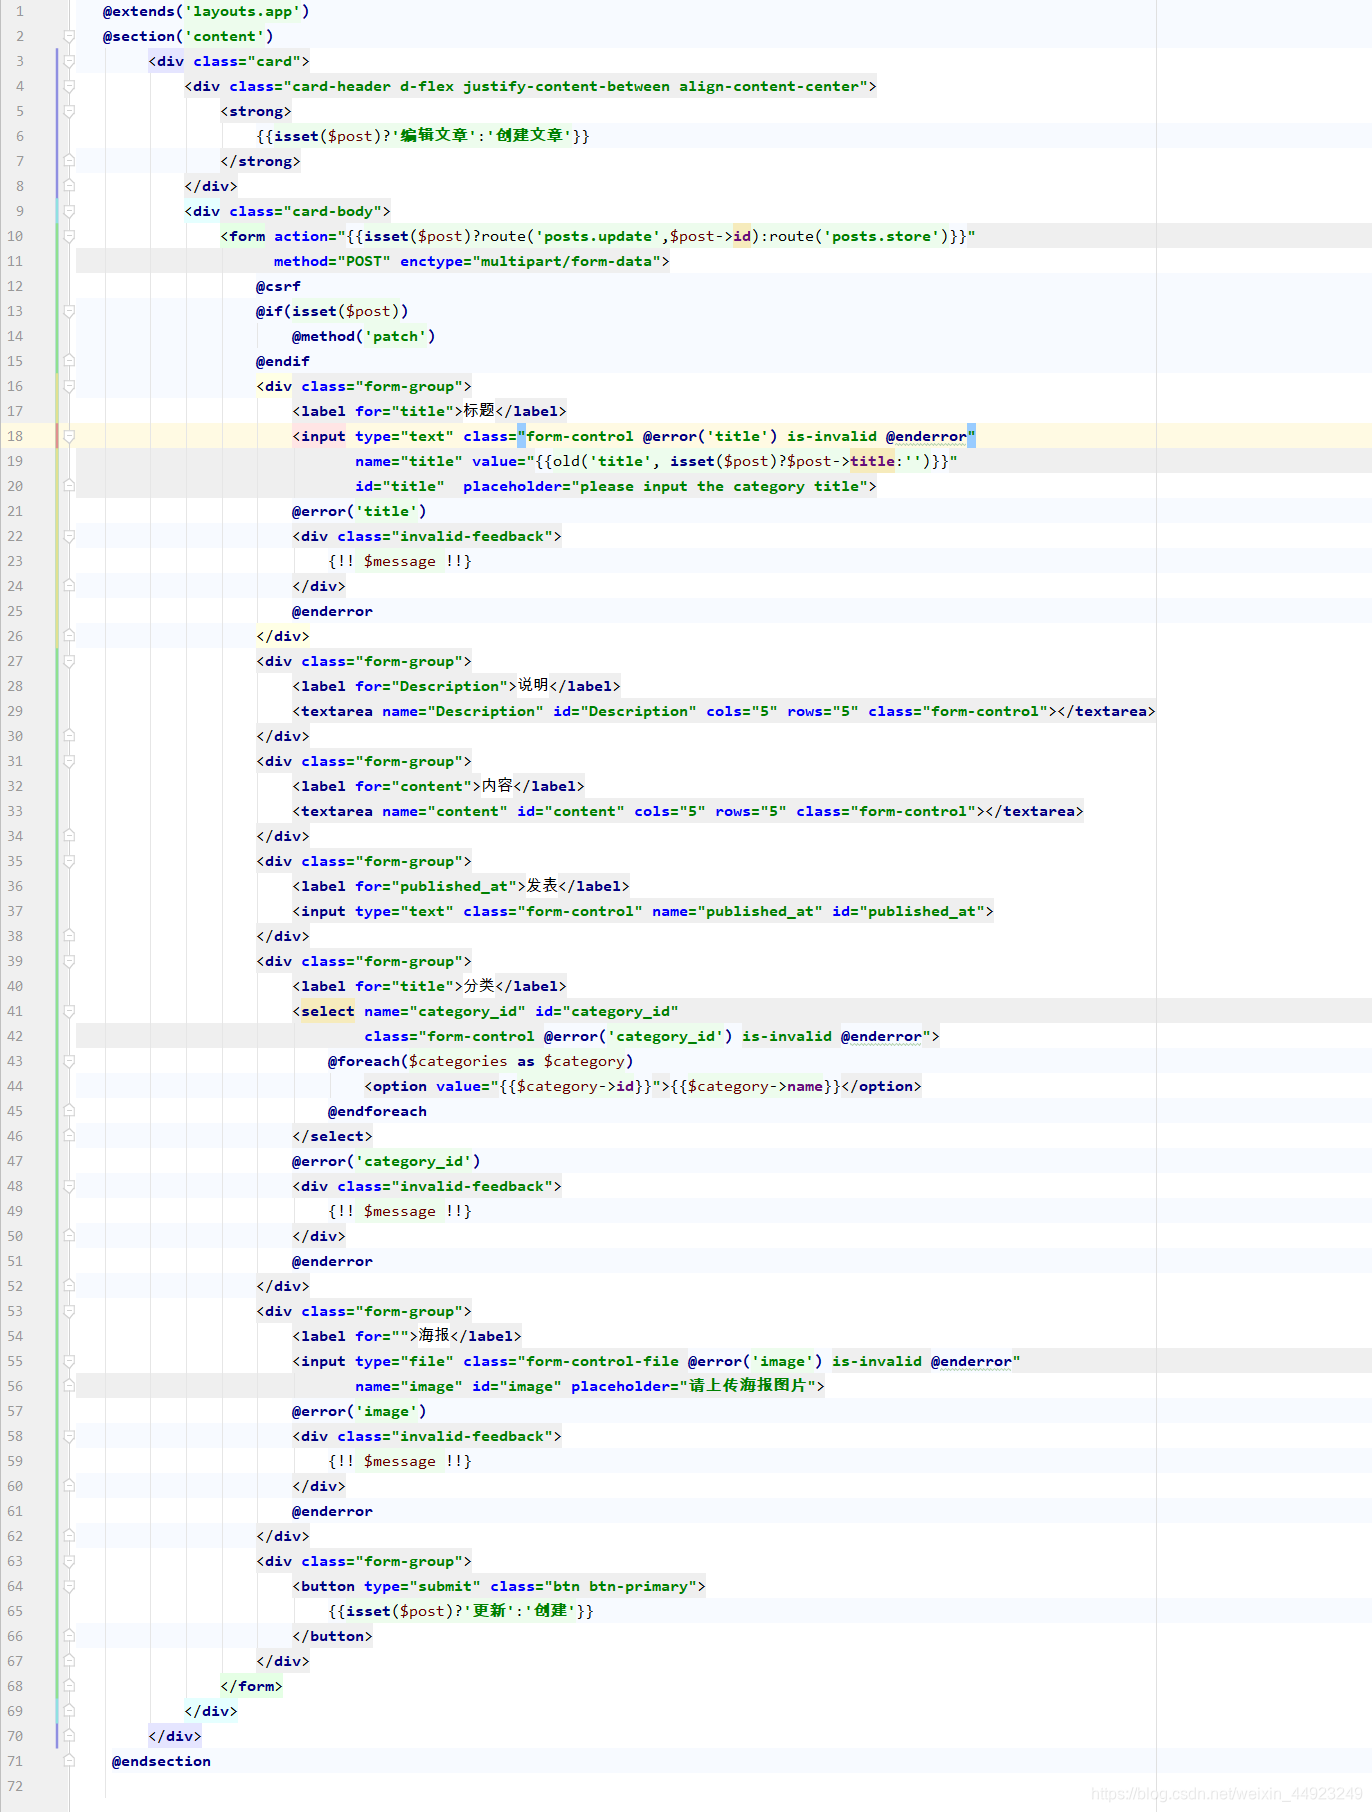
2.index.blade.php

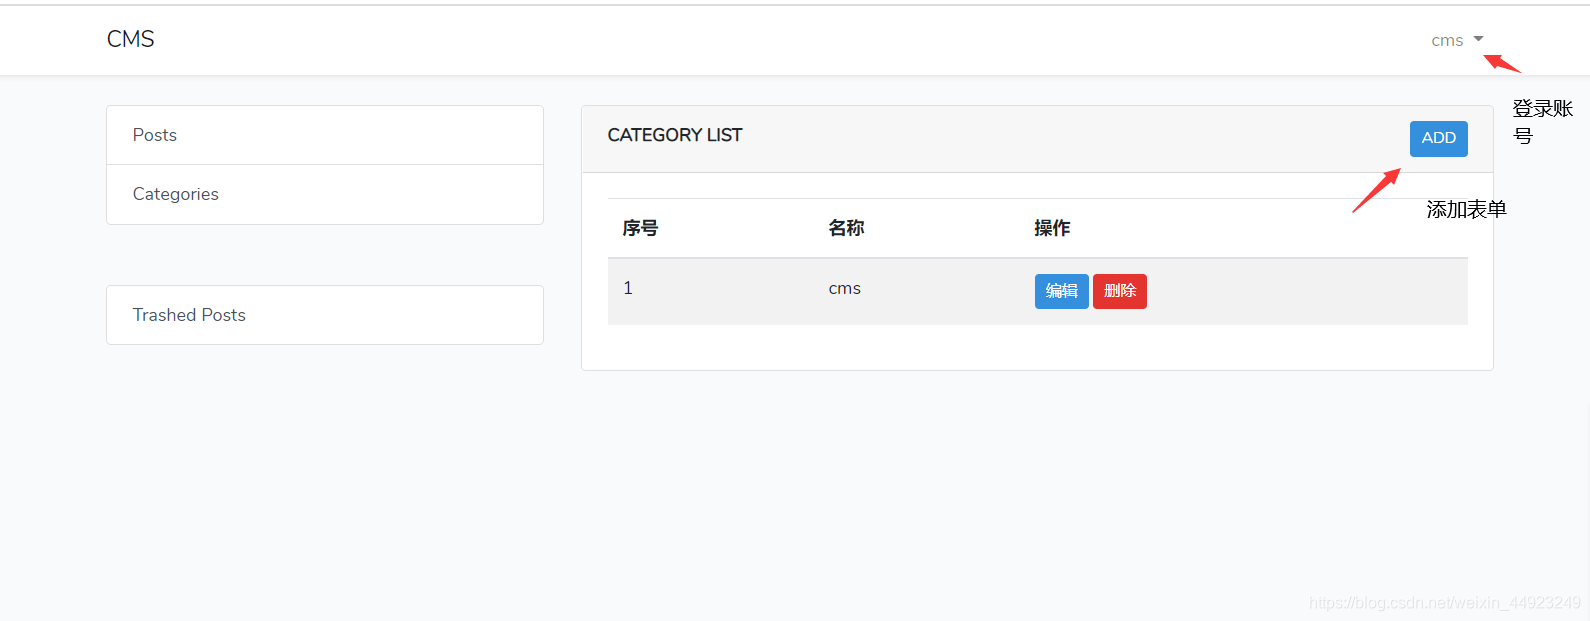
效果展示
这是我自己学习并利用laravel框架实现基本的CMS,写的这个博客有所不足和错误希望您谅解并指出来,也希望这个对您的学习laravel有用!

- 利用laravel框架实现一个简单的应用(CMS)
- 利用laravel框架实现CMS应用
- Laravel框架实现利用监听器进行sql语句记录功能
- 利用码云平台和wamp集成环境,实现多人开发php项目laravel框架构建的前凑准备
- 在PHP(Laravel框架)中利用UUID实现数据分表
- Laravel框架实现利用中间件进行操作日志记录功能
- 利用Laravel实现内容管理系统(CMS)
- Java基本功练习十七GUI(图形用户界面基础【基本概念及其使用、三种布局管理器实现同样的框架练习】)
- 自己写的日志框架--linkinLog4j--实现基本的框架功能
- iOS开发UI-利用Quartz2D 实现基本绘图(画三角形、矩形、圆、圆弧)
- Flex利用PureMVC框架实现页面跳转
- 基本字符串压缩 利用字符重复出现的次数,编写一个方法,实现基本的字符串压缩功能。比如,字符串“aabcccccaaa”经压缩会变成“a2b1c5a3”。若压缩后的字符串没有变短,则返回原先的字符串。
- 利用Node.js+Koa框架实现前后端交互的方法
- laravel框架总结 -- composer基本使用
- [读书笔记]深入解析MapReduce架构设计与实现原理——CH4 Hadoop RPC基本框架
- 利用接口测试框架实现web状态的监控
- apache 中实现 laravel框架去掉url中包含的index.php后缀
- ajax+struts实现简单的聊天室(利用prototype框架)
- 面向搜索引擎的内容管理系统(CMS)设计——利用Squid反相代理缓存实现网站内容静态发布 转贴
- .NETORM框架设计(利用抽象、多态实现无反射的绿色环保ORM框架)