【总结】JavaScript的面向对象
JavaScript的面向对象
面向对象的基本概念
类:类是对象的类型模板
例如,定义Student类来表示学生,类本身是一种类型,Student表示学生类型,但不表示任何具体的某个学生;
实例:实例是根据类创建的对象
例如,根据Student类可以创建出xiaoming、xiaohong、xiaojun等多个实例,每个实例表示一个具体的学生,他们全都属于Student类型。
所以,类和实例是大多数面向对象编程语言的基本概念。
不过,在JavaScript中,这个概念需要改一改。
JavaScript不区分类和实例的概念,而是通过 原型(prototype 来实现面向对象编程。
原型是指当我们想要创建 xiaoming 这个具体的学生时,我们并没有一个Student类型可用。
那怎么办?恰好有这么一个现成的对象:
var robot = {
name: 'Robot',
height: 1.6,
run: function () {
console.log(this.name + ' is running...');
}
};
我们看这个robot对象有名字,有身高,还会跑,有点像小明,干脆就根据它来“创建”小明得了!
于是我们把它改名为Student,然后创建出xiaoming:
var Student = {
name: 'Robot',
height: 1.2,
run: function () {
console.log(this.name + ' is running...');
}
};

var xiaoming = {
name: '小明'
};

xiaoming.__proto__ = Student;
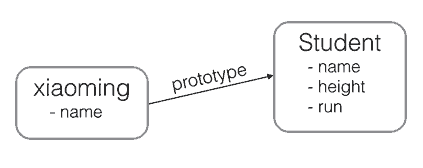
注意最后一行代码把xiaoming的原型指向了对象Student,看上去xiaoming仿佛是从Student继承下来的:
xiaoming.name; // '小明'
xiaoming.run(); // 小明 is running...
xiaoming有自己的name属性,但并没有定义run()方法。
不过,由于小明是从Student继承而来,只要Student有run()方法,xiaoming也可以调用:
JavaScript的原型链和Java的Class区别就在,它没有“Class”的概念,所有对象都是实例,所谓继承关系不过是把一个对象的原型指向另一个对象而已。
如果你把xiaoming的原型指向其他对象:
var Bird = {
fly: function () {
console.log(this.name + ' is flying...');
}
};

xiaoming.__proto__ = Bird;
现在xiaoming已经无法run()了,他已经变成了一只鸟:
xiaoming.fly(); // 小明 is flying...
在JavaScrip代码运行时期,你可以把xiaoming从Student变成Bird,或者变成任何对象。
请注意,上述代码仅用于演示目的。在编写JavaScript代码时,不要直接用obj.proto__去改变一个对象的原型,并且,低版本的IE也无法使用__proto。Object.create()方法可以传入一个原型对象,并创建一个基于该原型的新对象,但是新对象什么属性都没有,因此,我们可以编写一个函数来创建xiaoming:
// 原型对象:
var Student = {
name: 'Robot',
height: 1.2,
run: function () {
console.log(this.name + ' is running...');
}
};

function createStudent(name) {
// 基于Student原型创建一个新对象:
var s = Object.create(Student);
// 初始化新对象:
s.name = name;
return s;
}

var xiaoming = createStudent('小明');
xiaoming.run(); // 小明 is running...
xiaoming.__proto__ === Student; // true
创建对象
JavaScript对每个创建的对象都会设置一个原型,指向它的原型对象。
当我们用obj.xxx访问一个对象的属性时,JavaScript引擎先在当前对象上查找该属性,如果没有找到,就到其原型对象上找,如果还没有找到,就一直上溯到Object.prototype对象,最后,如果还没有找到,就只能返回undefined。
例如,创建一个Array对象:
var arr = [1, 2, 3];
其原型链是:
arr ----> Array.prototype ----> Object.prototype ----> null
Array.prototype定义了indexOf()、shift()等方法,因此你可以在所有的Array对象上直接调用这些方法。
当我们创建一个函数时:
function foo() {
return 0;
}
函数也是一个对象,它的原型链是:
foo ----> Function.prototype ----> Object.prototype ----> null
由于Function.prototype定义了apply()等方法,因此,所有函数都可以调用apply()方法。
很容易想到,如果原型链很长,那么访问一个对象的属性就会因为花更多的时间查找而变得更慢,因此要注意不要把原型链搞得太长。
构造函数
除了直接用{ … }创建一个对象外,JavaScript还可以用一种构造函数的方法来创建对象。它的用法是,先定义一个构造函数:
function Student(name) {
this.name = name;
this.hello = function () {
alert('Hello, ' + this.name + '!');
}
}
你会问,咦,这不是一个普通函数吗?
这确实是一个普通函数,但是在JavaScript中,可以用关键字new来调用这个函数,并返回一个对象:
var xiaoming = new Student('小明');
xiaoming.name; // '小明'
xiaoming.hello(); // Hello, 小明!
注意,如果不写new,这就是一个普通函数,它返回undefined。
但是,如果写了new,它就变成了一个构造函数,它绑定的this指向新创建的对象,并默认返回this,也就是说,不需要在最后写return this;。
新创建的xiaoming的原型链是:
xiaoming ----> Student.prototype ----> Object.prototype ----> null
也就是说,xiaoming的原型指向函数Student的原型。如果你又创建了xiaohong、xiaojun,那么这些对象的原型与xiaoming是一样的:
xiaoming ↘
xiaohong -→ Student.prototype ----> Object.prototype ----> null
xiaojun  ↗
用 new Student() 创建的对象还从原型上获得了一个constructor属性,它指向函数Student本身:
xiaoming.constructor ===  Student.prototype.constructor; // true
Student.prototype.constructor === Student; // true

Object.getPrototypeOf(xiaoming) === Student.prototype; // true

xiaoming instanceof Student; // true
看晕了吧?用一张图来表示这些乱七八糟的关系就是:
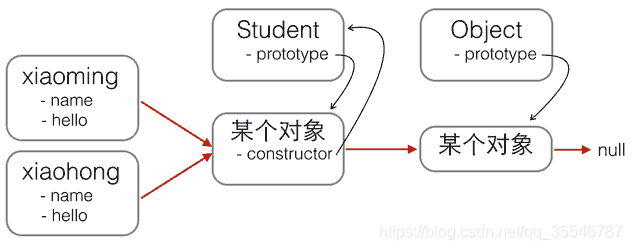
红色箭头是原型链。注意,Student.prototype指向的对象就是xiaoming、xiaohong的原型对象,这个原型对象自己还有个属性constructor,指向Student函数本身。
另外,函数Student恰好有个属性prototype指向xiaoming、xiaohong的原型对象,但是xiaoming、xiaohong这些对象可没有prototype这个属性,不过可以用__proto__这个非标准用法来查看。
现在我们就认为xiaoming、xiaohong这些对象“继承”自Student。
不过还有一个小问题,注意观察:
xiaoming.name; // '小明'
xiaohong.name; // '小红'
xiaoming.hello; // function: Student.hello()
xiaohong.hello; // function: Student.hello()
xiaoming.hello === xiaohong.hello; // false
xiaoming和xiaohong各自的name不同,这是对的,否则我们无法区分谁是谁了。
xiaoming和xiaohong各自的hello是一个函数,但它们是两个不同的函数,虽然函数名称和代码都是相同的!
如果我们通过new Student()创建了很多对象,这些对象的hello函数实际上只需要共享同一个函数就可以了,这样可以节省很多内存。
要让创建的对象共享一个hello函数,根据对象的属性查找原则,我们只要把hello函数移动到xiaoming、xiaohong这些对象共同的原型上就可以了,也就是Student.prototype:
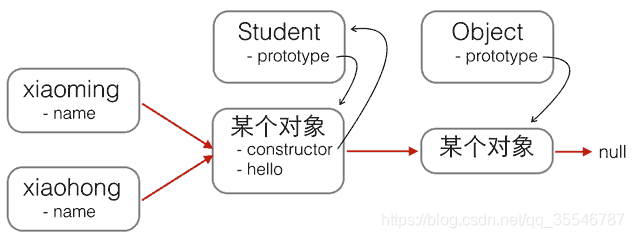
修改代码如下:
function Student(name) {
this.name = name;
}

Student.prototype.hello = function () {
alert('Hello, ' + this.name + '!');
};
用new创建基于原型的JavaScript的对象就是这么简单!
忘记写new怎么办?
如果一个函数被定义为用于创建对象的构造函数,但是调用时忘记了写new怎么办?
在strict模式下,this.name = name将报错,因为this绑定为undefined,在非strict模式下,this.name = name不报错,因为this绑定为window,于是无意间创建了全局变量name,并且返回undefined,这个结果更糟糕。
所以,调用构造函数千万不要忘记写new。为了区分普通函数和构造函数,按照约定,构造函数首字母应当大写,而普通函数首字母应当小写,这样,一些语法检查工具如jslint将可以帮你检测到漏写的new。
最后,我们还可以编写一个createStudent()函数,在内部封装所有的new操作。一个常用的编程模式像这样:
function Student(props) {
this.name = props.name || '匿名'; // 默认值为'匿名'
this.grade = props.grade || 1; // 默认值为1
}

Student.prototype.hello = function () {
alert('Hello, ' + this.name + '!');
};

function createStudent(props) {
return new Student(props || {})
}
这个createStudent()函数有几个巨大的优点:一是不需要new来调用,二是参数非常灵活,可以不传,也可以这么传:
xiaoming = createStudent({
name: '小明'
});
xiaoming.grade; // 1
如果创建的对象有很多属性,我们只需要传递需要的某些属性,剩下的属性可以用默认值。由于参数是一个Object,我们无需记忆参数的顺序。如果恰好从JSON拿到了一个对象,就可以直接创建出xiaoming。
原型继承
我们先回顾Student构造函数:
function Student(props) {
this.name = props.name || 'Unnamed';
}

Student.prototype.hello = function () {
alert('Hello, ' + this.name + '!');
}
以及Student的原型链:
现在,我们要基于Student扩展出
PrimaryStudent,可以先定义出
PrimaryStudent:
function PrimaryStudent(props) {
// 调用Student构造函数,绑定this变量:
Student.call(this, props);
this.grade = props.grade || 1;
}
但是,调用了Student构造函数不等于继承了Student,
PrimaryStudent创建的对象的原型是:
new PrimaryStudent() ----> PrimaryStudent.prototype ----> Object.prototype ----> null
必须想办法把原型链修改为:
new PrimaryStudent() ----> PrimaryStudent.prototype ----> Student.prototype ----> Object.prototype ----> null
这样,原型链对了,继承关系就对了。新的基于PrimaryStudent创建的对象不但能调用PrimaryStudent.prototype定义的方法,也可以调用Student.prototype定义的方法。
我们必须借助一个中间对象来实现正确的原型链,这个中间对象的原型要指向Student.prototype。为了实现这一点,参考道爷(就是发明JSON的那个道格拉斯)的代码,中间对象可以用一个空函数F来实现:
/ PrimaryStudent构造函数:
function PrimaryStudent(props) {
Student.call(this, props);
this.grade = props.grade || 1;
}

// 空函数F:
function F() {
}

// 把F的原型指向Student.prototype:
F.prototype = Student.prototype;

// 把PrimaryStudent的原型指向一个新的F对象,F对象的原型正好指向Student.prototype:
PrimaryStudent.prototype = new F();

// 把PrimaryStudent原型的构造函数修复为PrimaryStudent:
PrimaryStudent.prototype.constructor = PrimaryStudent;

// 继续在PrimaryStudent原型(就是new F()对象)上定义方法:
PrimaryStudent.prototype.getGrade = function () {
return this.grade;
};

// 创建xiaoming:
var xiaoming = new PrimaryStudent({
name: '小明',
grade: 2
});
xiaoming.name; // '小明'
xiaoming.grade; // 2

// 验证原型:
xiaoming.__proto__ === PrimaryStudent.prototype; // true
xiaoming.__proto__.__proto__ === Student.prototype; // true

// 验证继承关系:
xiaoming instanceof PrimaryStudent; // true
xiaoming instanceof Student; // true
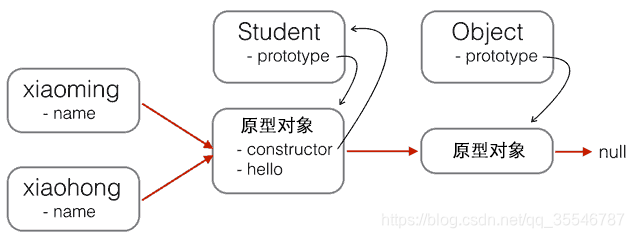
用一张图来表示新的原型链:
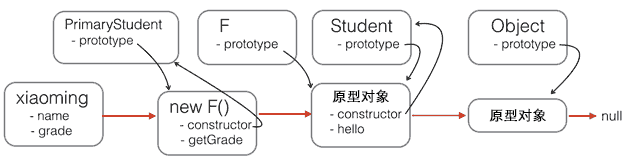
注意,函数F仅用于桥接,我们仅创建了一个new F()实例,而且,没有改变原有的Student定义的原型链。
如果把继承这个动作用一个inherits()函数封装起来,还可以隐藏F的定义,并简化代码:
function inherits(Child, Parent) {
var F = function () {};
F.prototype = Parent.prototype;
Child.prototype = new F();
Child.prototype.constructor = Child;
}
这个inherits()函数可以复用:
function Student(props) {
this.name = props.name || 'Unnamed';
}

Student.prototype.hello = function () {
alert('Hello, ' + this.name + '!');
}
function PrimaryStudent(props) {
Student.call(this, props);
this.grade = props.grade || 1;
}

// 实现原型继承链:
inherits(PrimaryStudent, Student);

// 绑定其他方法到PrimaryStudent原型:
PrimaryStudent.prototype.getGrade = function () {
return this.grade;
};
小结
JavaScript的原型继承实现方式就是:
定义新的构造函数,并在内部用call()调用希望“继承”的构造函数,并绑定this;
借助中间函数F实现原型链继承,最好通过封装的inherits函数完成;
继续在新的构造函数的原型上定义新方法。
class继承
在上面我们看到了JavaScript的对象模型是基于原型实现的,特点是简单,缺点是理解起来比传统的类-实例模型要困难,最大的缺点是继承的实现需要编写大量代码,并且需要正确实现原型链。
有没有更简单的写法?有!
新的关键字
class从ES6开始正式被引入到JavaScript中。class的目的就是让定义类更简单。
我们先回顾用函数实现Student的方法:
function Student(name) {
this.name = name;
}

Student.prototype.hello = function () {
alert('Hello, ' + this.name + '!');
}
如果用新的class关键字来编写Student,可以这样写:
class Student {
constructor(name) {
this.name = name;
}

hello() {
alert('Hello, ' + this.name + '!');
}
}
比较一下就可以发现,class的定义包含了构造函数constructor和定义在原型对象上的函数hello()(注意没有function关键字),这样就避免了Student.prototype.hello = function () {…}这样分散的代码。
最后,创建一个Student对象代码和前面章节完全一样:
var xiaoming = new Student('小明');
xiaoming.hello();
class继承
用class定义对象的另一个巨大的好处是继承更方便了。想一想我们从Student派生一个PrimaryStudent需要编写的代码量。现在,原型继承的中间对象,原型对象的构造函数等等都不需要考虑了,直接通过extends来实现:
class PrimaryStudent extends Student {
constructor(name, grade) {
super(name); // 记得用super调用父类的构造方法!
this.grade = grade;
}

myGrade() {
alert('I am at grade ' + this.grade);
}
}
注意PrimaryStudent的定义也是class关键字实现的,而extends则表示原型链对象来自Student。子类的构造函数可能会与父类不太相同,例如,PrimaryStudent需要name和grade两个参数,并且需要通过super(name)来调用父类的构造函数,否则父类的name属性无法正常初始化。
PrimaryStudent已经自动获得了父类Student的hello方法,我们又在子类中定义了新的myGrade方法。
ES6引入的class和原有的JavaScript原型继承有什么区别呢?实际上它们没有任何区别,class的作用就是让JavaScript引擎去实现原来需要我们自己编写的原型链代码。简而言之,用class的好处就是极大地简化了原型链代码。
你一定会问,class这么好用,能不能现在就用上?
现在用还早了点,因为不是所有的主流浏览器都支持ES6的class。如果一定要现在就用上,就需要一个工具把class代码转换为传统的prototype代码,可以试试Babel这个工具。
本文总结自:廖雪峰老师的官博 :https://www.liaoxuefeng.com/wiki/1022910821149312

- web前端开发笔记:JavaScript面向对象总结
- JavaScript学习总结——Javascript面向(基于)对象编程
- javascript面向对象程序设计实践常用知识点总结
- JavaScript学习总结(九)——Javascript面向(基于)对象编程
- JavaScript学习总结(九)——Javascript面向(基于)对象编程
- JavaScript面向对象总结(长篇慢慢看)
- JavaScript 面向对象开发知识总结基础篇
- JavaScript 面向对象开发知识基础总结
- javascript 面向对象总结
- JavaScript面向对象基础语法总结
- Javascript面向对象资料总结
- JavaScript学习总结_六.面向对象
- JavaScript学习总结(5)——Javascript面向(基于)对象编程
- JavaScript 面向对象开发知识总结基础篇
- JavaScript学习总结(5)——Javascript面向(基于)对象编程
- Javascript学习总结-面向对象-(五)
- JavaScript学习总结(5)——Javascript面向(基于)对象编程
- javascript中面向对象中对象,属性,原型链和一些扩展知识总结
- 原生javascript难点总结(1)---面向对象分析以及带来的思考
- javascript面向对象函数的总结