创新实训博客(11)——App端界面设计(基本部分)
2020-07-14 06:21
447 查看
关于TopBar的设置
[code]    <style name="AppTheme" parent="Theme.AppCompat.Light.NoActionBar">
<!-- Customize your theme here. -->
<item name="colorPrimary">@color/colorPrimary</item>
<item name="colorPrimaryDark">@color/colorPrimaryDark</item>
<item name="colorAccent">@color/colorAccent</item>
</style>
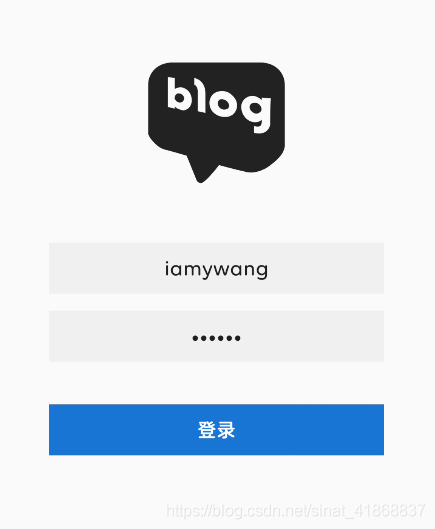
用户登录界面
使用LinearLayout自上向下排列。
基本流程:1. 点击登录按钮 2. 向服务器发请求 3. 返回基本信息和token 4. 本地存储token 跳转界面
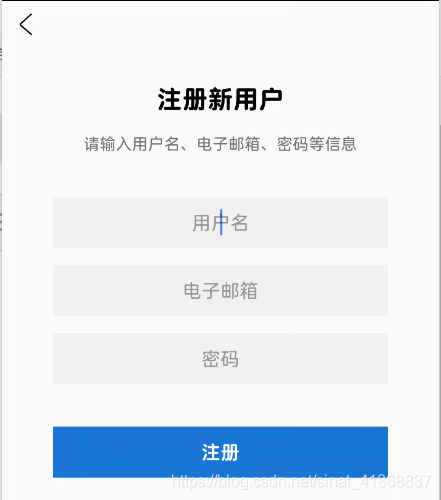
用户注册界面
使用RelativeLayout,上方是固定的topbar,下面是主要的内容,用线性布局。
基本流程设计:1. 填写个人信息并且点击注册 2. 向服务器发起请求 3. 服务器处理完成后返回信息 4. 根据返回信息执行下一步操作
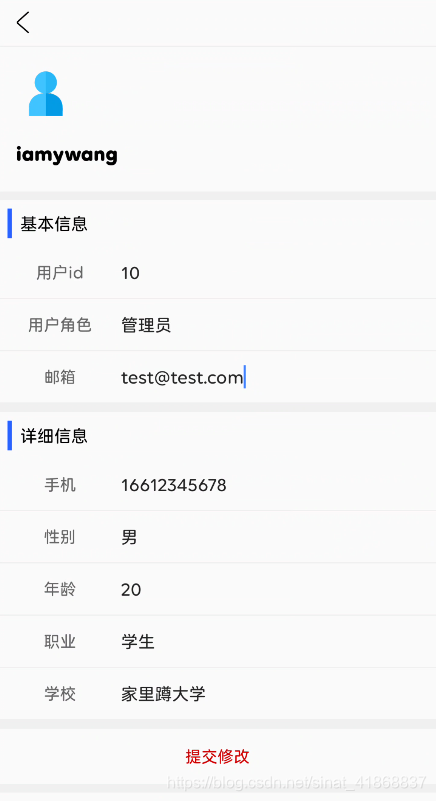
用户个人信息修改界面
使用RelativeLayout,上方是固定的topbar,下面是主要的内容,用线性布局,带有滚动条。
基本流程设计:1. 获取token 2. 根据token向服务器发请求 3. 返回信息存储 4. 设置view
提交修改按钮:点击后向服务器发请求,修改信息。
不过,这里的id和用户角色以及用户名都不允许普通用户进行修改,只能管理员后台修改。
博客列表项复用组件
基本的布局如下:
如何设置列表项:
[code]    @Override
public View getView(int position, View convertView, ViewGroup parent) {
convertView = LayoutInflater.from(mContext).inflate(R.layout.item_article, parent, false);
// 获取组件
TextView article_author = (TextView) convertView.findViewById(R.id.item_article_author_name);
TextView article_title = (TextView) convertView.findViewById(R.id.item_article_title);
TextView article_summary = (TextView) convertView.findViewById(R.id.item_article_summary);
TextView article_count = (TextView) convertView.findViewById(R.id.item_article_count);
// 设置组件内容
article_author.setText(mData.get(position).getAuthor());
article_title.setText(mData.get(position).getTitle());
article_summary.setText(mData.get(position).getSummary());
String count_text = mData.get(position).getRatingCount() + "阅读 - " + mData.get(position).getLikeCount() + "喜欢";
article_count.setText(count_text);
return convertView;
}
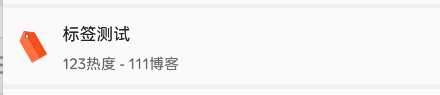
标签列表项复用组件
基本布局如下:
如何设置列表项:
[code]    @Override
public View getView(int position, View convertView, ViewGroup parent) {
convertView = LayoutInflater.from(mContext).inflate(R.layout.item_tag, parent, false);
// 获取组件
ImageView tag_pic = (ImageView) convertView.findViewById(R.id.item_tag_pic);
TextView tag_title = (TextView) convertView.findViewById(R.id.item_tag_title);
TextView tag_data = (TextView) convertView.findViewById(R.id.item_tag_data);
// 获取类型
int type = mData.get(position).getType();
if (type == 0) {
// tag类型
Drawable pic = mContext.getDrawable(R.drawable.ic_tag);
tag_pic.setImageDrawable(pic);
} else if (type == 1) {
// author类型
Drawable pic = mContext.getDrawable(R.drawable.ic_user);
tag_pic.setImageDrawable(pic);
}
// 设置组件内容
tag_title.setText(mData.get(position).getName());
String count_text = mData.get(position).getRatingCount() + "热度 - " + mData.get(position).getArticleCount() + "博客";
tag_data.setText(count_text);
return convertView;
}
XML代码
因为XML代码很多很复杂,因此只附上登录界面的XML代码
[code]<?xml version="1.0" encoding="utf-8"?>
<androidx.constraintlayout.widget.ConstraintLayout xmlns:android="http://schemas.android.com/apk/res/android"
xmlns:app="http://schemas.android.com/apk/res-auto"
xmlns:tools="http://schemas.android.com/tools"
android:layout_width="match_parent"
android:layout_height="match_parent"
tools:context=".activity.LoginActivity">

<LinearLayout
android:orientation="vertical"
android:layout_width="match_parent"
android:layout_height="match_parent"
app:layout_constraintTop_toTopOf="parent"
>

<View
android:layout_width="match_parent"
android:layout_height="match_parent"
android:layout_weight="7" />

<ImageView
android:id="@+id/login_image"
android:layout_width="wrap_content"
android:layout_height="match_parent"
android:layout_gravity="center_horizontal"
android:layout_marginTop="16dp"
android:layout_marginBottom="32dp"
android:layout_weight="6"
android:contentDescription="@string/activity_login_button"
app:srcCompat="@drawable/ic_login_logo" />

<EditText
android:id="@+id/login_user"
android:layout_width="match_parent"
android:layout_height="48dp"
android:layout_gravity="center"
android:layout_marginStart="48dp"
android:layout_marginTop="8dp"
android:layout_marginEnd="48dp"
android:layout_marginBottom="8dp"
android:background="@color/lightgray"
android:ems="12"
android:gravity="center"
android:hint="@string/activity_login_hint_1"
android:inputType="text"
android:textSize="18sp"
android:importantForAutofill="no" />

<EditText
android:id="@+id/login_passwd"
android:layout_width="match_parent"
android:layout_height="48dp"
android:layout_gravity="center"
android:layout_marginStart="48dp"
android:layout_marginTop="8dp"
android:layout_marginEnd="48dp"
android:layout_marginBottom="8dp"
android:background="@color/lightgray"
android:ems="12"
android:gravity="center"
android:hint="@string/activity_login_hint_2"
android:inputType="textPassword"
android:textSize="18sp"
android:importantForAutofill="no" />

<Button
android:id="@+id/login_button"
style="@android:style/Widget.Material.Light.Button.Borderless"
android:layout_width="match_parent"
android:layout_height="48dp"
android:layout_gravity="center"
android:layout_marginStart="48dp"
android:layout_marginTop="32dp"
android:layout_marginEnd="48dp"
android:layout_marginBottom="16dp"
android:background="@color/bBlue"
android:onClick="onLogin"
android:text="@string/activity_login_button"
android:textColor="@android:color/white"
android:textSize="18sp" />

<View
android:layout_width="match_parent"
android:layout_height="match_parent"
android:layout_weight="5" />

<LinearLayout
android:layout_width="wrap_content"
android:layout_height="wrap_content"
android:layout_gravity="center_horizontal"
android:layout_marginBottom="16dp"
android:orientation="horizontal">

<TextView
android:id="@+id/login_click_tip1"
android:layout_width="150dp"
android:layout_height="32dp"
android:layout_gravity="center_horizontal"
android:gravity="center_horizontal|center_vertical"
android:text="@string/activity_login_tip_1"
android:textColor="@android:color/black" />

<View
android:layout_width="1dp"
android:layout_height="match_parent"
android:layout_weight="1"
android:background="@color/split_bar" />

<TextView
android:id="@+id/login_click_tip2"
android:layout_width="150dp"
android:layout_height="32dp"
android:layout_gravity="center_horizontal"
android:layout_weight="1"
android:gravity="center_horizontal|center_vertical"
android:onClick="onRegister"
android:text="@string/activity_login_tip_2"
android:textColor="@android:color/black" />
</LinearLayout>
</LinearLayout>

</androidx.constraintlayout.widget.ConstraintLayout>

相关文章推荐
- 创新实训博客(13)——App端界面设计(博客以及其他部分)
- 创新实训博客(12)——App端界面设计(首页Fragment部分)
- 创新实训博客(32)——用户画像部分基本统计数据的设计构想
- 创新实训博客(25)——接口调用请求汇总(用户基本操作和历史记录相关部分)
- 创新实训博客(37)——在App端显示一些统计数据的设计与尝试
- 创新实训博客(20)——Vue中使用ECharts进行数据可视化(基本图表部分)
- 创新实训博客(34)——用户画像部分前端展示
- 创新实训博客(33)——探索Android开发中的消息推送功能(推送服务模块进阶设计)
- 创新实训博客(29)——接口调用请求汇总(可视化部分)
- 创新实训博客(28)——接口调用请求汇总(App和博客相关部分)
- 创新实训博客(27)——接口调用请求汇总(博客相关部分)
- 创新实训博客(26)——接口调用请求汇总(后台管理部分)
- 创新实训博客(43)——爬取任务管理界面修改配置
- 创新实训博客(42)——搜索界面自动补全的前端处理
- 创新实训博客(41)——管理员数据统计和搜索自动提示设计
- 创新实训博客(21)——Vue中使用ECharts进行数据可视化(进阶部分)
- 自然语言交流系统 phxnet团队 创新实训 项目博客 (四)
- Swing界面设计工具的基本思想和技术
- Android学习笔记:界面设计Material Design的基本使用方法(一)
- 自然语言交流系统 phxnet团队 创新实训 项目博客 (九)