Mybatis-plus入门与使用
##1 mybatis-plus简介
mybatis-plus是增强版的mybatis,它继承mybatis所有的特性,不做改变,为简化开发、提高效率而生的。
##2 mybatis与mybatis-plus的区别
2.1mybatis特点

2.2mybatis-plus特点

3 springboot整合mybais-plus
3.1 创建数据库(数据库为user)

3.2springboot与mybatis-plus整合
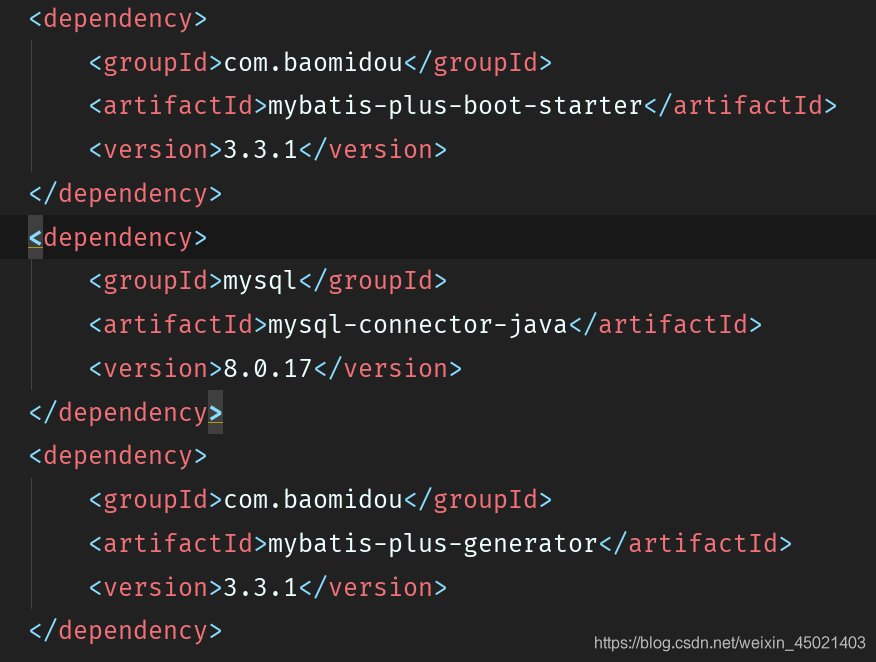
1添加相关依赖
2配置数据源

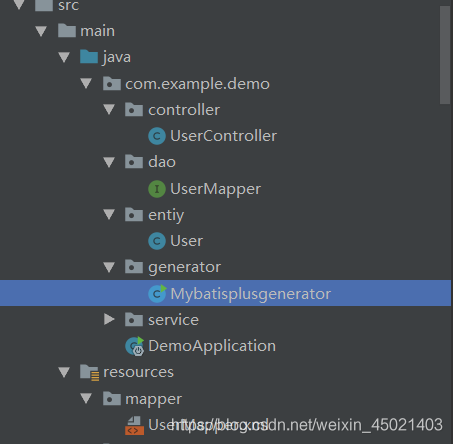
3 配置mybatis-plus generator
package com.example.demo.generator;

import com.baomidou.mybatisplus.annotation.DbType;
import com.baomidou.mybatisplus.annotation.IdType;
import com.baomidou.mybatisplus.generator.AutoGenerator;
import com.baomidou.mybatisplus.generator.config.DataSourceConfig;
import com.baomidou.mybatisplus.generator.config.GlobalConfig;
import com.baomidou.mybatisplus.generator.config.PackageConfig;
import com.baomidou.mybatisplus.generator.config.StrategyConfig;
import com.baomidou.mybatisplus.generator.config.rules.NamingStrategy;

public class Mybatisplusgenerator {
public static void main(String[] args){

//1. 全局配置
GlobalConfig config = new GlobalConfig();
//是否支持AR模式
config.setActiveRecord(true)
.setAuthor("James") //作者
.setOutputDir("D:\\java\\demo\\src\\main\\java")  //生成路径
.setFileOverride(true)//是否文件覆盖,如果多次
.setServiceName("%sService") //设置生成的service接口名首字母是否为I
.setIdType(IdType.AUTO) //主键策略
.setServiceName("%sService")//设置生成的service接口的名字的首字母是否为I
.setBaseResultMap(true)
.setBaseColumnList(true);
//2. 数据源配置
DataSourceConfig dsConfig = new DataSourceConfig();
dsConfig.setDbType(DbType.MYSQL)
.setUrl("jdbc:mysql://localhost:3306/user?useUnicode=true&characterEncoding=utf-8&useSSL=false&serverTimezone = GMT")
.setDriverName("com.mysql.cj.jdbc.Driver")
.setUsername("root")
.setPassword("chen623507");
//3.策略配置
StrategyConfig stConfig = new StrategyConfig();
stConfig.setCapitalMode(true) // 全局大写命名
.setNaming(NamingStrategy.underline_to_camel) // 数据库表映射到实体的命名策略
.setInclude("user"); //生成的表
//4.包名策略
PackageConfig pkConfig = new PackageConfig();
pkConfig.setParent("com.example.demo")//父包名
.setController("controller")
.setEntity("entiy")
.setService("service")
.setMapper("dao")
.setXml("mapper");
//5.整合配置
AutoGenerator ag = new AutoGenerator().setGlobalConfig(config)
.setDataSource(dsConfig)
.setStrategy(stConfig)
.setPackageInfo(pkConfig);
ag.execute();
}
}
结果
4 entiy:
package com.example.demo.entiy;

import com.baomidou.mybatisplus.annotation.IdType;
import com.baomidou.mybatisplus.annotation.TableId;
import lombok.Data;

import java.io.Serializable;

/**
* <p>
*
* </p>
*
* @author James
* @since 2020-03-30
*/
@Data
public class User implements Serializable {

private static final long serialVersionUID=1L;

/**
* 主键ID
*/
@TableId(value = "id", type = IdType.AUTO)
private Long id;

/**
* 姓名
*/
private String userName;

/**
* 年龄
*/
private Integer age;

/**
* 邮箱
*/
private String email;

}
5 mapper:
package com.example.demo.dao;

import com.example.demo.entiy.User;
import com.baomidou.mybatisplus.core.mapper.BaseMapper;
import org.apache.ibatis.annotations.Mapper;

/**
* <p>
*  Mapper 接口
* </p>
*
* @author James
* @since 2020-03-30
*/
@Mapper
public interface UserMapper extends BaseMapper<User> {

}
其中@Mapper注解作用为:
5.1:使用@Mapper交给springboot管理
5.2:不用写Mapper映射文件
5.3:为这个UserMapper接口生成一个实现类,让别的类进行引用
6 通用的CRUD操作
select操作
1根据ID查询
@Autowired
private UserMapper userMapper;
@Test
public void usertest(){

User user=userMapper.selectById(1);
System.out.println(user);
}
mybatis-plus中的BaseMapper的方法中selectById传入一个ID,就可以查询结果
selectById中sql语句为
select * from user where id=1

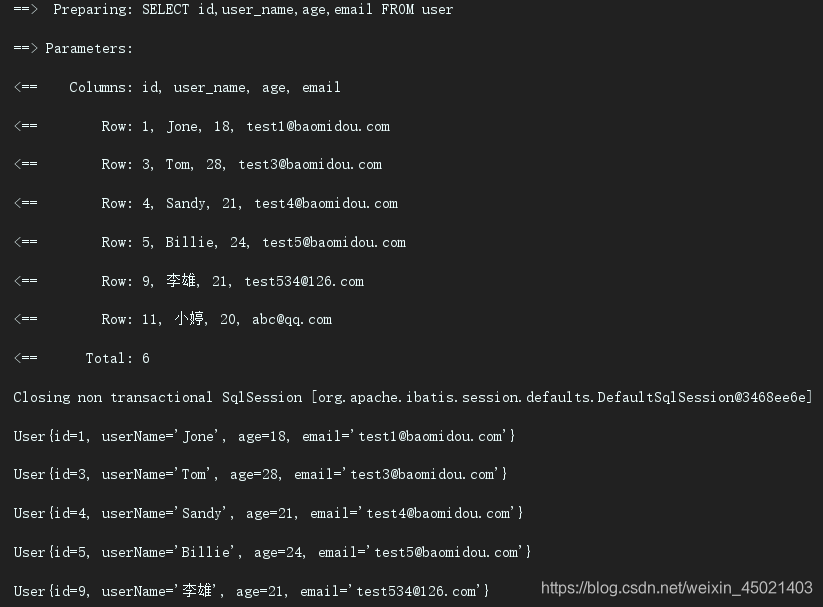
2查出所有的数据库的数据(selectList)
List<User> listuser=userMapper.selectList(null);
for(User user1:listuser){
System.out.println(user1);
sql语句为:SELECT id,user_name,age,email FROM user ,selectList中传入一个条件querywrapper。
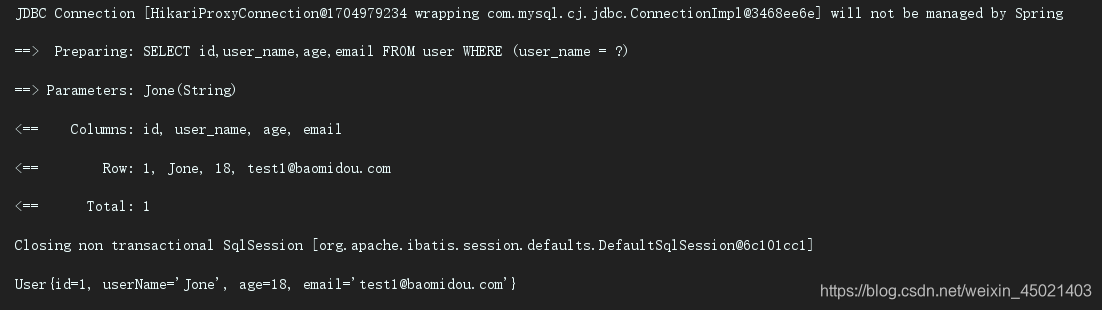
3 根据entiy查询一条数据(selectOne)
@Test
public void usertest1(){
QueryWrapper<User> wrapper=new QueryWrapper<>();
wrapper.eq("user_name","Jone");
User user=userMapper.selectOne(wrapper);
System.out.println(user);
}
sql语句为 SELECT id,user_name,age,email FROM user WHERE (user_name = ?) ,这里使用条件构造器Querywrapper,QueryWrapper中方法eq中参数为(字段名,字段值)
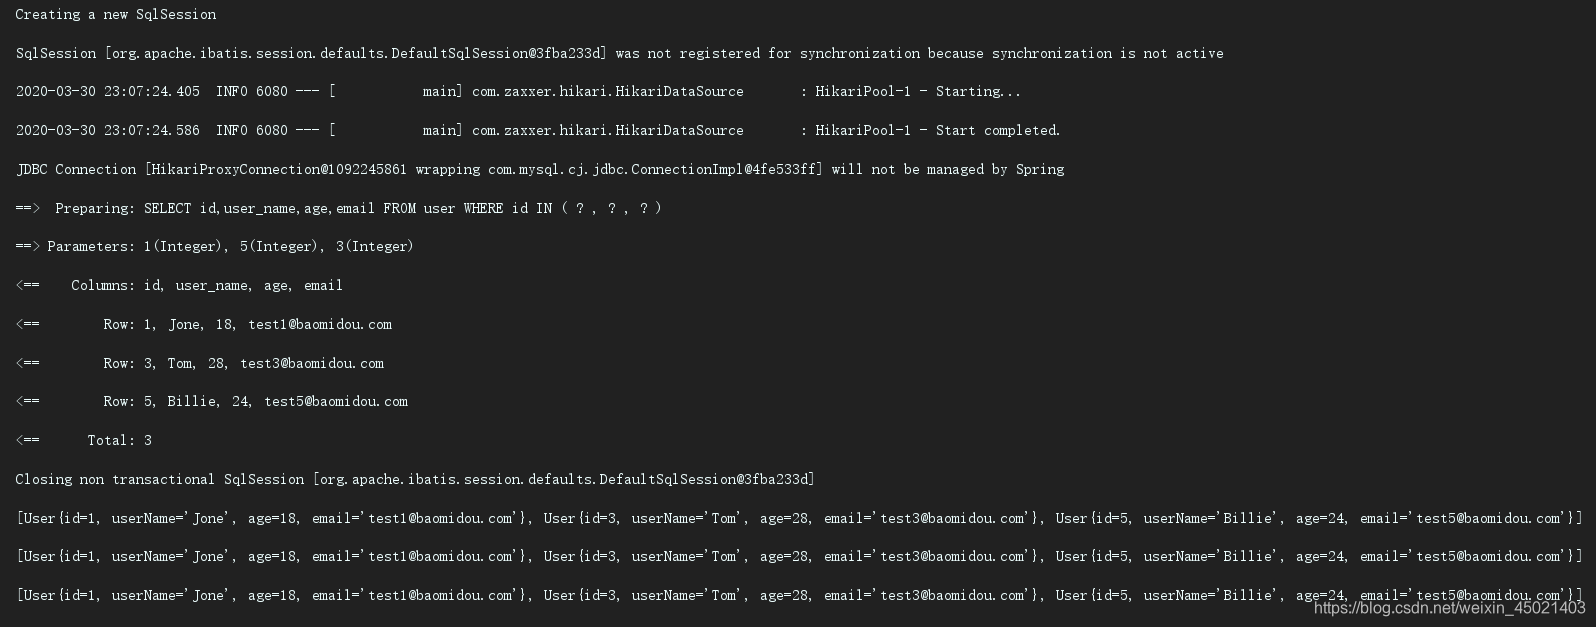
4 根据id批量查询数据(selectBatchIds)
List<Integer> list=new ArrayList<>();
list.add(1);
list.add(5);
list.add(3);
List<User> userList=userMapper.selectBatchIds(list);
for(User user:userList){
System.out.println(userList);
sql语句为 SELECT id,user_name,age,email FROM user WHERE id IN ( ? , ? , ? ) ,selectBatchIds中参数为一个集合
insert操作
User user=new User();
user.setUserName("James");
user.setAge(23);
user.setEmail("tes234t@qq.com");
int users=userMapper.insert(user);
System.out.println(users);
sql语句为 INSERT INTO user ( user_name, age, email ) VALUES ( ?, ?, ? )

update操作
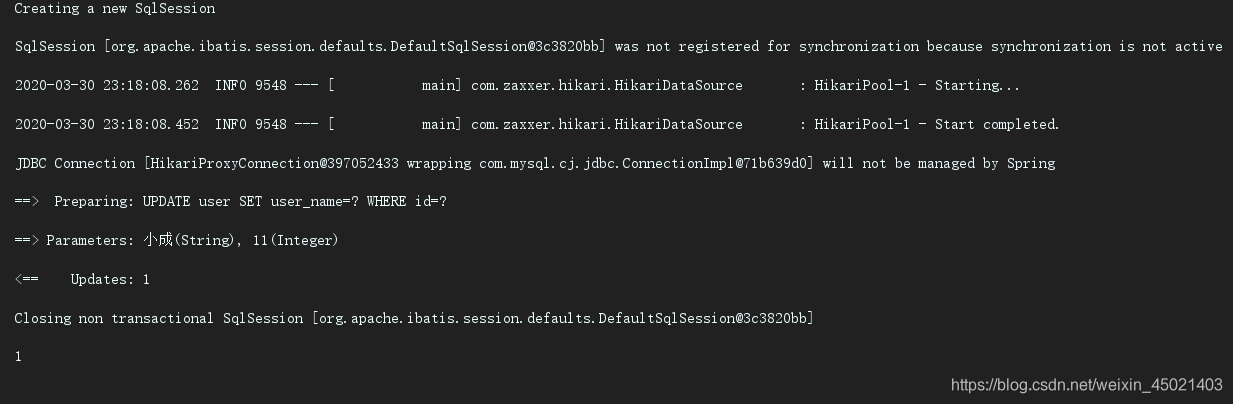
1根据id更新(updateById)
User user=new User();
user.setId(11);
user.setUserName("小成");
int users=userMapper.updateById(user);
System.out.println(users);
sql语句为 UPDATE user SET user_name=? WHERE id=? ,updateById方法中参数为一个实体类(user),没有传入实体类不更新
2根据条件更新(update)
使用条件构造器更新(QueryWrapper)
User user=new User();
user.setAge(26);
user.setEmail("tes1234t@qq.com");
QueryWrapper<User> wrapper=new QueryWrapper<>();
wrapper.eq("user_name","Jone");
int users=userMapper.update(user,wrapper);
System.out.println(users);
sql语句为UPDATE user SET age=?, email=? WHERE (user_name = ?) 。
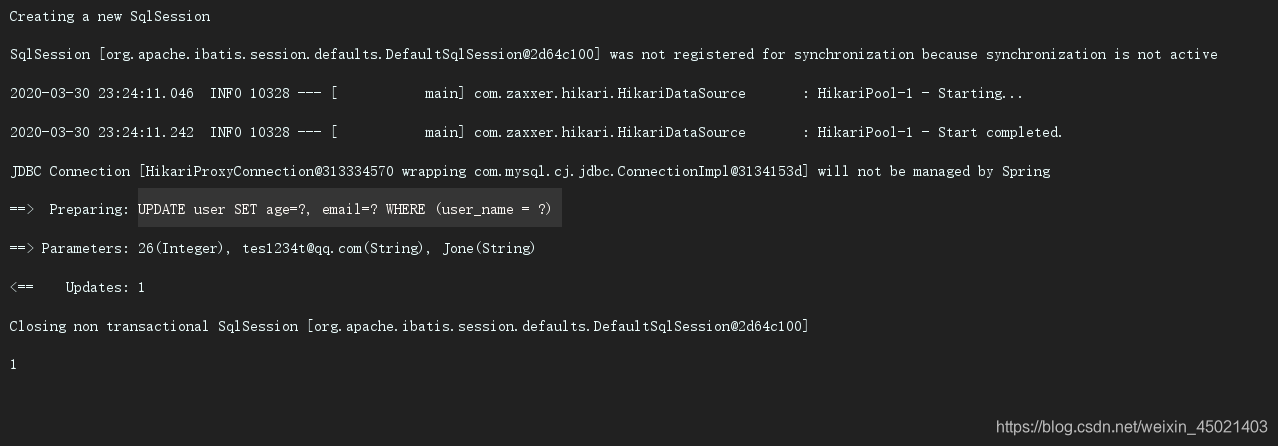
注:update方法传入两个参数,一个为实体类,另一个为wrapper,没有传入会报错
delete操作
1根据id删除一条数据(deleteById)
int deleteuser=userMapper.deleteById(11);
System.out.println(deleteuser);
sql语句为 DELETE FROM user WHERE id=?
注:deleteById传入是一个id,传入id后运行时自动生成sql DELETE FROM user WHERE id=?

2根据条件删除(delete)
QueryWrapper<User> wrapper=new QueryWrapper<>();
wrapper.eq("user_name","James");
int deletes=userMapper.delete(wrapper);
System.out.println(deletes);
sql语句为 DELETE FROM user WHERE (user_name = ?)
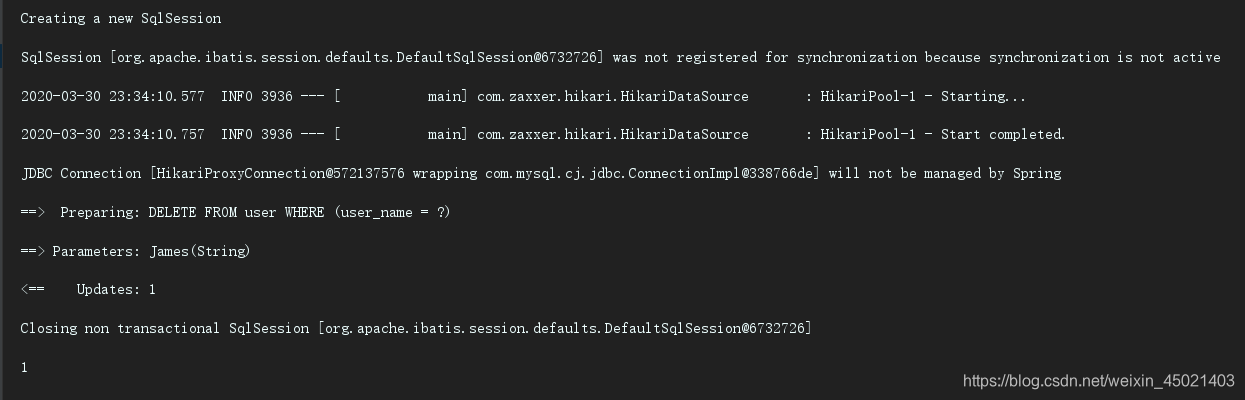
注 delete方法中参数是一个wrapper类,条件封装在QueryWrapper中。
7分页查询
1配置mybatis-plus插件(PaginationInterceptor)
@Configuration
public class MybatisplusConfig {
@Bean
public PaginationInterceptor paginationInterceptor(){
return new PaginationInterceptor();
}
}
2分页查询(IPage)
Page<User> page=new Page<>(1,3);
IPage<User> userIPage=userMapper.selectPage(page,null);
System.out.println(userIPage);
sql语句为:SELECT id,user_name,age,email FROM user LIMIT ?,?
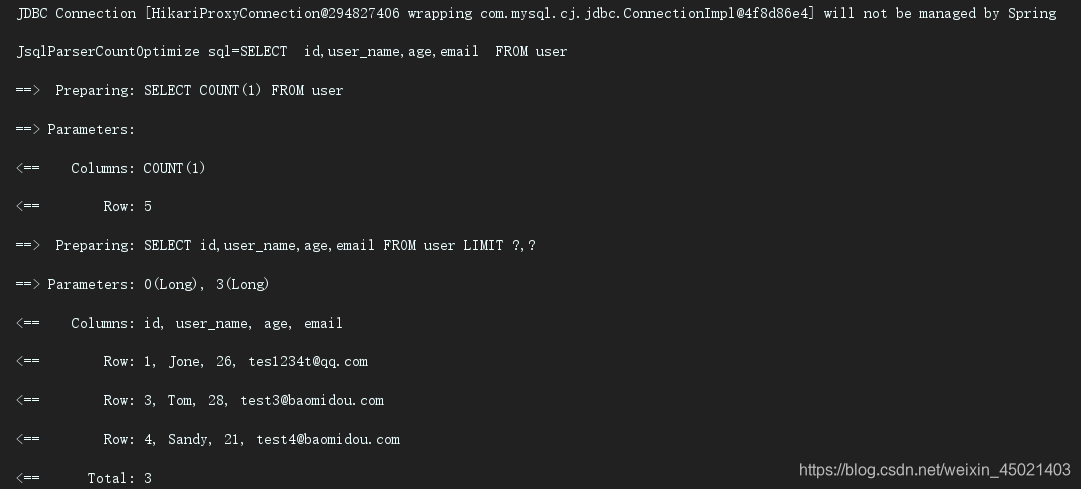
注:分页查询分两步进行,第一步先统计出user表中有多少条数据 sql语句为SELECT COUNT(1) FROM user ,第二步再查询user表,sql语句为 SELECT id,user_name,age,email FROM user LIMIT ?,? 。Page中有两个参数,current参数为显示当前页,size显示有几条数据。IPage中两个参数,一个是实体类(user),另一个为wrapper(查询条件),若无条件查询,则为null
3根据条件进行分页查询
Page<User> page=new Page<>(1,3);
QueryWrapper<User> wrapper=new QueryWrapper<>();
wrapper.eq("user_name","Jone");
IPage<User> userIPage=userMapper.selectPage(page,wrapper);
System.out.println(userIPage);
sel语句为 1 SELECT COUNT(1) FROM user WHERE (user_name = ?) ,2 SELECT id,user_name,age,email FROM user WHERE (user_name = ?) LIMIT ?,?
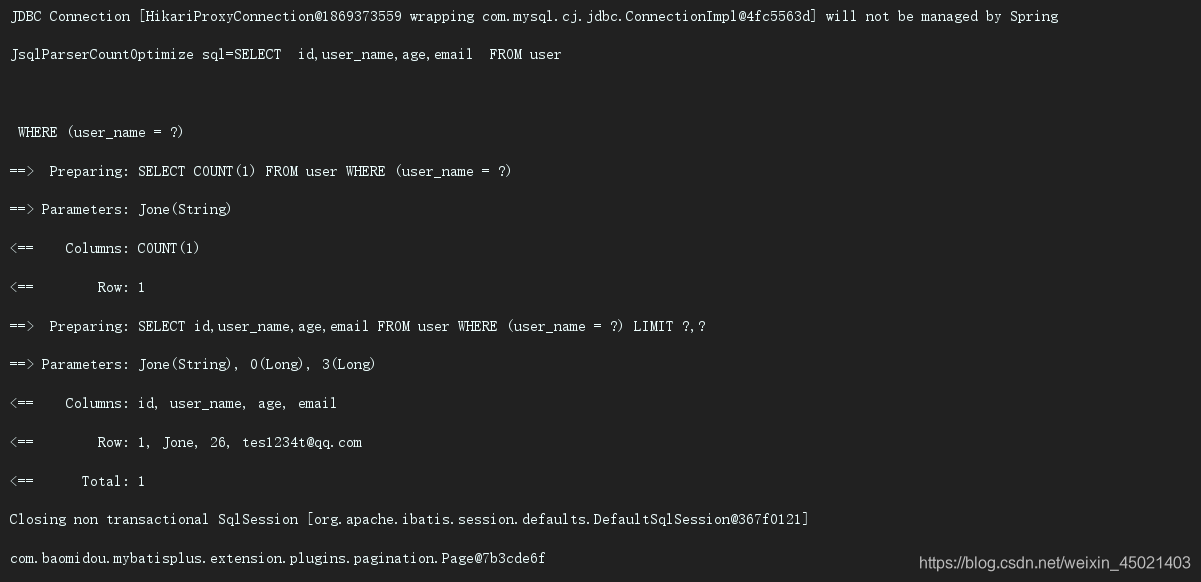
注:分页查询分两步进行,第一步先根据条件(wrapper)统计出user表中有多少条数据 sql语句为SELECT COUNT(1) FROM user WHERE (user_name = ?) ,第二步再根据条件(wrapper)查询user表,sql语句为SELECT id,user_name,age,email FROM user WHERE (user_name = ?) LIMIT ?,? 。Page中有两个参数,current参数为显示当前页,size显示有几条数据。IPage中两个参数,一个是实体类(user),另一个为wrapper(查询条件),若无条件查询,则为null
3根据条件进行分页查询
总结
MP的宗旨是简化开发,t提高效率。但是它也有不好的地方。在提供方便的同时却容易造成代码层次混乱,我们可能会把大量数据逻辑写到service层甚至contoller层中,使代码难以阅读。所以什么事都要取思考,在使用MP时一定要做分析,不要将所有数据操作都交给MP去实现,对于简单的单表数据操作用Mybatis-plus。一些复杂的数据操作如多表查询还是建议用mybatis中xml来操作。毕竟MP是mybatis增强版工具,原生mybatis功能还可以使用。

- MyBatis-Plus快速入门使用
- 优雅高效的MyBatis-Plus工具快速入门使用
- 使用IDEA的MyBatis-plus快速入门小例子
- 优雅高效的MyBatis-Plus工具快速入门使用
- 优雅高效的MyBatis-Plus工具快速入门使用
- mybatis-plus快速入门使用
- spring boot的使用入门-使用Druid连接池整合Mybatis-Plus连接Mysql数据库
- SpringBoot和mybatisplus的入门使用
- Mybatis-plus的快速集成和入门使用
- 转:优雅高效的MyBatis-Plus工具快速入门使用
- MyBatis-Plus工具快速入门使用
- MyBatis Plus工具快速入门使用教程
- Mybatis-Plus 搭建与使用入门(小结)
- SpringBoot入门 MyBatis-Plus使用
- Mybatis-Plus入门使用方法
- SpringBoot中的MybatisPlus的使用——入门
- MyBatis-Plus 的代码生成器使用入门
- mybatis-plus的使用 ------ 入门
- 优雅高效的MyBatis-Plus工具快速入门使用
- 优雅高效的MyBatis-Plus工具快速入门使用