巧用 Serverless,轻松搭建微信公众号的智能后台服务
一般来说,想给微信公众号增加更多的功能,需要有一台服务器,来进行公众号后台服务的搭建。那么在 Serverless 架构下,是否有更简便的方法来实现这么一个公众号后台呢?我们试试?
初步搭建
Serverless 原生开发
首先我们当然要有一个微信公众号!
接下来,我们要为我们的函数计算服务申请固定 IP:


点击白名单之后,我们可以填写表单,完成固定公网出口 IP 的申请。
接下来进行代码开发。
- 将函数绑定到公众号后台,参考文档:https://developers.weixin.qq.com/doc/offiaccount/Basic_Information/Access_Overview.html 我们可以先在函数中按照文档完成一个基本的鉴定功能:
def checkSignature(param):
'''
文档地址:https://developers.weixin.qq.com/doc/offiaccount/Basic_Information/Access_Overview.html
:param param:
:return:
'''
signature = param['signature']
timestamp = param['timestamp']
nonce = param["nonce"]
tmparr = [wxtoken, timestamp, nonce]
tmparr.sort()
tmpstr = ''.join(tmparr)
tmpstr = hashlib.sha1(tmpstr.encode("utf-8")).hexdigest()
return tmpstr == signature
再定义一个基本的回复方法:
def response(body, status=200):
return {
"isBase64Encoded": False,
"statusCode": status,
"headers": {"Content-Type": "text/html"},
"body": body
}
然后在函数入口处:
def main_handler(event, context):
if 'echostr' in event['queryString']:  # 接入时的校验
return response(event['queryString']['echostr'] if checkSignature(event['queryString']) else False)
配置我们 Yaml:
# serverless.yml
Weixin_GoServerless:
component: "@serverless/tencent-scf"
inputs:
name: Weixin_GoServerless
codeUri: ./Admin
handler: index.main_handler
runtime: Python3.6
region: ap-shanghai
description: 微信公众号后台服务器配置
memorySize: 128
timeout: 20
environment:
variables:
wxtoken: 自定义一个字符串
appid: 暂时不写
secret: 暂时不写
events:
- apigw:
name: Weixin_GoServerless
parameters:
protocols:
- https
environment: release
endpoints:
- path: /
method: ANY
function:
isIntegratedResponse: TRUE
执行代码,完成部署:

接下来在公众号后台,选择基本配置:

选择修改配置:

这里要注意:
URL,写我们刚才部署完成返回给我们的地址,并且在最后加一个 /
Token,写我们 Yaml 中的 wxtoken,两个地方要保持一样的字符串
EncodingAESKey,可以点击随机生成
消息加密方法可以选择明文
完成之后,我们可以点击提交:

看到提交成功,就说明我们已经完成了第一步骤的绑定。接下来,我们到函数的后台:

打开固定出口 IP,看到 IP 地址之后,复制 IP 地址:

点击查看->修改,并将 IP 地址复制粘贴进来,保存。
同时我们查看开发者 ID 和密码:

并将这两个内容复制粘贴,放到我们环境变量中:

至此,我们完成了一个公众号后台服务的绑定。
为了方便之后的操作,先获取一下全局变量:
wxtoken = os.environ.get('wxtoken')
appid = os.environ.get('appid')
secret = os.environ.get('secret')
- 接下来对各个模块进行编辑(本文只提供部分简单基础的模块,更多功能实现可以参考微信公众号文档实现)
- 获取 AccessToken 模块:
def getAccessToken():
'''
文档地址:https://developers.weixin.qq.com/doc/offiaccount/Basic_Information/Get_access_token.html
正常返回:{"access_token":"ACCESS_TOKEN","expires_in":7200}
异常返回:{"errcode":40013,"errmsg":"invalid appid"}
:return:
'''
url = "https://api.weixin.qq.com/cgi-bin/token?grant_type=client_credential&appid=%s&secret=%s" % (appid, secret)
accessToken = json.loads(urllib.request.urlopen(url).read().decode("utf-8"))
print(accessToken)
return None if "errcode" in accessToken else accessToken["access_token"]
- 创建自定义菜单模块:
def setMenu(menu):
'''
文档地址:https://developers.weixin.qq.com/doc/offiaccount/Custom_Menus/Creating_Custom-Defined_Menu.html
正确返回:{"errcode":0,"errmsg":"ok"}
异常返回:{"errcode":40018,"errmsg":"invalid button name size"}
:return:
'''
accessToken = getAccessToken()
if not accessToken:
return "Get Access Token Error"

url = "https://api.weixin.qq.com/cgi-bin/menu/create?access_token=%s" % accessToken
postData = urllib.parse.urlencode(menu).encode("utf-8")
requestAttr = urllib.request.Request(url=url, data=postData)
responseAttr = urllib.request.urlopen(requestAttr)
responseData = json.loads(responseAttr.read())
return responseData['errmsg'] if "errcode" in responseData else "success"
- 常见消息回复模块:
def textXML(body, event):
'''
:param body: {"msg": "test"}
msg: 必填,回复的消息内容(换行:在content中能够换行,微信客户端就支持换行显示)
:param event:
:return:
'''
return """<xml><ToUserName><![CDATA[{toUser}]]></ToUserName>
<FromUserName><![CDATA[{fromUser}]]></FromUserName>
<CreateTime>{time}</CreateTime>
<MsgType><![CDATA[text]]></MsgType>
<Content><![CDATA[{msg}]]></Content></xml>""".format(toUser=event["FromUserName"],
fromUser=event["ToUserName"],
time=int(time.time()),
msg=body["msg"])

def pictureXML(body, event):
'''
:param body:  {"media_id": 123}
media_id: 必填,通过素材管理中的接口上传多媒体文件,得到的id。
:param event:
:return:
'''
return """<xml><ToUserName><![CDATA[{toUser}]]></ToUserName>
<FromUserName><![CDATA[{fromUser}]]]></FromUserName>
<CreateTime>{time}</CreateTime>
<MsgType><![CDATA[image]]></MsgType>
<Image>
<MediaId><![CDATA[{media_id}]]></MediaId>
</Image></xml>""".format(toUser=event["FromUserName"],
fromUser=event["ToUserName"],
time=int(time.time()),
media_id=body["media_id"])

def voiceXML(body, event):
'''
:param body: {"media_id": 123}
media_id: 必填,通过素材管理中的接口上传多媒体文件,得到的id
:param event:
:return:
'''
return """<xml><ToUserName><![CDATA[{toUser}]]></ToUserName>
<FromUserName><![CDATA[{fromUser}]]></FromUserName>
<CreateTime>{time}</CreateTime>
<MsgType><![CDATA[voice]]></MsgType>
<Voice>
<MediaId><![CDATA[{media_id}]]></MediaId>
</Voice></xml>""".format(toUser=event["FromUserName"],
fromUser=event["ToUserName"],
time=int(time.time()),
media_id=body["media_id"])

def videoXML(body, event):
'''
:param body: {"media_id": 123, "title": "test", "description": "test}
media_id: 必填,通过素材管理中的接口上传多媒体文件,得到的id
title::选填,视频消息的标题
description:选填,视频消息的描述
:param event:
:return:
'''
return """<xml><ToUserName><![CDATA[{toUser}]]></ToUserName>
<FromUserName><![CDATA[{fromUser}]]></FromUserName>
<CreateTime>{time}</CreateTime>
<MsgType><![CDATA[video]]></MsgType>
<Video>
<MediaId><![CDATA[{media_id}]]></MediaId>
<Title><![CDATA[{title}]]></Title>
<Description><![CDATA[{description}]]></Description>
</Video></xml>""".format(toUser=event["FromUserName"],
fromUser=event["ToUserName"],
time=int(time.time()),
media_id=body["media_id"],
title=body.get('title', ''),
description=body.get('description', ''))

def musicXML(body, event):
'''
:param body:  {"media_id": 123, "title": "test", "description": "test}
media_id:必填,缩略图的媒体id,通过素材管理中的接口上传多媒体文件,得到的id
title:选填,音乐标题
description:选填,音乐描述
url:选填,音乐链接
hq_url:选填,高质量音乐链接,WIFI环境优先使用该链接播放音乐
:param event:
:return:
'''
return """<xml><ToUserName><![CDATA[{toUser}]]></ToUserName>
<FromUserName><![CDATA[{fromUser}]]></FromUserName>
<CreateTime>{time}</CreateTime>
<MsgType><![CDATA[music]]></MsgType>
<Music>
<Title><![CDATA[{title}]]></Title>
<Description><![CDATA[{description}]]></Description>
<MusicUrl><![CDATA[{url}]]></MusicUrl>
<HQMusicUrl><![CDATA[{hq_url}]]></HQMusicUrl>
<ThumbMediaId><![CDATA[{media_id}]]></ThumbMediaId>
</Music></xml>""".format(toUser=event["FromUserName"],
fromUser=event["ToUserName"],
time=int(time.time()),
media_id=body["media_id"],
title=body.get('title', ''),
url=body.get('url', ''),
hq_url=body.get('hq_url', ''),
description=body.get('description', ''))

def articlesXML(body, event):
'''
:param body: 一个list [{"title":"test", "description": "test", "picUrl": "test", "url": "test"}]
title:必填,图文消息标题
description:必填,图文消息描述
picUrl:必填,图片链接,支持JPG、PNG格式,较好的效果为大图360*200,小图200*200
url:必填,点击图文消息跳转链接
:param event:
:return:
'''
if len(body["articles"]) > 8:  # 最多只允许返回8个
body["articles"] = body["articles"][0:8]
tempArticle = """<item>
<Title><![CDATA[{title}]]></Title>
<Description><![CDATA[{description}]]></Description>
<PicUrl><![CDATA[{picurl}]]></PicUrl>
<Url><![CDATA[{url}]]></Url>
</item>"""
return """<xml><ToUserName><![CDATA[{toUser}]]></ToUserName>
<FromUserName><![CDATA[{fromUser}]]></FromUserName>
<CreateTime>{time}</CreateTime>
<MsgType><![CDATA[news]]></MsgType>
<ArticleCount>{count}</ArticleCount>
<Articles>
{articles}
</Articles></xml>""".format(toUser=event["FromUserName"],
fromUser=event["ToUserName"],
time=int(time.time()),
count=len(body["articles"]),
articles="".join([tempArticle.format(
title=eveArticle['title'],
description=eveArticle['description'],
picurl=eveArticle['picurl'],
url=eveArticle['url']
) for eveArticle in body["articles"]]))
对 main_handler 进行修改,使其:
识别绑定功能
识别基本信息
识别特殊额外请求(例如通过url触发自定义菜单的更新)
整体代码:
def main_handler(event, context):
print('event: ', event)

if event["path"] == '/setMenu':  # 设置菜单接口
menu = {
"button": [
{
"type": "view",
"name": "精彩文章",
"url": "https://mp.weixin.qq.com/mp/homepage?__biz=Mzg2NzE4MDExNw==&hid=2&sn=168bd0620ee79cd35d0a80cddb9f2487"
},
{
"type": "view",
"name": "开源项目",
"url": "https://mp.weixin.qq.com/mp/homepage?__biz=Mzg2NzE4MDExNw==&hid=1&sn=69444401c5ed9746aeb1384fa6a9a201"
},
{
"type": "miniprogram",
"name": "在线编程",
"appid": "wx453cb539f9f963b2",
"pagepath": "/page/index"
}]
}
return response(setMenu(menu))

if 'echostr' in event['queryString']:  # 接入时的校验
return response(event['queryString']['echostr'] if checkSignature(event['queryString']) else False)
else:  # 用户消息/事件
event = getEvent(event)
if event["MsgType"] == "text":
# 文本消息
return response(body=textXML({"msg": "这是一个文本消息"}, event))
elif event["MsgType"] == "image":
# 图片消息
return response(body=textXML({"msg": "这是一个图片消息"}, event))
elif event["MsgType"] == "voice":
# 语音消息
pass
elif event["MsgType"] == "video":
# 视频消息
pass
elif event["MsgType"] == "shortvideo":
# 小视频消息
pass
elif event["MsgType"] == "location":
# 地理位置消息
pass
elif event["MsgType"] == "link":
# 链接消息
pass
elif event["MsgType"] == "event":
# 事件消息
if event["Event"] == "subscribe":
# 订阅事件
if event.get('EventKey', None):
# 用户未关注时,进行关注后的事件推送(带参数的二维码)
pass
else:
# 普通关注
pass
elif event["Event"] == "unsubscribe":
# 取消订阅事件
pass
elif event["Event"] == "SCAN":
# 用户已关注时的事件推送(带参数的二维码)
pass
elif event["Event"] == "LOCATION":
# 上报地理位置事件
pass
elif event["Event"] == "CLICK":
# 点击菜单拉取消息时的事件推送
pass
elif event["Event"] == "VIEW":
# 点击菜单跳转链接时的事件推送
pass
在上述代码中可以看到:
if event["MsgType"] == "text":
# 文本消息
return response(body=textXML({"msg": "这是一个文本消息"}, event))
elif event["MsgType"] == "image":
# 图片消息
return response(body=textXML({"msg": "这是一个图片消息"}, event))
这里就是说,当用户发送了文本消息时候,我们给用户回复一个文本消息:这是一个文本消息。当用户发送了一个图片,我们给用户返回这是一个图片消息,用这两个功能测试我们这个后台的连通性:

可以看到,系统已经可以正常返回。
有人问了,这样一个简单的 Demo 有什么意义呢?可以告诉大家,我们可以很轻量地通过一个函数来实现微信公众号的后端服务;这里都是基础能力,我们可以在这个基础能力之上,尽情添加创新力,例如:
用户传过来的是图片消息,我们可以通过一些识图 API 告诉用户这个图片包括了什么?
用户传过来的是文字消息,我们可以先设定一些帮助信息/检索信息进行对比,如果没找到就给用户开启聊天功能(这里涉及到人工智能中的自然语言处理,例如文本相似度检测)
如果用户发送的是语音,我们还可以将其转成文本,生成对话消息,然后再转换成语音返回给用户
如果用户发送了地理位置信息,我们可以返回用户所在经纬度的街景信息,或者周边生活服务信息等
留给大家想象!
使用 Werobot 框架
上面的方法,是通过 Serverless 原生开发的方法进行对接。除此之外,我们还可以选择一些已有的框架,例如
werobot等。
WeRoBot 是一个微信公众号开发框架。通过 Serverless Component 中的
tencent-werobot组件快速部署该框架:
Weixin_Werobot:
component: "@serverless/tencent-werobot"
inputs:
functionName: Weixin_Werobot
code: ./test
werobotProjectName: app
werobotAttrName: robot
functionConf:
timeout: 10
memorySize: 256
environment:
variables:
wxtoken: 你的token
apigatewayConf:
protocols:
- http
environment: release
然后新建代码:
import os
import werobot

robot = werobot.WeRoBot(token=os.environ.get('wxtoken'))

robot.config['SESSION_STORAGE'] = False
robot.config["APP_ID"] = os.environ.get('appid')
robot.config["APP_SECRET"] = os.environ.get('secret')

# @robot.handler 处理所有消息
@robot.handler
def hello(message):
return 'Hello World!'

if __name__ == "__main__":
# 让服务器监听在 0.0.0.0:80
robot.config['HOST'] = '0.0.0.0'
robot.config['PORT'] = 80
robot.run()
并且在本地安装 werobot 相关依赖,完成之后,执行部署:

将下面的这个地址复制到公众号后台,开启调用即可。

参考 Git:https://github.com/serverless-tencent/tencent-werobot
这里需要注意的是,我们一定要关掉 Session 或者将 Session 改成云数据库,不能使用本地文件等,例如关闭 Session 配置:
robot.config['SESSION_STORAGE'] = False
文本相似度实现图文检索
有时候用户不知道我们发了什么文章,也不清楚每个文章具体内容,他可能只需要简单的关键词,来看一下这个公众号是否有他想要的东西。
例如他搜索:如何上传文件?或者搜索:如何开发Component?而图文检索功能就可以快速把最相关的历史文章推送给用户,这将会是很方便的一件事情。效果图如下:
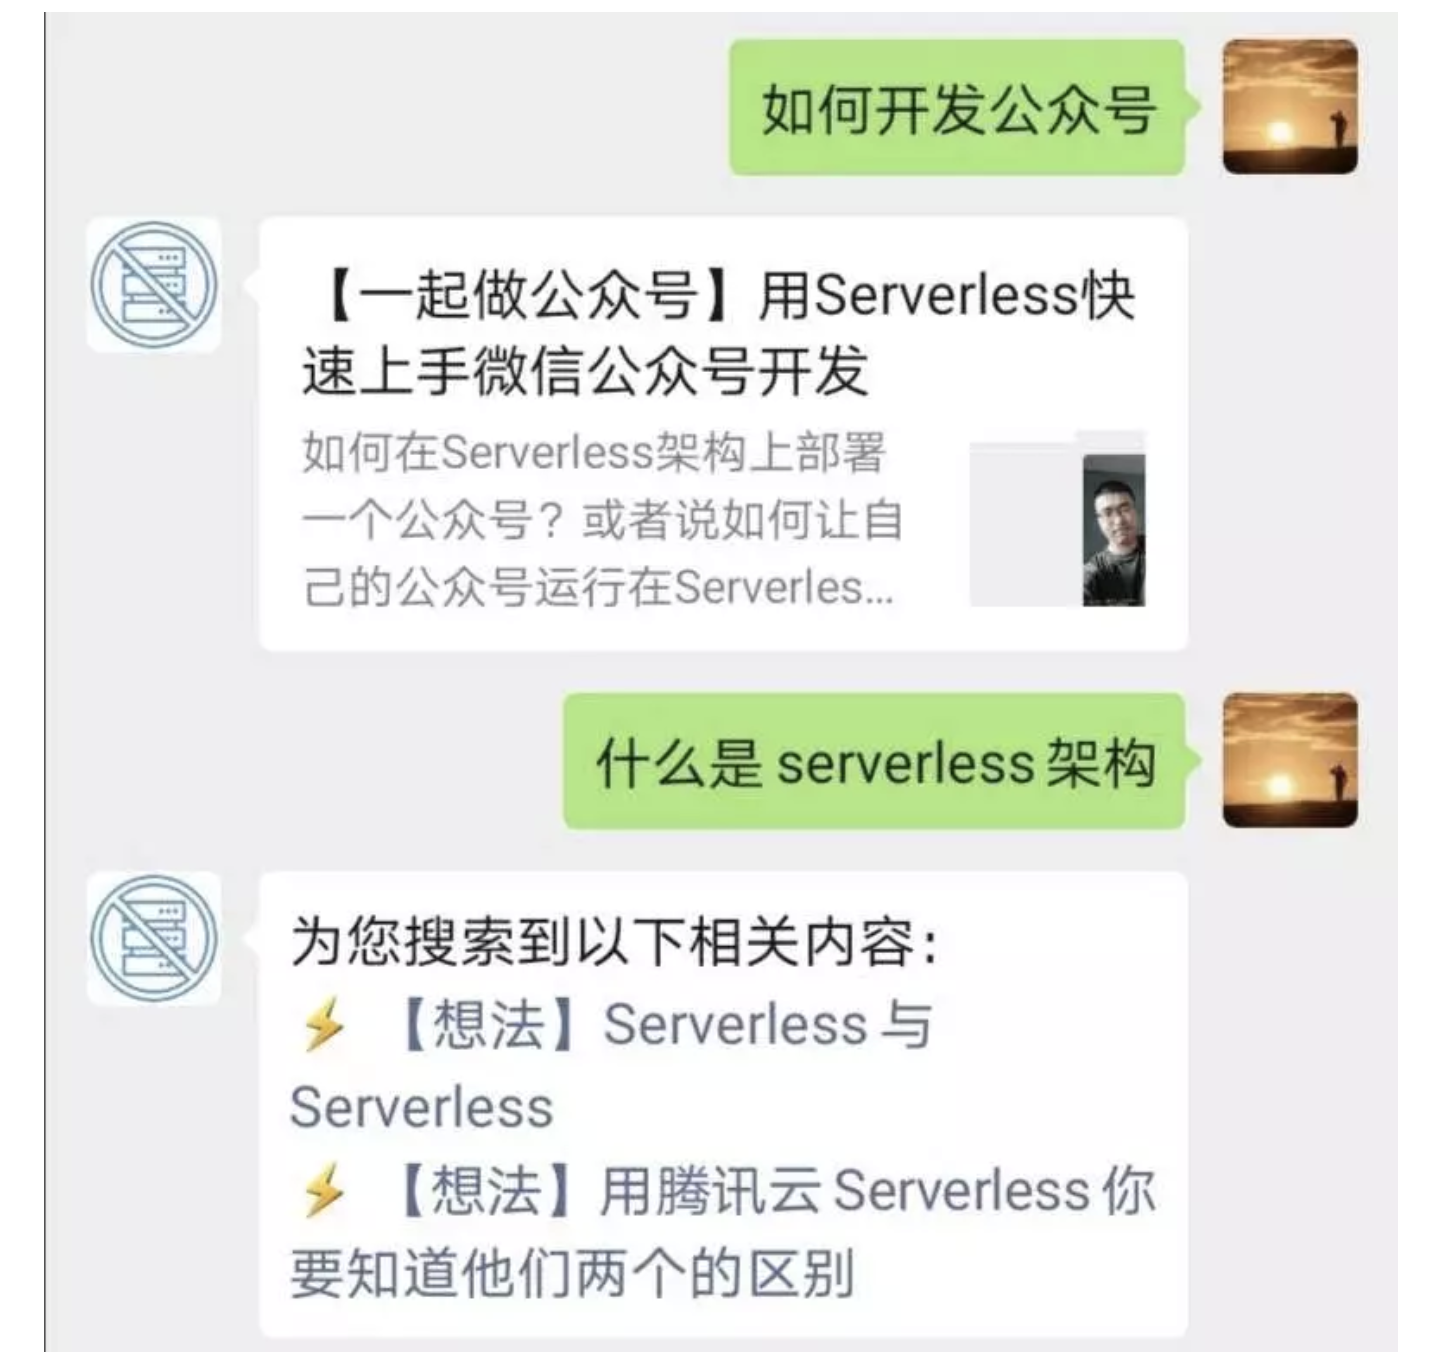
通过简单的问题描述,找到目标结果,这就是我们做的文章搜索功能。当然,我们还可以把它拓展成「客服系统」,这是后话了。
回到正题,我们在之前的代码基础上,新增两个函数:
- 函数 1:索引建立函数
主要功能:通过触发该函数,可以将现有的公众号数据进行整理,并且建立适当的索引文件,存储到 COS 中。
# -*- coding: utf8 -*-
import os
import re
import json
import random
from snownlp import SnowNLP
from qcloud_cos_v5 import CosConfig
from qcloud_cos_v5 import CosS3Client

bucket = os.environ.get('bucket')
secret_id = os.environ.get('secret_id')
secret_key = os.environ.get('secret_key')
region = os.environ.get('region')
client = CosS3Client(CosConfig(Region=region, SecretId=secret_id, SecretKey=secret_key))

def main_handler(event, context):
response = client.get_object(
Bucket=bucket,
Key=event["key"],
)
response['Body'].get_stream_to_file('/tmp/output.txt')

with open('/tmp/output.txt') as f:
data = json.loads(f.read())

articlesIndex = []
articles = {}
tempContentList = [
"_", " ",
]
for eveItem in data:
for i in range(0, len(eveItem['content']['news_item'])):
content = eveItem['content']['news_item'][i]['content']
content = re.sub(r'<code(.*?)</code>', '_', content)
content = re.sub(r'<.*?>', '', content)
for eve in tempContentList:
content = content.replace(eve, "")
desc = "%s。%s。%s" % (
eveItem['content']['news_item'][i]['title'],
eveItem['content']['news_item'][i]['digest'],
"。".join(SnowNLP(content).summary(3))
)
tempKey = "".join(random.sample('zyxwvutsrqponmlkjihgfedcba', 5))
articlesIndex.append(
{
"media_id": tempKey,
"description": desc
}
)
articles[tempKey] = eveItem['content']['news_item'][i]

client.put_object(
Bucket=bucket,
Body=json.dumps(articlesIndex).encode("utf-8"),
Key=event['index_key'],
EnableMD5=False
)
client.put_object(
Bucket=bucket,
Body=json.dumps(articles).encode("utf-8"),
Key=event['key'],
EnableMD5=False
)
这一部分,可能定制化比较多一些。首先是 tempContentList 变量,这里可以写上一些公众号中可能出现但不重要的话,例如公众号末尾的引导关注文案,这些文案一般不参与搜索,所以最好在建立索引的时候进行替换去除。然后我们还通过上述代码去掉了 code 标签里面的内容,因为代码也会影响结果。同时我还去掉了 html 标签。
原始的文件大概是这样的:

处理好的文件(通过标题+描述+SnowNLP提取的摘要):

这些文件将存储到 COS 中。
这一部分的核心就是,正确让我们提取出来的 description 尽可能准确地描述文章的内容。一般情况下,标题就是文章的核心,但是标题可能有一些信息丢失。
例如文章「用腾讯云 Serverless 你要知道他们两个的区别」,但实际上描述的是 Plugin 和 Component 的区别。虽然标题知道是两个东西,但是却缺少了核心的目标,所以再加上我们下面的描述:什么是 Serverless Framework Plugin?什么是Component?Plugin与Component 有什么区别?想要入门 Serverless CLI,这两个产品必须分的清楚,本文将会分享这二者区别与对应的特点、功能。
当然,加上描述之后内容变得已经相当精确,但是正文中,可能有更加精准的描述或者额外的内容,所以采用的是标题+描述+摘要(textRank 提取出来的前三句,属于提取式文本)。
- 函数 2: 搜索函数
主要功能:当用户向微信号发送了指定关键词,通过该函数获取的结果。
思考:函数 1 和函数 2,都可以集成在之前的函数中,为什么要把这两个函数单独拿出来做一个独立的函数存在呢?将它们放在同一个函数中不好么?
原因是 —— 主函数触发次数相对来说是最多的,而且这个函数本身不需要太多的资源配置(64M 就够了),而函数 1 和函数 2,可能需要消耗更多的资源,如果三个函数合并放在一起,可能函数的内存大小需要整体调大,满足三个函数需求。这样可能会消耗更多资源,
例如:主函数触发了 10 次(64M,每次 1S),函数 1 触发了 2 次(512 M,每次 5S),函数 2 触发了 4 次(384M,每次 3S)
如果将三个函数放在一起,资源消耗是:
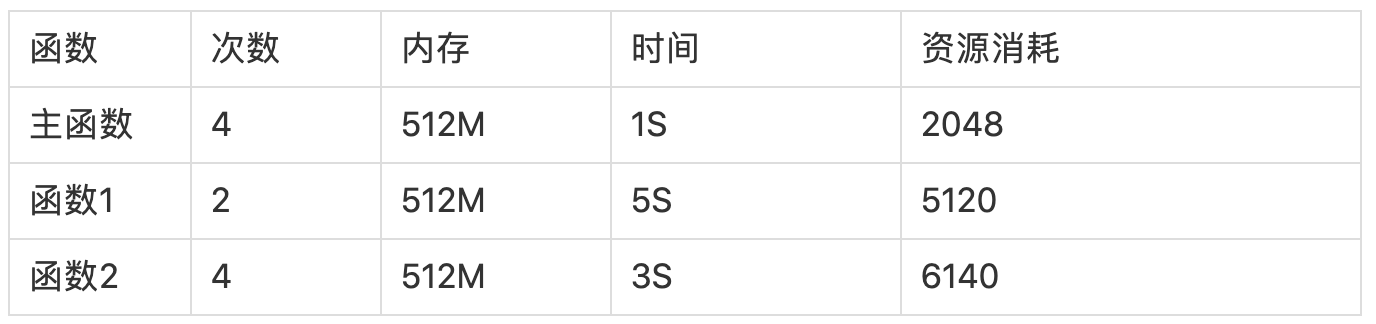
如果将其变成三个函数来执行,资源消耗是:

前者总计资源消耗 13308,后者 10432。调用次数越多,主函数的调用比例越大,所以节约的资源也就会越多。因此此处建议将资源消耗差距比较大的模块,分成不同函数进行部署。
import os
import json
import jieba
from qcloud_cos_v5 import CosConfig
from qcloud_cos_v5 import CosS3Client
from collections import defaultdict
from gensim import corpora, models, similarities

bucket = os.environ.get('bucket')
secret_id = os.environ.get('secret_id')
secret_key = os.environ.get('secret_key')
region = os.environ.get('region')
client = CosS3Client(CosConfig(Region=region, SecretId=secret_id, SecretKey=secret_key))

def main_handler(event, context):
response = client.get_object(
Bucket=bucket,
Key=event["key"],
)
response['Body'].get_stream_to_file('/tmp/output.txt')

with open('/tmp/output.txt') as f:
data = json.loads(f.read())

articles = []
articlesDict = {}
for eve in data:
articles.append(eve['description'])
articlesDict[eve['description']] = eve['media_id']

sentence = event["sentence"]

documents = []
for eve_sentence in articles:
tempData = " ".join(jieba.cut(eve_sentence))
documents.append(tempData)
texts = [[word for word in document.split()] for document in documents]
frequency = defaultdict(int)
for text in texts:
for word in text:
frequency[word] += 1
dictionary = corpora.Dictionary(texts)
new_xs = dictionary.doc2bow(jieba.cut(sentence))
corpus = [dictionary.doc2bow(text) for text in texts]
tfidf = models.TfidfModel(corpus)
featurenum = len(dictionary.token2id.keys())
sim = similarities.SparseMatrixSimilarity(
tfidf[corpus],
num_features=featurenum
)[tfidf[new_xs]]
answer_list = [(sim[i], articles[i]) for i in range(1, len(articles))]
answer_list.sort(key=lambda x: x[0], reverse=True)
result = []
print(answer_list)
for eve in answer_list:
if eve[0] > 0.10:
result.append(articlesDict[eve[1]])
if len(result) >= 8:
result = result[0:8]
return {"result": json.dumps(result)}
这一部分的代码也是很简单,主要是通过文本的相似度对每个文本进行评分,然后按照评分从高到低进行排序,给定一个阈值(此处设定的阈值为 0.1),输出阈值之前的数据。
另外要注意,此处引用了两个依赖是 jieba 和 gensim,这两个依赖都可能涉及到二进制文件,所以强烈推荐在 CentOS 系统下进行打包。
接下来就是主函数中的调用,为了实现上述功能,需要在主函数中新增方法:
- 获取全部图文消息
def getTheTotalOfAllMaterials():
'''
文档地址:https://developers.weixin.qq.com/doc/offiaccount/Asset_Management/Get_the_total_of_all_materials.html
:return:
'''
accessToken = getAccessToken()
if not accessToken:
return "Get Access Token Error"
url = "https://api.weixin.qq.com/cgi-bin/material/get_materialcount?access_token=%s" % accessToken
responseAttr = urllib.request.urlopen(url=url)
return json.loads(responseAttr.read())

def getMaterialsList(listType, count):
'''
文档地址:https://developers.weixin.qq.com/doc/offiaccount/Asset_Management/Get_materials_list.html
:return:
'''
accessToken = getAccessToken()
if not accessToken:
return "Get Access Token Error"

url = "https://api.weixin.qq.com/cgi-bin/material/batchget_material?access_token=%s" % accessToken
materialsList = []
for i in range(1, int(count / 20) + 2):
requestAttr = urllib.request.Request(url=url, data=json.dumps({
"type": listType,
"offset": 20 * (i - 1),
"count": 20
}).encode("utf-8"), headers={
"Content-Type": "application/json"
})
responseAttr = urllib.request.urlopen(requestAttr)
responseData = json.loads(responseAttr.read().decode("utf-8"))
materialsList = materialsList + responseData["item"]
return materialsList
可以通过以下代码调用:
rticlesList = getMaterialsList("news", getTheTotalOfAllMaterials()['news_count'])
- 将图文消息存储到 COS,并且通过函数的 Invoke 接口,实现函数间调用:
def saveNewsToCos():
global articlesList
articlesList = getMaterialsList("news", getTheTotalOfAllMaterials()['news_count'])
try:
cosClient.put_object(
Bucket=bucket,
Body=json.dumps(articlesList).encode("utf-8"),
Key=key,
EnableMD5=False
)
req = models.InvokeRequest()
params = '{"FunctionName":"Weixin_GoServerless_GetIndexFile", "ClientContext":"{\\"key\\": \\"%s\\", \\"index_key\\": \\"%s\\"}"}' % (
key, indexKey)
req.from_json_string(params)
resp = scfClient.Invoke(req)
resp.to_json_string()
response = cosClient.get_object(
Bucket=bucket,
Key=key,
)
response['Body'].get_stream_to_file('/tmp/content.json')
with open('/tmp/content.json') as f:
articlesList = json.loads(f.read())
return True
except Exception as e:
print(e)
return False
- 根据搜索反馈回来的 Key 实现文章内容的对应
def searchNews(sentence):
req = models.InvokeRequest()
params = '{"FunctionName":"Weixin_GoServerless_SearchNews", "ClientContext":"{\\"sentence\\": \\"%s\\", \\"key\\": \\"%s\\"}"}' % (
sentence, indexKey)
req.from_json_string(params)
resp = scfClient.Invoke(req)
print(json.loads(json.loads(resp.to_json_string())['Result']["RetMsg"]))
media_id = json.loads(json.loads(json.loads(resp.to_json_string())['Result']["RetMsg"])["result"])
return media_id if media_id else None
最后在 main_handler 中,增加使用逻辑:

逻辑很简答,就是根据用户发的消息,去查找对应的结果.拿到结果之后判断结果个数,如果有 1 个相似内容,则返回一个图文,如果有多个则返回带有链接的文本。
另外一个逻辑是建立索引,直接是通过 API 网关触发即可。当然,如果怕不安全或者有需要的话,可以增加权限坚定的参数:

额外优化:

在接口列表中,我们可以看到获取 accessToken 的接口实际上是有次数限制的,每次获取有效期两个小时。所以,我们就要在函数中,对这部分内容做持久化。为了这个小东西,弄一个 MySQL 并不划算,所以决定用 COS:
def getAccessToken():
'''
文档地址:https://developers.weixin.qq.com/doc/offiaccount/Basic_Information/Get_access_token.html
正常返回:{"access_token":"ACCESS_TOKEN","expires_in":7200}
异常返回:{"errcode":40013,"errmsg":"invalid appid"}
:return:
'''
global accessToken

# 第一次判断是判断本地是否已经有了accessToken,考虑到容器复用情况
if accessToken:
if int(time.time()) - int(accessToken["time"]) <= 7000:
return accessToken["access_token"]

# 如果本地没有accessToken,可以去cos获取
try:
response = cosClient.get_object(
Bucket=bucket,
Key=accessTokenKey,
)
response['Body'].get_stream_to_file('/tmp/token.json')
with open('/tmp/token.json') as f:
accessToken = json.loads(f.read())
except:
pass

# 这一次是看cos中是否有,如果cos中有的话,再次进行判断段
if accessToken:
if int(time.time()) - int(accessToken["time"]) <= 7000:
return accessToken["access_token"]

# 如果此时流程还没停止,则说明accessToken还没获得到,就需要从接口获得,并且同步给cos
url = "https://api.weixin.qq.com/cgi-bin/token?grant_type=client_credential&appid=%s&secret=%s" % (appid, secret)
accessTokenResult = json.loads(urllib.request.urlopen(url).read().decode("utf-8"))
accessToken = {"time": int(time.time()), "access_token": accessTokenResult["access_token"]}
print(accessToken)
response = cosClient.put_object(
Bucket=bucket,
Body=json.dumps(accessToken).encode("utf-8"),
Key=accessTokenKey,
EnableMD5=False
)
return None if "errcode" in accessToken else accessToken["access_token"]
当然这段代码可以继续优化,这里只是一个思路。
除了利用文本相似度进行图文检索,我们还可以利用云厂商提供的 AI 能力,为公众号增加机器人功能,限于篇幅就先告一段落,感兴趣的读者可以自己探索一下。
总结
至此,我们完成了一个简单的公众号开发。通过 Serverless 的原生开发思路(也可以使用 Werobot 等公众号开发框架),将公众号后台服务部署到 Serverless 架构上。再通过自然语言处理技术(特指文本相似度等)实现了一个图文检索功能。
Serverless 架构在开发微信公众号这种事件驱动类的触发式场景有着很大的优势,本文也仅仅是一个小探索,更多的功能和应用,能力和价值,还是要看具体业务。希望读者可以通过本文,对 Serverless 架构有更深入的了解。
Serverless Framework 30 天试用计划
我们诚邀您来体验最便捷的 Serverless 开发和部署方式。在试用期内,相关联的产品及服务均提供免费资源和专业的技术支持,帮助您的业务快速、便捷地实现 Serverless!
One More Thing
3 秒你能做什么?喝一口水,看一封邮件,还是 —— 部署一个完整的 Serverless 应用?
复制链接至 PC 浏览器访问:https://serverless.cloud.tencent.com/deploy/express
3 秒极速部署,立即体验史上最快的 Serverless HTTP 实战开发!
传送门:
- GitHub: github.com/serverless
- 官网:serverless.com
欢迎访问:Serverless 中文网,您可以在 最佳实践 里体验更多关于 Serverless 应用的开发!

- Azure 项目构建 - 用 Azure 认知服务在微信公众号上搭建智能会务系统
- 利用 FC + OSS 快速搭建 Serverless 实时按需图像处理服务
- 快速搭建 Serverless 人脸识别离线服务
- 快速搭建 Serverless 人脸识别离线服务
- 程序员如何搞副业赚钱:基于函数计算/Serverless搭建后端服务
- 新搭建后台server服务? oh no!------程序员的脑力劳动和体力劳动
- 快速搭建 Serverless 人脸识别离线服务
- 轻松搭建基于 Serverless 的 Go 应用(Gin、Beego 举例)
- 轻松搭建基于 Serverless 的 Go 应用(Gin、Beego 举例)
- 轻松搭建Windows SSH和FTP服务
- Serverless无服务应用架构纵横谈
- Serverless 架构应用开发指南:创建自己的 Serverless 短链服务
- Serverless 风格微服务的持续交付(上):架构案例
- ubuntu开启nfs服务,并搭建gdbserver
- 使用spring boot搭建后台微服务框架
- Knative 实战:基于 Knative Serverless 技术实现天气服务-上篇
- 万物皆可 Serverless 之使用云函数 SCF+COS 免费运营微信公众号
- node+mysql+ajax+javascript搭建一套服务接口,实现前后台数据请求
- 小记 - ltp server服务搭建指南
- 使用 OpenWhisk 自建 Serverless 服务