Spring Cloud: 配置中心 Config

配置中心作用
分布式系统中,项目越来越大,子项目越来越多,配置文件也协同零零散散的子项目星罗棋布,往往更改一个基础服务的配置要导致一些列重启,造成运维困难,维护成本高而且容易出错。为了解决这一问题,配置中心应运而生。配置中心开源项目比较多,这里主要介绍Cloud全家桶的Spring Cloud Config。
Consul
Consul也可以作为配置中心,之前文章有介绍:Spring Cloud: 注册中心Consul使用, 但是功能较少,没有远程服务
Spring Cloud Config
SpringCloud Config是一套为分布式系统中的基础设施和微服务应用提供集中化配置的管理方案,分为服务端与客户端两个部分。基于Config服务器,就可以集中管理各种环境下的各种应用的配置信息。客户端和服务器端与Spring中的Environment和PropertySource概念相匹配,所以这不仅适用于所有的Spring应用,而且对于任意语言的应用都能够适用。一个应用可能有多个环境,从开发到测试,再到生产环境,开发者可以管理这些不同环境下的配置,而且能够确保应用在环境迁移后有完整的配置能够正常运行。Config服务端默认的存储实现是Git,这能够很容易地支持配置环境的标签版本,而且有各种工具方便地管理这些配置内容。
配置中心实践
服务器端
1. 创建consul-config
创建一个新项目,用于作为配置中心的服务器,作为git仓库中配置文件的api接口
依赖:
implementation 'org.springframework.cloud:spring-cloud-config-server:2.2.2.RELEASE'
implementation 'org.springframework.boot:spring-boot-starter-actuator'
implementation 'org.springframework.cloud:spring-cloud-starter-consul-discovery:2.2.2.RELEASE'
启动类添加注解:

配置文件:
server:
port: 8740

spring:
application:
name: consul-config
cloud:
consul:
host: localhost
port: 8500
discovery:
prefer-ip-address: true
service-name: ${spring.application.name}
2. git仓库创建配置文件目录
推荐使用gitee,因为github速度有点慢,而且有时连接有问题:

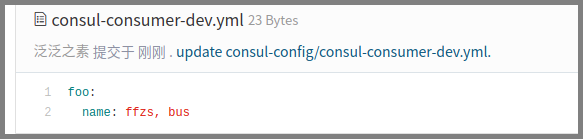
consul-consumer-dev.yml内容如下:

仓库转化为web接口,参照如下规则:
- /{application}/{profile}[/{label}]
- /{application}-{profile}.yml
- /{label}/{application}-{profile}.yml
- /{application}-{profile}.properties
- /{label}/{application}-{profile}.properties
以consul-consumer-dev.yml为例, application对应的就是consul-consumer, profile对应的就是dev
3. 添加仓库配置
将gitee上的仓库配置起来,config关联git远程仓库,在search-paths目录中找到可以匹配的文件,再开放以/application/profile为路径的restful接口供客户端获取配置信息:
config:
label: master
server:
git:
uri: https://gitee.com/ffzs/consul-config.git  # git上项目url路径
search-paths: /consul-config   # git 项目中目录
#          username: xx
#          password: xx
如果是私密的项目需要配置,git的账号和密码
4. 测试
可以通过路径直接找到配置信息,比如访问http://localhost:8740/consul-consumer/dev:

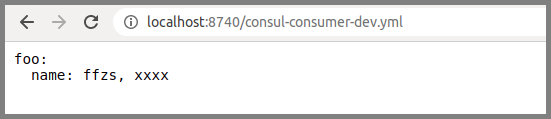
也可以通过路径直接访问文件内容,如访问http://localhost:8740/consul-consumer-dev.yml,直接获取文件内容:
客户端
创建项目:
新建一个config-client项目,依赖如下:
implementation 'org.springframework.boot:spring-boot-starter-web'
implementation 'org.springframework.cloud:spring-cloud-starter-config:2.2.2.RELEASE'
implementation 'org.springframework.cloud:spring-cloud-starter-consul-discovery:2.2.2.RELEASE'
implementation 'org.springframework.boot:spring-boot-starter-actuator'
创建bootstrap.yml文件:
spring:
application:
name: config-client
cloud:
consul:
host: localhost
port: 8500
discovery:
prefer-ip-address: true
service-name: ${spring.application.name}

config:
fail-fast: true
uri: http://localhost:8740   # config 服务器路径
name: consul-consumer   #  获取的application名称 默认为 ${spring.application.name}
profile: dev  # 获取的 profile 默认为 ${spring.profiles.active}
label: master   # 分支 默认就是master

profiles:
active: dev
修改application.yml配置文件:
server:
port: 1111

foo:
name: ffzs, xx

management:
endpoints:
web:
exposure:
include: "*"
endpoint:
health:
show-details: always
创建一个控制器:
SpringConfigController.class:
@RestController
@RefreshScope   //用于刷新
public class SpringConfigController {

@Value("${foo.name}")
String name;

@RequestMapping("name")
public String name() {
return "<h1> I am " + name + "</h1>";
}
}
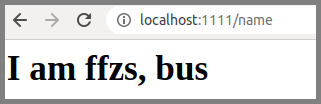
2. 测试
运行,访问http://localhost:1111/name:
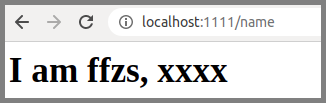
获取到的是git仓库里的内容,说明成功获取了配置。
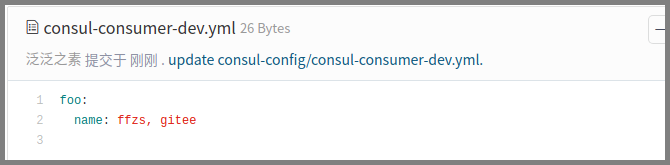
3. 修改配置
这时我们修改git仓库中内容如下:
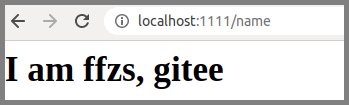
使用actuator刷新配置,通过向actuator/refresh发送post请求:

这时在访问发现name已经更改:
4. 通过注册中心获取Config服务
config配置更改如下:
config:
discovery:
enabled: true
service-id: consul-config    # consul上服务id
fail-fast: true
#      uri: http://localhost:8740   # config 服务器路径
name: consul-consumer  # 获取的application名称 默认为 ${spring.application.name}
profile: dev  # 获取的 profile 默认为 ${spring.profiles.active}
label: master
Spring Cloud Bus
Spring Cloud Bus被大家称为消息总线,通过轻量级的消息代理来连接各个分布的节点,可以利用像消息队列的广播机制在分布式系统中进行消息传播。通过消息总线可以实现很多业务功能,其中对于配置中心客户端刷新就是一个非常典型的使用场景。
Spring Cloud Bus进行配置更新的步骤如下:
- 提交代码触发post请求给/actuator/bus-refresh。
- Server端接收到请求并发送给Spring Cloud Bus。
- Spring Cloud bus接到消息并通知给其他客户端。
- 其他客户端接收到通知,请求Server端获取最新配置。
- 全部客户端均获取到最新的配置。
1. 安装RabbitMQ
见Spring Cloud: 链路监控 Sleuth、 Zipkin中有介绍安装方法,就不赘述了
2. 服务端更改
修改依赖:
implementation 'org.springframework.cloud:spring-cloud-starter-bus-amqp:2.2.2.RELEASE'
bootstrap.yml配置中添加:
rabbitmq:
host: localhost
port: 5672
username: ffzs
password: 123zxc
3. 客户端修改
修改依赖:
implementation 'org.springframework.cloud:spring-cloud-starter-bus-amqp:2.2.2.RELEASE'
application.yml中添加:
rabbitmq:
host: localhost
port: 5672
username: ffzs
password: 123zxc
4. 测试
重新运行,访问http://localhost:15672/,3个连接说明连接正常:

修改git文件内容:
运行curl -X POST http://localhost:1111/actuator/bus-refresh进行配置文件刷新,再次访问http://localhost:1111/name,发现名字已经更改:

- Spring Cloud教程 | 第四篇:远程配置中心账号密码设置以及高可用 | Spring Cloud Config
- spring cloud :五、分布式配置中心(spring cloud config)
- Spring Cloud学习--配置中心(Config)
- Spring Cloud(八)高可用的分布式配置中心 Spring Cloud Config
- Spring Cloud学习(六) - Config(统一配置中心)
- Spring Cloud(十)高可用的分布式配置中心 Spring Cloud Config 中使用 Refresh
- Spring Cloud (5) | 配置中心 Config Server 配置git or github or gitlab
- spring cloud系列-02.配置中心Config搭建
- Spring Cloud(Dalston.SR5)--Config 集群配置中心-刷新配置
- Spring Cloud(九)高可用的分布式配置中心 Spring Cloud Config 集成 Eureka 服务
- Spring Cloud学习:05分布式配置中心(Spring Cloud Config)
- Spring Cloud(十)高可用的分布式配置中心 Spring Cloud Config 中使用 Refresh
- Spring Cloud教程 | 第三篇:远程配置中心 | Spring Cloud Config
- SpringCloud-Config 分布式配置中心
- Spring Cloud config之一:分布式配置中心入门介绍
- 史上最简单的SpringCloud教程 | 第六篇: 分布式配置中心(Spring Cloud Config)
- 【配置中心】分布式-组件config-center
- 史上最简单的SpringCloud教程 | 第六篇: 分布式配置中心(Spring Cloud Config)
- SpringCloud入门6:分布式配置中心(Spring Cloud Config)