SpringBoot从入门到精通教程(二十七)- @Valid注解用法详解+全局处理器Exception优雅处理参数验证用法
问题痛点
用 Spring 框架写代码时,写接口类,相信大家对该类的写法非常熟悉。在写接口时要写效验请求参数逻辑,这时候我们会常用做法是写大量的 if 与 if else 类似这样的代码来做判断,如下所示:
[code]@RestController
public class TestController {

@PostMapping("/user")
public String addUserInfo(@RequestBody User user) {
if (user.getName() == null || "".equals(user.getName()) {
......
} else if(user.getSex() == null || "".equals(user.getSex())) {
......
} else if(user.getUsername() == null || "".equals(user.getUsername())) {
......
} else {
......
}
......
}

}
这样的代码如果按正常代码逻辑来说,是没有什么问题的,不过按优雅来说,简直糟糕透了。不仅不优雅,而且如果存在大量的验证逻辑,这会使代码看起来乱糟糟,大大降低代码可读性。
那么有没有更好的方法能够简化这个过程呢?
答案当然是有,推荐的是使用
@Valid注解来帮助我们简化验证逻辑。
Tips技术点
1. @Valid注解
- 注解 @Valid 的主要作用是用于数据效验,可以在定义的实体中的属性上,添加不同的注解来完成不同的校验规则,而在接口类中的接收数据参数中添加 @valid 注解,这时你的实体将会开启一个校验的功能。
2. @Valid 的相关注解
下面是 @Valid 相关的注解,在实体类中不同的属性上添加不同的注解,就能实现不同数据的效验功能
[code]注解名称    作用描述
@Null   限制只能为null
@NotNull    限制必须不为null
@AssertFalse    限制必须为false
@AssertTrue 限制必须为true
@DecimalMax(value)  限制必须为一个不大于指定值的数字
@DecimalMin(value)  限制必须为一个不小于指定值的数字
@Digits(integer,fraction)   限制必须为一个小数,且整数部分的位数不能超过integer,小数部分的位数不能超过fraction
@Future 限制必须是一个将来的日期
@Max(value) 限制必须为一个不大于指定值的数字
@Min(value) 限制必须为一个不小于指定值的数字
@Past   限制必须是一个过去的日期
@Pattern(value) 限制必须符合指定的正则表达式
@Size(max,min)  限制字符长度必须在min到max之间
@Past   验证注解的元素值(日期类型)比当前时间早
@NotEmpty   验证注解的元素值不为null且不为空(字符串长度不为0、集合大小不为0)
@NotBlank   验证注解的元素值不为空(不为null、去除首位空格后长度为0),不同于@NotEmpty,@NotBlank只应用于字符串且在比较时会去除字符串的空格
@Email  验证注解的元素值是Email,也可以通过正则表达式和flag指定自定义的email格式
3. 使用 @Valid 进行参数效验步骤
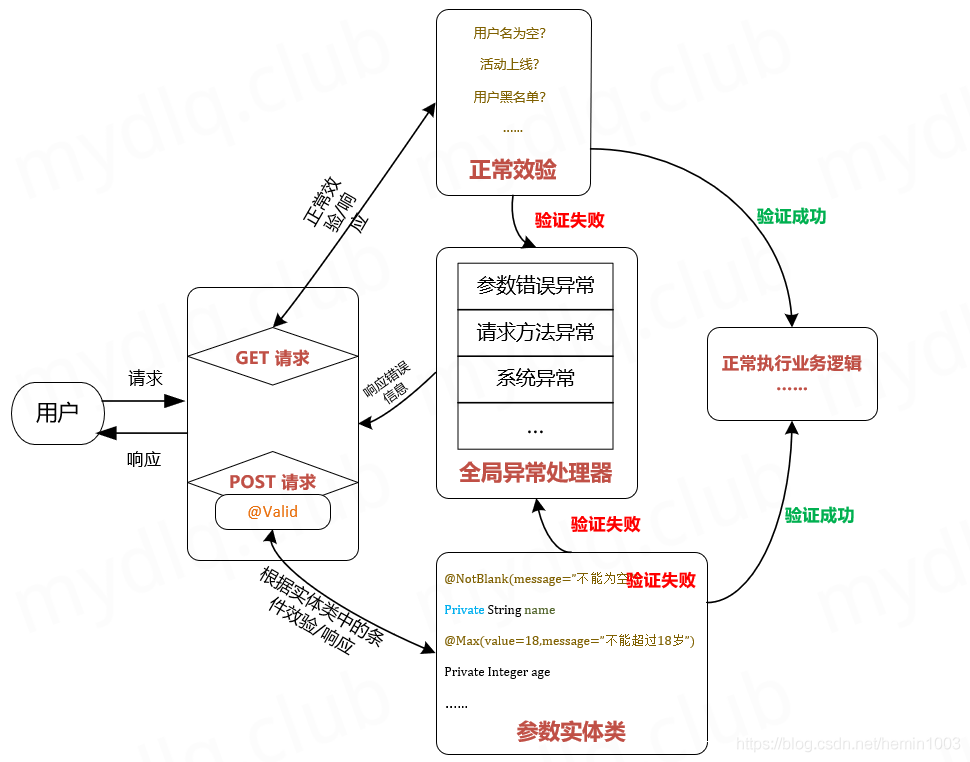
整个过程如下图所示,用户访问接口,然后进行参数效验,因为 @Valid 不支持平面的参数效验(直接写在参数中字段的效验)所以基于 GET 请求的参数还是按照原先方式进行效验,而 POST 则可以以实体对象为参数,可以使用 @Valid 方式进行效验。如果效验通过,则进入业务逻辑,否则抛出异常,交由全局异常处理器进行处理。
案例用法
1. 实体类中添加 @Valid 相关注解
使用
@Valid相关注解非常简单,只需要在参数的实体类中属性上面添加如
@NotBlank、
@Max、
@Min等注解来对该字段进限制,如下:
User:
[code]public class User {
@NotBlank(message = "姓名不为空")
private String username;

@NotBlank(message = "密码不为空")
private String password;
}
如果是嵌套的实体对象,则需要在最外层属性上添加
@Valid注解:
User:
[code]public class User {
@NotBlank(message = "姓名不为空")
private String username;

@NotBlank(message = "密码不为空")
private String password;

//嵌套必须加 @Valid,否则嵌套中的验证不生效
@Valid
@NotNull(message = "用户信息不能为空")
private UserInfo userInfo;
}
UserInfo:
[code]public class User {
@NotBlank(message = "年龄不为空")
@Max(value = 18, message = "不能超过18岁")
private String age;

@NotBlank(message = "性别不能为空")
private String gender;
}
2. 接口类中添加 @Valid 注解
在
Controller类中添加接口,
POST方法中接收设置了 @Valid 相关注解的实体对象,然后在参数中添加
@Valid注解来开启效验功能,需要注意的是,
@Valid对
Get请求中接收的平面参数请求无效,稍微略显遗憾。
[code]@RestController
public class TestController {

@PostMapping("/user")
public String addUserInfo(@Valid @RequestBody User user) {
return "调用成功!";
}

}
3. 全局异常处理类中处理 @Valid 抛出的异常
最后,我们写一个全局异常处理类,然后对接口中抛出的异常进行处理,而
@Valid配合
Spring会抛出
MethodArgumentNotValidException异常,这里我们需要对该异常进行处理即可。
[code]package com.md.demo.exception;

import java.util.List;

import org.springframework.http.HttpStatus;
import org.springframework.http.converter.HttpMessageNotReadableException;
import org.springframework.util.StringUtils;
import org.springframework.validation.BindingResult;
import org.springframework.validation.FieldError;
import org.springframework.validation.ObjectError;
import org.springframework.web.bind.MethodArgumentNotValidException;
import org.springframework.web.bind.MissingServletRequestParameterException;
import org.springframework.web.bind.annotation.ExceptionHandler;
import org.springframework.web.bind.annotation.ResponseStatus;
import org.springframework.web.bind.annotation.RestControllerAdvice;

import com.md.demo.util.JsonResult;
import com.md.demo.util.ResultCode;

import lombok.extern.slf4j.Slf4j;

@Slf4j
@RestControllerAdvice("com.md")  //指定异常处理的包名
public class GlobalExceptionHandler {

/**
* 参数效验异常处理器
*
* @param e 参数验证异常
* @return ResponseInfo
*/
@ResponseStatus(HttpStatus.BAD_REQUEST)  //设置状态码为 400
@ExceptionHandler(MethodArgumentNotValidException.class)
public JsonResult parameterExceptionHandler(MethodArgumentNotValidException e) {
log.error("数验证异常", e);
// 获取异常信息
BindingResult exceptions = e.getBindingResult();
// 判断异常中是否有错误信息,如果存在就使用异常中的消息,否则使用默认消息
if (exceptions.hasErrors()) {
List<ObjectError> errors = exceptions.getAllErrors();
if (!errors.isEmpty()) {
// 这里列出了全部错误参数,按正常逻辑,只需要第一条错误即可
FieldError fieldError = (FieldError) errors.get(0);
return new JsonResult(ResultCode.PARAM_ERROR, fieldError.getDefaultMessage());
}
}
return new JsonResult(ResultCode.PARAM_ERROR);
}
}
代码演示
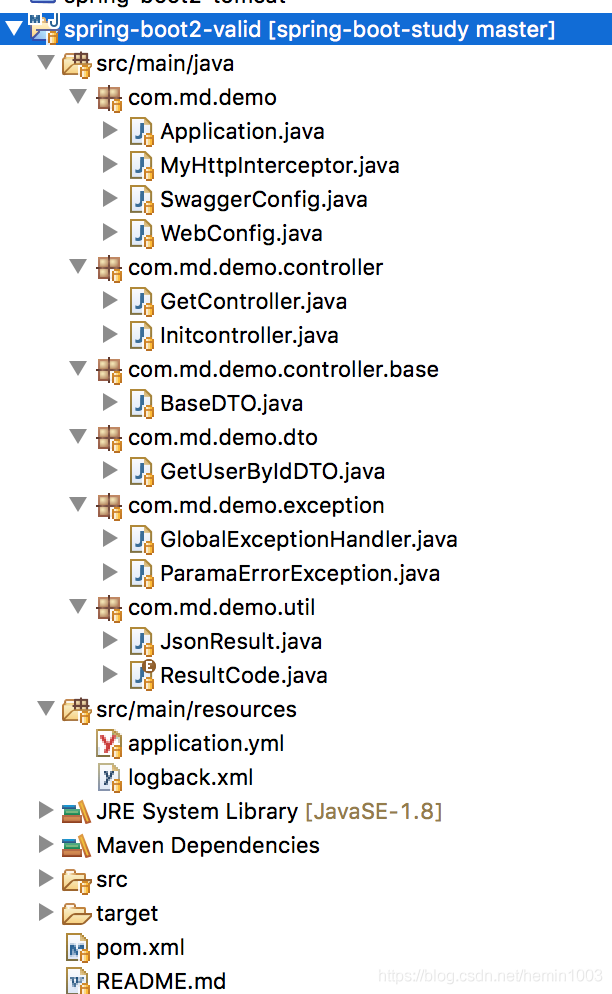
1. 项目目录结构
2. pom.xml依赖组件(使用Lombok 包来简化开发过程)
[code]<?xml version="1.0" encoding="UTF-8"?>
<project xmlns="http://maven.apache.org/POM/4.0.0"
xmlns:xsi="http://www.w3.org/2001/XMLSchema-instance"
xsi:schemaLocation="http://maven.apache.org/POM/4.0.0 http://maven.apache.org/xsd/maven-4.0.0.xsd">
<modelVersion>4.0.0</modelVersion>

<parent>
<groupId>com.md</groupId>
<artifactId>spring-boot2-parent</artifactId>
<version>0.0.1-SNAPSHOT</version>
<relativePath>../pom.xml</relativePath>
</parent>

<artifactId>spring-boot2-valid</artifactId>
<packaging>jar</packaging>

<name>spring-boot2-valid</name>
<description>Spring Boot, MVC, Rest API for App</description>

<properties>
<project.build.sourceEncoding>UTF-8</project.build.sourceEncoding>
<java.version>1.8</java.version>
</properties>

<dependencies>
<dependency>
<groupId>org.springframework.boot</groupId>
<artifactId>spring-boot-starter</artifactId>
</dependency>
<!-- 构建成可运行的Web项目 -->
<dependency>
<groupId>org.springframework.boot</groupId>
<artifactId>spring-boot-starter-web</artifactId>
</dependency>
<dependency>
<groupId>net.sf.json-lib</groupId>
<artifactId>json-lib-ext-spring</artifactId>
</dependency>
<dependency>
<groupId>org.projectlombok</groupId>
<artifactId>lombok</artifactId>
<optional>true</optional>
</dependency>
<dependency>
<groupId>io.springfox</groupId>
<artifactId>springfox-swagger2</artifactId>
</dependency>
<dependency>
<groupId>io.springfox</groupId>
<artifactId>springfox-swagger-ui</artifactId>
</dependency>
<dependency>
<groupId>com.github.xiaoymin</groupId>
<artifactId>swagger-bootstrap-ui</artifactId>
</dependency>
</dependencies>

<build>
<plugins>
<plugin>
<groupId>org.springframework.boot</groupId>
<artifactId>spring-boot-maven-plugin</artifactId>
</plugin>
</plugins>
</build>

</project>
3. 自定义个异常类
自定义个异常类,方便我们处理 GET 请求(GET 请求参数中一般是没有实体对象的,所以不能使用 @Valid),当请求验证失败时,手动抛出自定义异常,交由全局异常处理。
[code]package com.md.demo.exception;

public class ParamaErrorException extends RuntimeException {

private static final long serialVersionUID = 1L;

public ParamaErrorException() {
}

public ParamaErrorException(String message) {
super(message);
}

}
4. 自定义DTO类中添加 @Valid 相关注解
GetUserByIdDTO:
[code]package com.md.demo.dto;

import javax.validation.constraints.NotEmpty;

import io.swagger.annotations.ApiModel;
import io.swagger.annotations.ApiModelProperty;
import lombok.Data;

@Data
@ApiModel("测试-查询条件")
public class GetUserByIdDTO {

@ApiModelProperty(value = "id标识值", required = true)
@NotEmpty(message = "[userId值]不能为空")
private String userId;

@ApiModelProperty(value = "用户名")
private String userName;
}
5. Controller 中添加 @Valid 注解(这里我定义了一个BaseDTO基本请求数据模型)
GetController:
[code]package com.md.demo.controller;

import javax.validation.Valid;

import org.springframework.validation.annotation.Validated;
import org.springframework.web.bind.annotation.GetMapping;
import org.springframework.web.bind.annotation.PathVariable;
import org.springframework.web.bind.annotation.PostMapping;
import org.springframework.web.bind.annotation.RequestBody;
import org.springframework.web.bind.annotation.RequestMapping;
import org.springframework.web.bind.annotation.RestController;

import com.md.demo.controller.base.BaseDTO;
import com.md.demo.dto.GetUserByIdDTO;
import com.md.demo.exception.ParamaErrorException;
import com.md.demo.util.JsonResult;
import com.md.demo.util.ResultCode;

import io.swagger.annotations.Api;
import io.swagger.annotations.ApiOperation;
import lombok.extern.slf4j.Slf4j;

/**
* @author Minbo
*/
@RestController
@RequestMapping("/api/")
@Api(tags = { "查询接口" })
@Slf4j
public class GetController {

/**
* 测试Post请求
*/
@ApiOperation(value = "TestPost接口", httpMethod = "POST")
@PostMapping("/test/post")
public JsonResult testPost(@Valid @RequestBody BaseDTO<GetUserByIdDTO> dto) {
log.debug("enter test post api...");
return new JsonResult(ResultCode.SUCCESS);
}

/**
* 测试Get请求
*/
@Validated
@ApiOperation(value = "TestGet接口", httpMethod = "GET")
@GetMapping("/test/get/{userName}")
public JsonResult testGet(@PathVariable String userName) {
log.debug("enter test get api...");
if (userName == null || "".equals(userName)) {
throw new ParamaErrorException("userName 不能为空");
}
return new JsonResult(ResultCode.SUCCESS);
}

}
6. 定义全局异常处理类
这里创建一个全局异常处理类,方便统一处理异常错误信息。里面添加了不同异常处理的方法,专门用于处理接口中抛出的异常信息
GlobalExceptionHandler:
[code]package com.md.demo.exception;

import java.util.List;

import org.springframework.http.HttpStatus;
import org.springframework.http.converter.HttpMessageNotReadableException;
import org.springframework.util.StringUtils;
import org.springframework.validation.BindingResult;
import org.springframework.validation.FieldError;
import org.springframework.validation.ObjectError;
import org.springframework.web.bind.MethodArgumentNotValidException;
import org.springframework.web.bind.MissingServletRequestParameterException;
import org.springframework.web.bind.annotation.ExceptionHandler;
import org.springframework.web.bind.annotation.ResponseStatus;
import org.springframework.web.bind.annotation.RestControllerAdvice;

import com.md.demo.util.JsonResult;
import com.md.demo.util.ResultCode;

import lombok.extern.slf4j.Slf4j;

@Slf4j
@RestControllerAdvice("com.md")
public class GlobalExceptionHandler {

@ExceptionHandler(Exception.class)
public JsonResult handleException(Exception e) {
log.error("系统异常【全局异常处理】:" + e.getMessage(), e);
return new JsonResult(ResultCode.SYS_EXCEPTION, "系统异常:" + e.getMessage());
}

/**
* 忽略参数异常处理器
*
* @param e 忽略参数异常
* @return ResponseResult
*/
@ResponseStatus(HttpStatus.BAD_REQUEST)
@ExceptionHandler(MissingServletRequestParameterException.class)
public JsonResult parameterMissingExceptionHandler(MissingServletRequestParameterException e) {
log.error("忽略参数异常", e);
return new JsonResult(ResultCode.PARAM_ERROR, "请求参数 " + e.getParameterName() + " 不能为空");
}

/**
* 缺少请求体异常处理器
*
* @param e 缺少请求体异常
* @return ResponseResult
*/
@ResponseStatus(HttpStatus.BAD_REQUEST)
@ExceptionHandler(HttpMessageNotReadableException.class)
public JsonResult parameterBodyMissingExceptionHandler(HttpMessageNotReadableException e) {
log.error("缺少请求体异常", e);
return new JsonResult(ResultCode.PARAM_ERROR, "参数体不能为空");
}

/**
* 参数效验异常处理器
*
* @param e 参数验证异常
* @return ResponseInfo
*/
@ResponseStatus(HttpStatus.BAD_REQUEST)
@ExceptionHandler(MethodArgumentNotValidException.class)
public JsonResult parameterExceptionHandler(MethodArgumentNotValidException e) {
log.error("数验证异常", e);
// 获取异常信息
BindingResult exceptions = e.getBindingResult();
// 判断异常中是否有错误信息,如果存在就使用异常中的消息,否则使用默认消息
if (exceptions.hasErrors()) {
List<ObjectError> errors = exceptions.getAllErrors();
if (!errors.isEmpty()) {
// 这里列出了全部错误参数,按正常逻辑,只需要第一条错误即可
FieldError fieldError = (FieldError) errors.get(0);
return new JsonResult(ResultCode.PARAM_ERROR, fieldError.getDefaultMessage());
}
}
return new JsonResult(ResultCode.PARAM_ERROR);
}

/**
* 自定义参数错误异常处理器
*
* @param e 自定义参数
* @return ResponseInfo
*/
@ResponseStatus(HttpStatus.BAD_REQUEST)
@ExceptionHandler({ ParamaErrorException.class })
public JsonResult paramExceptionHandler(ParamaErrorException e) {
log.error("自定义参数参数", e);
// 判断异常中是否有错误信息,如果存在就使用异常中的消息,否则使用默认消息
if (!StringUtils.isEmpty(e.getMessage())) {
return new JsonResult(ResultCode.PARAM_ERROR, e.getMessage());
}
return new JsonResult(ResultCode.PARAM_ERROR);
}

}
7. 启动类
Application:
[code]package com.md.demo;

import org.springframework.boot.SpringApplication;
import org.springframework.boot.autoconfigure.SpringBootApplication;
import org.springframework.context.annotation.Bean;
import org.springframework.context.annotation.ComponentScan;
import org.springframework.web.cors.CorsConfiguration;
import org.springframework.web.cors.UrlBasedCorsConfigurationSource;
import org.springframework.web.filter.CorsFilter;

import com.github.xiaoymin.swaggerbootstrapui.annotations.EnableSwaggerBootstrapUI;

/**
* 程序主入口
*
* @author Minbo
*
*/
@SpringBootApplication
@EnableSwaggerBootstrapUI
@ComponentScan(basePackages = "com.md")
public class Application {

public static void main(String[] args) {
SpringApplication.run(Application.class, args);
}

/**
* 开启过滤器功能
*
* @return
*/
private CorsConfiguration buildConfig() {
CorsConfiguration corsConfiguration = new CorsConfiguration();
corsConfiguration.addAllowedOrigin("*");
corsConfiguration.addAllowedHeader("*");
corsConfiguration.addAllowedMethod("*");
return corsConfiguration;
}

/**
* 跨域过滤器
*
* @return
*/
@Bean
public CorsFilter corsFilter() {
UrlBasedCorsConfigurationSource source = new UrlBasedCorsConfigurationSource();
source.registerCorsConfiguration("/**", buildConfig());
return new CorsFilter(source);
}
}
接口测试
1. 启动后,访问地址:http://localhost:9090/doc.html (已集成了swagger2框架,Swagger集成用法教程)
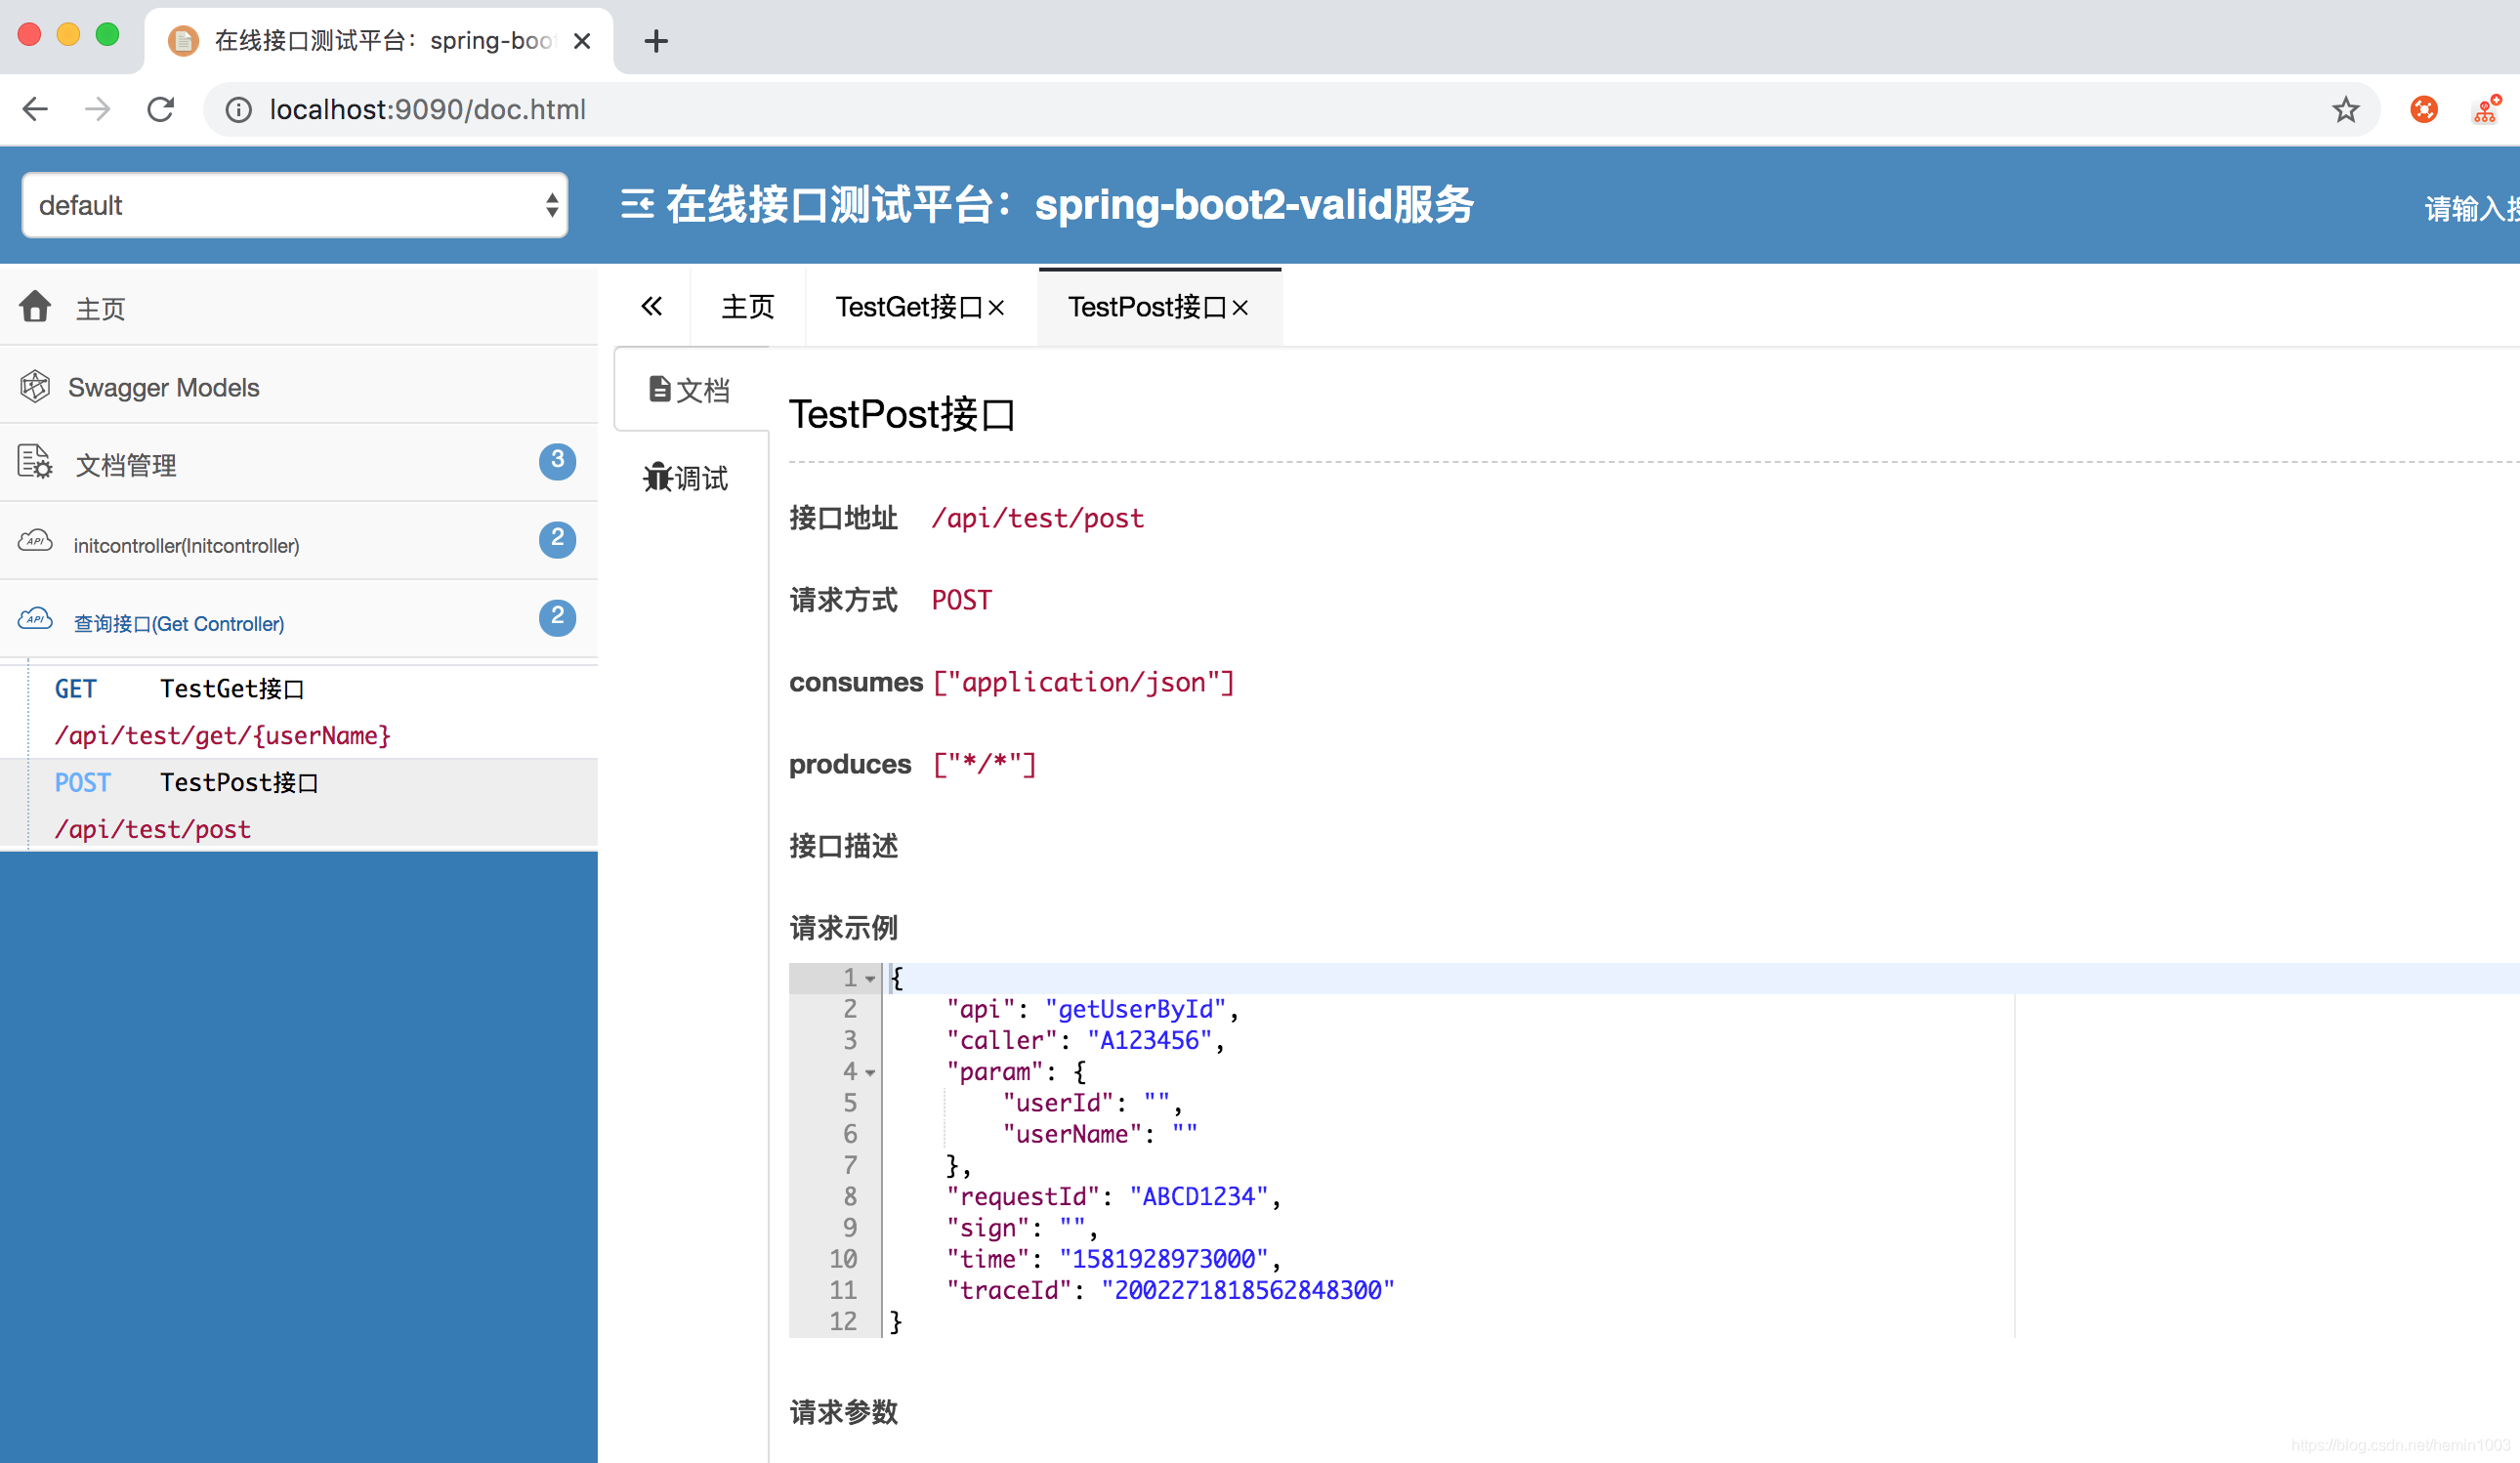
2. 测试post接口
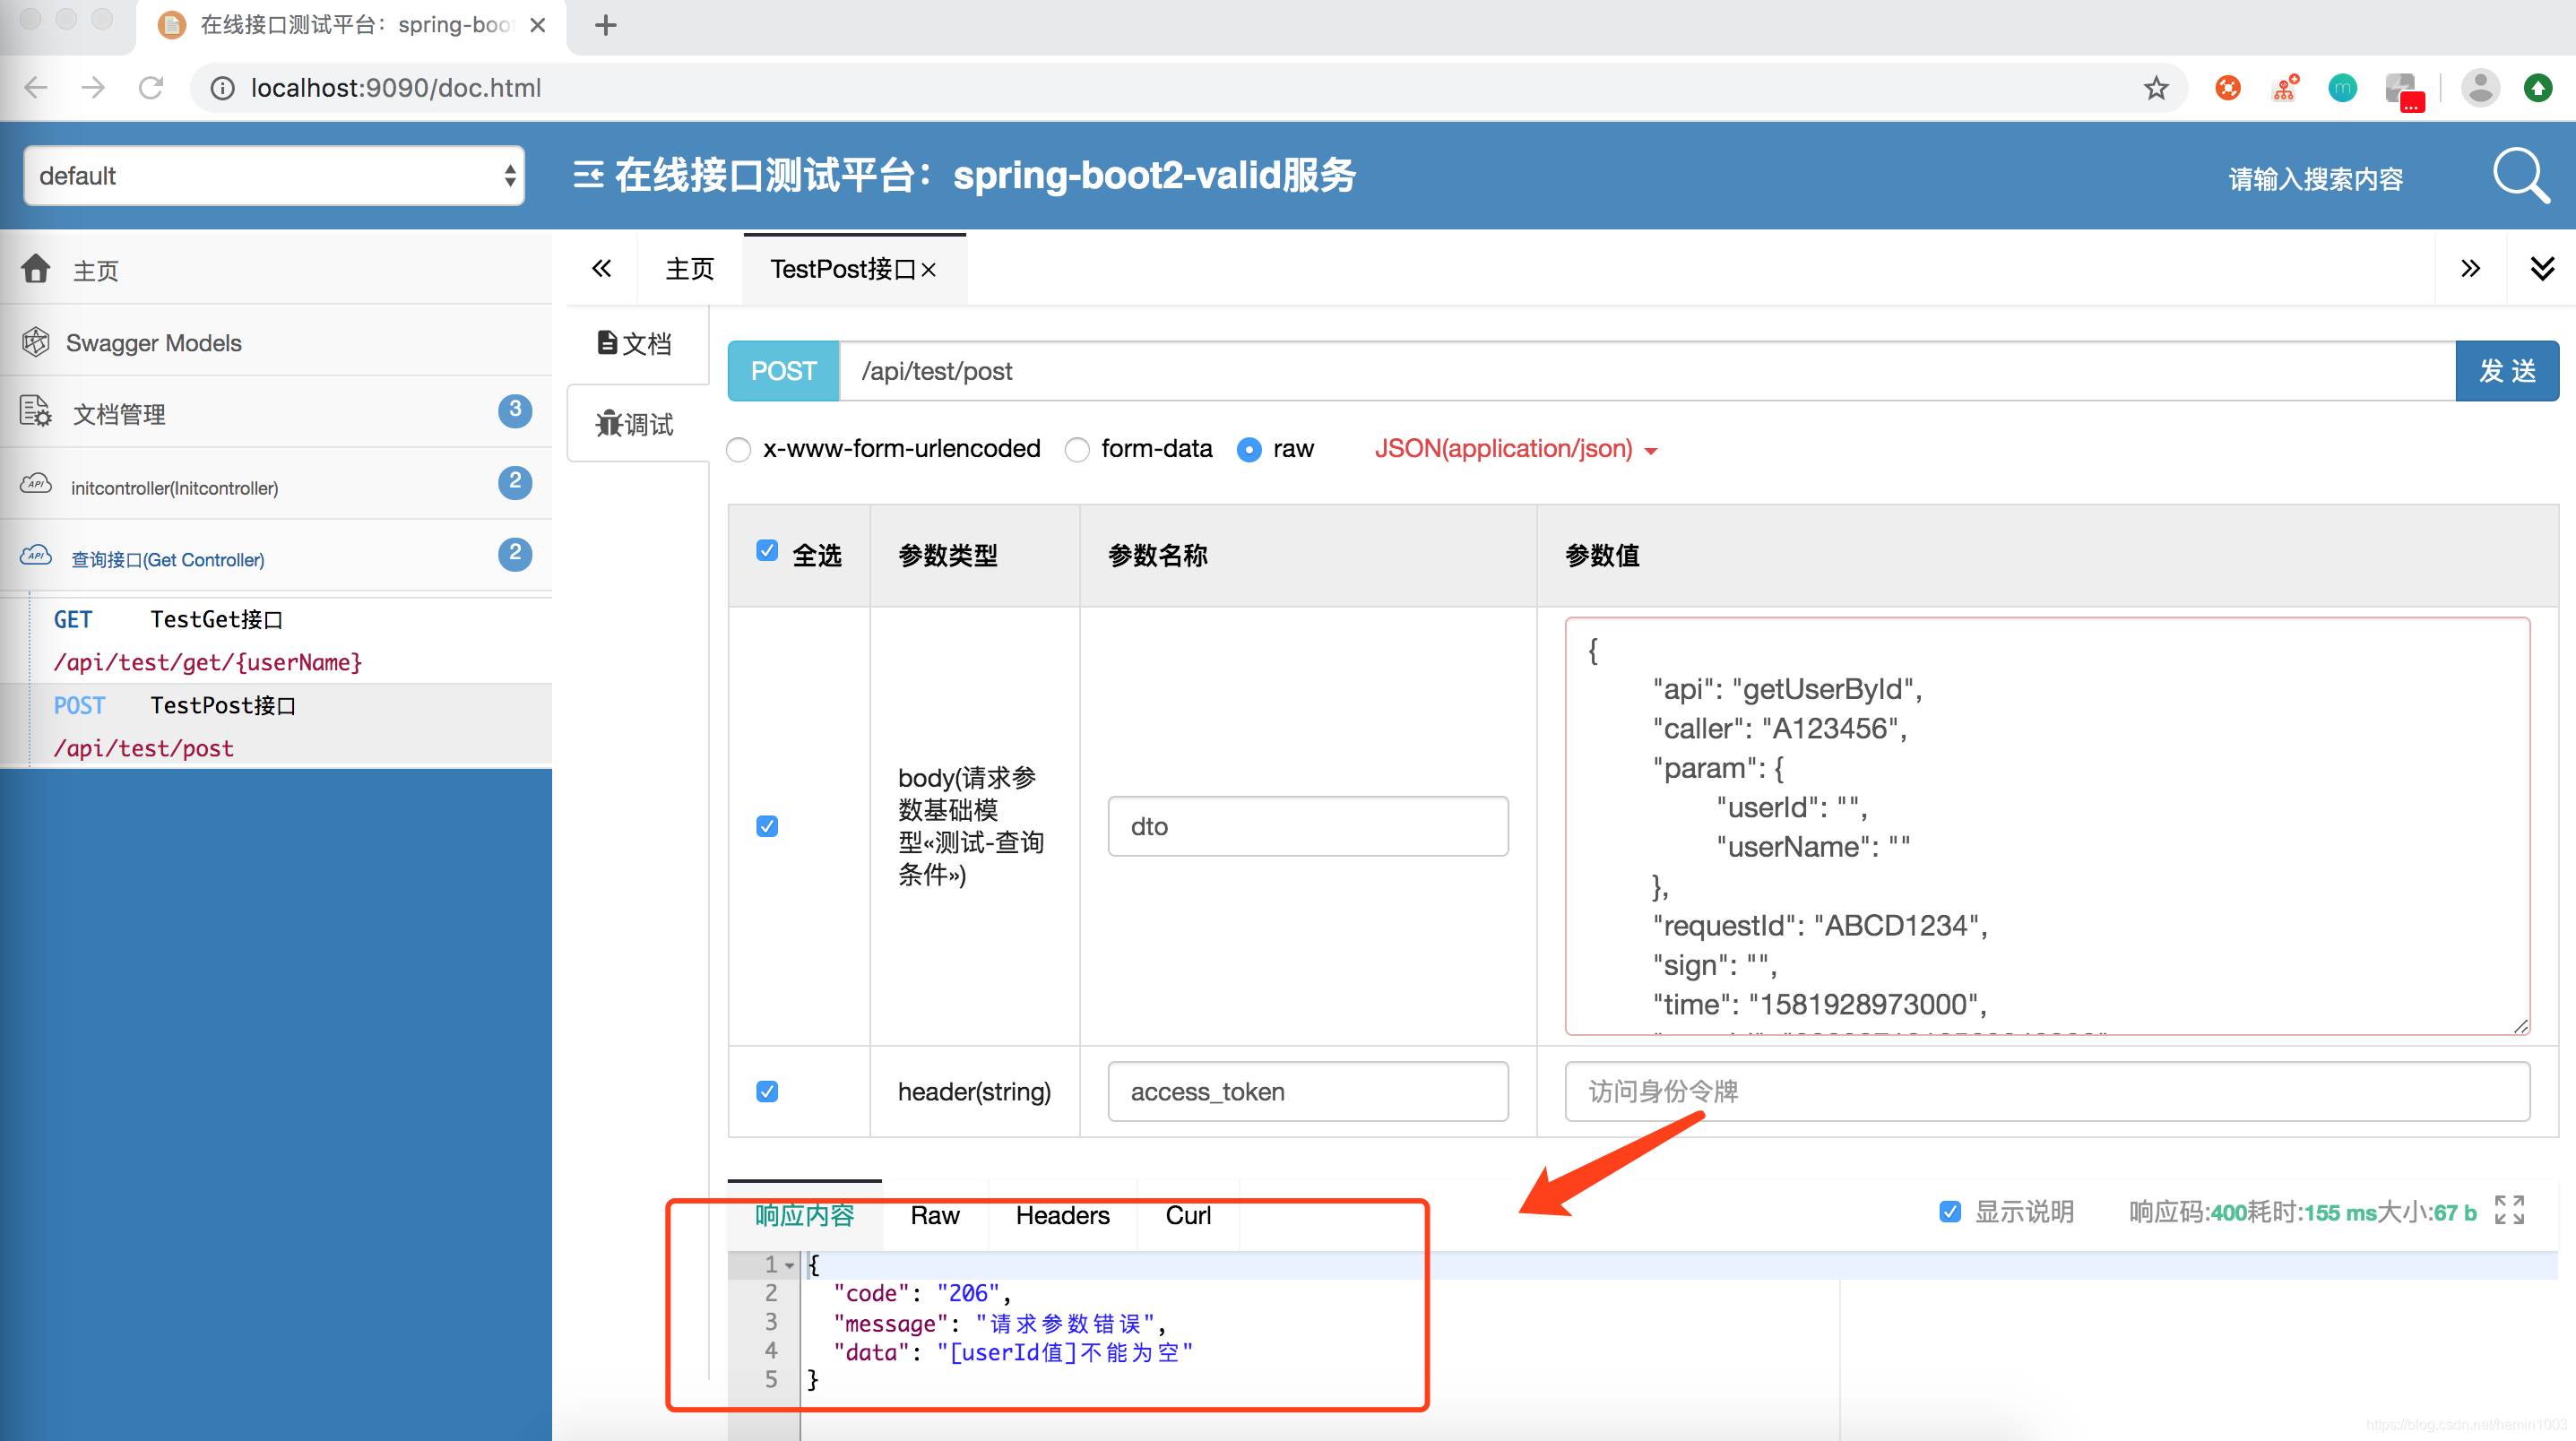
可以看到在执行 POST 请求,也能正常按我们全局异常处理器中的设置处理异常信息,且提示信息为我们设置在实体类中的 Message
3. 测试get接口

完整源码下载
下一章教程
SpringBoot从入门到精通教程(二十八)- 动态修改日志输出级别用法
该系列教程
我的专栏
至此,全部介绍就结束了
-------------------------------
-------------------------------
关于我(个人域名)
期望和大家一起学习,一起成长,共勉,O(∩_∩)O谢谢
欢迎交流问题,可加个人QQ 469580884,
或者,加我的群号 751925591,一起探讨交流问题
不讲虚的,只做实干家
Talk is cheap,show me the code


- Springboot使用@Valid注解,对其参数错误异常的统一处理
- PHP入门教程之自定义函数用法详解(创建,调用,变量,参数,返回值等)
- SpringBoot从入门到精通教程(三十二)- MybatisPlus框架动态数据源用法(支持多个DB,动态切换数据源)
- PHP入门教程之自定义函数用法详解(创建,调用,变量,参数,返回值等)
- linux sed命令参数及用法详解---linux 利用script来处理文本文件
- 【Github教程】史上最全github用法:github入门到精通
- 学习笔记(13):最新完整react教程从入门到精通包教包会-【选学】url-loader图片等资源文件处理...
- 【Github教程】史上最全github用法:github入门到精通
- Zend Framework入门教程之Zend_Config组件用法详解
- SpringBoot如何优雅地处理全局异常详解
- 【Github教程】史上最全github用法:github入门到精通
- AngularJS 入门教程之事件处理器详解
- SpirngMVC会使用不同的处理器来处理注解验证
- 多对多中间表详解 -- Django从入门到精通系列教程
- SpringBoot修改缓存为redis与SpringBoot缓存注解用法详解
- 【Github教程】史上最全github用法:github入门到精通
- 【Github教程】史上最全github用法:github入门到精通
- Zend Framework入门教程之Zend_Config组件用法详解
- 深入浅出webpack教程系列_安装与基本打包用法和命令参数详解
- mui初级入门教程(二)— html5+ webview 底部栏用法详解