Sring boot项目实战
Spring boot项目实战(相关类)
个人学习记录
本篇博客仅记录个人的学习记录,仅考虑本人自己观看
构建Maven +springboot 多模块的项目
根据多模块项目图结合Maven构建出Springboot开发项目。

创建项目的目录结构

对面pom.xml就导入响应模块的jar,在server创建响应 的入口类
@SpringBootApplication
@ImportResource(value = {"classpath:spring/spring-jdbc.xml"})
@MapperScan(basePackages = "org.example.model.mapper")
public class MainApplication extends SpringBootServletInitializer {
@Override
protected SpringApplicationBuilder configure(SpringApplicationBuilder builder) {
return builder.sources(MainApplication.class);
}

public static void main(String[] args) {
SpringApplication.run(MainApplication.class,args);
}
}
之后能运行起来 就算是基本的项目环境创建完毕
创建前后端统一响应模型
创建枚举类 在api模块下

public enum StatusCode {
success(0,"成功"),
fail(-1,"失败"),
InvalidParams(201,"非法参数"),
;
private Integer code;
private String  msg;

StatusCode(Integer code, String msg) {
this.code = code;
this.msg = msg;
}

//get set方法省略
}
随后创建统一的响应类
public class BaseResponse<T> {
private Integer code;
private String msg;
private T date;
public BaseResponse(Integer code, String msg, T date) {
this.code = code;
this.msg = msg;
this.date = date;
}

public BaseResponse(Integer code, String msg) {
this.code = code;
this.msg = msg;
}
public BaseResponse(StatusCode statusCode) {
this.code = statusCode.getCode();
this.msg = statusCode.getMsg();
}

//get set方法省略
在service模块下创建baseController 测试一下响应模型,使用postman发请求,看看结果
@RestController
@RequestMapping("base")
public class BaceController extends AbstractController {

@Autowired
BaseService baseService;
@RequestMapping(value = "info",method = RequestMethod.GET)
public BaseResponse info(){
BaseResponse response=new BaseResponse(StatusCode.success);
try {
response.setDate("-------------响应数据-------------");
}catch (Exception e) {
response = new BaseResponse(StatusCode.fail.getCode(),e.getMessage());
}
return response;
}
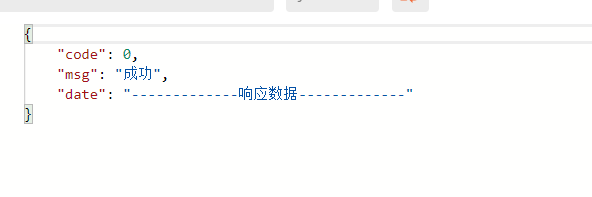
结果如下:创建统一响应模型成功
Lombok插件使用
IDEA 的setting设置里选择Plugins加入Lombok插件
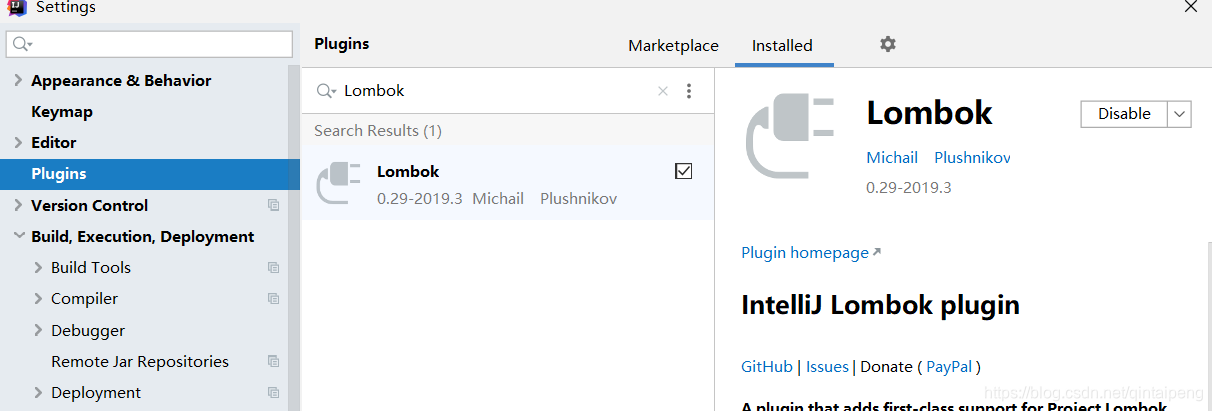
安装好之后,需要重启idea才生生效。
常用的注解如下:

@AllArgsContructor :自动生成有参构造参数。
@NoArgsConstructor:自动生成无参构造参数。
@Date :是get set tostring方法的集合注解。
使用Lombok的好处是在写实体类时能通过注解完成实体的创建,高效。
Springboot 的日志
日志的输出有利于在开发过程,针对某些错误,针对的打印出相关的信息,以便解决出现的问题。
引入log4j的jar包
<dependency>
<groupId>org.slf4j</groupId>
<artifactId>slf4j-api</artifactId>
<version>${slf4j.version}</version>
</dependency>

<dependency>
<groupId>org.slf4j</groupId>
<artifactId>slf4j-log4j12</artifactId>
<version>${slf4j.version}</version>
</dependency>

<dependency>
<groupId>log4j</groupId>
<artifactId>log4j</artifactId>
<version>${log4j.version}</version>
</dependency>
创建统一的日志类

当其他类继承这个类时 例如:
@RestController
@RequestMapping("base")
public class BaceController extends AbstractController {
@Autowired
BaseService baseService;
@RequestMapping(value = "list",method = RequestMethod.GET)
public BaseResponse list(){
BaseResponse response=new BaseResponse(StatusCode.success);
try {
List<BaseDto> list = baseService.getList();
log.info("打印出list日志信息{}",list);
response.setDate(list);
}catch (Exception e) {
response = new BaseResponse(StatusCode.fail.getCode(),e.getMessage());
}
return response;
}
}
上述代码的log.info()语句就是继承了统一的日志类就可使用日志输出语句。当然 System.out.println();也可以,但是他只是在控制台打印响应的数据,而日志可以打印出那个时间那个类等等响应的信息。区别如图下:第一条是日志打印出来了,第二天是 System.out.println();打印出来的。

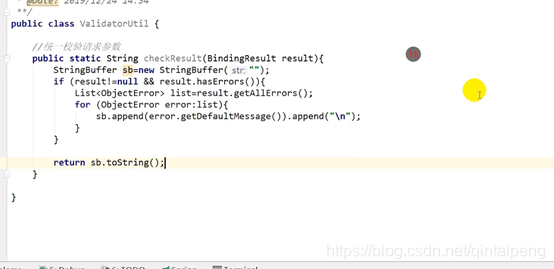
统一的校验器工具类

以上的问题可以通过Validator创建统一的校验类来解决。创建ValidatorUtil类来封装校验处理逻辑
在实体类上添加上注解
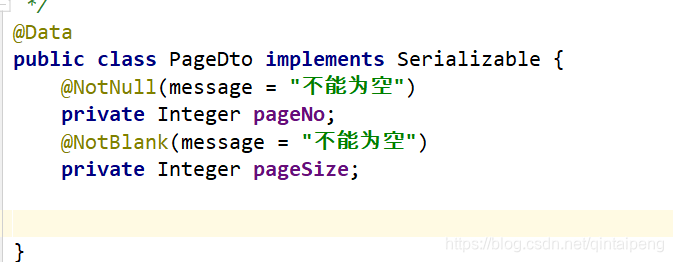
两个都是判断不能为空的条件,如果需要更多自行百度注解。然后贴出Controller层的代码如下:
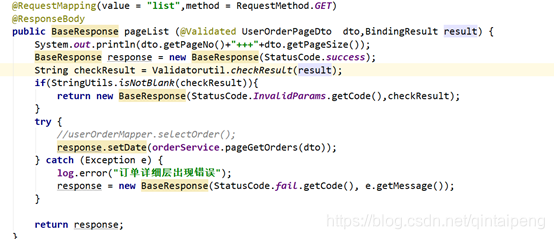
给传入的实体参数钱加上@Validated标签这样就可以校验传入的参数。后面的参数BindingResult接口接收响应的校验信息。通过result参数传入我已经定义好的统一校验工具类返回响应的校验信息checkResult,前面的参数是状态码。请求这个控制类:两个参数为空,返回的结果如下:

创建全局异常处理类

创建NotFoundException 继承Exception{} 并创建构造方法
public class NotFoundException extends Exception {
public NotFoundException(String message) {
super(message);
}
}
异常处理方式一,跳转到响应的异常处理页面如404.html.创建全局异常类
@ControllerAdvice
public class GlobalExceptionHandler {
@ExceptionHandler(value = NotFoundException.class)
public String notFoundHandle(Exception e, HttpServletRequest request){
request.setAttribute("errorInfo",e.getMessage());
return "404";
}
异常处理方法二 返回Json格式的信息
@ExceptionHandler(value = NotFoundException.class)
@ResponseBody
public BaseResponse notFoundHandle(Exception e,HttpServletRequest request){
BaseResponse response=new BaseResponse(StatusCode.fail);
Map<String,Object> resMap= Maps.newHashMap();
resMap.put("requestURI",request.getRequestURI());
resMap.put("errorInfo",e.getMessage());
response.setDate(resMap);
return response;
}
在Controller中的使用,就在方法中抛出NotFoundException,代码如下:
@Controller
@RequestMapping("Exception")
public class ExceptionController {
@Autowired
OrderService orderService;

@RequestMapping(value = "info",method = RequestMethod.GET)
@ResponseBody
public BaseResponse selectUser(@RequestParam String orderNo) throws NotFoundException {
UserOrder order = orderService.userOrders(orderNo);
if(order==null){
throw new NotFoundException("当前没有该订单的详情11!");
}
//userOrderMapper.selectOrder();
BaseResponse response = new BaseResponse(StatusCode.success);
response.setDate(order);
return response;
}
}
当输入的订单好没有时,返回响应的异常处理结果,以json的形式如下图:

跳转到404.html的截图:

总结:这些都是在开发过程中需要编写的一些统一的工具类,为了方便开发。接下来就是具体的springboot项目开发了。这篇到此结束。
 原创文章 8获赞 0访问量 201
关注
私信
原创文章 8获赞 0访问量 201
关注
私信

- 【springmvc+mybatis项目实战】杰信商贸-2.数据库配置
- 实战项目商城(第八天)
- swift学习六天 项目实战-知乎日报之UITabelView使用
- 【电信计费系统项目实战】基础篇---登录界面实现
- 软工实践作业2:个人项目实战之Sudoku
- Android项目实战视频教程_快递轨迹查询应用开发
- s1(java)项目实战(固定资产管理)(op_ReturnAsset )
- s1(java)项目实战(固定资产管理)(set_ employeeAdd )
- Python实战-天气预报项目-获取天气信息
- Java从零到企业级电商项目实战-服务端
- 2018最新Apicloud仿有缘网项目实战视频教程(原价899)
- Unity3D-RPG项目实战(1):引擎特殊目录
- Java项目实战 报表开发(JasperReport)
- 1.4项目实战之飞机大战
- 廖大python实战项目第二天
- Android 项目开发实战:图案解锁
- Asp.Net Core 2.0 项目实战(10) 基于cookie登录授权认证并实现前台会员、后台管理员同时登录
- MVVM项目实战之路-搭建一个登录界面
- 实战项目:考勤系统的需求分析
- WebService第三步 - 项目开发实战2