Python实现病毒仿真器的方法示例(附demo)
最近新冠在神州大陆横行,全国上下一心抗击疫情。作为一枚程序员,我也希望可以为抗击疫情做出自己的贡献,钟院士一直劝说大家不要出门,减少人口间的流动。对此,我特意做了一个病毒仿真器,探询冠状病毒传播。
1. 仿真效果
仿真开始,一开始只有5个发病者,传播率为0.8,潜伏期为14天
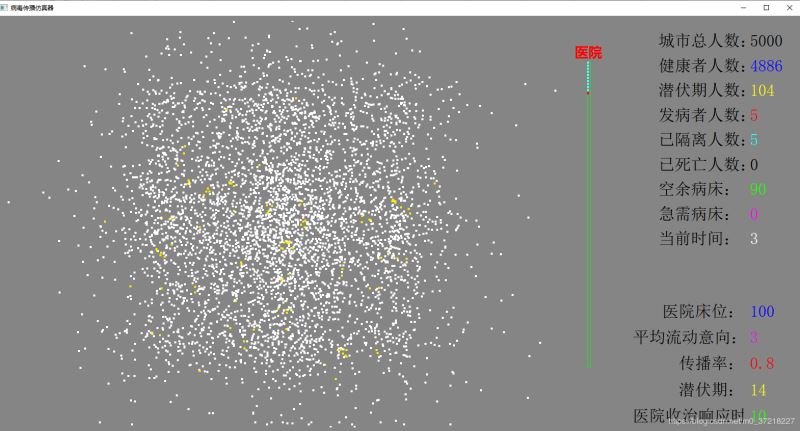
由于人口的流动,以及医院床位的隔离,一开始病毒扩撒不是很速度
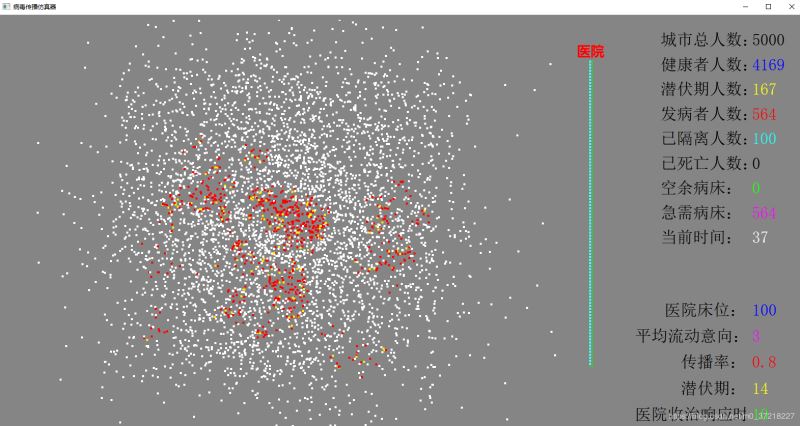
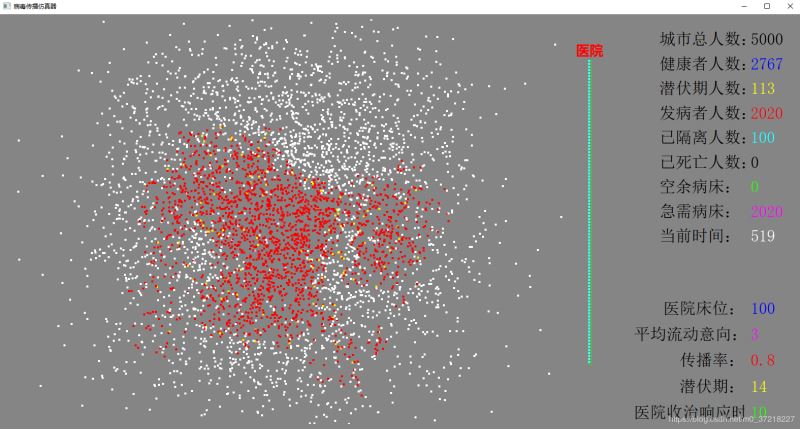
随着医院床位满了,隔离失败,加上人口的流动,病患数开始几何式的增加
2. 什么是仿真器
仿真器(emulator)以某一系统复现另一系统的功能。与计算机模拟系统(Computer Simulation)的区别在于,仿真器致力于模仿系统的外在表现、行为,而不是模拟系统的抽象模型。
3. python如何实现仿真器
现在来谈谈仿真器实现的原理。仿真器使用Python和PyQt5实现。PyQt5是封装了Qt library的跨平台GUI开发库,基于Python语言。
这里主要涉及到仿真器效果绘制,以及如何模拟多个参数。先来说一下绘制市民的状态。绘制的工作通过drawing.py文件的Drawing类来完成。该类是QWidget的子类,这也就意味着Drawing类本身是PyQt5的一个组件。与按钮、标签类似。只是并不需要往Drawing上放置任何子组件。只要在Drawing上绘制各种图形即可。
在PyQt5中,任何一个QWidget的子类,都可以实现一个paintEvent方法,当组件每次刷新时,就会调用paintEvent方法重新绘制组件的内容。Drawing类中paintEvent方法的代码如下:
# 每次Drawing刷新,都会调用该方法
def paintEvent(self,event):
qp = QPainter()
qp.begin(self)
self.drawing(qp) # 绘制城市的各种状态的市民
qp.end()
在绘制图像前,需要创建QPainter对象,然后调用QPainter对象的begin方法,结束绘制后,需要调用QPainter对象的end方法。上面代码中的drawing方法用于完成具体的绘制工作。
仿真器设置一个人员池,来进行人员的流动性
class Persons(metaclass=Singleton):
def __init__(self):
self.persons = []          # 保存所有的人员
self.latency_persons = []      # 保存处于潜伏期的人员

city = City(Params.city_center_x,Params.city_center_y)

for value in range(0, Params.city_person_count):
x = Params.person_position_scale * next_gaussian() + city.center_x
y = Params.person_position_scale * next_gaussian() + city.center_y
if x > Params.city_width:
x = Params.city_width
if y > Params.city_height:
y = Params.city_height
self.persons.append(Person(city,x,y))
# 获取特定人群的数量
def get_person_size(self,state):
if state == -1:
return len(self.persons)
count = 0
for person in self.persons:
if person.state == state:
count += 1
return count
仿真代码
from PyQt5.QtWidgets import *
from socket import *
class Transmission:
def __init__(self,ui):
self.ui = ui
self.host = 'localhost'
self.port = 5678
self.addr = (self.host,self.port)
def send_command(self,command,value=None):
tcp_client_socket = socket(AF_INET,SOCK_STREAM)
tcp_client_socket.connect(self.addr)
if value == None:
value = 0
data = command + ':' + str(value)
tcp_client_socket.send(('%s\r\n' % data).encode(encoding='utf-8'))
data = tcp_client_socket.recv(1024)
result = data.decode('utf-8').strip()
tcp_client_socket.close()
return result
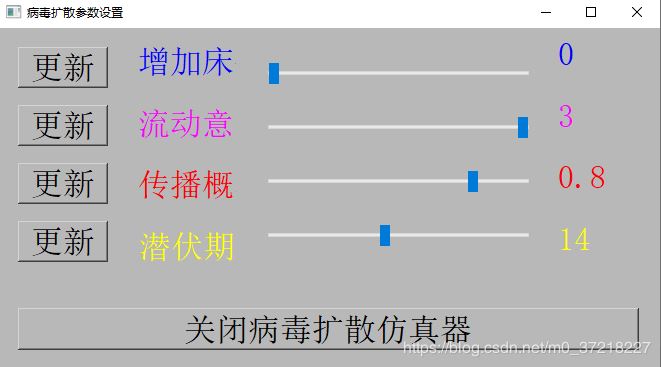
def setup(self):
self.ui.horizontalSliderBedCount.valueChanged.connect(self.bed_count_value_change)
self.ui.pushButtonUpdateBedCount.clicked.connect(self.update_bed_count)
self.ui.horizontalSliderFlowIntention.valueChanged.connect(self.flow_intention_value_change)
self.ui.pushButtonFlowIntention.clicked.connect(self.update_flow_intention)
self.ui.horizontalSliderBroadRate.valueChanged.connect(self.broad_rate_value_change)
self.ui.pushButtonBroadRate.clicked.connect(self.update_broad_rate)
self.ui.horizontalSliderLatency.valueChanged.connect(self.latency_value_change)
self.ui.pushButtonLatency.clicked.connect(self.update_latency)
self.ui.pushButtonClose.clicked.connect(self.close_virus_simulation)
def bed_count_value_change(self):
self.ui.labelBedIncrement.setText(
f'<html><head/><body><p><span style=\" font-size:24pt; color:#0000ff;\">{self.ui.horizontalSliderBedCount.value()}</span></p></body></html>')
def update_bed_count(self):
print(self.ui.horizontalSliderBedCount.value())
result = self.send_command('add_bed_count', self.ui.horizontalSliderBedCount.value())
if result == 'ok':
QMessageBox.information(self.ui.centralwidget, '消息', f'成功添加了{self.ui.horizontalSliderBedCount.value()}张床位',
QMessageBox.Ok)
def flow_intention_value_change(self):
self.ui.labelFlowIntention.setText(
f'<html><head/><body><p><span style=\" font-size:24pt; color:#fc02ff;\">{self.ui.horizontalSliderFlowIntention.value() / 100}</span></p></body></html>')
def update_flow_intention(self):
result = self.send_command('set_flow_intention', self.ui.horizontalSliderFlowIntention.value())
if result == 'ok':
QMessageBox.information(self.ui.centralwidget, '消息',
f'成功设置流动意向为{self.ui.horizontalSliderFlowIntention.value() / 100}', QMessageBox.Ok)
def broad_rate_value_change(self):
self.ui.labelBroadRate.setText(
f'<html><head/><body><p><span style=\" font-size:24pt; color:#fc0107;\">{self.ui.horizontalSliderBroadRate.value() / 100}</span></p></body></html>')
def update_broad_rate(self):
result = self.send_command('set_broad_rate', self.ui.horizontalSliderBroadRate.value())
if result == 'ok':
QMessageBox.information(self.ui.centralwidget, '消息',
f'成功设置传播率为{self.ui.horizontalSliderBroadRate.value() / 100}', QMessageBox.Ok)
def latency_value_change(self):
self.ui.labelLatency.setText(
f'<html><head/><body><p><span style=\" font-size:24pt; color:#ffff0a;\">{self.ui.horizontalSliderLatency.value()}</span></p></body></html>')
def update_latency(self):
result = self.send_command('set_latency', self.ui.horizontalSliderLatency.value())
if result == 'ok':
QMessageBox.information(self.ui.centralwidget, '消息', f'成功设置传播率为{self.ui.horizontalSliderLatency.value()}',
QMessageBox.Ok)
def close_virus_simulation(self):
reply = QMessageBox.information(self.ui.centralwidget, "请问", "是否真的要关闭病毒扩散仿真器?",
QMessageBox.Yes | QMessageBox.No, QMessageBox.No)
if reply == QMessageBox.Yes:
result = self.send_command('close')
if result == 'ok':
QMessageBox.information(self.ui.centralwidget, '消息', '已经成功关闭病毒扩散仿真器', QMessageBox.Ok)
设置变量
class Params:
success = False

# 初始感染人数
original_infected_count = 50

# 病毒传播率
broad_rate = 0.8

# 病毒潜伏期,14天
virus_latency = 140

# 医院收治响应时间
hospital_receive_time = 10

# 医院床位
hospital_bed_count = 100

# 安全距离
safe_distance = 2

# 平均流动意向[-3,3]  值越大,流动意向越强
average_flow_intention = 3

# 城市总人口数量
city_person_count = 5000

# 病死率
fatality_rate = 0.02

# 死亡时间
dead_time = 30
# 死亡时间方差
dead_variance = 30

# 城市宽度
city_width = 1100

# 城市高度
city_height = 800

# 医院宽度(需要计算获得)
hospial_width = 0

# 城市中心x坐标
city_center_x = 550

# 城市中心y坐标
city_center_y = 400

# 用于计算城市中每个人随机位置的scale(用于正态分布)
person_position_scale = 200

current_time = 1 # 当前时间
我们可以根据这些修改仿真页面
以上就是Python实现病毒仿真器的方法示例的详细内容,更多关于请关注脚本之家其它相关文章!
您可能感兴趣的文章:

- Python小练习2:pandas.Dataframe使用方法示例demo
- python实现list元素按关键字相加减的方法示例
- Python实现获取本地及远程图片大小的方法示例
- python利用拉链法实现字典方法示例
- Python跨文件全局变量的实现方法示例
- Python SVM(支持向量机)实现方法完整示例
- Python实现随机创建电话号码的方法示例
- Python实现对象转换为xml的方法示例
- Python对字符串实现去重操作的方法示例
- Python实现备份MySQL数据库的方法示例
- Python简单实现两个任意字符串乘积的方法示例
- Python实现动态添加属性和方法操作示例
- Python实现读取txt文件并转换为excel的方法示例
- Python实现FTP弱口令扫描器的方法示例
- Python实现计算圆周率π的值到任意位的方法示例
- Python基于scapy实现修改IP发送请求的方法示例
- Python实现将文本生成二维码的方法示例
- Python实现小数转化为百分数的格式化输出方法示例
- Python实现返回数组中第i小元素的方法示例
- Python实现pdf文档转txt的方法示例