erui _ eruie 003使用OAuth 2.0构建React Native应用并进行身份验证
本文最初发表于Okta开发人员博客。 感谢您支持使SitePoint成为可能的合作伙伴。
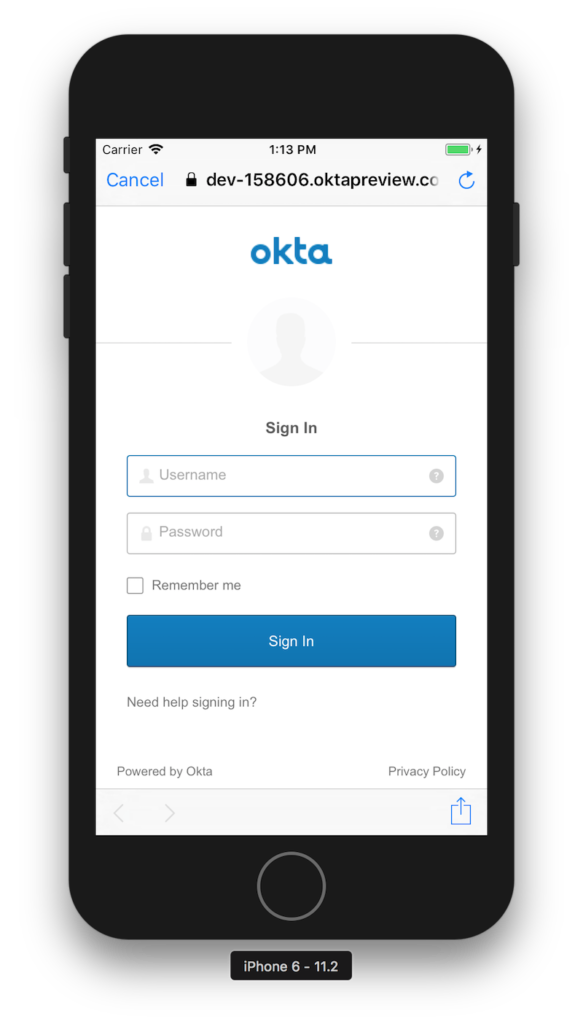
使用Okta和OpenID Connect(OIDC),您可以轻松地将身份验证集成到React Native应用程序中,而不必自己再次构建它。 OIDC允许您直接针对Okta API,本文向您展示了如何在React Native应用程序中做到这一点。 今天,您将了解如何通过AppAuth库使用OIDC重定向将用户登录到您的React Native应用程序。
今天,我将向您展示如何使用最新和最佳版本开发React Native应用。 在撰写本文时,这是React 16.2.0和React Native 0.54.0。 您将创建一个新应用,然后添加AppAuth要进行身份验证,请使用Okta进行身份验证,然后查看它是否可以在iOS和Android上运行。
AppAuth是用于本机应用程序的客户端SDK,可使用OAuth 2.0和OpenID Connect对最终用户进行身份验证和授权。 适用于iOS,macOS,Android和Native JS环境,实现了现代化的安全性和可用性最佳实践用于本机应用程序的身份验证和授权。
React has a
create-react-appcommand-line tool (CLI) that you can use to create new React apps. React Native has a similar tool called Create React Native App. Before you install it, make sure you have Node v6 or later installed.
Install
create-react-native-appand create a new project called
okta-rn:
npm install -g create-react-native-app
create-react-native-app okta-rn
cd okta-rn
npm start
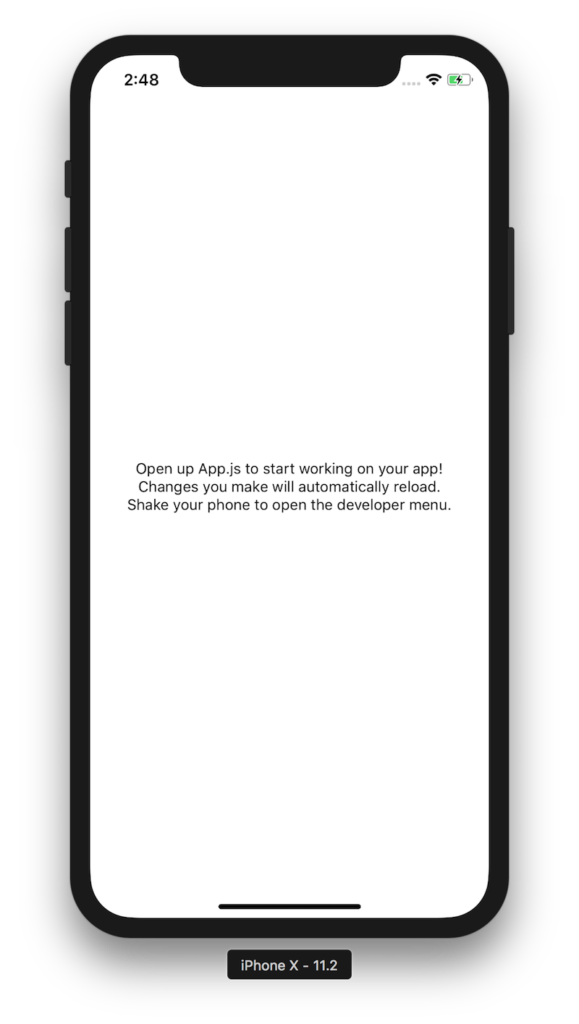
To view your app with live reloading, point the Expo app to this QR code.
You'll find the QR scanner on the Projects tab of the app.

[QR Code]

Or enter this address in the Expo app's search bar:

exp://172.31.98.12:19000

Your phone will need to be on the same local network as this computer.
For links to install the Expo app, please visit https://expo.io.

Logs from serving your app will appear here. Press Ctrl+C at any time to stop.

› Press a to open Android device or emulator, or i to open iOS emulator.
› Press q to display QR code.
› Press r to restart packager, or R to restart packager and clear cache.
› Press d to toggle development mode. (current mode: development)
If you’re on a Mac, press i to open iOS emulator. You will be prompted to install/open with Expo, then presented with the rendered
App.js.

提示:您可以使用Microsoft的工具在您的React Native应用中使用TypeScript代替JavaScript。TypeScript React Native Starter。 如果您决定走这条路,建议您完成本教程后,按照以下步骤转换应用。
在此示例中,我将使用反应本机应用程序身份验证,由创建的库强大。 我使用此库的原因有三点:1)它们提供了出色的例我可以在短短几分钟内完成工作,2)它使用AppAuth(成熟的OAuth客户端实现),并且3)我无法使其他任何工作正常进行。
- 我试过了react-native-oauth但发现添加新提供商之前需要使用现有提供商。 我只想让Okta作为提供者。 此外,问题数量很多,并且拉取请求也作为警告信号。我试过了反应本机简单身份验证但在使已弃用的Navigator组件与最新的React Native版本一起使用时遇到问题。我试过了doing 带有React Native的本OAuth 2教程,但在重定向回我的应用程序时遇到了问题。
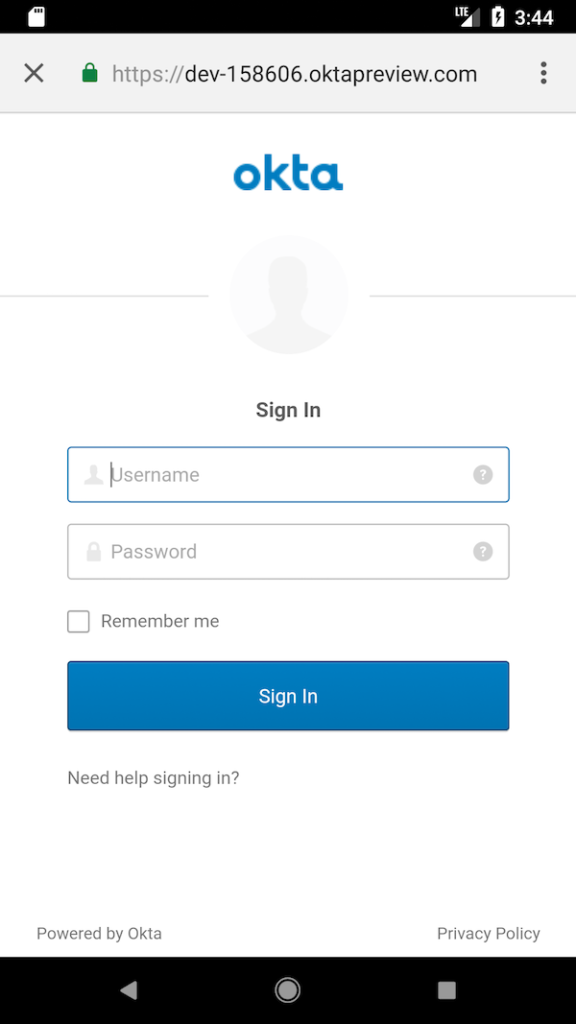
将AppAuth添加到React Native应用之前,您需要一个应用进行授权。 如果您没有永久免费的Okta Developer帐户,今天拿一个!
Log in to your Okta Developer account and navigate to Applications > Add Application. Click Native and click Next. Give the app a name you’ll remember (e.g.,
React Native), select
Refresh Tokenas a grant type, in addition to the default
Authorization Code. Copy the Login redirect URI (e.g.,
com.oktapreview.dev-158606:/callback) and save it somewhere. You’ll need this value when configuring your app.
npm run eject
| Question | Answer |
|---|---|
| How would you like to eject from create-react-native-app? | React Native |
| What should your app appear as on a user’s home screen? | Okta RN |
| What should your Android Studio and Xcode projects be called? | OktaRN |
npm i react-native-app-auth@2.2.0
npm i
react-native link
运行这些命令后,您必须配置本机iOS项目。 为了方便起见,我们复制了以下步骤。
React Native App Auth取决于AppAuth-ios,因此您必须将其配置为依赖项。 最简单的方法是使用可可豆. To install 可可豆, run the following command:
sudo gem install cocoapodsCreate a
Podfilein the
iosdirectory of your project that specifies AppAuth-ios as a dependency. Make sure that
OktaRNmatches the app name you specified when running
npm run eject.
platform :ios, '11.0'

target 'OktaRN' do
pod 'AppAuth', '>= 0.91'
end
Then run
pod installfrom the
iosdirectory. This can take a while the first time, even on a fast connection. Now is a good time to grab a coffee or a scotch! 🥃
Open your project in Xcode by running
open OktaRN.xcworkspacefrom the
iosdirectory.
If you intend to support iOS 10 and older, you need to define the supported redirect URL schemes in
ios/OktaRN/Info.plistas follows:
<key>CFBundleURLTypes</key>
<array>
<dict>
<key>CFBundleURLName</key>
<string>$(PRODUCT_BUNDLE_IDENTIFIER)</string>
<key>CFBundleURLSchemes</key>
<array>
<string>{yourReversedOktaDomain}</string>
</array>
</dict>
</array>
<key>CFBundleIdentifier</key>
<string>com.okta.developer.reactnative.$(PRODUCT_NAME:rfc1034identifier)</string>
<key>CFBundleURLTypes</key>
<array>
<dict>
<key>CFBundleURLName</key>
<string>$(PRODUCT_BUNDLE_IDENTIFIER)</string>
<key>CFBundleURLSchemes</key>
<array>
<string>com.oktapreview.dev-158606</string>
</array>
</dict>
</array>
Open
AppDelegate.hin your Xcode project (OktaRN > OktaRN >
AppDelegate.h) and add the lines with the
+next to them below.
+ @protocol OIDAuthorizationFlowSession;

@interface AppDelegate : UIResponder <UIApplicationDelegate>
+ @property(nonatomic, strong, nullable) id<OIDAuthorizationFlowSession> currentAuthorizationFlow;
@property (nonatomic, strong) UIWindow *window;
@end
This property holds the authorization flow information that started before you redirect to Okta. After Okta authorizes you, it redirects to the
redirect_urithat’s passed in.
The authorization flow starts from an
openURL()app delegate method. To add it, open
AppDelegate.mand import
AppAuth.h.
#import "AppAuth.h"
Then at the bottom of the class (before
@end), add the
openURL()method.
- (BOOL)application:(UIApplication *)app
openURL:(NSURL *)url
options:(NSDictionary<NSString *, id> *)options {
if ([_currentAuthorizationFlow resumeAuthorizationFlowWithURL:url]) {
_currentAuthorizationFlow = nil;
return YES;
}
return NO;
}
Replace the code in
App.jswith the following JavaScript. This code allows you to authorize, refresh your access token, and revoke it.
import React, { Component } from 'react';
import { UIManager, LayoutAnimation } from 'react-native';
import { authorize, refresh, revoke } from 'react-native-app-auth';
import { Page, Button, ButtonContainer, Form, Heading } from './components';
UIManager.setLayoutAnimationEnabledExperimental &&
UIManager.setLayoutAnimationEnabledExperimental(true);
const scopes = ['openid', 'profile', 'email', 'offline_access'];
type State = {
hasLoggedInOnce: boolean,
accessToken: ?string,
accessTokenExpirationDate: ?string,
refreshToken: ?string
};
const config = {
issuer: 'https://{yourOktaDomain}/oauth2/default',
clientId: '{clientId}',
redirectUrl: 'com.{yourReversedOktaDomain}:/callback',
additionalParameters: {},
scopes: ['openid', 'profile', 'email', 'offline_access']
};
export default class App extends Component<{}, State> {
state = {
hasLoggedInOnce: false,
accessToken: '',
accessTokenExpirationDate: '',
refreshToken: ''
};
animateState(nextState: $Shape<State>, delay: number = 0) {
setTimeout(() => {
this.setState(() => {
LayoutAnimation.easeInEaseOut();
return nextState;
});
}, delay);
}
authorize = async () => {
try {
const authState = await authorize(config);
this.animateState(
{
hasLoggedInOnce: true,
accessToken: authState.accessToken,
accessTokenExpirationDate: authState.accessTokenExpirationDate,
refreshToken: authState.refreshToken
},
500
);
} catch (error) {
Alert.alert('Failed to log in', error.message);
}
};
refresh = async () => {
try {
const authState = await refresh(config, {
refreshToken: this.state.refreshToken
});
this.animateState({
accessToken: authState.accessToken || this.state.accessToken,
accessTokenExpirationDate:
authState.accessTokenExpirationDate || this.state.accessTokenExpirationDate,
refreshToken: authState.refreshToken || this.state.refreshToken
});
} catch (error) {
Alert.alert('Failed to refresh token', error.message);
}
};
revoke = async () => {
try {
await revoke(config, {
tokenToRevoke: this.state.accessToken,
sendClientId: true
});
this.animateState({
accessToken: '',
accessTokenExpirationDate: '',
refreshToken: ''
});
} catch (error) {
Alert.alert('Failed to revoke token', error.message);
}
};
render() {
const {state} = this;
return (
<Page>
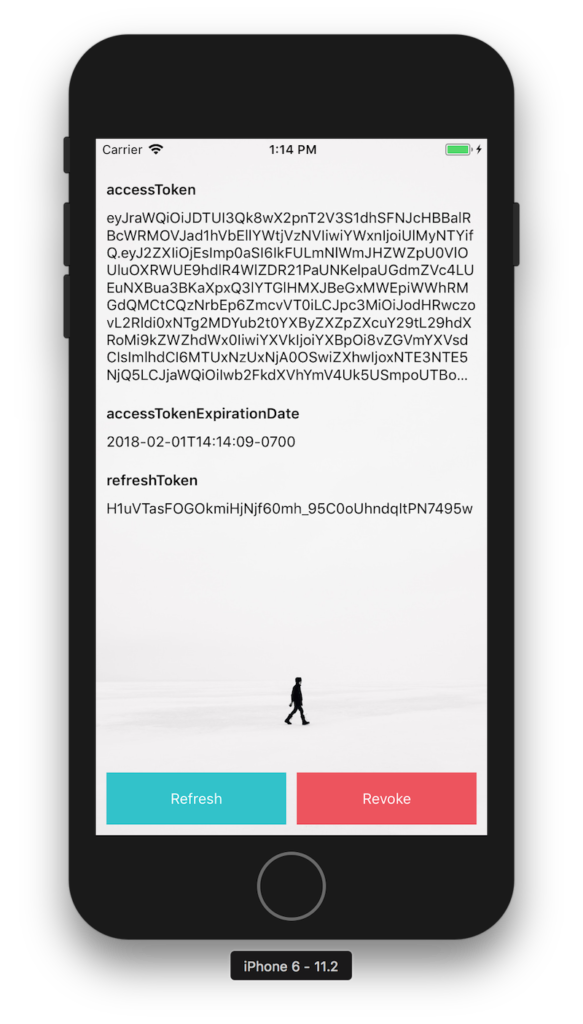
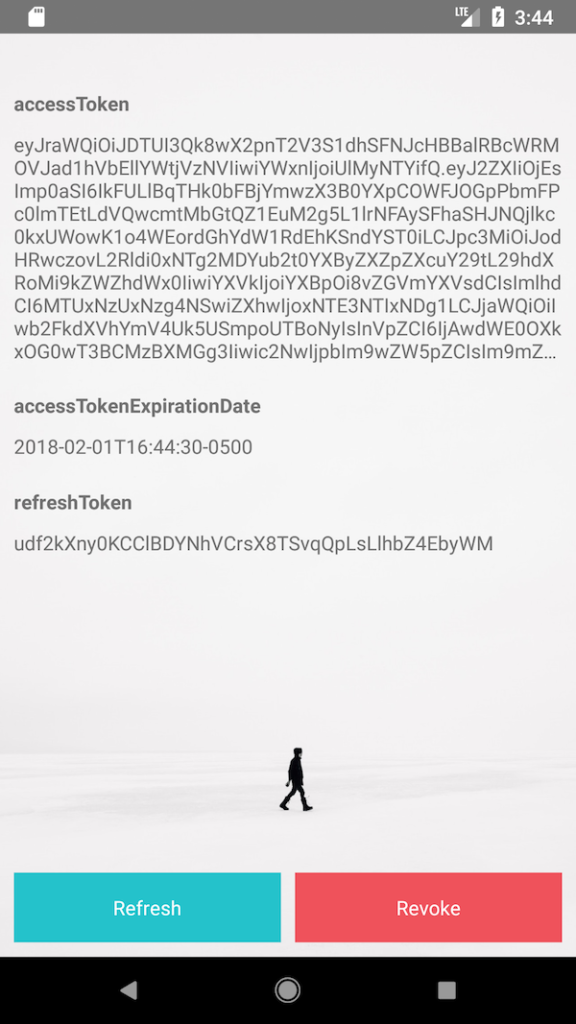
{!!state.accessToken ? (
<Form>
<Form.Label>accessToken</Form.Label>
<Form.Value>{state.accessToken}</Form.Value>
<Form.Label>accessTokenExpirationDate</Form.Label>
<Form.Value>{state.accessTokenExpirationDate}</Form.Value>
<Form.Label>refreshToken</Form.Label>
<Form.Value>{state.refreshToken}</Form.Value>
</Form>
) : (
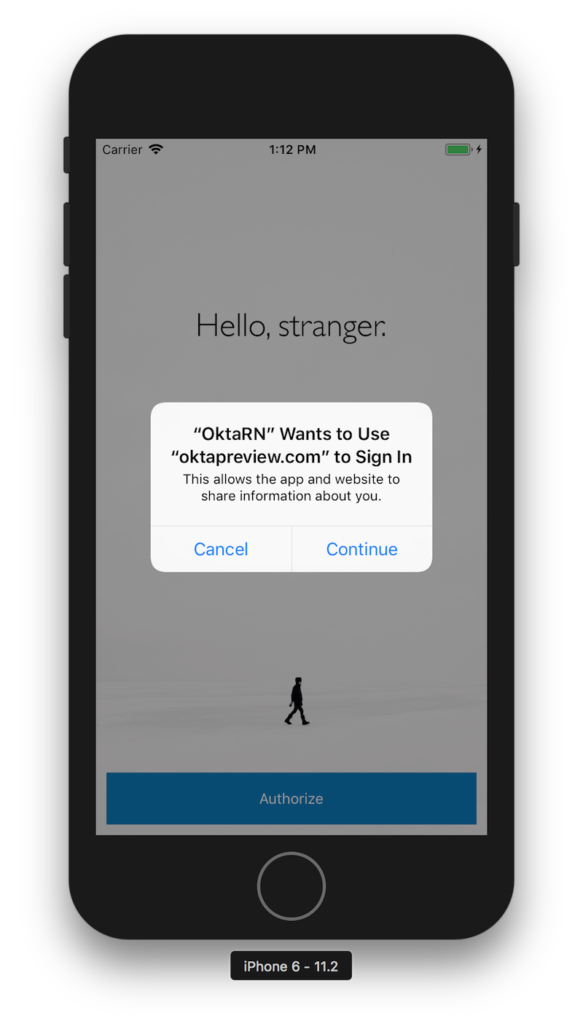
<Heading>{state.hasLoggedInOnce ? 'Goodbye.' : 'Hello, stranger.'}</Heading>
)}
<ButtonContainer>
{!state.accessToken && (
<Button onPress={this.authorize} text="Authorize" color="#017CC0"/>
)}
{!!state.refreshToken && <Button onPress={this.refresh} text="Refresh" color="#24C2CB"/>}
{!!state.accessToken && <Button onPress={this.revoke} text="Revoke" color="#EF525B"/>}
</ButtonContainer>
</Page>
);
}
}
Make sure to adjust
configwith your settings.
const config = {
issuer: 'https://{yourOktaDomain}/oauth2/default',
clientId: '{clientId}',
redirectUrl: 'com.{yourReversedOktaDomain}:/callback',
...
};
Change
index.jsto use
OktaRNas the name of your app.
AppRegistry.registerComponent('OktaRN', () => App);
该代码使用样式化的组件,因此您需要将其安装为依赖项。
npm i styled-componentsThen copy the
componentsdirectory into your project’s root directory from Formidable’s example.
svn export https://github.com/FormidableLabs/react-native-app-auth/trunk/Example/components
Grab the background image that’s referenced in the
Page.jscomponent too.
svn export https://github.com/FormidableLabs/react-native-app-auth/trunk/Example/assets
Run your app with
npm run ios.

cd android
./gradlew wrapper --gradle-version 4.6
适用于Android的React Native App Auth取决于AppAuth-android,但您需要在项目中添加正确的Android支持库版本。
Add the Google Maven repository to your
android/build.gradleand upgrade the Android Tools dependency:
buildscript {
repositories {
jcenter()
google()
}
dependencies {
classpath 'com.android.tools.build:gradle:3.0.1'
}
}
Upgrade the
appcompatdependency in
android/app/build.gradleto
25.3.1to match the one expected by AppAuth.
dependencies {
compile "com.android.support:appcompat-v7:25.3.1"
}
Remove
buildToolsVersion "23.0.1"as its no longer necessary.
Update the
compileSdkVersion:
android {
compileSdkVersion 25
}
Add the
appAuthRedirectSchemeproperty the
defaultConfigin
android/app/build.gradle:
android {
defaultConfig {
...
manifestPlaceholders = [
appAuthRedirectScheme: '{yourReversedOktaDomain}'
]
}
}
After making this change, my
defaultConfiglooks as follows.
defaultConfig {
applicationId "com.oktarn"
minSdkVersion 16
targetSdkVersion 22
versionCode 1
versionName "1.0"
ndk {
abiFilters "armeabi-v7a", "x86"
}
manifestPlaceholders = [
appAuthRedirectScheme: 'com.oktapreview.dev-158606'
]
}
To try it on an Android emulator, run
npm run android. If you don’t have a phone plugged in or an Android Virtual Device (AVD) running, you’ll see an error:
* What went wrong:
Execution failed for task ':app:installDebug'.
> com.android.builder.testing.api.DeviceException: No connected devices!
To fix this, open Android Studio, choose open existing project, and select the
androiddirectory in your project. If you’re prompted to update anything, approve it.
![]()
Run
npm run androidagain. You should see a welcome screen and be able to authorize successfully.

TIP: To fix
Configuration 'compile' in project ':app' is deprecated. Use 'implementation' instead., change
compileunder
dependenciesto
implementation. More information can be found in Migrate to Android Plugin for Gradle 3.0.0.
的react-native-git-upgrade工具是将项目升级为使用最新版本的便捷方法。 安装并运行它。
npm i -g react-native-git-upgrade
react-native-git-upgrade
npm i
Or, you can just change your
package.jsonto have
"react-native": "0.54.2"and then run
npm i.
If you’d like to get an ID token in addition to an access token, add
idTokenas a property of type
Stateand the
statevariable in
App.js.
type State = {
...
idToken: ?string
};

export default class App extends Component<{}, State> {
...
state = {
...
idToken: ''
};
Then update the
authorize()method to set the property from
authState. You’ll want to add similar logic in the
refresh()and
revoke()methods.
authorize = async () => {
try {
const authState = await authorize(config);
this.animateState(
{
hasLoggedInOnce: true,
accessToken: authState.accessToken,
accessTokenExpirationDate: authState.accessTokenExpirationDate,
refreshToken: authState.refreshToken,
idToken: authState.idToken
},
500
);
} catch (error) {
Alert.alert('Failed to log in', error.message);
}
};
要查看您的ID令牌中的内容,请安装缓冲。
npm i bufferImport it at the top of
App.js.
import { Buffer } from 'buffer';
Then change the
render()method to decode it.
render() {
const {state} = this;
if (state.idToken) {
const jwtBody = state.idToken.split('.')[1];
const base64 = jwtBody.replace('-', '+').replace('_', '/');
const decodedJwt = Buffer.from(base64, 'base64');
state.idTokenJSON = JSON.parse(decodedJwt);
}
...
Finally, add a
<Form.Label>and
<Form.Value>row after the one that displays the access token.
<Form.Label>ID Token</Form.Label>
<Form.Value>{JSON.stringify(state.idTokenJSON)}</Form.Value>
Run
npm run ios(or
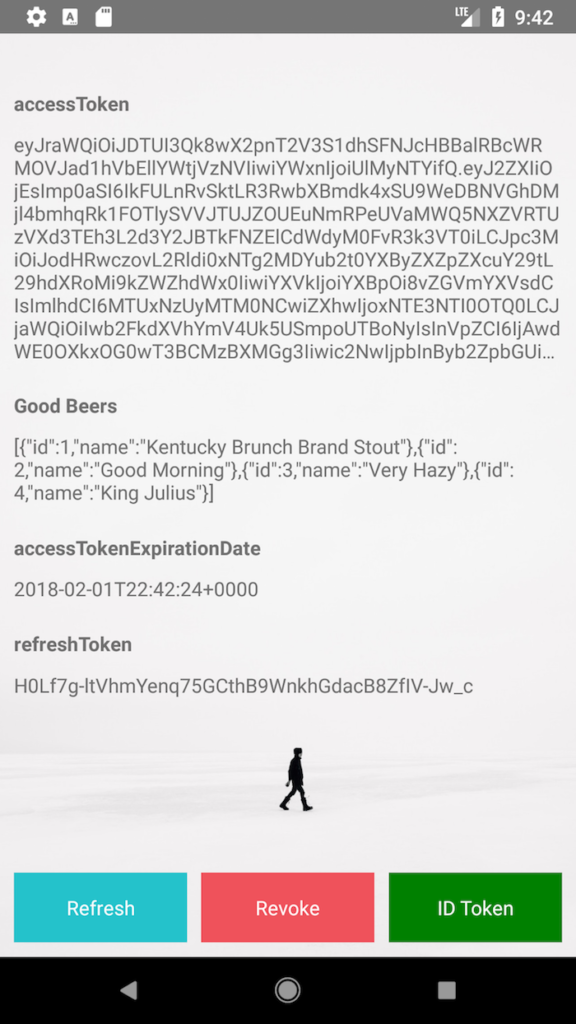
npm run android) and you should see the claims in the ID token after authorizing with Okta. Below is a screenshot proving it works in iOS Simulator.

Now that you have an access token, what can you do with it? You can call an Okta-protected API with it in an
Authorizationheader!
我写了关于如何在中创建“ Good Beers” API的文章。使用Spring Boot和React进行Bootiful开发。 您可以使用该应用程序的后端来证明它可以工作。
Clone the project from GitHub and check out the
oktabranch.
git clone https://github.com/oktadeveloper/spring-boot-react-example.git
git checkout okta
Modify
spring-boot-react-example/server/src/main/resources/application.propertiesto set the
issuerand
clientId.
okta.oauth2.issuer=https://{yourOktaDomain}/oauth2/default
okta.oauth2.clientId={clientId}
注意:您需要Java 8已安装以运行此Spring Boot应用程序。
Start the app by running
./mvnwfrom the
serverdirectory.
Back to the React Native client. In
App.js, add
beersas a property of
state.
state = {
...
beers: []
};
Set it to this same value in the
revoke()method. Add a
fetchGoodBeers()method that uses the access token to call the backend.
fetchGoodBeers = async () => {
if (this.state.beers.length) {
// reset to id token if beers is already populated
this.animateState({beers: []})
} else {
fetch('http://localhost:8080/good-beers', {
headers: {
'Authorization': `Bearer ${this.state.accessToken}`
}
}).then(response => response.json())
.then(data => {
this.animateState({beers: data})
})
.catch(error => console.error(error));
}
};
TIP: For this to work in the Android emulator (and on a real phone), you’ll need to change
localhostto your IP address.
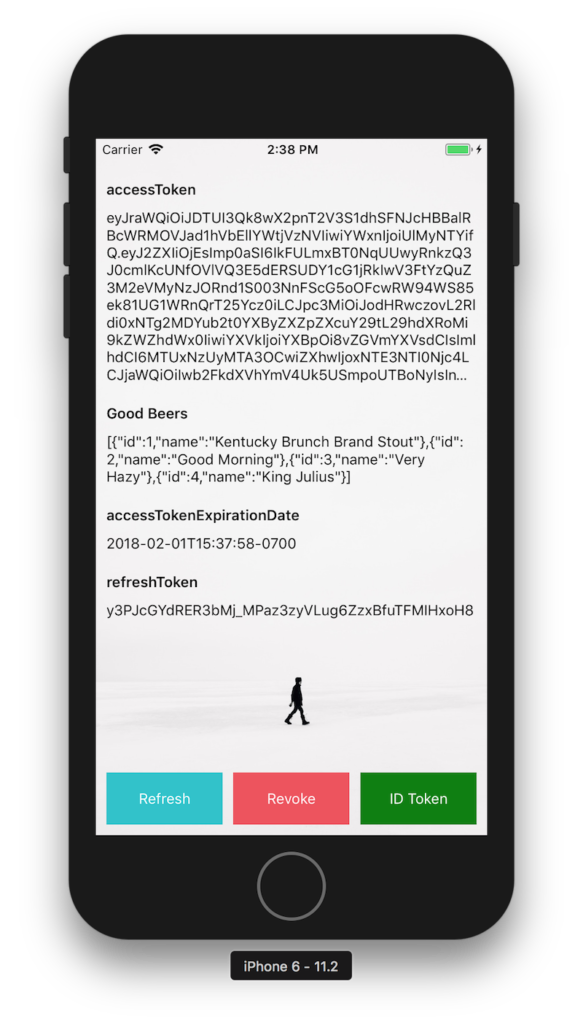
In the
<ButtonContainer>at the bottom, add a “Good Beers” button that allows you to call the API, as well as press it again to view the ID Token.
{!!state.accessToken && <Button onPress={this.fetchGoodBeers} text={!this.state.beers.length ? 'Good Beers' : 'ID Token'} color="#008000" />}
<Form.Label>{state.beers.length ? 'Good Beers' : 'ID Token'}</Form.Label>
<Form.Value>{JSON.stringify(state.beers.length ? state.beers : state.idTokenJSON)}</Form.Value>
NOTE: There is an open issue in react-native-app-auth about revoke not working with Okta because an
Authorizationheader is not sent.
希望您喜欢这个关于如何使用Okta和React Native进行身份验证的旋风之旅。 您可以在上了解有关React Native的更多信息它的官方网站。 您还可以添加约6万颗星在GitHub上。
您可以在以下位置找到此应用程序的源代码https://github。com/oktadeveloper/okta-react-native-app-auth-example。
- 在15分钟内使用用户身份验证构建React应用程序使用身份验证构建预先应用使用Spring Boot和React进行Bootiful开发
如果您对本文有任何疑问,请在Twitter上打我@mraible。
from: https://www.sitepoint.com//build-a-react-native-application-authenticate-with-oauth-2-0/
 dangzhuang7815
 原创文章 0获赞 0访问量 320
关注
私信
原创文章 0获赞 0访问量 320
关注
私信

- 使用OAuth 2.0构建React Native应用并进行身份验证
- erui _ eruie 003使用React,GraphQL和用户身份验证构建运行状况跟踪应用
- 使用React,GraphQL和用户身份验证构建运行状况跟踪应用
- erui _ eruie 003使用Node和OAuth 2.0构建简单的REST API
- erui _ eruie 003使用Node和React构建一个基本的CRUD应用
- erui _ eruie 002使用Passport.js和OpenID Connect构建安全的节点身份验证
- 在PHP应用中简化OAuth2.0身份验证集成:OAuth 2.0 Client
- erui _ eruie 003如何使用Sencha Grid构建React 16 Web应用程序
- Node.js项目实战-构建可扩展的Web应用(第一版): 6 在Node.js应用中使用session和OAuth进行用户认证和授权
- React Native:使用 JavaScript 构建原生应用 详细剖析
- 在IIS中使用Windows域服务器域摘要式身份验证对Web应用程序进行访问
- springmvc+mybatis登录验证2.0(更新了使用session来进行保存用户值,注销后清除session),并进行了拦截器的设定
- wicket基础应用(1)--使用wicket对表单中的数据进行验证
- django使用email进行身份验证
- Windows下使用AndroidStudio+ReactNative开发Android应用
- Rails使用has_secure_password进行身份验证
- 一步一步教你使用AgileEAS.NET基础类库进行应用开发-WinForm应用篇-演示使用报表构建UI-入库业务查询模块
- 在IIS中使用Windows域服务器域摘要式身份验证对Web应用程序进行访问控
- 无责任Windows Azure SDK .NET开发入门篇二[使用Azure AD 进行身份验证--2.1使用Azure AD需要了解几个概念]