发布开源项目到Maven中央仓库
2020-05-05 12:38
513 查看
一、创建Sonatype账户
去这个地址注册一个账号:https://issues.sonatype.org/secure/Dashboard.jspa
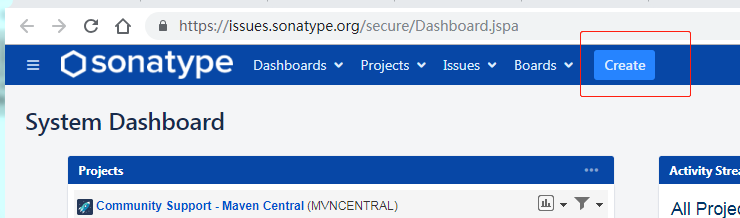
二、创建一个Issues
登录Sonatype网站,创建一个Issues,直接点击
Create按钮即可,如下图:
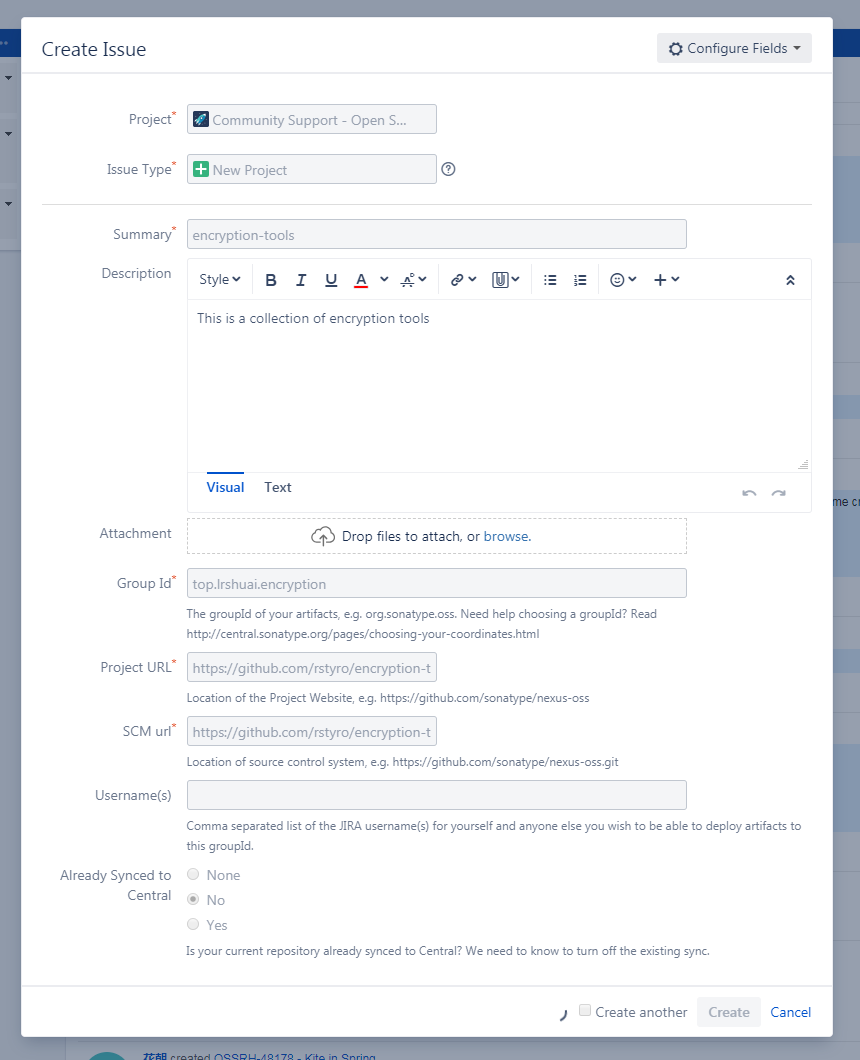
- project
选择Community Suport - Open Source Project Repository Hosting
- Issue Type
这个选择New Project
- Summary
选择项目名 - Description
项目描述 - Group Id
创建Maven项目的时候都有吧,这个是Maven为了区分组的唯一标识 - Project URL
开源项目的地址 - SCM url
开源项目的代码仓库地址,比如https://github.com/rstyro/encryption-tools.git
如下示例图:
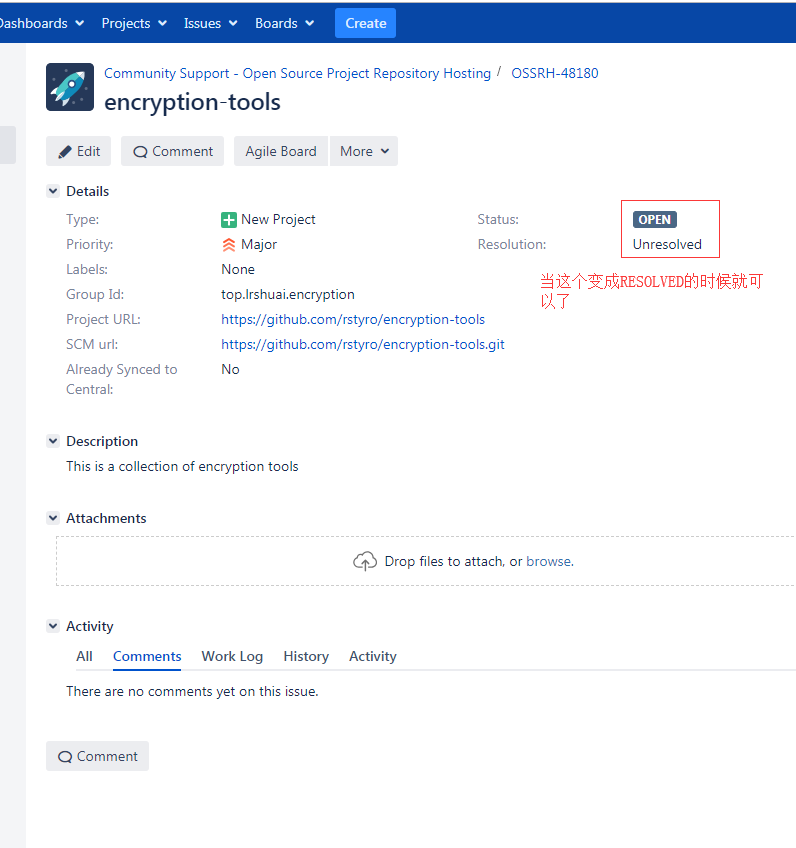
三、等待工作人员审核
点击Issues 下面可看到,刚才创建的Issues,查看状态,如果状态变成
RESOLVED即可下一步
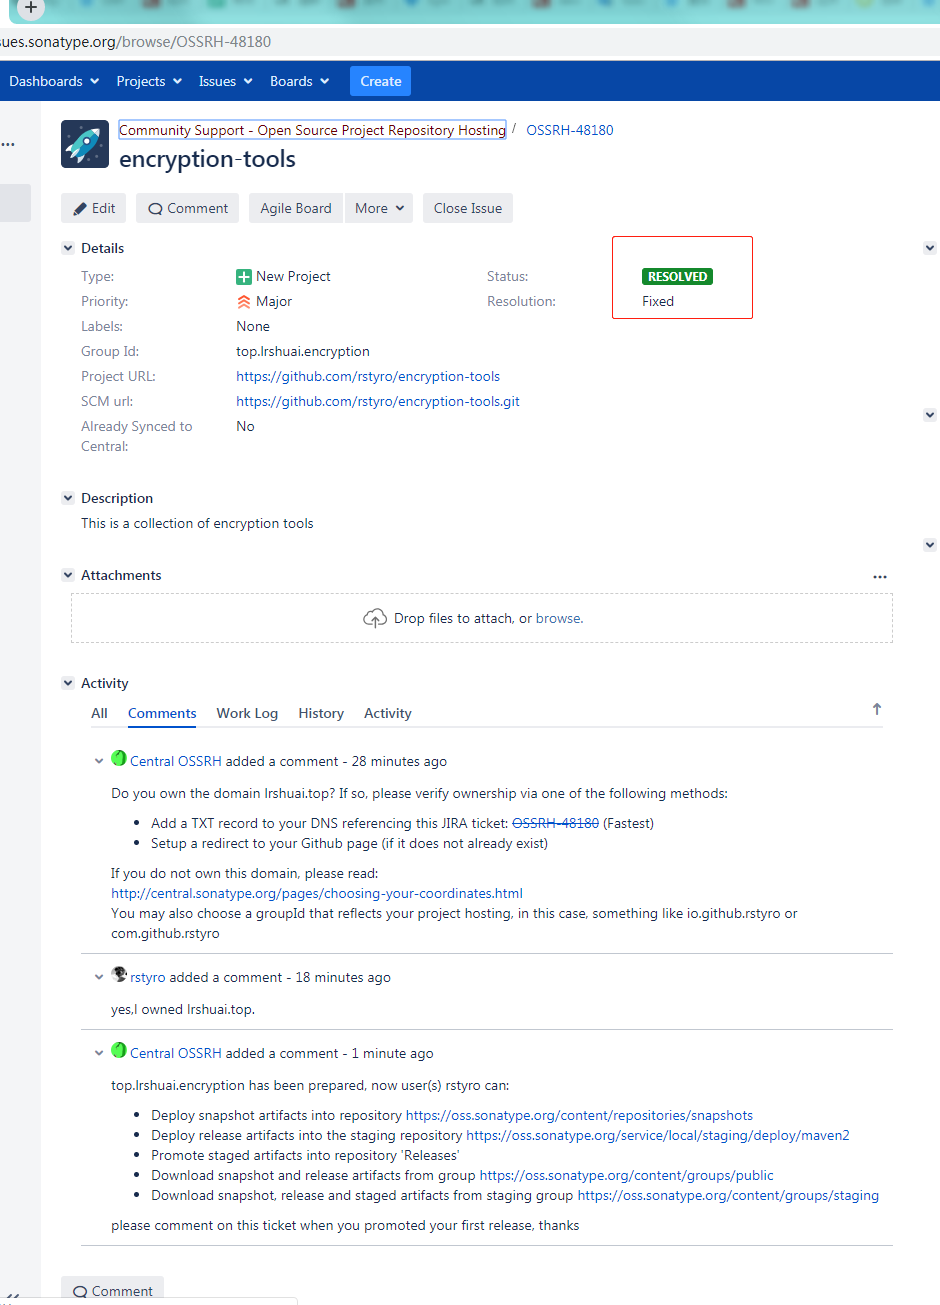
如果你的
Group Id写的是你自己的域名,可能会有工作人员询问你是否是你自己的域名
如果是自己的域名,那就去服务器域名解析那,配置一条TXT 记录即可
如果不是,那建议你还是使用io.github.yourname或者com.github.yourname这样的Group Id.
四、PGP安装及生成密钥
- 一脸懵逼,PGP是什么鬼,干嘛用?
- 目的:是签名构建用的,为了保证你的构件不被第三方篡改,用于校验。
1、下载
- 去http://files.gpg4win.org/ 下载选(带vanilla的)
gpg4win-vanilla-2.3.4.exe
- 快捷下载地址:http://files.gpg4win.org/gpg4win-vanilla-2.3.4.exe
2、安装
- 傻瓜式安装,选择你安装的位置,一路
next
3、生成密钥对
- 查询是否安装成功
gpg --version
- 生成密钥对
gpg --gen-key
步骤如下:
- Please select what kind of key you want:
选择加密方式,默认是 RSA 密钥对 - RSA keys may be between 1024 and 4096 bits long.
密钥对的长度 - Please specify how long the key should be valid.
密钥对的有效期 - Real name
姓名 - Email address
邮箱 - Comment
备注 - Change (N)ame, (C)omment, (E)mail or (O)kay/(Q)uit?
选择 O ,生成密钥对 - you need a passphrase to protect your secret key
输入一个密钥(secret),要记住哦,后面有用到。
如果有默认值直接回车也可,或者调写括号内的值,示例图如下:
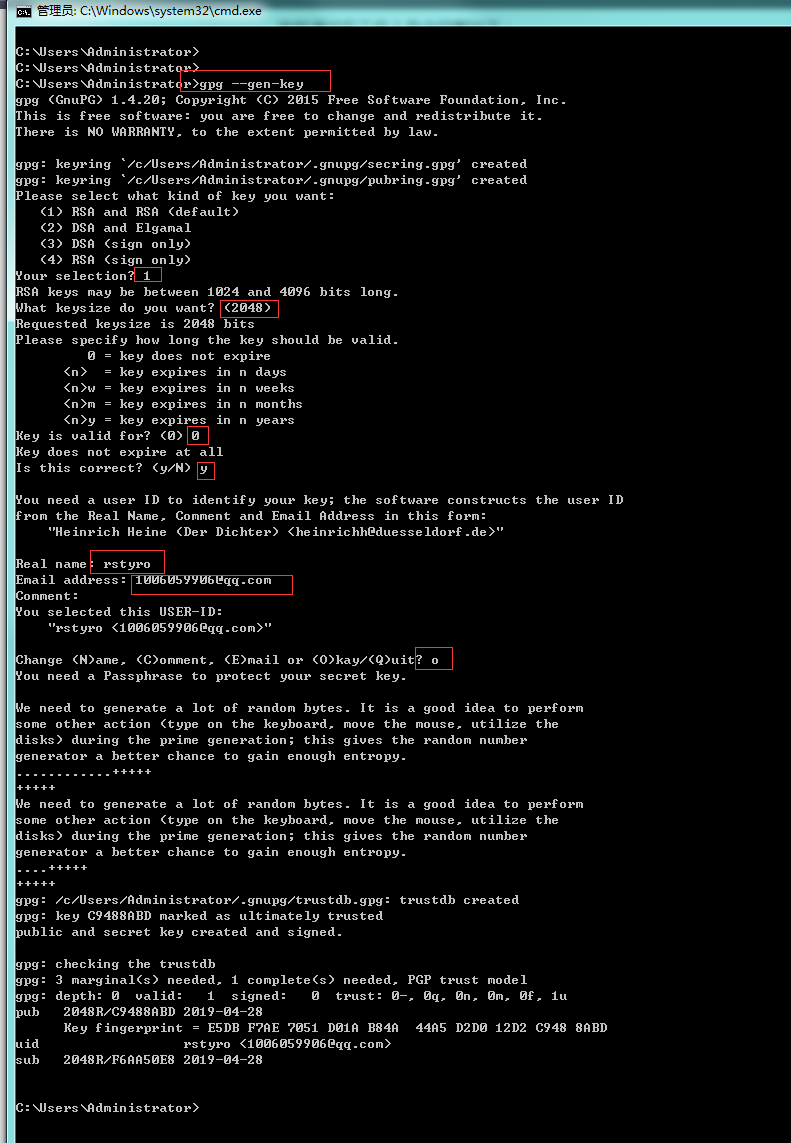
最后的打印输出:
gpg: /c/Users/Administrator/.gnupg/trustdb.gpg: trustdb created
gpg: key C9488ABD marked as ultimately trusted
public and secret key created and signed.

gpg: checking the trustdb
gpg: 3 marginal(s) needed, 1 complete(s) needed, PGP trust model
gpg: depth: 0  valid:   1  signed:   0  trust: 0-, 0q, 0n, 0m, 0f, 1u
pub   2048R/C9488ABD 2019-04-28
Key fingerprint = E5DB F7AE 7051 D01A B84A  44A5 D2D0 12D2 C948 8ABD
uid                  rstyro <1006059906@qq.com>
sub   2048R/F6AA50E8 2019-04-28
- 其中
C9488ABD
就是公钥ID
4、将公钥发布到 PGP 密钥服务器
# 公钥发布PGP 密钥服务器
gpg --keyserver hkp://pool.sks-keyservers.net --send-keys C9488ABD

# 查询公钥是否发布成功
gpg --keyserver hkp://pool.sks-keyservers.net --recv-keys C9488ABD
此后,可使用本地的私钥来对上传构件进行数字签名,而下载该构件的用户可通过上传的公钥来验证签名,也就是说,大家可以验证这个构件是否由本人上传的,因为有可能该构件被坏人给篡改了
五、修改Maven配置文件
1、settings.xml
- 该文件为Maven的配置文件,在Maven安装目录下的
conf
文件夹下 - 修改 Maven
settings.xml
文件,中的servers
节点中添加
<server>
<id>oss</id>
<username>Sonatype 用户名</username>
<password>Sonatype 密码</password>
</server>
2、pom.xml
修改pom文件
<?xml version="1.0" encoding="UTF-8"?>
<project xmlns="http://maven.apache.org/POM/4.0.0"
xmlns:xsi="http://www.w3.org/2001/XMLSchema-instance"
xsi:schemaLocation="http://maven.apache.org/POM/4.0.0 http://maven.apache.org/xsd/maven-4.0.0.xsd">
<modelVersion>4.0.0</modelVersion>

<name>encryption-tools</name>
<description>This is a collection of encryption tools </description>
<url>https://github.com/rstyro/encryption-tools</url>

<groupId>top.lrshuai.encryption</groupId>
<artifactId>encryption-tools</artifactId>
<version>1.0.0</version>

<developers>
<developer>
<name>rstyro</name>
<email>1006059906@qq.com</email>
</developer>
</developers>

<licenses>
<license>
<name>The MIT License</name>
<url>http://opensource.org/licenses/MIT</url>
</license>
</licenses>
<scm>
<connection>scm:git:git@github.com:rstyro/encryption-tools.git</connection>
<developerConnection>scm:git:git@github.com:rstyro/encryption-tools.git</developerConnection>
<url>git@github.com:rstyro/encryption-tools.git</url>
</scm>

<profiles>
<profile>
<!-- 本地开发环境 -->
<id>dev</id>
<properties>
<profiles.active>dev</profiles.active>
</properties>
<activation>
<!-- 设置默认激活这个配置 -->
<activeByDefault>true</activeByDefault>
</activation>

</profile>
<profile>
<!--打包环境-->
<id>release</id>
<properties>
<profiles.active>release</profiles.active>
</properties>
<!--定义snapshots库和releases库的nexus地址-->
<distributionManagement>
<snapshotRepository>
<!--oss需要对应到settings.xml下的service的id-->
<id>oss</id>
<url>https://oss.sonatype.org/content/repositories/snapshots/</url>
</snapshotRepository>
<repository>
<id>oss</id>
<url>https://oss.sonatype.org/service/local/staging/deploy/maven2/</url>
</repository>
</distributionManagement>
</profile>
<profile>
<!-- 测试环境 -->
<id>beta</id>
<properties>
<profiles.active>beta</profiles.active>
</properties>
</profile>
</profiles>

<build>
<plugins>
<!--编译插件-->
<plugin>
<groupId>org.apache.maven.plugins</groupId>
<artifactId>maven-compiler-plugin</artifactId>
<configuration>
<source>1.7</source>
<target>1.7</target>
</configuration>
</plugin>
<!--生产源码文件插件-->
<plugin>
<groupId>org.apache.maven.plugins</groupId>
<artifactId>maven-source-plugin</artifactId>
<version>3.0.0</version>
<configuration>
<attach>true</attach>
</configuration>
<executions>
<execution>
<phase>compile</phase>
<goals>
<goal>jar</goal>
</goals>
</execution>
</executions>
</plugin>
<!--生产javadoc插件-->
<plugin>
<groupId>org.apache.maven.plugins</groupId>
<artifactId>maven-javadoc-plugin</artifactId>
<version>2.9.1</version>
<executions>
<execution>
<phase>package</phase>
<goals>
<goal>jar</goal>
</goals>
</execution>
</executions>
</plugin>
<!--gpg加密插件-->
<plugin>
<groupId>org.apache.maven.plugins</groupId>
<artifactId>maven-gpg-plugin</artifactId>
<version>1.5</version>
<executions>
<execution>
<phase>verify</phase>
<goals>
<goal>sign</goal>
</goals>
</execution>
</executions>
</plugin>
</plugins>
</build>

<dependencies>
<!-- jdk-->
<dependency>
<groupId>commons-codec</groupId>
<artifactId>commons-codec</artifactId>
<version>1.12</version>
</dependency>

<!-- bc -->
<dependency>
<groupId>org.bouncycastle</groupId>
<artifactId>bcprov-jdk15on</artifactId>
<version>1.58</version>
</dependency>
</dependencies>
</project>
pom需要配置的属性:
- name: 项目名称。
- description: 项目描述。
- url: 项目地址
- licenses: 开源协议。
- developers: 开发者列表。
- scm: 项目的git地址相关。
- profiles: 配置不同的环境。比如开发环境 测试环境 发布环境。
- groupId: 定义当前maven项目隶属的实际项目。
- artifactId: 该元素定义实际项目中的一个Maven项目(模块).
- version: 版本号, 带SNAPSHOT为快照版本,否则为 release 版本。
- build: 插件。需要加上maven-source-plugin、maven-javadoc-plugin、maven-gpg-plugin三个插件
- dependencies: 依赖的模块
六、发布控件
1、发布到OSS
进入到开源项目的根目录运行如下命令:
- 命令
mvn clean deploy -P release -Dgpg.passphrase=你的Passphase
你的Passphase:就是你在第四步,生成密钥对输入的secrt
注意:此时上传的构件并未正式发布到中央仓库中,只是部署到 OSS 中了,还没有真正的发布
2、在OSS发布到中央仓库
- 进入:https://oss.sonatype.org并登陆,点击左侧
Staging Repositories
(暂存的存储库) 按钮 - 状态应该是
open
,你要将其置为closed
,点击上方的close
按钮即可 - 接下来系统会自动验证有效性,如果你的Group Id和pom.xml没有错误,状态会自动变成closed
- 如果成功变成Closed 就可以发布了,点击
Release
进行发布,ok
如果有问题,会在下面提示你那里有问题,加入有问题你可以点击
drop按钮删掉这个构件,然后重新发布

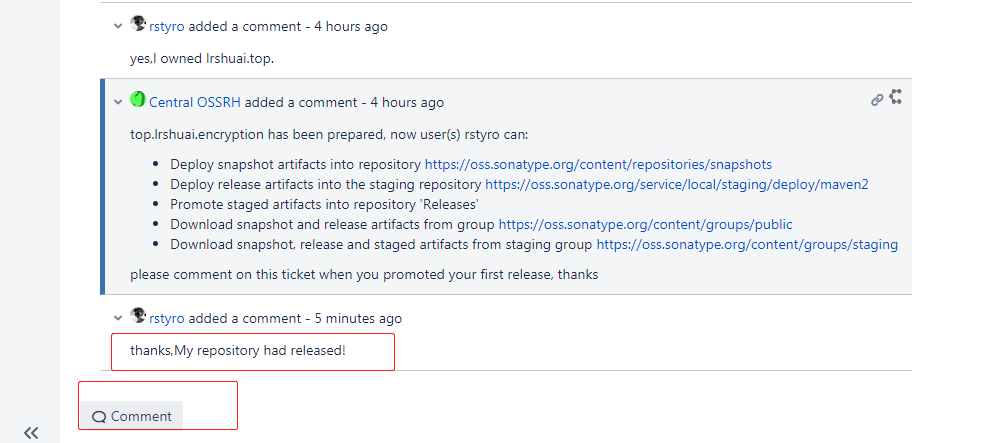
3、通知 Sonatype 构件已成功发布
- 在comment中回复你已经成功发布,比如:
My repository had released!
- 在Issue下面回复一条“构件已成功发布”的评论,这是为了通知 Sonatype 的工作人员为需要发布的构件做审批,发布后会关闭该Issue。
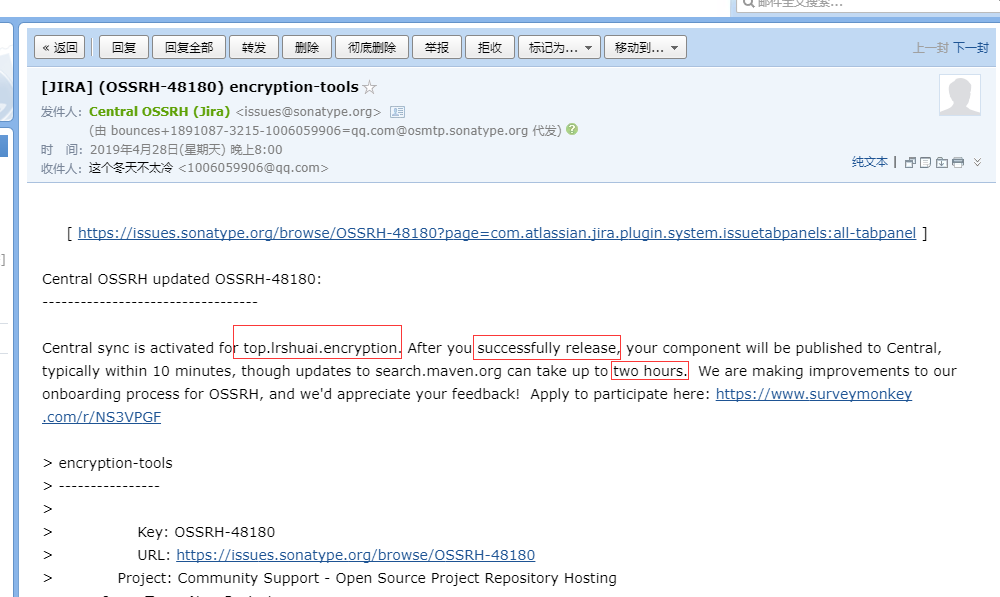
4、等待审批
- 当审批通过后,将会收到邮件通知。然后去 maven的中央仓库中搜索到自己发布的构件,看是否存在
- 至此就结束了
七、升级控件
当修改完成之后,直接走
第六步骤进行构建发布即可。
转载于:https://www.cnblogs.com/rstyro/articles/10811744.html
 原创文章 0获赞 0访问量 733
关注
私信
原创文章 0获赞 0访问量 733
关注
私信

相关文章推荐
- 圣诞节前发布的开源项目小结-欢迎补充
- AndroidStudio怎么将开源项目发布到jcenter
- 如何通过 JitPack 发布自己的开源项目
- Facebook将其Blender聊天机器人作为开源项目发布
- [ABP实战开源项目]---ABP实时服务-通知系统.发布模式
- Android Studio 发布开源项目到Jcenter重要步骤记录
- 圣诞节前发布的开源项目小结-欢迎补充
- Android Studio 发布开源项目到Jcenter重要步骤记录
- Top10机器学习开源项目发布,历时一个月评出 | 附GitHub地址
- 发布一个开源项目 — Autohome增强插件 for chrome
- Android开源项目如何发布到JCenter上
- 使用Google Code发布开源项目
- 开源项目rewater发布
- 发布项目到maven中央仓库
- 即插即用!开源项目[云框架]发布“基于Spring cloud的微服务架构”
- 发布开源项目Anaer,解析远程页面元素
- 发布一个开源项目 — Autohome增强插件(for chrome)
- 圣诞节前发布的开源项目小结-欢迎补充
- 发布一个开源项目MyVCR
- 第一次在CSDN的GFORGE发布开源项目,多多指教!