【菜鸟学院】精通Spring框架——03工厂模式
源码:https://github.com/2020GetGoodOffer/springStudy
Spring是一个将设计模式用的淋漓尽致的经典框架,从类名就能看出,下面是一些列举:
| 设计模式名称 | 举例 |
|---|---|
| 工厂模式 | BeanFactory |
| 装饰者模式 | BeanWrapper |
| 代理模式 | AopProxy |
| 委派模式 | DispatcherServlet |
| 策略模式 | HandlerMapping |
| 适配器模式 | HandlerAdapter |
| 模板模式 | JdbcTemplate |
| 观察者模式 | ContextLoaderListener |
首先我们来学习工厂模式
简单工厂模式
简单工厂模式是指由一个工厂对象决定创建哪一种产品类的实例,但它不属于23种设计模式。简单工厂模式适用于工厂类负责创建的对象较少的场景,且客户端只需要传入工厂类的参数,对于如何创建对象不需要关心。
我们来看代码,还是以课程为例,定义一个课程标准ICourse接口:
public interface ICourse {
//录制课程
void record();
}
创建一个Java课程的实现类:
public class JavaCourse implements ICourse {

public void record() {
System.out.println("录制Java课程");
}
}
在客户端调用代码:
public static void main(String[] args) {
ICourse course=new JavaCourse();
course.record();
}
在上面的代码中,ICourse指向子类JavaCourse的引用,应用层代码需要依赖JavaCourse,如果业务继续扩展,那么客户端的以来会变得越来越臃肿。因此我们要想办法把这种依赖减弱,把创建细节隐藏起来。
使用简单工厂模式对代码进行优化,先增加课程类:
public class MySQLCourse implements ICourse {
public void record() {
System.out.println("录制MySQL课程");
}
}
创建工厂类CourseFactory:
public class CourseFactory {

public ICourse create(String name){
if("java".equals(name))
return new JavaCourse();
else if ("mysql".equals(name))
return new MySQLCourse();
else
return null;
}
}
修改客户端调用代码如下:
public static void main(String[] args) {
CourseFactory factory = new CourseFactory();
ICourse course = factory.create("java");
course.record();
}
客户端调用变简单了,但如果我们的业务继续扩展,要增加其他课程,那么工厂中的create方法就要每次根据产品的增加修改代码逻辑,不符合开闭原则。因此我们可以根据反射技术继续优化简单工厂模式:
public class CourseFactory {

public ICourse create(String className){
try{
if(!(className==null||className.equals(""))){
return (ICourse) Class.forName(className).newInstance();
}
}catch (Exception e){
e.printStackTrace();
}
return null;
}
}
修改客户端调用代码:
这里方便明确学习内容使用了中文包命名,实际开发请使用英文
public static void main(String[] args) {
CourseFactory factory = new CourseFactory();
ICourse course = factory.create("工厂模式.简单工厂模式.JavaCourse");
course.record();
}
优化之后,产品不断丰富的过程中不需要修改CourseFactory中的代码,但还有个问题是方法参数是字符串,可控性有待提升而且需要强制类型转换,再修改一下代码:
public class CourseFactory {

public ICourse create(Class<? extends ICourse> clazz){
try{
if(clazz!=null){
return clazz.getConstructor().newInstance();
}
}catch (Exception e){
e.printStackTrace();
}
return null;
}
}
优化客户端代码:
public static void main(String[] args) {
CourseFactory factory = new CourseFactory();
ICourse course = factory.create(JavaCourse.class);
course.record();
}
简单工厂模式的JDK实例
Calendar中的getInstance方法:
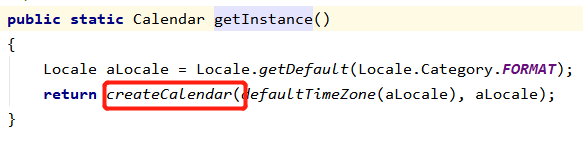
private static Calendar createCalendar(TimeZone zone,Locale aLocale){
CalendarProvider provider =
LocaleProviderAdapter.getAdapter(CalendarProvider.class, aLocale)
.getCalendarProvider();
if (provider != null) {
try {
return provider.getInstance(zone, aLocale);
} catch (IllegalArgumentException iae) {
// fall back to the default instantiation
}
}

Calendar cal = null;

if (aLocale.hasExtensions()) {
String caltype = aLocale.getUnicodeLocaleType("ca");
if (caltype != null) {
switch (caltype) {
case "buddhist":
cal = new BuddhistCalendar(zone, aLocale);
break;
case "japanese":
cal = new JapaneseImperialCalendar(zone, aLocale);
break;
case "gregory":
cal = new GregorianCalendar(zone, aLocale);
break;
}
}
}
if (cal == null) {
if (aLocale.getLanguage() == "th" && aLocale.getCountry() == "TH") {
cal = new BuddhistCalendar(zone, aLocale);
} else if (aLocale.getVariant() == "JP" && aLocale.getLanguage() == "ja"
&& aLocale.getCountry() == "JP") {
cal = new JapaneseImperialCalendar(zone, aLocale);
} else {
cal = new GregorianCalendar(zone, aLocale);
}
}
return cal;
}
还有在logback中也使用到了简单工厂模式。
简单工厂模式的缺点就是工厂类的职责相对过重,不易于扩展复杂的产品结构。
工厂方法模式
工厂方法模式是指定义一个创建对象的接口,但让这个接口的实现类来决定实例化哪个类,工厂方法模式让类的实例化推迟到子类中进行。
在工厂方法模式中用户只需要关心所需产品对应的工厂,无需关心创建细节,而且加入新的产品时符合开闭原则。
工厂方法模式主要解决产品的扩展问题,在简单工厂模式中随着产品链的丰富,如果每个课程的创建逻辑有区别,则工厂的职责会变得越来越多,不利于维护。
根据单一职责原则我们将职能继续拆分,Java课程由Java工厂创建,MySql课程由MySQL工厂创建,对工厂本身也做一个抽象。
先创建一个ICourseFactory接口:
public interface ICourseFactory {
ICourse create();
}
再分别创建子工厂:
public class JavaCourseFactory implements ICourseFactory {
@Override
public ICourse create() {
return new JavaCourse();
}
}
public class MySQLCourseFactory implements ICourseFactory{
@Override
public ICourse create() {
return new MySQLCourse();
}
}
测试代码如下:
public static void main(String[] args) {
ICourseFactory factory=new JavaCourseFactory();
ICourse course = factory.create();
course.record();

factory=new MySQLCourseFactory();
course = factory.create();
course.record();
}
适合场景
工厂方法模式适合:
(1)创建对象需要大量重复代码
(2)客户端(应用层)不依赖于产品实例如何被创建、如何被实现等细节
(3)一个类通过其子类来指定创建哪个对象
缺点:
(1)类的个数容易过多,增加复杂度
(2)增加了系统的抽象性和理解难度
抽象工厂模式
抽象工厂模式是指提供一个创建一系列相关或相互依赖对象的接口,无需指定它们的具体类。
客户端(应用层)不依赖于产品类实例如何被创建如何被实现等细节,强调的是一系列相关的产品对象(属于同一产品族)一起使用创建对象需要大量重复代码。需要提供一个产品类的库,所有的产品以同样的接口出现,从而使客户端不依赖具体实现。
讲解抽象工厂模式之前,我们先学习两个概念:产品等级结构和产品族。产品族就相当于移动、联通、电信之间的关系,产品等级就相当于移动品牌中的手机、路由器、笔记本之间的关系。
继续以课程举例,假设除了课堂视频外还需要提供课堂笔记,在产品等级中增加两个产品IVideo和INote:
public interface IVideo {
void record();
}
public interface INote {

void edit();
}
然后创建一个抽象工厂接口CourseFactory:
//抽象工厂是用户的主入口,是Spring中应用的最广泛的设计模,易于扩展
public interface CourseFactory {
INote createNote();
IVideo createVideo();
}
接下来,创建Java产品族的Java视频类和Java笔记类:
public class JavaVideo implements IVideo{
@Override
public void record() {
System.out.println("录制Java视频");
}
}
public class JavaNote implements INote {
@Override
public void edit() {
System.out.println("编写Java笔记");
}
}
创建Java产品族的具体工厂JavaCourseFactory:
public class JavaCourseFactory implements CourseFactory {

@Override
public INote createNote() {
return new JavaNote();
}

@Override
public IVideo createVideo() {
return new JavaVideo();
}
}
然后创建MySQL产品的视频类和笔记类:
public class MySQLVideo implements IVideo {
@Override
public void record() {
System.out.println("录制MySQL课程");
}
}
public class MySQLNote implements INote {
@Override
public void edit() {
System.out.println("编写MySQL笔记");
}
}
创建MySQL产品族的具体工厂MySQLCourseFactory:
public class MySQLCourseFactory implements CourseFactory {
@Override
public INote createNote() {
return new MySQLNote();
}

@Override
public IVideo createVideo() {
return new MySQLVideo();
}
}
客户端调用代码:
public class Test {

public static void main(String[] args) {
JavaCourseFactory factory = new JavaCourseFactory();
factory.createNote().edit();
factory.createVideo().record();
}
}
结构图:
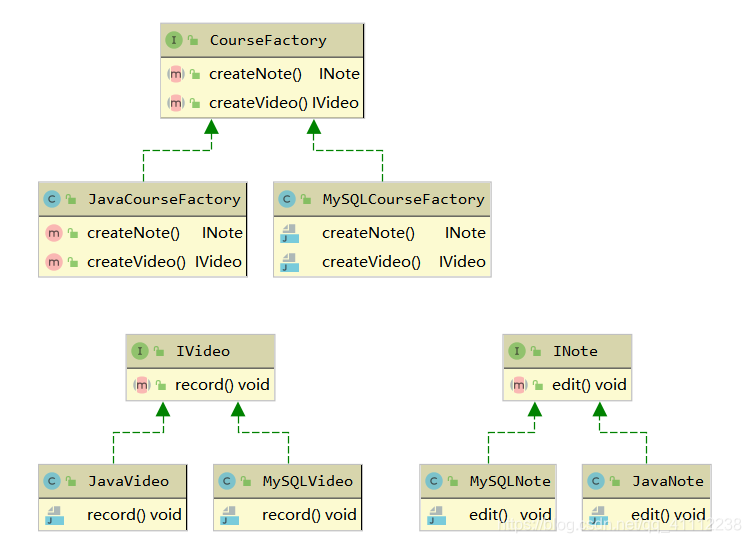
上面的代码完整描述了两个产品族Java和MySQL,也描述了两个产品等级视频和笔记。抽象工厂模式完美清晰地描述了这样一层复杂的关系。
但是如果我们继续要扩展产品等级,将源码Source也加入课程,那么我们的代码要从抽象工厂全部调整,很显然不符合开闭原则。由此可知抽象工厂模式也是有缺点的:①规定了所有可能被创建的产品集合,产品族中扩展新的产品困难,需要修改抽象工厂接口。②增加了系统抽象性和理解难度。
但在实际开发中,我们我们可以根据情况不遵循开闭原则,代码每半年或一年升级一次未尝不可。
利用工厂模式重构
通过一个JDBC的案例来演示,我们每次操作都需要重新创建数据库连接,这样十分消耗性能。
我们利用工厂模式将数据库连接先创建好,放到容器中缓存,在业务调用时就只需要现取现用:
数据库连接池的抽象类:
public abstract class Pool {

public String propertiesName="connection-INF.properties";
//定义唯一实例
private static Pool instance=null;
//最大连接数
protected int maxConnect=100;
//保持连接数
protected int normalConnect=10;
//驱动字符串
protected String driverName=null;
//驱动变量
protected Driver driver=null;

//私有构造方法 不允许外部访问
private Pool(){
try{
init();
loadDrivers(driverName);
}catch (Exception e){
e.printStackTrace();
}
}

//初始化配置
private void init() throws IOException {
InputStream is = Pool.class.getResourceAsStream(propertiesName);
Properties properties = new Properties();
properties.load(is);
this.driverName=properties.getProperty("driverName");
this.maxConnect=Integer.parseInt(properties.getProperty("maxConnect"));
this.normalConnect=Integer.parseInt(properties.getProperty("normalConnect"));
}

//装载和注册所有JDBC驱动程序
private void loadDrivers(String driverName){
try{
driver= (Driver) Class.forName(driverName).getConstructor().newInstance();
DriverManager.registerDriver(driver);
System.out.println("成功注册JDBC驱动程序"+ driverName);
}catch (Exception e){
System.out.println("无法注册JDBC驱动程序"+ driverName +",错误:"+e);
}
}

//创建连接池
public abstract void createPool();

//单例模式返回数据库连接池实例
public static synchronized Pool getInstance() throws Exception{
if(instance!=null)
instance= (Pool) Class.forName("org.jdbc.sqlhelper.Pool").getConstructor().newInstance();
return instance;
}

//获得一个可用连接,如果没有则创建,且小于最大连接限制
public abstract Connection getConnection();

//获得一个连接,有时间限制
public abstract Connection getConnection(long time);

//将连接对象返回给连接池
public abstract void freeConnection(Connection connection);

//返回当前空闲连接数
public abstract int getNum();

//返回当前工作连接数
public abstract int getNumActive();

//撤销驱动
protected synchronized void release(){
try{
DriverManager.deregisterDriver(driver);
System.out.println("撤销JDBC驱动"+driver.getClass().getName());
}catch (Exception e){
System.out.println("无法撤销JDBC驱动"+driver.getClass().getName());
}
}
}
DBConnectionPool数据库连接池:
public class DBConnectionPool extends Pool {

//正在使用的连接数
private int checkOut;
//存放产生的连接对象容器
private Vector<Connection> freeConnections=new Vector<>();
//数据库连接信息
private String url;
private String userName;
private String passWord;
//空闲连接数
private static int num;
//当前可用连接数
private static int numActive=0;
//连接池实例
private static DBConnectionPool pool=null;

//产生数据库连接池
private DBConnectionPool(){
try {
init();
for(int i=0;i<normalConnect;i++){
Connection connection=newConnection();
if(connection!=null){
freeConnections.addElement(connection);//往容器中添加连接对象
num++;//记录总连接数
}
}
}catch (Exception e){
e.printStackTrace();
}
}

//获得一个数据库连接池实例
public static synchronized DBConnectionPool getInstance(){
if(pool==null)
pool=new DBConnectionPool();
return pool;
}

//初始化
private void init() throws IOException{
InputStream is = Pool.class.getResourceAsStream(propertiesName);
Properties properties = new Properties();
properties.load(is);
this.userName=properties.getProperty("userName");
this.passWord=properties.getProperty("passWord");
this.driverName=properties.getProperty("driverName");
this.url=properties.getProperty("url");
this.maxConnect=Integer.parseInt(properties.getProperty("maxConnect"));
this.normalConnect=Integer.parseInt(properties.getProperty("normalConnect"));
}

//如果不再使用某个连接对象,释放其到连接池
public synchronized void freeConnection(Connection connection){
freeConnections.addElement(connection);
num++;
checkOut--;
numActive--;
notifyAll();
}

//创建一个新连接
private Connection newConnection(){
Connection connection=null;
try{
if(userName==null)
connection= DriverManager.getConnection(url);
else
connection=DriverManager.getConnection(url,userName,passWord);
System.out.println("连接池创建一个新的连接");
}catch (Exception e){
System.out.println("无法创建这个url的连接"+url);
return null;
}
return connection;
}

//返回空连接
public int getNum(){
return num;
}

//返回当前连接数
public int getNumActive(){
return numActive;
}

//单例模式获取可用连接
public synchronized Connection getConnection(){
Connection connection=null;
if(freeConnections.size()>0){
num--;
connection=freeConnections.firstElement();
freeConnections.remove(0);
try{
if(connection.isClosed()){
System.out.println("从连接池中删除一个无效连接");
connection=getConnection();
}
}catch (Exception e){
System.out.println("从连接池中删除一个无效连接");
connection=getConnection();
}
}else if(maxConnect==0||checkOut<maxConnect) {//没有空闲连接且当前连接小于最大允许值 最大值为0则不限制
connection = newConnection();
}
if(connection!=null)
checkOut++;
numActive++;
return connection;
}

//获取一个连接,加上等待时间限制,单位ms
public synchronized Connection getConnection(long timeout){
long startTime=new Date().getTime();
Connection connection;
while ((connection=getConnection())==null){
try{
wait(timeout);
}catch (Exception ignored){}
if(new Date().getTime()-startTime>=timeout)
return null;
}
return connection;
}

//关闭所有连接
public synchronized void release(){
try{
Enumeration<Connection> allConnections = freeConnections.elements();
while (allConnections.hasMoreElements()){
Connection connection=allConnections.nextElement();
try{
connection.close();
num--;
}catch (SQLException e){
System.out.println("无法关闭连接");
}
}
}finally {
super.release();
}
}

//建立连接池
public void createPool(){
pool=new DBConnectionPool();
if(pool!=null)
System.out.println("连接池创建成功");
else
System.out.println("连接池创建失败");
}
}
- 点赞
- 收藏
- 分享
- 文章举报
 要学好Java
发布了92 篇原创文章 · 获赞 430 · 访问量 8万+
私信
关注
要学好Java
发布了92 篇原创文章 · 获赞 430 · 访问量 8万+
私信
关注

- 【菜鸟学院】精通Spring框架——07委派模式
- 【菜鸟学院】精通Spring框架——06代理模式
- 【菜鸟学院】精通Spring框架——04单例模式
- [Java] 设计模式之工厂系列 03- spring.properties 的键值读取 / Spring3.0 读取 比较
- [Java] 设计模式之工厂系列 03- spring.properties 的键值读取 / Spring3.0 读取 比较
- 通过学习spring优秀框架来学习设计模式---单例、工厂
- 框架 day37 Spring3,AOP,代理模式(动态/CGLIB/工厂bean),传统AOP,AspectJ框架(基于xml/注解),切入点表达式,jdbcTemplate
- 【设计模式】从菜鸟到大鸟之工厂三姐妹
- Spring 框架基础(06):Mvc架构模式简介,执行流程详解
- Spring 框架的设计理念与设计模式分析
- Spring4从入门到精通---工厂方法创建bean
- Spring 框架中用到了哪些设计模式?
- Java描述设计模式(03):工厂方法模式
- Spring 框架的设计理念与设计模式分析
- 通过实例理解Spring的Bean工厂和AOP框架
- Spring 框架的设计理念与设计模式分析
- 深入浅出的理解框架(Struts2、Hibernate、Spring)与 MVC 设计模式
- Java程序员从笨鸟到菜鸟之(三十二)大话设计模式(二)设计模式分类和三种工厂模式
- Spring 框架的设计理念与设计模式分析
- Spring--IoC--Bean的装配--工厂方法设计模式