Docker的安装与使用
01. Docker简介
1.1什么是容器
在了解docker之前,先了解一下什么是容器。
容器: 是一种虚拟化技术,这种技术将操作系统内核虚拟化,可以允许用户空间软件实例(instances)被分割成几个独立的单元,在内核中运行,而不是只有一个单一实例运行。
解释: 在操作系统和应用程序之间添加的一层:容器层。容器层对于操作系统来说,就是一个应用程序。容器层对于应用程序来说,好像一个操作系统。
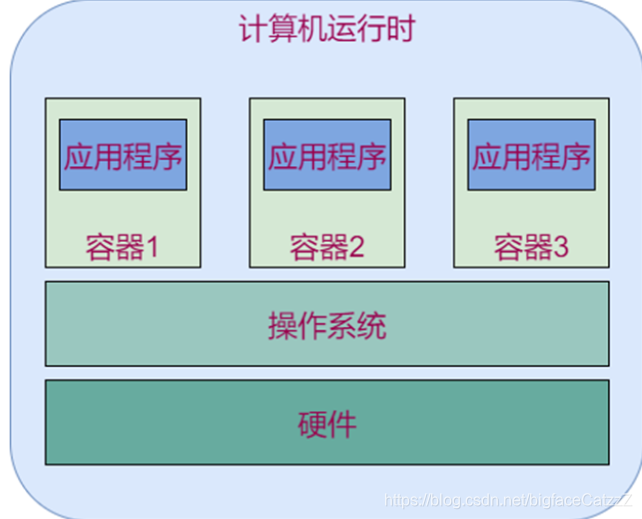
- 一个主机可以有多个相似或相同的容器
- 应用程序不知道自己运行在容器中。
- docker是当前最主流的容器工具
1.2 Docker介绍
docker是一个实现容器技术的软件,用到了linux内核的命名空间原理。
docker 的中文翻译为码头工人,而官方的解释为:
Docker是一个开源的容器引擎,它基于LCX容器技术,使用Go语言开发。源代码托管在Github上,并遵从Apache2.0协议。Docker采用C/S架构,其可以轻松的为任何应用创建一个轻量级的、可移植的、自给自足的容器。
简单来说,Docker就是一种快速解决生产问题的一种技术手段。
docker的优点:
- 多: 适用场景多
- 快: 环境部署快、更新快
- 好: 好多人在用
- 省: 省钱省力省人工
缺点:
- 依赖操作系统 不善沟通:
- 依赖网络 不善理财 银行U盾等场景不能用
02. Docker安装
2.1 安装curl
:~$ sudo 1 apt install curl
2.2下载并执行脚本
:~$ curl -sSL https://get.daocloud.io/docker | sh
2.3添加用户组
修改添加当前用户到docker用户组,修改socket权限
:~$ sudo usermod -aG docker 用户名
2.4测试
:~$ docker --help

Usage: docker [OPTIONS] COMMAND

A self-sufficient runtime for containers
03. Docker服务
3.1 查看docker版本
:~$ docker version
Client: Docker Engine - Community
Version: 19.03.5
API version: 1.40
Go version: go1.12.12
Git commit: 633a0ea838
Built: Wed Nov 13 07:29:52 2019
OS/Arch: linux/amd64
Experimental: false
Server: Docker Engine - Community
Engine:
Version: 19.03.5
API version: 1.40 (minimum version 1.12)
Go version: go1.12.12
Git commit: 633a0ea838
Built: Wed Nov 13 07:28:22 2019
OS/Arch: linux/amd64
Experimental: false
containerd:
Version: 1.2.10
GitCommit: b34a5c8af56e510852c35414db4c1f4fa6172339
runc:
Version: 1.0.0-rc8+dev
GitCommit: 3e425f80a8c931f88e6d94a8c831b9d5aa481657
docker-init:
Version: 0.18.0
GitCommit: fec3683
3.2查看服务状态
:~$ sudo systemctl status docker
3.3启动服务
:~$ sudo systemctl start docker
3.4关闭服务
:~$ sudo systemctl stop docker
:~$ docker version
Client: Docker Engine - Community
Version: 19.03.5
API version: 1.40
Go version: go1.12.12
Git commit: 633a0ea838
Built: Wed Nov 13 07:29:52 2019
OS/Arch: linux/amd64
Experimental: false
Cannot connect to the Docker daemon at unix:///var/run/docker.sock. Is the
docker daemon running?
3.5重启服务
:~$ sudo systemctl restart docker
3.6运行测试
:~$ docker run hello-world
Hello from Docker!
This message shows that your installation appears to be working correctly.
To generate this message, Docker took the following steps:
1. The Docker client contacted the Docker daemon.
2. The Docker daemon pulled the "hello-world" image from the Docker Hub.(amd64)
3. The Docker daemon created a new container from that image which runs
the executable that produces the output you are currently reading.
4. The Docker daemon streamed that output to the Docker client, which sent
it to your terminal.
To try something more ambitious, you can run an Ubuntu container with:
$ docker run -it ubuntu bash
Share images, automate workflows, and more with a free Docker ID:
https://hub.docker.com/
For more examples and ideas, visit:
https://docs.docker.com/get-started/
解释:
- docker客户端命令行连接到守护进程
- 守护进程发现当前没有hello-world镜像,于是去dockerhub下载了一个镜像
- 守护进程基于hello-world镜像创建了一个容器,容器内有一个可执行程序,现在的内容都是由该程序输出的。
- 守护进程将容器的输出发送给命令行,也就是当前终端
04. Docker镜像和加速器
docker有三个核心概念:镜像,容器和仓库。
4.1Docker加速器
在国内使用docker的官方镜像源,会因为网络的原因,造成无法下载,或者一直处于超时。所以我们使用 daocloud的方法进行加速配置。
加速器文档链接:http://guide.daocloud.io/dcs/daocloud-9153151.html
访问 https://dashboard.daocloud.io 网站,登录 daocloud 账户
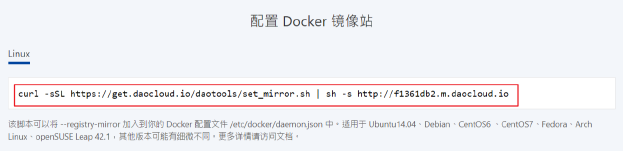
docker加速器
:~$ curl -sSL https://get.daocloud.io/daotools/set_mirror.sh | sh
-s http://f1361db2.m.daocloud.io
docker version >= 1.12
[sudo] 用户 的密码:
{"registry-mirrors": ["http://f1361db2.m.daocloud.io"]}
Success.
You need to restart docker to take effect: sudo systemctl restart
docker.service
:~$ sudo systemctl restart docker
4.2 Docker镜像
Docker镜像是什么?
它是一个只读的文件,就类似于我们安装操作系统时候所需要的那个iso光盘镜像,通过运行这个镜像来完成各种应用的部署。
这里的镜像就是一个能被docker运行起来的一个程序。通过联网,docker可以从互联网获取一些公共的镜像直接使用,类似于ubuntu的apt-get,可以获取某个应用程序包一样。
05. Docker镜像的基本操作
5.1 查找镜像
我们可以从 Docker Hub 网站来搜索镜像,Docker Hub 网址为:https://hub.docker.com/
我们也可以使用 docker search 命令来搜索镜像。比如我们需要一个 httpd 的镜像来作为我们的 web服务。我们可以通过 docker search 命令搜索 httpd 来寻找适合我们的镜像。
命令格式:
docker search [image_name]
示例:
:~$ docker search httpd
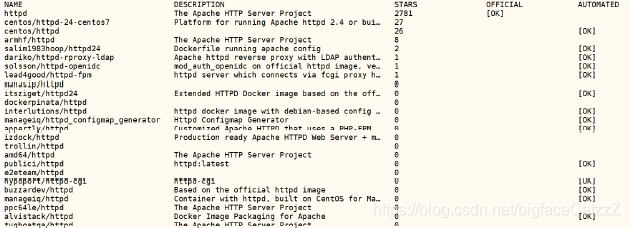
描述:
- NAME: 镜像仓库源的名称
- DESCRIPTION: 镜像的描述
- OFFICIAL: 是否 docker 官方发布
- stars: 类似 Github 里面的 star,表示点赞、喜欢的意思。
- AUTOMATED: 自动构建。
5.2 获取镜像
命令格式:
docker pull [image_name]
示例:
:~$ docker pull httpd
Using default tag: latest
latest: Pulling from library/httpd
32b8712d1f38: Pull complete
f1ca037d6393: Pull complete
c4bd3401259f: Pull complete
docker.io/library/httpd:latest
获取的镜像在哪里?
/var/lib/docker 目录下,由于权限的原因我们需要切换root用户 #操作下面的文件可以查看相关的镜像信息
# vim /var/lib/docker/image/overlay2/repositories.json
5.3 查看本地镜像列表
命令格式:
docker images <image_name>
我们可以使用 docker images 来列出本地主机上的镜像。
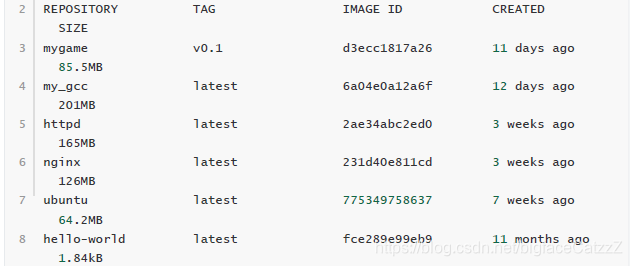
描述:
- REPOSITORY:表示镜像的仓库源
- TAG:镜像的标签
- IMAGE ID:镜像ID
- CREATED:镜像创建时间
- SIZE:镜像大小
镜像的ID唯一标识了镜像,如果ID相同,说明是同一镜像。TAG信息来区分不同发行版本,如果不指定具体标记,默认使用latest标记信息。
同一仓库源可以有多个 TAG,代表这个仓库源的不同个版本,如 ubuntu 仓库源里,有 15.10、14.04 等多个不同的版本,我们使用 REPOSITORY:TAG 来定义不同的镜像。
列出所有的本地的images(包括已删除的镜像记录)
:/var/lib/docker$ docker images -a
5.4 重命名镜像
命令格式:
docker tag [old_image]:[old_tag] [1 new_image]:[new_tag]
示例:
:~$ docker tag httpd:latest httpd:v1.0

此命令中,docker tag 后可跟 名字:TAG 或者直接跟 IMAGE ID
5.5 删除镜像
命令格式:
docker rmi [image_id]|[image_name]:[tag]
示例:
:~$ docker rmi my_gcc

如果一个image_id存在多个名称,应该使用name:tag的格式删除
5.6 镜像导出
命令格式:
docker save -o [导出进项名称] [本地镜像名]
示例:
:~$ docker save -o ubuntu.tar ubuntu
:~$ ls
cJSONFiles.zip docker.sh examples.desktop html_test nginx share snap software ubuntu.tar www zinx-master 公共的 模板 视频 图片 文档 下载 音乐 桌面
5.7 镜像导入
命令格式:
docker load < [image.tar_name]
docker load --input [image.tar_name]
如果容器在运行,需要先删除容器
:~$ docker rm 容器ID
如果发现导入的时候没有权限需要使用chmod命令修改镜像文件的权限
5.8 查看镜像历史
命令格式:
docker history [image_name]
我们获取到一个镜像,想知道他默认启动了哪些命令或者都封装了哪些系统层,那么我们可以使用docker history这条命令来获取我们想要的信息。
:~$ docker rm 容器ID
06. 容器的概念
Docker大部分的操作都是围绕着它的三大核心概念:镜像、容器和仓库。因此,准备把握这三大核心概念对于掌握Docker技术尤为重要。
Docker镜像
Docker镜像类似于虚拟机镜像,可以将它理解为一个只读的模板。
例如:一个镜像可以包含一个基本你的操作系统环境,里面仅安装了Apache应用程序(或用户需要的其它软件)。可以把它称为一个Apache镜像。
镜像是创建Docker容器的基础。
通过版本管理和增量的文件系统,Docker提供了一套十分简单的机制来创建和更新现有的镜像,用户甚至可以从网上下载一个已经做好的应用镜像直接使用。
Docker容器
容器就是运行镜像的实例. 镜像看作是静态的,容器是动态的。
Docker容器类似于一个轻量级的沙箱,Docker利用容器来运行和隔离应用。
容器是从镜像创建的应用运行实例。它可以启动、开始、停止、删除,而这些容器都是彼此相互隔离、互不可见的。
可以把容器看做一个简易版本的Linux系统环境(包括root用户权限、进程空间、用户空间和网络空间等)以及运行在其中的应用程序打包而成的盒子。
Docker仓库
Docker仓库类似于代码仓库,是Docker集中存放镜像文件的场所。
根据所存储的镜像公开与否,Docker仓库可以分为公开仓库和私有仓库两种形式。
目前最大的公开仓库是官方提供的Docker Hub,其中存放着数量庞大的镜像供用户下载。国内不少云服务提供商(如腾讯云、阿里云等等)也提供了仓库的本地源、可以提供稳定的国内访问。
当然,如果用户不希望公开分享自己的镜像文件,Docker也支持用户在本地网络内创建一个只能自己访问的私有仓库。
当用户创建了自己的镜像之后就可以使用push命令将它上传到指定的公有或者私有仓库。这样用户下次在另外一台机器上使用镜像时,只需要将其从仓库上pull下来就可以了。
07. 容器的基本操作
7.1 帮助文档
docker 客户端非常简单 ,我们可以直接输入 docker 命令来查看到 Docker 客户端的所有命令选项。
:~$ docker
Usage: docker [OPTIONS] COMMAND
A self-sufficient runtime for containers
可以通过命令 docker command --help 更深入的了解指定的 Docker 命令使用方法。
例如我们要查看 docker images 指令的具体使用方法:
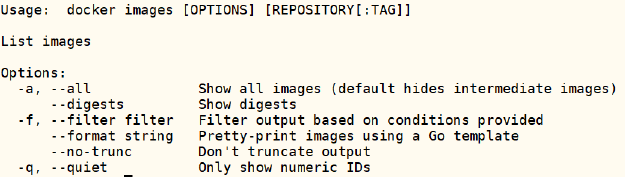
:~$ docker images --help
7.2查看容器
:~$ docker ps

说明:
- CONTAINER ID 容器ID
- IMAGE 基于那个镜像
- COMMAND 运行镜像使用了哪些命令?
- CREATED多久前创建时间
- STATUS 开启还是关闭
- PORTS端口号
- NAMES容器名称默认是随机的
7.3 启动容器
命令格式:
docker run <参数,可选> [docker_image] [执行的命令]
示例: 启动nginx
:~$ docker run nginx
查看容器信息
docker inspect [docker_image]
:~$ docker inspect boring_ride
"Networks": {
"bridge": {
"IPAMConfig": null,
"Links": null,
"Aliases": null,
"Gateway": "172.17.0.1",
"IPAddress": "172.17.0.2",
"IPPrefixLen": 16,
"IPv6Gateway": "",
"GlobalIPv6Address": "",
"GlobalIPv6PrefixLen": 0,
"MacAddress": "02:42:ac:11:00:02",
"DriverOpts": null
}
}
访问nginx
:~$ curl http://172.17.0.2
<!DOCTYPE html>
<html>
<head>
<title>Welcome to nginx!</title>
<style>
body {
width: 35em;
margin: 0 auto;
font-family: Tahoma, Verdana, Arial, sans-serif;
}
</style>
</head>
<body>
<h1>Welcome to nginx!</h1>
<p>If you see this page, the nginx web server is successfully installed and working. Further configuration is required.</p>
<p>For online documentation and support please refer to <a href="http://nginx.org/">nginx.org</a>.<br/>
Commercial support is available at
<a href="http://nginx.com/">nginx.com</a>.</p>
<p><em>Thank you for using nginx.</em></p>
</body>
</html>
查看容器端口信息
docker port <container_id>
查看所有容器信息
:~$ docker ps -a
7.4 启动已经终止的容器
在生产过程中,常常会出现运行和不运行的容器,我们使用 start 命令开起一个已关闭的容器
命令格式:
docker start [OPTIONS] CONTAINER [CONTAINER...]
示例:
:~$ docker start boring_ride
boring_ride
7.5 以守护进程的方式启动容器
更多的时候,需要让Docker容器在后台以守护形式运行。此时可以通过添加-d参数来实现
命令格式:
docker run -d [image_name] command ...
示例:
:~$ docker run -d nginx
1e25168a4e8563ede8396ab434f4fcc85effc5170aad22eeedd60c6d2c66bce5
:~$ docker psCONTAINER ID IMAGE COMMAND CREATED STATUS PORTS NAMES
1e25168a4e85 nginx "nginx -g 'daemon of…" 7 seconds ago Up 6 seconds 80/tcp heuristic_clarke
98809071af66 nginx "nginx -g 'daemon of…" 17 minutes ago Up 3 minutes 80/tcp boring_ride
7.6 停止容器
正常停止容器:
docker stop [CONTAINER ID]
非正常停止容器
docker kill [CONTAINER ID]
7.7 删除容器
正常删除,删除已经关闭的
docker rm [CONTAINER ID]
非正常删除,删除正在运行的
docker rm -f [CONTAINER ID]
强制批量删除,删除全部容器(慎用)
docker rm -f $(docker ps -a -q)
7.8 进入容器
创建容器的同时进入容器
:~$ docker run --name "myubuntu" -it ubuntu /bin/bash
root@6f67b1aea1dc:/#
说明:
:~$ docker run --name “myubuntu” -it ubuntu /bin/bash
#docker 容器启动命令参数详解:
#–name:给容器定义一个名称
#-i:则让容器的标准输入保持打开。
#-t:让docker分配一个伪终端,并绑定到容器的标准输入上
#/bin/bash:执行一个命令
手工方式进入容器
:~$ docker run -d nginx
e59693e9357873b66a9867526e1b88909d84f75fda95dae36cc2d76dab56ecc0

:~$ docker psCONTAINER ID IMAGE COMMAND CREATED STATUS PORTS NAMES
e59693e93578 nginx "nginx -g 'daemon of…" 5 seconds ago Up 3 seconds 80/tcp clever_johnson

:~$ docker exec -it clever_johnson /bin/bash

root@e59693e93578:/# ls
bin dev home lib64 mnt proc run srv tmp var boot etc lib media opt root sbin sys usr

root@e59693e93578:/usr/share/nginx/html# sed -i 's/nginx/docker/g' index.html
root@e59693e93578:/usr/share/nginx/html#
生产方式进入容器
编写脚本docker.sh
#!/bin/bash
# 定义进入仓库函数
docker_in(){
NAME_ID=$1
PID=$(docker inspect --format {{.State.Pid}} $NAME_ID)
sudo nsenter --target $PID --mount --uts --ipc --net --pid
}
docker_in $1
执行命令:
:~$ vim docker.sh
:~$ docker psCONTAINER ID IMAGE COMMAND CREATED STATUS PORTS NAMES
e59693e93578 nginx "nginx -g 'daemon of…" 6 minutes ago Up 6 minutes 80/tcp clever_johnson
:~$ chmod +x docker.sh
:~$ ./docker.sh clever_johnson
[sudo] 用户 的密码:
root@e59693e93578:/#
root@e59693e93578:/# ls
bin dev home lib64 mnt proc run srv tmp var boot etc lib media opt root sbin sys usr
root@e59693e93578:/#
08. 基于容器创建镜像
:~$ docker run -d nginx
64a478692f745eeb4e30a4054d4adb0723b063a734fac899b3b4c4ed8e75dbe4

:~$ docker psCONTAINER ID IMAGE COMMAND CREATED STATUS PORTS NAMES
64a478692f74 nginx "nginx -g 'daemon of…" 4 seconds ago Up 3 seconds 80/tcp vibrant_gould
e59693e93578 nginx "nginx -g 'daemon of…" 26 minutes ago Up 26 minutes 80/tcp clever_johnson

:~$ docker commit -m "修改了主页" -a "123" clever_johnson mynginx:v1.0
sha256:5a4d4a3affb1383211cb5801a8c261b258528a9b18e7048cabf2625d32b32b68

:~$ docker
docker dockerd docker-init docker-proxy

:~$ docker images
REPOSITORY TAG IMAGE ID CREATED SIZE
mynginx v1.0 5a4d4a3affb1 19 seconds ago 126MB
nginx latest 231d40e811cd 2 weeks ago 126MB
ubuntu latest 775349758637 5 weeks ago 64.2MB
hello-world latest fce289e99eb9 11 months ago 1.84kB

:~$
查看修改历史:
:~$ docker history mynginx:v1.0
IMAGE CREATED CREATED BY SIZE COMMENT
5a4d4a3affb1 About a minute ago nginx -g daemon off; 729B 修改了主页
09. Docker仓库
仓库(Repository)是集中存放镜像的地方。
目前 Docker 官方维护了一个公共仓库 Docker Hub。
大部分需求都可以通过在 Docker Hub 中直接下载镜像来实现。
登录需要输入用户名和密码,登录成功后,我们就可以从 docker hub 上拉取自己账号下的全部镜像。
9.1 登陆
:~$ docker login
Login with your Docker ID to push and pull images from Docker Hub. If you
don't have a Docker ID, head over to https://hub.docker.com to create one.
Username: 自己的用户名
Password:
WARNING! Your password will be stored unencrypted in
/home/deng/.docker/config.json.
Configure a credential helper to remove this warning. See
https://docs.docker.com/engine/reference/commandline/login/#credentialsstore
Login Succeeded
9.2 登出
:~$ docker logout
Removing login credentials for https://index.docker.io/v1/
9.3 拉取镜像
#查询镜像
:~$ docker search ubuntu
#拉取镜像
:~$ docker pull ubuntu
9.4 推送镜像
用户登录后,可以通过 docker push 命令将自己的镜像推送到 Docker Hub。
#登录docker Hub
:~$ docker login
#将本地镜像重命名成规范名称
:~$ docker tag hello-world:latest 自己用户名/hello:v1.0
:~$ docker images
#推送自己的镜像
:~$ docker push 自己用户名/hello:v1.0
The push refers to repository [docker.io/自己用户名/hello]
af0b15c8625b: Mounted from library/hello-world
v1.0: digest:
sha256:92c7f9c92844bbbb5d0a101b22f7c2a7949e40f8ea90c8b3bc396879d95e899a size: 524

#查询自己账户的镜像
:~$ docker search 自己用户名/hello
10. 映射
随机映射
:~$ docker rm -f $(docker ps -aq)
afa6d8ccd4d8
64a478692f74
e59693e93578
46ba41f6b221
6f67b1aea1dc

:~$ docker ps -aCONTAINER ID IMAGE COMMAND CREATED STATUS PORTS NAMES

:~$ docker run -d -P nginx
ed60135bd18f33a92158e707e5c0931a083f7daf22956a40e3ca7bef0368076b

:~$ docker psCONTAINER ID IMAGE COMMAND CREATED STATUS PORTS NAMES
ed60135bd18f nginx "nginx -g 'daemon of…" 28 seconds ago Up 26 seconds 0.0.0.0:32768->80/tcp sad_gates
浏览器输入 http://192.168.13.135:32768/ 可进行测试
启动多个nginx进行测试,端口都不会重复。
指定端口映射
:~$ docker run -d -p 10086:80 nginx
0e4de51059ad7d05bb07183379373eca7f916f293d07f21152bae10ae747713b

:~$ docker psCONTAINER ID IMAGE COMMAND CREATED STATUS PORTS NAMES
0e4de51059ad nginx "nginx -g 'daemon of…" 5 seconds ago Up 3 seconds 0.0.0.0:10086->80/tcp elated_banzai
4f2efe02b745 nginx "nginx -g 'daemon of…" 4 minutes ago Up 4 minutes 0.0.0.0:32771->80/tcp frosty_jang
a131b1e5268c nginx "nginx -g 'daemon of…" 4 minutes ago Up 4 minutes 0.0.0.0:32770->80/tcp sleepy_rubin
9706fcec6f3c nginx "nginx -g 'daemon of…" 4 minutes ago Up 4 minutes 0.0.0.0:32769->80/tcp funny_galileo
ed60135bd18f nginx "nginx -g 'daemon of…" 7 minutes ago Up 7 minutes 0.0.0.0:32768->80/tcp sad_gates
查看映射端口信息
:~$ docker port sad_gates
80/tcp -> 0.0.0.0:32768
host模式
:~$ docker run -d --network host nginx
f871acf7f2dca3ad398dd4fe1bbdd2578dc6530b94bc24ec38d8ae9cc0944626

:~$ docker psCONTAINER ID IMAGE COMMAND CREATED STATUS PORTS NAMES
f871acf7f2dc nginx "nginx -g 'daemon of…" 3 seconds ago Up 2 seconds laughing_chandrasekhar
0e4de51059ad nginx "nginx -g 'daemon of…" 5 minutes ago Up 5 minutes 0.0.0.0:10086->80/tcp elated_banzai
4f2efe02b745 nginx "nginx -g 'daemon of…" 9 minutes ago Up 9 minutes 0.0.0.0:32771->80/tcp frosty_jang
a131b1e5268c nginx "nginx -g 'daemon of…" 9 minutes ago Up 9 minutes 0.0.0.0:32770->80/tcp sleepy_rubin
9706fcec6f3c nginx "nginx -g 'daemon of…" 10 minutes ago Up 10 minutes 0.0.0.0:32769->80/tcp funny_galileo
ed60135bd18f nginx "nginx -g 'daemon of…" 12 minutes ago Up 12 minutes 0.0.0.0:32768->80/tcp sad_gates
浏览器测试 http://1 192.168.13.135/ 不需端口即可
参考文档
Docker官方英文资源:
docker官网:http://www.docker.com
Docker windows入门:https://docs.docker.com/windows/
Docker Linux 入门:https://docs.docker.com/linux/
Docker mac 入门:https://docs.docker.com/mac/
Docker 用户指引:https://docs.docker.com/engine/userguide/
Docker 官方博客:http://blog.docker.com/
Docker Hub: https://hub.docker.com/
Docker开源:https://www.docker.com/open-source
Docker中文资源:
Docker中文网站:http://www.docker.org.cn
Docker入门教程: http://www.docker.org.cn/book/docker.html
Docker安装手册:http://www.docker.org.cn/book/install.html
一小时Docker教程 :https://blog.csphere.cn/archives/22
Docker纸质书:http://www.docker.org.cn/dockershuji.html
DockerPPT:http://www.docker.org.cn/dockerppt.html
- 点赞
- 收藏
- 分享
- 文章举报
 bigfaceCatzzZ
发布了13 篇原创文章 · 获赞 1 · 访问量 831
私信
关注
bigfaceCatzzZ
发布了13 篇原创文章 · 获赞 1 · 访问量 831
私信
关注

- Dockerfile简介及Docker 程序部署
- docker简介和常用命令“易读”
- podman和docker对比
- Linux安装Nginx(非Docker)
- 安装Docker(附安装最新版本教程)
- 安装Docker-Win10环境-图解轻松学Docker&K8S
- Docker网络模式与配置Docker自定义网络(bridge模式)
- k8s中部署prometheus常用exporter
- Docker Quickstart Terminal windows10系统下出现闪退的解决方案
- Docker搭建MySQL主从复制
- docker
- Docker底层网络经典文章分享
- Docker Desktop for Mac安装Kubernetes解决kubernetes is starting...
- 树莓派docker搭建配置
- Docker+基本命令
- Docker+Dockerfile
- Docker-Machine
- Docker安装配置
- Docker镜像推送到阿里云
- Boot2Docker