从零开始,SpringBoot+Redis+MySQL搭建个人博客(二)-----引入MySQL数据库并实现通过properties实现多个数据库环境自动切换配置
目录
一、关于三种环境
在日常开发中我们的代码一般都是需要在三种环境下运行的:
本地环境(dev):即开发环境
测试环境(qa):模拟生产环境用来测试
生产环境(pro):面向客户的程序运行环境
因为三种环境里的MySQL参数不同,我们每次在准备将本地代码打包上传的时候都需要先修改配置文件,有时候粗心大意忘记修改账户和密码,还有可能导致短时间的服务宕机,我们今天来试着配置一下,让maven打包的时候自动选择配置文件来打包。
在开始之前先在resources文件夹下(本身存在application.properties文件)另外创建application-dev.properties、application-qa.properties、application-pro.properties文件,在本文中,暂时将application.properties文件设置为
[code]spring.profiles.active=dev
二、引入MySQL
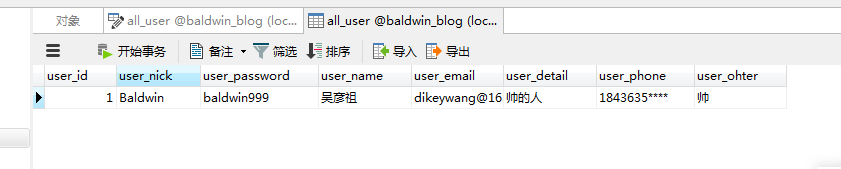
1、准备数据
本应分别在三个不同的数据库中设置对应的数据,我们这里只测试本地数据库,所以只在本地创建了user表
2.编写mapper和bean
这里使用mybatis.generator工具直接生成,关于generator的使用请自行查找
generatorConfiguration.xml
[code]<?xml version="1.0" encoding="UTF-8"?>
<!DOCTYPE generatorConfiguration PUBLIC "-//mybatis.org//DTD MyBatis Generator Configuration 1.0//EN"
"http://mybatis.org/dtd/mybatis-generator-config_1_0.dtd">
<generatorConfiguration>

<!-- 数据库驱动jar路径 -->
<classPathEntry
location="C:\Users\admin\.m2\repository\mysql\mysql-connector-java\5.1.46\mysql-connector-java-5.1.46.jar"/>

<context id="mysql">

<!-- 1:注释构建;type-可通过实现CommentGenerator接口构建自定义的注释构建类 -->
<commentGenerator>
<property name="suppressDate" value="true"/>
<!-- 是否去除自动生成的注释;true:是;false:否 -->
<property name="suppressAllComments" value="true"/>
</commentGenerator>

<!-- 2:数据库连接信息 -->
<jdbcConnection driverClass="com.mysql.jdbc.Driver" connectionURL="jdbc:mysql://127.0.0.1:3306/payment_2"
userId="root" password="wy1240594179">
</jdbcConnection>

<!--是否启用java.math.BigDecimal-->
<javaTypeResolver>
<property name="forceBigDecimals" value="false"/>
</javaTypeResolver>

<!-- 3:生成实体类地址 -->
<javaModelGenerator targetPackage="payment.sdk.bean.save" targetProject="payment">
<property name="enableSubPackages" value="true"/>
<property name="trimStrings" value="true"/>
</javaModelGenerator>

<!-- 4.生成map.xml地址 -->
<sqlMapGenerator targetPackage="payment.sdk.mapper.xml" targetProject="payment">
<property name="enableSubPackages" value="true"/>
</sqlMapGenerator>

<!-- 5.生成DAO地址 -->
<javaClientGenerator targetPackage="payment.sdk.mapper" type="XMLMAPPER" targetProject="payment">
<property name="enableSubPackages" value="true"/>
</javaClientGenerator>

<!-- 配置表信息 -->
<table tableName="subreq" domainObjectName="SubReq" enableCountByExample="false" enableUpdateByExample="false"
enableDeleteByExample="false" enableSelectByExample="false" selectByExampleQueryId="false">
<!--true:使用实际列名  false:转列名   默认:false--><property name="useActualColumnNames" value="true"/>
</table>
</context>
</generatorConfiguration>
User.java
[code]package cn.yzstu.baldwinblog.bean;

public class User {
private Integer userId;

private String userNick;

private String userPassword;

private String userName;

private String userEmail;

private String userDetail;

private String userPhone;

private String userOhter;

public Integer getUserId() {
return userId;
}

public void setUserId(Integer userId) {
this.userId = userId;
}

public String getUserNick() {
return userNick;
}

public void setUserNick(String userNick) {
this.userNick = userNick == null ? null : userNick.trim();
}

public String getUserPassword() {
return userPassword;
}

public void setUserPassword(String userPassword) {
this.userPassword = userPassword == null ? null : userPassword.trim();
}

public String getUserName() {
return userName;
}

public void setUserName(String userName) {
this.userName = userName == null ? null : userName.trim();
}

public String getUserEmail() {
return userEmail;
}

public void setUserEmail(String userEmail) {
this.userEmail = userEmail == null ? null : userEmail.trim();
}

public String getUserDetail() {
return userDetail;
}

public void setUserDetail(String userDetail) {
this.userDetail = userDetail == null ? null : userDetail.trim();
}

public String getUserPhone() {
return userPhone;
}

public void setUserPhone(String userPhone) {
this.userPhone = userPhone == null ? null : userPhone.trim();
}

public String getUserOhter() {
return userOhter;
}

public void setUserOhter(String userOhter) {
this.userOhter = userOhter == null ? null : userOhter.trim();
}

@Override
public String toString() {
return "User{" +
"userId=" + userId +
", userNick='" + userNick + '\'' +
", userPassword='" + userPassword + '\'' +
", userName='" + userName + '\'' +
", userEmail='" + userEmail + '\'' +
", userDetail='" + userDetail + '\'' +
", userPhone='" + userPhone + '\'' +
", userOhter='" + userOhter + '\'' +
'}';
}
UserMapper.java
[code]package cn.yzstu.baldwinblog.mapper;

import cn.yzstu.baldwinblog.bean.User;
import org.apache.ibatis.annotations.Mapper;

public interface UserMapper {
int deleteById(Integer userId);

int insert(User record);

User selectById(Integer userId);

int updateById(User record);
}
UserMapper.xml
[code]<?xml version="1.0" encoding="UTF-8" ?>
<!DOCTYPE mapper PUBLIC "-//mybatis.org//DTD Mapper 3.0//EN" "http://mybatis.org/dtd/mybatis-3-mapper.dtd" >
<mapper namespace="cn.yzstu.baldwinblog.mapper.UserMapper" >
<resultMap id="BaseResultMap" type="cn.yzstu.baldwinblog.bean.User" >
<id column="user_id" property="userId" jdbcType="INTEGER" />
<result column="user_nick" property="userNick" jdbcType="CHAR" />
<result column="user_password" property="userPassword" jdbcType="VARCHAR" />
<result column="user_name" property="userName" jdbcType="VARCHAR" />
<result column="user_email" property="userEmail" jdbcType="VARCHAR" />
<result column="user_detail" property="userDetail" jdbcType="VARCHAR" />
<result column="user_phone" property="userPhone" jdbcType="VARCHAR" />
<result column="user_ohter" property="userOhter" jdbcType="VARCHAR" />
</resultMap>
<sql id="Base_Column_List" >
user_id, user_nick, user_password, user_name, user_email, user_detail, user_phone,
user_ohter
</sql>
<select id="selectById" resultMap="BaseResultMap" parameterType="java.lang.Integer" >
select
<include refid="Base_Column_List" />
from all_user
where user_id = #{userId,jdbcType=INTEGER}
</select>

<delete id="deleteById" parameterType="java.lang.Integer" >
delete from all_user
where user_id = #{userId,jdbcType=INTEGER}
</delete>

<insert id="insertSelective" parameterType="cn.yzstu.baldwinblog.bean.User" >
insert into all_user
<trim prefix="(" suffix=")" suffixOverrides="," >
<if test="userId != null" >
user_id,
</if>
<if test="userNick != null" >
user_nick,
</if>
<if test="userPassword != null" >
user_password,
</if>
<if test="userName != null" >
user_name,
</if>
<if test="userEmail != null" >
user_email,
</if>
<if test="userDetail != null" >
user_detail,
</if>
<if test="userPhone != null" >
user_phone,
</if>
<if test="userOhter != null" >
user_ohter,
</if>
</trim>
<trim prefix="values (" suffix=")" suffixOverrides="," >
<if test="userId != null" >
#{userId,jdbcType=INTEGER},
</if>
<if test="userNick != null" >
#{userNick,jdbcType=CHAR},
</if>
<if test="userPassword != null" >
#{userPassword,jdbcType=VARCHAR},
</if>
<if test="userName != null" >
#{userName,jdbcType=VARCHAR},
</if>
<if test="userEmail != null" >
#{userEmail,jdbcType=VARCHAR},
</if>
<if test="userDetail != null" >
#{userDetail,jdbcType=VARCHAR},
</if>
<if test="userPhone != null" >
#{userPhone,jdbcType=VARCHAR},
</if>
<if test="userOhter != null" >
#{userOhter,jdbcType=VARCHAR},
</if>
</trim>
</insert>

<update id="updateById" parameterType="cn.yzstu.baldwinblog.bean.User" >
update all_user
<set >
<if test="userNick != null" >
user_nick = #{userNick,jdbcType=CHAR},
</if>
<if test="userPassword != null" >
user_password = #{userPassword,jdbcType=VARCHAR},
</if>
<if test="userName != null" >
user_name = #{userName,jdbcType=VARCHAR},
</if>
<if test="userEmail != null" >
user_email = #{userEmail,jdbcType=VARCHAR},
</if>
<if test="userDetail != null" >
user_detail = #{userDetail,jdbcType=VARCHAR},
</if>
<if test="userPhone != null" >
user_phone = #{userPhone,jdbcType=VARCHAR},
</if>
<if test="userOhter != null" >
user_ohter = #{userOhter,jdbcType=VARCHAR},
</if>
</set>
where user_id = #{userId,jdbcType=INTEGER}
</update>
</mapper>
三个文件生成之后一般都要按照自己的需求来改一下,以上是经过我修改的文件
当然还需要配置一下扫描路径,代码写到这里的时候,我考虑了一下,将mapper.xml文件放在了转移到了src/main/resources/mybatis/mapper/下,并在src/main/resources/mybatis/下创建mybatis-config.xml文件留作备用,暂时为空
在application-dev.xml文件中配置数据库相关信息和映射文件相关信息
[code]spring.datasource.driverClassName = com.mysql.jdbc.Driver
spring.datasource.url=jdbc:mysql://127.0.0.1:3306/baldwin_blog?useUnicode=true&characterEncoding=utf8&useSSL=false&serverTimezone=UTC
spring.datasource.username=root
spring.datasource.password=wy******

mybatis.config-locations=classpath:mybatis/mybatis-config.xml
mybatis.mapper-locations=classpath:mybatis/mapper/*.xml
3.准备service
接口:UserService.java
[code]package cn.yzstu.baldwinblog.service;

import cn.yzstu.baldwinblog.bean.User;

/**
* @描述
* @Author Baldwin
* @E-Mail DikeyWang@163.com || baldwin@******.com
* @Time 2019/12/11 20:52
* @Other
*/
public interface UserService {
User getbyId(int id);
}
实现类:UserServiceImpl.java
[code]package cn.yzstu.baldwinblog.service.impl;

import cn.yzstu.baldwinblog.bean.User;
import cn.yzstu.baldwinblog.mapper.UserMapper;
import cn.yzstu.baldwinblog.service.UserService;
import org.springframework.beans.factory.annotation.Autowired;
import org.springframework.stereotype.Service;

/**
* \* Created with IntelliJ IDEA.
* \* User: Baldwin
* \* E_Mail: baldwin@******.com || DikeyWang@163.com
* \* Date: 2019/12/11
* \* Time: 20:53
* \* To change this template use File | Settings | File Templates.
* \* Description:
* \
*/
@Service
public class UserServiceImpl implements UserService {

@Autowired
private UserMapper userMapper;

@Override
public User getbyId(int id) {
return userMapper.selectById(Integer.valueOf(id));
}
}
4.单元测试
将光标放在我们的类名上,然后点击Alt+Enter可以选择自动创建Test模块


选择我们熟悉的测试工具,配置自己需要的内容,然后点击OK
生成的测试类可以在test文件夹下找到,现在我们要给他加一些关于SB的测试参数,最终结果如下
[code]package cn.yzstu.baldwinblog.mapper;

import cn.yzstu.baldwinblog.bean.User;
import org.junit.Test;
import org.junit.runner.RunWith;
import org.springframework.beans.factory.annotation.Autowired;
import org.springframework.boot.test.context.SpringBootTest;
import org.springframework.test.context.junit4.SpringRunner;

import static org.junit.Assert.*;

/**
* @描述
* @Author Baldwin
* @E-Mail DikeyWang@163.com || baldwin@******.com
* @Time 2019/12/12 12:10
* @Other
*/
@RunWith(SpringRunner.class)
@SpringBootTest
public class UserMapperTest {

@Autowired
private UserMapper userMapper;

@Test
public void selectById() {
User user = userMapper.selectById(1);
System.out.println("Baldwin是一个"+user.getUserDetail());
}
}
点击运行,我们得到了一个预期之中,并且符合客观事实的结果(红框)

5.Controller
新建UserController.java
[code]package cn.yzstu.baldwinblog.controller;

import cn.yzstu.baldwinblog.bean.User;
import cn.yzstu.baldwinblog.service.UserService;
import org.springframework.beans.factory.annotation.Autowired;
import org.springframework.web.bind.annotation.RequestMapping;
import org.springframework.web.bind.annotation.RestController;

/**
* \* Created with IntelliJ IDEA.
* \* User: Baldwin
* \* E_Mail: baldwin@******.com || DikeyWang@163.com
* \* Date: 2019/12/11
* \* Time: 20:55
* \* To change this template use File | Settings | File Templates.
* \* Description:
* \
*/
@RestController
@RequestMapping(value = "/user")
public class UserController {

@Autowired
private UserService userService;

@RequestMapping(value = "/login.action")
String userLogin(){
String str;
User user = userService.getbyId(1);
str = user.toString();
return str;
}
}
6.注解法配置MapperScan
在启动文件中增加注解@MapperScan("****"),让程序能够找到mapper.java文件的位置,也可以在每个mapper类的上方添加@Mapper注解,但是这样太麻烦了,我还是喜欢第一种方法。
[code]package cn.yzstu.baldwinblog;

import org.mybatis.spring.annotation.MapperScan;
import org.springframework.boot.SpringApplication;
import org.springframework.boot.autoconfigure.SpringBootApplication;

@SpringBootApplication
@MapperScan("cn.yzstu.baldwinblog.mapper")
public class BaldwinblogApplication {
public static void main(String[] args) {
SpringApplication.run(BaldwinblogApplication.class, args);
}
}
@MapperScan与@Mapper注解需要导入包mybatis-spring-boot-starter,而且需要指定版本,(2019-12-12:当前默认版本无法使用该注解)太高的版本可能导致注解失效
[code]<!--缺少此jar包,导致@Mapper注解无效-->
<dependency>
<groupId>org.mybatis.spring.boot</groupId>
<artifactId>mybatis-spring-boot-starter</artifactId>
<!--版本1.2.0否则无效-->
<version>1.2.0</version>
</dependency>
7.项目本地测试
运行SB项目,并在浏览器中访问http://localhost:8080/user/login.action

到目前为止,我们已经成功在SB项目中引入MySQL。
8.当前pom.xml
[code]<?xml version="1.0" encoding="UTF-8"?>
<project xmlns="http://maven.apache.org/POM/4.0.0" xmlns:xsi="http://www.w3.org/2001/XMLSchema-instance"
xsi:schemaLocation="http://maven.apache.org/POM/4.0.0 https://maven.apache.org/xsd/maven-4.0.0.xsd">
<modelVersion>4.0.0</modelVersion>
<parent>
<groupId>org.springframework.boot</groupId>
<artifactId>spring-boot-starter-parent</artifactId>
<version>2.2.2.RELEASE</version>
<relativePath/> <!-- lookup parent from repository -->
</parent>
<groupId>com.yzstu</groupId>
<artifactId>baldwinblog</artifactId>
<version>1.0.0</version>
<packaging>jar</packaging>
<name>baldwinblog</name>
<description>This project is a new blog with SB and so on</description>

<properties>
<java.version>1.8</java.version>
</properties>

<dependencies>
<dependency>
<groupId>org.springframework.boot</groupId>
<artifactId>spring-boot-starter-web</artifactId>
</dependency>
<dependency>
<groupId>org.springframework.boot</groupId>
<artifactId>spring-boot-starter-test</artifactId>
<scope>test</scope>
</dependency>
<dependency>
<groupId>org.springframework.boot</groupId>
<artifactId>spring-boot-starter-test</artifactId>
<scope>test</scope>
<exclusions>
<exclusion>
<groupId>org.junit.vintage</groupId>
<artifactId>junit-vintage-engine</artifactId>
</exclusion>
</exclusions>
</dependency>
<!--缺少此jar包,导致@Mapper注解无效-->
<dependency>
<groupId>org.mybatis.spring.boot</groupId>
<artifactId>mybatis-spring-boot-starter</artifactId>
<!--版本1.2.0否则无效-->
<version>1.2.0</version>
</dependency>
<dependency>
<groupId>mysql</groupId>
<artifactId>mysql-connector-java</artifactId>
</dependency>
<dependency>
<groupId>org.springframework.boot</groupId>
<artifactId>spring-boot-devtools</artifactId>
<optional>true</optional>
</dependency>
<dependency>
<groupId>org.xmlunit</groupId>
<artifactId>xmlunit-core</artifactId>
</dependency>
<dependency>
<groupId>junit</groupId>
<artifactId>junit</artifactId>
<scope>test</scope>
</dependency>
</dependencies>

<build>
<plugins>
<plugin>
<groupId>org.springframework.boot</groupId>
<artifactId>spring-boot-maven-plugin</artifactId>
</plugin>

<!--mybatis-generator插件-->
<plugin>
<!--Mybatis-generator插件,用于自动生成Mapper和POJO-->
<groupId>org.mybatis.generator</groupId>
<artifactId>mybatis-generator-maven-plugin</artifactId>
<version>1.3.2</version>
<configuration>
<!--配置文件的位置 一定要改成配置文件的位置-->
<configurationFile>src/main/resources/generatorConfig.xml</configurationFile>
<verbose>true</verbose>
<overwrite>true</overwrite>
</configuration>
<executions>
<execution>
<id>Generate MyBatis Artifacts</id>
<goals>
<goal>generate</goal>
</goals>
</execution>
</executions>
<dependencies>
<dependency>
<groupId>org.mybatis.generator</groupId>
<artifactId>mybatis-generator-core</artifactId>
<version>1.3.2</version>
</dependency>
</dependencies>
</plugin>
</plugins>
</build>

</project>
三、配置三种properties
我们在上面已经创建了三个properties,根据我们在application.properties中的配置

我们刚才测试运行的应该是application-dev.properties文件,这个我们从日志中可以得到验证

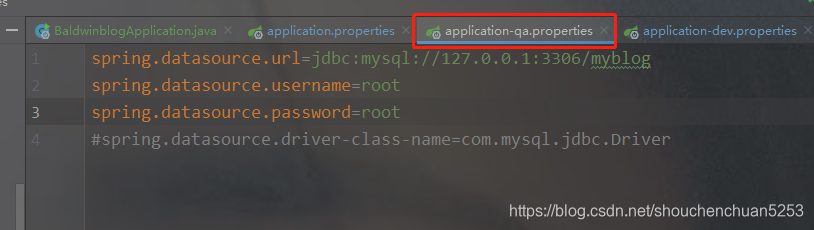
不放心的话,我们还可以做一下测试,将我们的application.xml修改为
[code]spring.profiles.active=qa
但是现在我们的application-qa.xml其实在本地是无法运行的
我们来运行一下试试

通过日志我们发现,确实运行了qa的配置文件,但是我们的qa文件应该是无法运行的,我们现在来访问 http://localhost:8080/user/login.action

果然出现了这个错误,这是因为我们的application-qa.xml文件中没有配置映射文件路径
那么我们现在来说一下如何让maven在打包的时候自动切换application.xml自动切换配置文件
1.设置项目对象模型pom.xml
添加profiles到pom.xml中,profiles节点是和build同级的。
[code]<profiles>
<profile>
<id>dev</id>
<properties>
<env>dev</env>
</properties>
<activation>
<activeByDefault>true</activeByDefault>
</activation>
</profile>
<profile>
<id>qa</id>
<properties>
<env>qa</env>
</properties>
</profile>
<profile>
<id>prod</id>
<properties>
<env>prod</env>
</properties>
</profile>
</profiles>
activation表示的是可以用这样的命令来触发profile,
true表示dev是默认的profile, 这样本地直接ide启动项目的时候就是连接的dev环境。
添加filters节点。
filters在build下一级
[code]        <filters>
<filter>src/main/resources/application-${env}.properties</filter>
</filters>
修改application.xml使配置生效
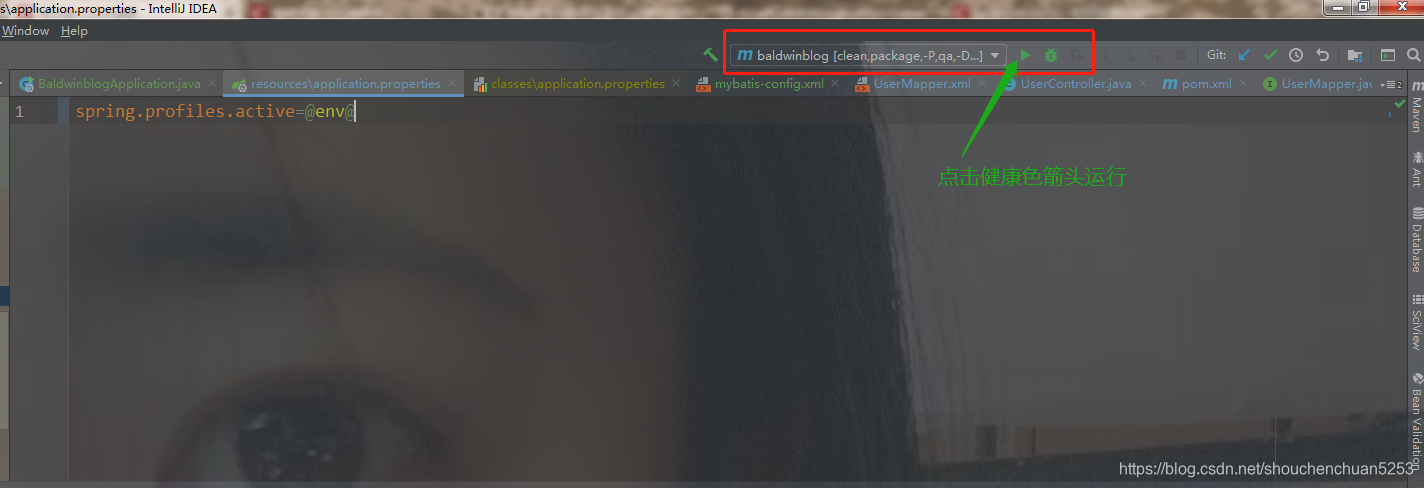
[code]spring.profiles.active=@env@
@env@ 就相当于一个变量,与我们先前的配置对应即可
2.配置maven打包命令
clean package -P qa -D maven.test.skip=true (clean并打包,跳过测试类)

运行maven打包指令并检查文件
3.检查
等待打包结束,检查target文件夹下的编译文件包
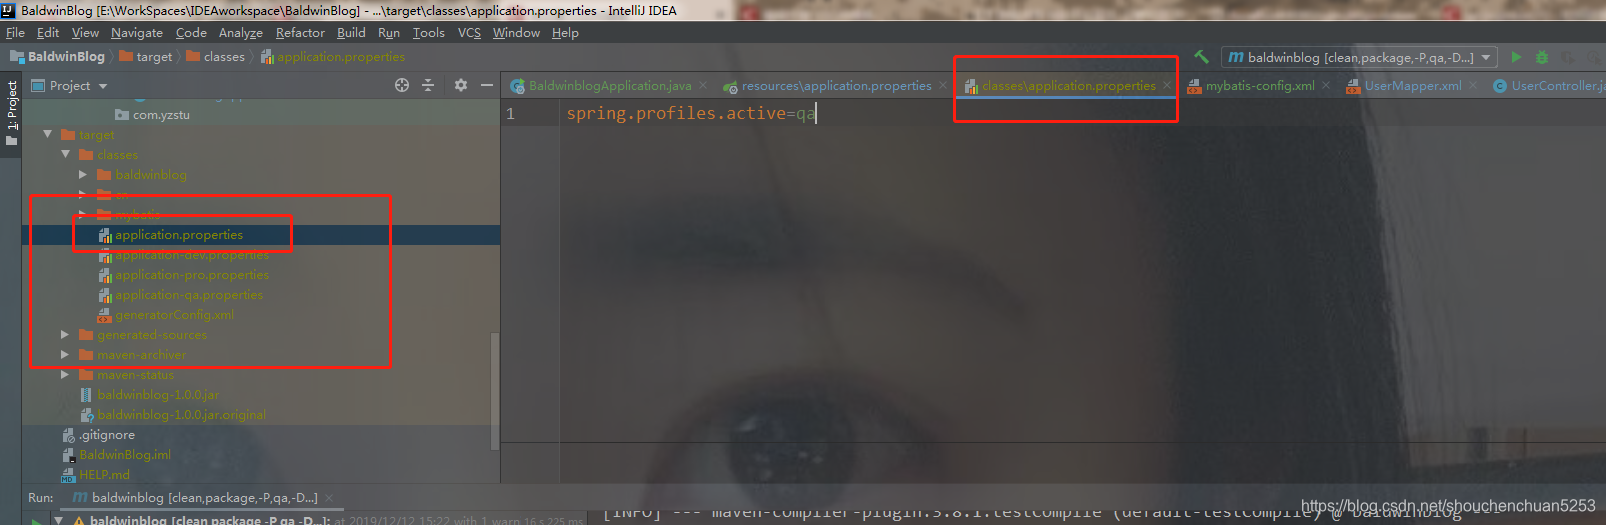
可以看到,与我们设置的是一样的,成功
四、总结
1.打包命令
开发环境打包命令:clean package -P dec -D maven.test.skip=true
测试环境打包命令:clean package -P qa -D maven.test.skip=true
生产环境打包命令:clean package -P pro -D maven.test.skip=true
2.当前架构

3.参考文章
纯洁的微笑:springboot(六)-如何优雅的使用mybatis
请叫我头头哥:SpringBoot入门教程(三)通过properties实现多个数据库环境自动切换配置
4.上一篇
从零开始,SpringBoot+Redis+MySQL搭建个人博客(一)-----搭建SpringBoot环境
5.下一篇
从零开始,SpringBoot+Redis+MySQL搭建个人博客(三)-----引入Redis
- 点赞 2
- 收藏
- 分享
- 文章举报
 Baldwin_KeepMind
发布了51 篇原创文章 · 获赞 277 · 访问量 14万+
私信
关注
Baldwin_KeepMind
发布了51 篇原创文章 · 获赞 277 · 访问量 14万+
私信
关注

- 从零开始,SpringBoot+Redis+MySQL搭建个人博客(三)-----引入Redis
- 从零开始,SpringBoot+Redis+MySQL搭建个人博客(六)-----添加登录功能并实现访问网址即跳转主页
- SpringBoot(三)通过properties实现多个数据库环境自动切换配置
- 通过 spring 容器内建的 profile 功能实现开发环境、测试环境、生产环境配置自动切换
- 通过 spring 容器内建的 profile 功能实现开发环境、测试环境、生产环境配置自动切换
- 通过 spring 容器内建的 profile 功能实现开发环境、测试环境、生产环境配置自动切换
- 使用Spring boot 的profile功能实现多环境配置自动切换
- 通过 spring 容器内建的 profile 功能实现开发环境、测试环境、生产环境配置自动切换
- 通过 spring 容器内建的 profile 功能实现开发环境、测试环境、生产环境配置自动切换
- 通过 spring 容器内建的 profile 功能实现开发环境、测试环境、生产环境配置自动切换
- 通过 spring 容器内建的 profile 功能实现开发环境、测试环境、生产环境配置自动切换
- 通过 spring 容器内建的 profile 功能实现开发环境、测试环境、生产环境配置自动切换
- 通过 spring 容器内建的 profile 功能实现开发环境、测试环境、生产环境配置自动切换
- 通过 spring 容器内建的 profile 功能实现开发环境、测试环境、生产环境配置自动切换
- Spring boot 的profile功能如何实现多环境配置自动切换
- 通过 spring 容器内建的 profile 功能实现开发环境、测试环境、生产环境配置自动切换
- 通过 spring 容器内建的 profile 功能实现开发环境、测试环境、生产环境配置自动切换
- 通过 spring 容器内建的 profile 功能实现开发环境、测试环境、生产环境配置自动切换
- 通过 spring 容器内建的 profile 功能实现开发环境、测试环境、生产环境配置自动切换
- 通过 spring 容器内建的 profile 功能实现开发环境、测试环境、生产环境配置自动切换