【源码解读系列五】深入剖析Springboot启动原理的底层源码
写在前面: 我是 扬帆向海,这个昵称来源于我的名字以及女朋友的名字。我热爱技术、热爱开源、热爱编程。
技术是开源的、知识是共享的。
这博客是对自己学习的一点点总结及记录,如果您对 Java、算法 感兴趣,可以关注我的动态,我们一起学习。
用知识改变命运,让我们的家人过上更好的生活。
相关文章:
【SpringBoot 系列】史上最全的springboot学习教程
| 本文通过剖析源码,对Spring Boot(基于2.x版本)的启动过程进行深入的理解 |
文章目录
- 1. 开启计时器
- 2. 设置系统属性的值
- 3. 监听器
- 4. 初始化默认参数
- 5.创建 Spring 环境
- 6. 打印器
- 7. 创建Spring应用上下文
- 8. 实例化异常报告器
- 9. Spring上下文前置处理
- 10. Spring上下文刷新
- 11. Spring上下文后置处理
- 12. 停止计时器
- 13. 发布Spring上下文启动完成事件
- 14. 执行所有 Runner 运行器
- 15. 发布Spring上下文就绪事件
一、入口类及其源码剖析
入口类
@SpringBootApplication
public class DevServiceApplication {

public static void main(String[] args) {
SpringApplication.run(DevServiceApplication.class,args);
}
}

首先从注解入手,进行分析:
@SpringBootApplication 注解
Spring Boot应用标注在某个类上说明这个类是SpringBoot的主配置类,SpringBoot就应该运行这个类的main方法来启动SpringBoot应用
源码剖析
@Target(ElementType.TYPE)
@Retention(RetentionPolicy.RUNTIME)
@Documented
@Inherited
@SpringBootConfiguration
@EnableAutoConfiguration
@ComponentScan(excludeFilters = { @Filter(type = FilterType.CUSTOM, classes = TypeExcludeFilter.class),
@Filter(type = FilterType.CUSTOM, classes = AutoConfigurationExcludeFilter.class) })
public @interface SpringBootApplication {
从源码可以看出,这个注解是@SpringBootConfiguration,@EnableAutoConfiguration以及@ComponentScan这三个注解的组合
① @SpringBootConfiguration
Spring Boot的配置类;标注在某个类上,表示一个类提供了Spring Boot应用程序
@Target(ElementType.TYPE)
@Retention(RetentionPolicy.RUNTIME)
@Documented
@Configuration
public @interface SpringBootConfiguration {
@Configuration:配置类上来标注这个注解;
@Target(ElementType.TYPE)
@Retention(RetentionPolicy.RUNTIME)
@Documented
@Component
public @interface Configuration {
注意:
配置类相当于配置文件;配置类也是容器中的一个组件,它使用了@Component这个注解。
② @EnableAutoConfiguration
告诉SpringBoot开启自动配置功能,这样自动配置才能生效
借助@import,扫描并实例化满足条件的自动配置的bean,然后加载到IOC容器中
@Target(ElementType.TYPE)
@Retention(RetentionPolicy.RUNTIME)
@Documented
@Inherited
@AutoConfigurationPackage
@Import(AutoConfigurationImportSelector.class)
public @interface EnableAutoConfiguration {

String ENABLED_OVERRIDE_PROPERTY = "spring.boot.enableautoconfiguration";

/**
* Exclude specific auto-configuration classes such that they will never be applied.
* @return the classes to exclude
*/
Class<?>[] exclude() default {};

/**
* Exclude specific auto-configuration class names such that they will never be
* applied.
* @return the class names to exclude
* @since 1.3.0
*/
String[] excludeName() default {};

}
@AutoConfigurationPackage:自动配置包
@Import(EnableAutoConfigurationImportSelector.class):给容器中导入组件
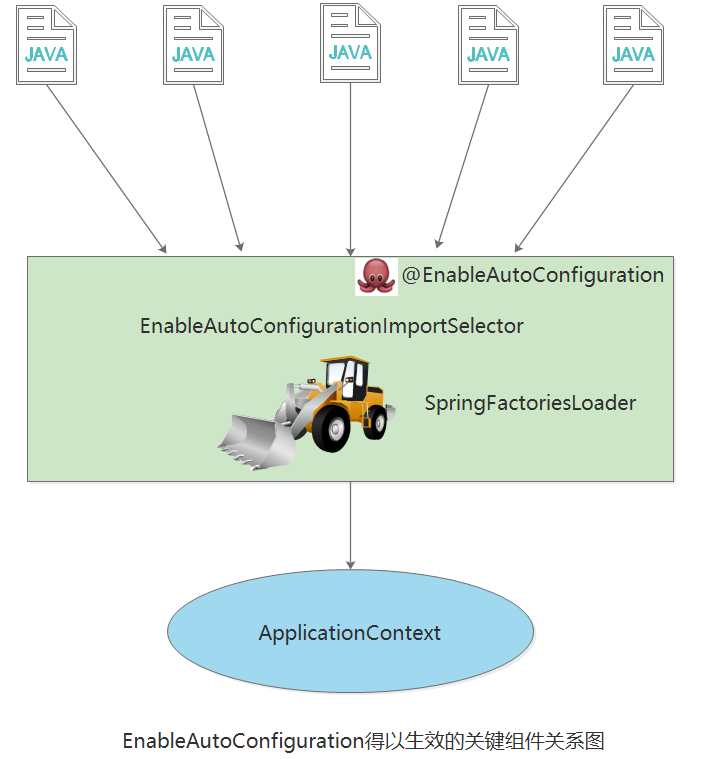
使用@EnableAutoConfiguration
这个注解开启自动扫描,然后使用select选择挑选满足条件的文件,并且使用SpringFactoriesLoader进行实例化。最后加载到IOC容器里面,即ApplicationContext中。
③ @ComponentScan
@ComponentScan就是自动扫描并加载符合条件的组件(比如@Component和@Repository等)或者bean定义,最终将这些bean定义加载到IOC容器中去 。
二、实例化SpringApplication对象的源码剖析
源码剖析
/**
* Create a new {@link SpringApplication} instance. The application context will load
* beans from the specified primary sources (see {@link SpringApplication class-level}
* documentation for details. The instance can be customized before calling
* {@link #run(String...)}.
* @param resourceLoader the resource loader to use
* @param primarySources the primary bean sources
* @see #run(Class, String[])
* @see #setSources(Set)
*/
@SuppressWarnings({ "unchecked", "rawtypes" })
public SpringApplication(ResourceLoader resourceLoader, Class<?>... primarySources) {
// 初始化资源加载器
this.resourceLoader = resourceLoader;
// 资源加载类不能为 null
Assert.notNull(primarySources, "PrimarySources must not be null");
// 初始化加载资源类集合并去重
this.primarySources = new LinkedHashSet<>(Arrays.asList(primarySources));
// 推断应用程序是不是web应用
this.webApplicationType = WebApplicationType.deduceFromClasspath();
// 设置初始化器(Initializer)
setInitializers((Collection) getSpringFactoriesInstances(ApplicationContextInitializer.class));
// 设置监听器
setListeners((Collection) getSpringFactoriesInstances(ApplicationListener.class));
// 推断出主应用入口类
this.mainApplicationClass = deduceMainApplicationClass();
}
其中,在推断应用程序是不是web应用的时候调用了deduceFromClasspath() 方法
源码剖析
static WebApplicationType deduceFromClasspath() {
if (ClassUtils.isPresent(WEBFLUX_INDICATOR_CLASS, null) && !ClassUtils.isPresent(WEBMVC_INDICATOR_CLASS, null)
&& !ClassUtils.isPresent(JERSEY_INDICATOR_CLASS, null)) {
// springboot2.0提出的响应式web应用
return WebApplicationType.REACTIVE;
}
for (String className : SERVLET_INDICATOR_CLASSES) {
// 如果两个包路径都没有的话,就是普通应用
if (!ClassUtils.isPresent(className, null)) {
// 普通的应用
return WebApplicationType.NONE;
}
}
// 其实最后返回的就是这个servlet,因为是web应用
return WebApplicationType.SERVLET;
}
1. 设置初始化器(Initializer)
initializers 是 SpringApplication 中的一个实例属性
源码剖析
/**
* Sets the {@link ApplicationContextInitializer} that will be applied to the Spring
* {@link ApplicationContext}.
* @param initializers the initializers to set
*/
public void setInitializers(Collection<? extends ApplicationContextInitializer<?>> initializers) {
this.initializers = new ArrayList<>(initializers);
}
initailizer实现了ApplicationContextInitializer接口
源码剖析
/**
* Callback interface for initializing a Spring {@link ConfigurableApplicationContext}
* prior to being {@linkplain ConfigurableApplicationContext#refresh() refreshed}.
*
* <p>Typically used within web applications that require some programmatic initialization
* of the application context. For example, registering property sources or activating
* profiles against the {@linkplain ConfigurableApplicationContext#getEnvironment()
* context's environment}. See {@code ContextLoader} and {@code FrameworkServlet} support
* for declaring a "contextInitializerClasses" context-param and init-param, respectively.
*
* <p>{@code ApplicationContextInitializer} processors are encouraged to detect
* whether Spring's {@link org.springframework.core.Ordered Ordered} interface has been
* implemented or if the @{@link org.springframework.core.annotation.Order Order}
* annotation is present and to sort instances accordingly if so prior to invocation.
*
* @author Chris Beams
* @since 3.1
* @param <C> the application context type
* @see org.springframework.web.context.ContextLoader#customizeContext
* @see org.springframework.web.context.ContextLoader#CONTEXT_INITIALIZER_CLASSES_PARAM
* @see org.springframework.web.servlet.FrameworkServlet#setContextInitializerClasses
* @see org.springframework.web.servlet.FrameworkServlet#applyInitializers
*/
public interface ApplicationContextInitializer<C extends ConfigurableApplicationContext> {

/**
* Initialize the given application context.
* @param applicationContext the application to configure
*/
// 把初始化的ApplicationContextInitializer实现类加载到SpringApplication中
void initialize(C applicationContext);

}
总结:
- ApplicationContextInitializer接口的作用,在Spring上下文被刷新之前进行初始化的操作。典型地比如在Web应用中,注册Property Sources或者是激活Profiles。Property Sources比较好理解,就是配置文件。Profiles是Spring为了在不同环境下(如DEV,TEST,PRODUCTION等),加载不同的配置项而抽象出来的一个实体。
- 调用initialize()方法,把初始化的ApplicationContextInitializer实现加载到SpringApplication中
通过getSpringFactoriesInstances(
ApplicationContextInitializer.class)方法获得实现类
源码剖析
private <T> Collection<T> getSpringFactoriesInstances(Class<T> type) {
return getSpringFactoriesInstances(type, new Class<?>[] {});
}

private <T> Collection<T> getSpringFactoriesInstances(Class<T> type, Class<?>[] parameterTypes, Object... args) {
ClassLoader classLoader = getClassLoader();
// Use names and ensure unique to protect against duplicates
// 使用 Set保存names
Set<String> names = new LinkedHashSet<>(SpringFactoriesLoader.loadFactoryNames(type, classLoader));
// 根据names进行实例化
List<T> instances = createSpringFactoriesInstances(type, parameterTypes, classLoader, args, names);
// 对实例进行排序
AnnotationAwareOrderComparator.sort(instances);
return instances;
}
2. 设置监听器
源码剖析
/**
* Sets the {@link ApplicationListener}s that will be applied to the SpringApplication
* and registered with the {@link ApplicationContext}.
* @param listeners the listeners to set
*/
public void setListeners(Collection<? extends ApplicationListener<?>> listeners) {
this.listeners = new ArrayList<>(listeners);
}
继承了ApplicationListener()接口
源码剖析
/**
* Interface to be implemented by application event listeners.
*
* <p>Based on the standard {@code java.util.EventListener} interface
* for the Observer design pattern.
*
* <p>As of Spring 3.0, an {@code ApplicationListener} can generically declare
* the event type that it is interested in. When registered with a Spring
* {@code ApplicationContext}, events will be filtered accordingly, with the
* listener getting invoked for matching event objects only.
*
* @author Rod Johnson
* @author Juergen Hoeller
* @param <E> the specific {@code ApplicationEvent} subclass to listen to
* @see org.springframework.context.ApplicationEvent
* @see org.springframework.context.event.ApplicationEventMulticaster
* @see org.springframework.context.event.EventListener
*/
@FunctionalInterface
public interface ApplicationListener<E extends ApplicationEvent> extends EventListener {

/**
* Handle an application event.
* @param event the event to respond to
*/
void onApplicationEvent(E event);

}
总结:
在这里使用到了观察者模式,有一个被观察者和许多观察者,当被观察者的状态发生改变时,要通知所有的观察者做一些操作。
3. 推断主应用入口类
源码剖析
private Class<?> deduceMainApplicationClass() {
try {
// 构造一个异常类
StackTraceElement[] stackTrace = new RuntimeException().getStackTrace();
for (StackTraceElement stackTraceElement : stackTrace) {
// 通过main的栈帧推断出入口类的名字
if ("main".equals(stackTraceElement.getMethodName())) {
return Class.forName(stackTraceElement.getClassName());
}
}
}
catch (ClassNotFoundException ex) {
// Swallow and continue
}
return null;
}
三、run() 方法源码剖析
源码剖析
/**
* Run the Spring application, creating and refreshing a new
* {@link ApplicationContext}.
* @param args the application arguments (usually passed from a Java main method)
* @return a running {@link ApplicationContext}
*/
public ConfigurableApplicationContext run(String... args) {
// 记时器,统计应用启动的时间
StopWatch stopWatch = new StopWatch();
stopWatch.start();
// 初始化应用上下文和异常报告集合
ConfigurableApplicationContext context = null;
// SpringBootExceptionReporter 是异常处理器,启动的时候通过它把异常信息展示出来
Collection<SpringBootExceptionReporter> exceptionReporters = new ArrayList<>();
// 设置系统属性java.awt.headless的值,默认为true
configureHeadlessProperty();
// 监听器,SpringApplicationRunListeners实际上是一个集合
SpringApplicationRunListeners listeners = getRunListeners(args);
// 回调所有的获取SpringApplicationRunListener.starting()方法
listeners.starting();
try {
// 初始化默认参数
ApplicationArguments applicationArguments = new DefaultApplicationArguments(args);// 准备 Spring 环境
ConfigurableEnvironment environment = prepareEnvironment(listeners, applicationArguments);
// 创建环境完成后回调,配置bean
configureIgnoreBeanInfo(environment);
// 打印器,springboot启动的时候会打印springboot的标志以及对应的版本
Banner printedBanner = printBanner(environment);
// 创建Spring应用上下文,来决定创建web的ioc还是普通的ioc
context = createApplicationContext();
// 实例化异常报告器
exceptionReporters = getSpringFactoriesInstances(SpringBootExceptionReporter.class,
new Class[] { ConfigurableApplicationContext.class }, context);
//准备上下文环境
// Spring上下文前置处理
prepareContext(context, environment, listeners, applicationArguments, printedBanner);
// prepareContext运行完成以后回调所有的SpringApplicationRunListener的contextLoaded();
// Spring上下文刷新,表示刷新完成,进行后续的一些操作
refreshContext(context);
// Spring上下文后置处理
afterRefresh(context, applicationArguments);
// 停止计时器
stopWatch.stop();
// 输出日志记录的类名、时间信息
if (this.logStartupInfo) {
new StartupInfoLogger(this.mainApplicationClass).logStarted(getApplicationLog(), stopWatch);
}
// 发布应用上下文启动完成事件
listeners.started(context);
// 执行所有 Runner 运行器
callRunners(context, applicationArguments);
}
catch (Throwable ex) {
handleRunFailure(context, ex, exceptionReporters, listeners);
throw new IllegalStateException(ex);
}

try {
// 发布应用上下文就绪事件
listeners.running(context);
}
catch (Throwable ex) {
handleRunFailure(context, ex, exceptionReporters, null);
throw new IllegalStateException(ex);
}
// 返回应用上下文
return context;
}
1. 开启计时器
开启计时器,用来统计应用启动的时间
public void start() throws IllegalStateException {
// 传入一个空字符串作为当前任务的名称
this.start("");
}

public void start(String taskName) throws IllegalStateException {
if (this.currentTaskName != null) {
// 如果当前任务名字不为空,抛出异常
throw new IllegalStateException("Can't start StopWatch: it's already running");
} else {
// 否则,记录当前任务的开始时间
this.currentTaskName = taskName;
this.startTimeNanos = System.nanoTime();
}
}
- 首先,传入一个空字符串作为当前任务的名称
- 其次,判断当前任务名是否空,如果为空,则记录当前应用启动的开始时间
2. 设置系统属性的值
系统属性的值默认是true,系统属性的值来源于System.getProperty()。
private void configureHeadlessProperty() {
System.setProperty(SYSTEM_PROPERTY_JAVA_AWT_HEADLESS,
System.getProperty(SYSTEM_PROPERTY_JAVA_AWT_HEADLESS, Boolean.toString(this.headless)));
}
3. 监听器
private SpringApplicationRunListeners getRunListeners(String[] args) {
// 类加载对应的监听器
Class<?>[] types = new Class<?>[] { SpringApplication.class, String[].class };
// 创建SpringApplicationRunListener实例
return new SpringApplicationRunListeners(logger,
getSpringFactoriesInstances(SpringApplicationRunListener.class, types, this, args));
}
4. 初始化默认参数
ApplicationArguments applicationArguments = new DefaultApplicationArguments(args);
5.创建 Spring 环境
private ConfigurableEnvironment prepareEnvironment(
SpringApplicationRunListeners listeners,
ApplicationArguments applicationArguments) {
// 获取环境。如果存在就直接返回,否则先创建一个再返回
ConfigurableEnvironment environment = getOrCreateEnvironment();
// 配置环境
configureEnvironment(environment, applicationArguments.getSourceArgs());
// 准备监听器环境
listeners.environmentPrepared(environment);
// 将环境绑定到SpringApplication上面
bindToSpringApplication(environment);
// 如果不是web应用环境,将环境转换成StandardEnvironment
if (this.webApplicationType == WebApplicationType.NONE) {
environment = new EnvironmentConverter(getClassLoader())
.convertToStandardEnvironmentIfNecessary(environment);
}
ConfigurationPropertySources.attach(environment);
// 返回环境
return environment;
}
总结:
- 获取环境。如果存在就直接返回,否则先创建一个再返回
- 配置环境
- 准备监听器环境
- 将环境绑定到SpringApplication上面
- 如果不是web应用环境,将环境转换成StandardEnvironment
- 最后返回环境
6. 打印器
springboot启动的时候会打印springboot的标志以及对应的版本
private Banner printBanner(ConfigurableEnvironment environment) {
if (this.bannerMode == Banner.Mode.OFF) {
return null;
}
ResourceLoader resourceLoader = (this.resourceLoader != null) ? this.resourceLoader
: new DefaultResourceLoader(getClassLoader());
SpringApplicationBannerPrinter bannerPrinter = new SpringApplicationBannerPrinter(resourceLoader, this.banner);
if (this.bannerMode == Mode.LOG) {
return bannerPrinter.print(environment, this.mainApplicationClass, logger);
}
return bannerPrinter.print(environment, this.mainApplicationClass, System.out);
}
7. 创建Spring应用上下文
protected ConfigurableApplicationContext createApplicationContext() {
// 首先进行判断有没有指定的实现类
Class<?> contextClass = this.applicationContextClass;
// 如果没有,则根据应用类型选择
if (contextClass == null) {
try {
// 根据webApplicationType的类型去反射创建ConfigurableApplicationContext的具体实例
switch (this.webApplicationType) {
case SERVLET:
contextClass = Class.forName(DEFAULT_SERVLET_WEB_CONTEXT_CLASS);
break;
case REACTIVE:
contextClass = Class.forName(DEFAULT_REACTIVE_WEB_CONTEXT_CLASS);
break;
default:
contextClass = Class.forName(DEFAULT_CONTEXT_CLASS);
}
}
catch (ClassNotFoundException ex) {
throw new IllegalStateException(
"Unable create a default ApplicationContext, please specify an ApplicationContextClass", ex);
}
}
// 通过反射,得到创建的对象
return (ConfigurableApplicationContext) BeanUtils.instantiateClass(contextClass);
}
总结:
- 首先进行判断有没有指定的实现类; 如果没有,则根据应用类型选择;
- 根据webApplicationType的类型去反射创建ConfigurableApplicationContext的具体实例;
- 最后通过反射,得到创建的对象
对于Web应用,上下文类型是DEFAULT_WEB_CONTEXT_CLASS。
8. 实例化异常报告器
用 getSpringFactoriesInstances() 方法,获取配置的异常类名称,并实例化所有的异常类。
源码剖析
private <T> Collection<T> getSpringFactoriesInstances(Class<T> type, Class<?>[] parameterTypes, Object... args) {
ClassLoader classLoader = getClassLoader();
// Use names and ensure unique to protect against duplicates
// 使用名称并确保唯一,以防止重复
Set<String> names = new LinkedHashSet<>(SpringFactoriesLoader.loadFactoryNames(type, classLoader));
List<T> instances = createSpringFactoriesInstances(type, parameterTypes, classLoader, args, names);
AnnotationAwareOrderComparator.sort(instances);
return instances;
}
9. Spring上下文前置处理
源码剖析
private void prepareContext(ConfigurableApplicationContext context, ConfigurableEnvironment environment,
SpringApplicationRunListeners listeners, ApplicationArguments applicationArguments, Banner printedBanner) {
// 给IOC容器设置一些环境属性
context.setEnvironment(environment);
// 给IOC容器注册一些组件
postProcessApplicationContext(context);
// 调用初始化方法
applyInitializers(context);
// 监听器,触发contextPrepared 事件
listeners.contextPrepared(context);
// 记录启动过程中的日志
if (this.logStartupInfo) {
logStartupInfo(context.getParent() == null);
logStartupProfileInfo(context);
}
// Add boot specific singleton beans
// 添加特定的单例beans
ConfigurableListableBeanFactory beanFactory = context.getBeanFactory();
beanFactory.registerSingleton("springApplicationArguments", applicationArguments);
if (printedBanner != null) {
beanFactory.registerSingleton("springBootBanner", printedBanner);
}
if (beanFactory instanceof DefaultListableBeanFactory) {
((DefaultListableBeanFactory) beanFactory)
.setAllowBeanDefinitionOverriding(this.allowBeanDefinitionOverriding);
}
if (this.lazyInitialization) {
context.addBeanFactoryPostProcessor(new LazyInitializationBeanFactoryPostProcessor());
}
// Load the sources
// 加载所有资源
Set<Object> sources = getAllSources();
Assert.notEmpty(sources, "Sources must not be empty");
// 加载启动类,将启动类注入到容器中去
load(context, sources.toArray(new Object[0]));
// 触发contextLoaded 事件
listeners.contextLoaded(context);
}
10. Spring上下文刷新
刷新完成以后,会进行后续的一些操作
源码剖析
private void refreshContext(ConfigurableApplicationContext context) {
// 调用父类的refresh操作
refresh(context);
if (this.registerShutdownHook) {
try {
// 注册一个关闭容器时的钩子函数,在JVM关机的时候关闭这个上下文。
context.registerShutdownHook();
}
catch (AccessControlException ex) {
// Not allowed in some environments.
}
}
}
调用了registerShutdownHook()方法
/**
* Register a shutdown hook {@linkplain Thread#getName() named}
* {@code SpringContextShutdownHook} with the JVM runtime, closing this
* context on JVM shutdown unless it has already been closed at that time.
* <p>Delegates to {@code doClose()} for the actual closing procedure.
* @see Runtime#addShutdownHook
* @see ConfigurableApplicationContext#SHUTDOWN_HOOK_THREAD_NAME
* @see #close()
* @see #doClose()
*/
@Override
public void registerShutdownHook() {
if (this.shutdownHook == null) {
// No shutdown hook registered yet.
this.shutdownHook = new Thread(SHUTDOWN_HOOK_THREAD_NAME) {
@Override
public void run() {
synchronized (startupShutdownMonitor) {
// 调用doClose方法,进行容器销毁时的清理工作
doClose();
}
}
};
Runtime.getRuntime().addShutdownHook(this.shutdownHook);
}
}
11. Spring上下文后置处理
在Spring容器刷新上下文后进行调用,依次调用注册的Runners。
/**
* Called after the context has been refreshed.
* @param context the application context
* @param args the application arguments
*/
protected void afterRefresh(ConfigurableApplicationContext context, ApplicationArguments args) {
}

private void callRunners(ApplicationContext context, ApplicationArguments args) {
List<Object> runners = new ArrayList<>();
runners.addAll(context.getBeansOfType(ApplicationRunner.class).values());
runners.addAll(context.getBeansOfType(CommandLineRunner.class).values());
AnnotationAwareOrderComparator.sort(runners);
// CommandLineRunner、ApplicationRunner 这两个接口,是在容器启动成功后的最后一步进行回调
for (Object runner : new LinkedHashSet<>(runners)) {
if (runner instanceof ApplicationRunner) {
callRunner((ApplicationRunner) runner, args);
}
if (runner instanceof CommandLineRunner) {
callRunner((CommandLineRunner) runner, args);
}
}
}
CommandLineRunner、ApplicationRunner 这两个接口,是在容器启动成功后的最后一步进行回调
12. 停止计时器
做计时监听器停止操作,并统计一些任务执行信息
public void stop() throws IllegalStateException {
if (this.currentTaskName == null) {
throw new IllegalStateException("Can't stop StopWatch: it's not running");
} else {
long lastTime = System.nanoTime() - this.startTimeNanos;
this.totalTimeNanos += lastTime;
this.lastTaskInfo = new StopWatch.TaskInfo(this.currentTaskName, lastTime);
if (this.keepTaskList) {
this.taskList.add(this.lastTaskInfo);
}

++this.taskCount;
this.currentTaskName = null;
}
}
13. 发布Spring上下文启动完成事件
void started(ConfigurableApplicationContext context) {
for (SpringApplicationRunListener listener : this.listeners) {
listener.started(context);
}
}
14. 执行所有 Runner 运行器
private void callRunners(ApplicationContext context, ApplicationArguments args) {
List<Object> runners = new ArrayList<>();
runners.addAll(context.getBeansOfType(ApplicationRunner.class).values());
runners.addAll(context.getBeansOfType(CommandLineRunner.class).values());
AnnotationAwareOrderComparator.sort(runners);
for (Object runner : new LinkedHashSet<>(runners)) {
if (runner instanceof ApplicationRunner) {
callRunner((ApplicationRunner) runner, args);
}
if (runner instanceof CommandLineRunner) {
callRunner((CommandLineRunner) runner, args);
}
}
}
15. 发布Spring上下文就绪事件
void running(ConfigurableApplicationContext context) {
for (SpringApplicationRunListener listener : this.listeners) {
listener.running(context);
}
}
触发所有 SpringApplicationRunListener 监听器的 running 事件的方法。
由于水平有限,本博客难免有不足,恳请各位大佬不吝赐教!
- 点赞 7
- 收藏
- 分享
- 文章举报
 扬帆向海
发布了96 篇原创文章 · 获赞 3130 · 访问量 49万+
私信
关注
扬帆向海
发布了96 篇原创文章 · 获赞 3130 · 访问量 49万+
私信
关注

- [深入剖析Spring Boot]启动、事件通知与配置加载原理
- Spring Boot干货系列:启动原理解析,圣诞节提前快乐
- 深入理解Spring 之 源码剖析 SpringBoot Aop 切面编织过程和代理执行过程
- 江帅帅:Spring Boot 应用&底层源码级深度探索系列 02 - 自动配置的底层逻辑...
- springboot之启动原理解析及源码阅读
- Spring Boot干货系列:(三)启动原理解析
- Spring-boot之启动原理--源码分析+实现ApplicationContextInitializer和SpringApplicationRunListener
- spring源码剖析(七)JdbcTemplate数据库封装原理解读
- Spring Boot干货系列:(三)启动原理解析
- Spring Boot干货系列:(三)启动原理解析
- Spring原理与源码分析系列(三)- Spring IoC容器启动过程分析(下)
- Spring Boot干货系列:(三)启动原理解析
- Spring Boot 源码解析,一步步分析启动原理
- 深入springboot原理——一步步分析springboot启动机制(starter机制)
- 深入讲解spring boot中servlet的启动过程与原理
- springboot之启动原理解析及源码阅读
- springboot之启动原理解析及源码阅读
- Spring Boot 2.x 启动全过程源码分析(上)入口类剖析
- SpringBoot系列3-----Docker SpringBoot与数据访问 启动原理 自定义starters
- SpringBoot-Loader源码分析系列2:启动 new JarLauncher().launch(args)的.launch(args)部分