windows、linux下打包Python3程序详细方法
最近项目中需要Python的打包,看到网上也没有很详细的资料,于是做了一些示例程序。研究了一下,Python如何在Windows和Linux上打包
背景
Python版本:3.6.
Windows版本:Windows 10 家庭中文版 64-bit (10.0, Build 18362) (18362.19h1_release.190318-1202)
Linux版本:centos7.
Python打包工具
今天没时间研究cx_Freeze,先研究了一下PyInstaller。
py2exe
py2exe是一个将python转换成windows上的可独立执行的可执行程序(*.exe)的工具。不过,该可执行程序,只能在相同的Windows系统下运行,而且不适合Linux。果断被我舍弃不在研究了。
cx_Freeze
cx_Freeze 是一个类似 py2exe 的工具,但 cx_Freeze 可以在 linux 下可以直接执行的 ELF 格式的二进制可执行文件,也可以在windows上执行。
cx_Freeze的作用可以让python程序可以脱离python运行环境,在没有安装python的微型linux系统(例如cdlinux、tinycore等)里,方便地运行你的python程序。
程序简介:https://pypi.org/project/cx-Freeze/5.0/
PyInstaller
号称是目前最全面的打包程序,然后我看了一下程序更新时间。一看是10天前,嗯,不错,就它了。
程序简介:https://pypi.org/project/PyInstaller/
看了一下参数介绍如下:

Windows打包Python程序实例
1、单个文件打包
核心源码
#! -*- coding: utf-8 -*-
"""
Author: ZhenYuSha
Create Time: 2020-1-20
Info: Python打包示例1,单个文件打包
“pyinstaller -F(单个可执行文件) 程序源 -n 程序名 -w(去掉控制台窗口,这在GUI界面时非常有用) -i 图标.ico”
“pyinstaller -F test1/Demo_Test1_Python.py”
"""
def bubble_sort(arr):
"""
冒泡排序
:param arr:
:return:
"""
for i in range(1, len(arr)):
for j in range(0, len(arr)-i):
if arr[j] > arr[j+1]:
arr[j], arr[j + 1] = arr[j + 1], arr[j]
return arr
if __name__ == '__main__':
test = [1, 8, 123, 18, 99, 300]
print("************************************")
print("*    冒泡排序    *")
print("************************************")
print("源列表:", test)
result = bubble_sort(test)
print("排序后:", result)
print("************************************")
input("按任意键退出...")
程序运行

打包方法
pyinstaller -F test1/Demo_Test1_Python.py
打包后效果

多个文件打包
核心源码
#! -*- coding: utf-8 -*-
"""
Author: ZhenYuSha
Create Time: 2020-1-20
Info: Python打包示例2,多个文件打包
“pyinstaller -F(单个可执行文件) 程序源 -n 程序名 -w(去掉控制台窗口,这在GUI界面时非常有用) -i 图标.ico”
“pyinstaller -F test2/Demo_Test2_Python.py”
"""
from test2.Demo_bubble_sort import bubble_sort
from test2.Demo_heap_sort import heap_sort
if __name__ == '__main__':
test1 = [1, 8, 123, 18, 99, 300]
test2 = test1[:]
print("************************************")
print("*    两个排序    *")
print("************************************")
print("列表1 id:", id(test1))
print("列表2 id:", id(test2))
print("源列表1:", test1)
print("源列表2:", test2)
result1 = bubble_sort(test1)
result2 = heap_sort(test1)
print("冒泡后:", result1)
print("堆排后:", result2)
print("************************************")
input("按任意键退出...")
程序运行

打包命令
pyinstaller -F test2/Demo_Test2_Python.py
打包后效果

多层文件打包
核心源码
#! -*- coding: utf-8 -*-
"""
Author: ZhenYuSha
Create Time: 2020-1-20
Info: Python打包示例3,多层文件打包
“pyinstaller -F(单个可执行文件) 程序源 -n 程序名 -w(去掉控制台窗口,这在GUI界面时非常有用) -i 图标.ico”
“pyinstaller -F test3/Demo_Test3_Python.py”
"""
from test3.sort.Demo_bubble_sort import bubble_sort
from test3.sort.Demo_heap_sort import heap_sort
from test3.Demo_test import Test
if __name__ == '__main__':
test1 = [1, 8, 123, 18, 99, 300]
test2 = test1[:]
print("************************************")
print("*    两个排序    *")
print("************************************")
print("列表1 id:", id(test1))
print("列表2 id:", id(test2))
print("源列表1:", test1)
print("源列表2:", test2)
result1 = bubble_sort(test1)
result2 = heap_sort(test1)
print("冒泡后:", result1)
print("堆排后:", result2)
Test.run()
print("************************************")
input("按任意键退出...")
程序运行

打包命令
pyinstaller -F test4/Demo_Test4_Python.py -n Test4 -i test4/test4.ico
打包后效果

Python Linux打包实例
多层文件打包
核心源码
#! -*- coding: utf-8 -*-
"""
Author: ZhenYuSha
Create Time: 2020-1-20
Info: Python打包示例5,多层文件打包修改程序名 linux打包
“pyinstaller -F(单个可执行文件) 程序源 -n 程序名 -w(去掉控制台窗口,这在GUI界面时非常有用) -i 图标.ico”
“-p 表示自定义需要加载的类路径(一般情况下用不到)”
“pyinstaller -F Demo_Test5_Python.py -n Test5”
"""
from sort.Demo_bubble_sort import bubble_sort
from sort.Demo_heap_sort import heap_sort
from Demo_test import Test
if __name__ == '__main__':
test1 = [1, 8, 123, 18, 99, 300]
test2 = test1[:]
print("************************************")
print("*    两个排序    *")
print("************************************")
print("列表1 id:", id(test1))
print("列表2 id:", id(test2))
print("源列表1:", test1)
print("源列表2:", test2)
result1 = bubble_sort(test1)
result2 = heap_sort(test1)
print("冒泡后:", result1)
print("堆排后:", result2)
Test.run()
print("************************************")
input("按任意键退出...")
程序运行

打包后效果

遇到的错误,以及解决方案
错误1(找不到pyinstaller)
我是用 pip install 安装的pyinstaller,于是先find了一下,找到了此命令,于是就做了个软链接。
解决方案,直接将安装目录下面的pyinstaller包作为软链接到/usr/bin下
ln -s /usr/local/python3.6.8/bin/pyinstaller /usr/bin/pyinstaller3.
错误2(rebuild your Python with --enable-shared)
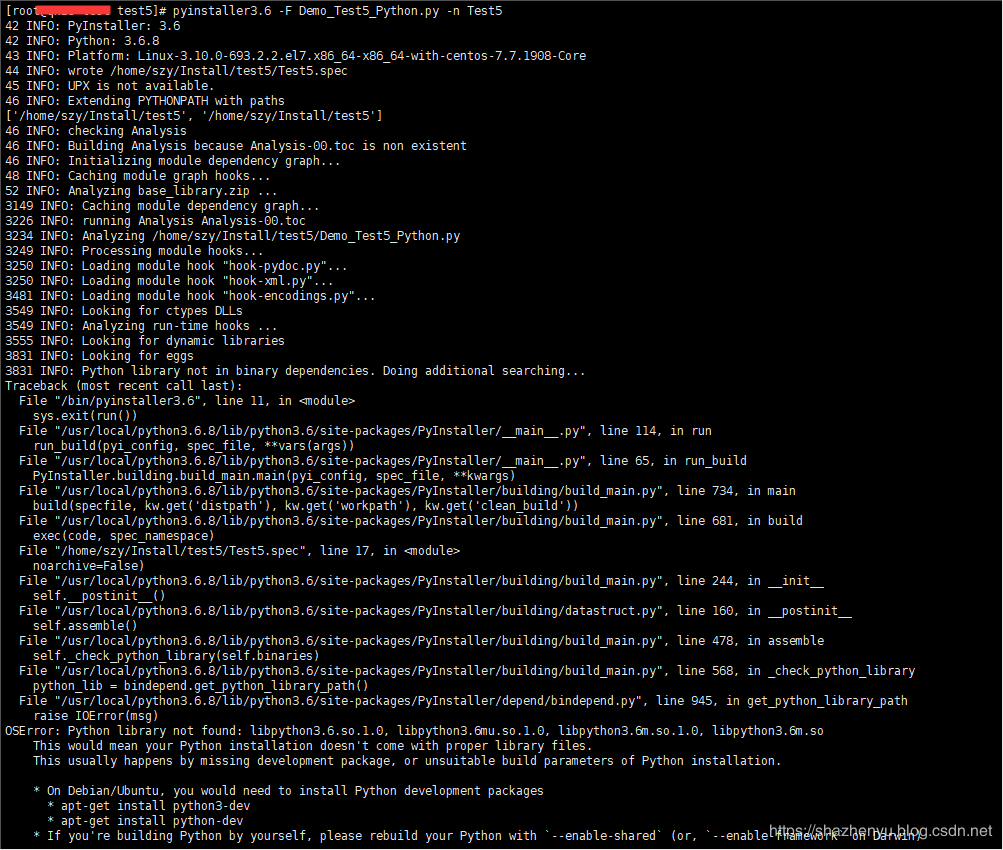
这种错误,人家已经把解决方案说出来了,就是需要重新编译嘛,那我们就按照他的来就OK了。先找到源码按照的目录,并按照以下命令操作。
./configure --prefix=/usr/local/python3.6.8(需要安装的目录) --enable-shared --with-ssl
make
make install
错误3(找不到 libpython3.6m.so.1.0)
解决方案,在安装目录找到此文件,并拷贝到/usr/lib64目录下:
本文主要讲解了如何在windows与linux下打包Python3程序的详细方法,更多关于打包Python程序的知识请查看下面的相关链接
您可能感兴趣的文章:

- 在windows下和Linux下运行python程序的方法
- windows和linux下打包python程序
- Linux程序代码移植到Windows的简单方法[转摘]
- Windows系统远程控制Linux系统的详细图文方法介绍
- Windows下将Python文件打包成.EXE可执行文件的方法
- 用pyinstaller打包windows下 python2.6的程序
- python在windows和linux下获得本机本地ip地址方法小结
- 在Linux中#!/usr/bin/python之后把后面的代码当成程序来执行。 但是在windows中用IDLE编程的话#后面的都是注释,之后的代码都被当成文本了。 该怎么样才能解决这个问题呢?
- 用Python在Windows下模仿Linux的|which.exe|程序
- python安装MySQLdb:在windows下或linux下(以及eclipse中pydev使用msqldb的配置方法)
- linux 系统下python程序中出现中文的处理方法
- golang 另类方法后台运行程序(linux、windows)
- 通过Py2exe将自己的python程序打包成.exe/.app的方法
- 将python文件打包exe独立运行程序方法详解
- Python实现Windows和Linux之间互相传输文件(文件夹)的方法
- Qt应用程序打包成windows下的.exe程序的方法
- windows和linux的转行符不同导致的Python无法执行的解决方法
- 用Python3.4.2+cx_Freeze4.3.3(cxfreeze)编写、打包Linux可执行程序
- WEB程序打包的详细方法,并自动创建数据库
- Python在Linux | Windows中输出带颜色的文字的方法