Spring Cloud入门-Sentinel实现服务限流、熔断与降级(Hoxton版本)
文章目录
- Spring Cloud入门系列汇总
- 摘要
- Sentinel简介
- 安装Sentinel控制台
- 创建sentinel-service模块
- 限流功能
- 创建RateLimitController类
- 根据资源名称限流
- 根据URL限流
- 自定义限流处理逻辑
项目使用的Spring Cloud为Hoxton版本,Spring Boot为2.2.2.RELEASE版本
Spring Cloud入门系列汇总
摘要
Spring Cloud Alibaba 致力于提供微服务开发的一站式解决方案,Sentinel 作为其核心组件之一,具有熔断与限流等一系列服务保护功能,本文将对其用法进行详细介绍。
Sentinel简介
随着微服务的流行,服务和服务之间的稳定性变得越来越重要。 Sentinel 以流量为切入点,从流量控制、熔断降级、系统负载保护等多个维度保护服务的稳定性。
Sentinel具有如下特性:
- 丰富的应用场景:承接了阿里巴巴近 10 年的双十一大促流量的核心场景,例如秒杀,可以实时熔断下游不可用应用;
- 完备的实时监控:同时提供实时的监控功能。可以在控制台中看到接入应用的单台机器秒级数据,甚至 500 台以下规模的集群的汇总运行情况;
- 广泛的开源生态:提供开箱即用的与其它开源框架/库的整合模块,例如与 Spring Cloud、Dubbo、gRPC 的整合;
- 完善的 SPI 扩展点:提供简单易用、完善的 SPI 扩展点。您可以通过实现扩展点,快速的定制逻辑。
安装Sentinel控制台
Sentinel控制台是一个轻量级的控制台应用,它可用于实时查看单机资源监控及集群资源汇总,并提供了一系列的规则管理功能,如流控规则、降级规则、热点规则等。
我们先从官网下载Sentinel,这里下载的是
sentinel-dashboard-1.7.0.jar文件,下载地址:https://github.com/alibaba/Sentinel/releas
下载完成后在命令行输入如下命令运行Sentinel控制台:
java -jar sentinel-dashboard-1.7.0.jar
Sentinel控制台默认运行在8080端口上,登录账号密码均为
sentinel,通过如下地址可以进行访问:http://localhost:8080

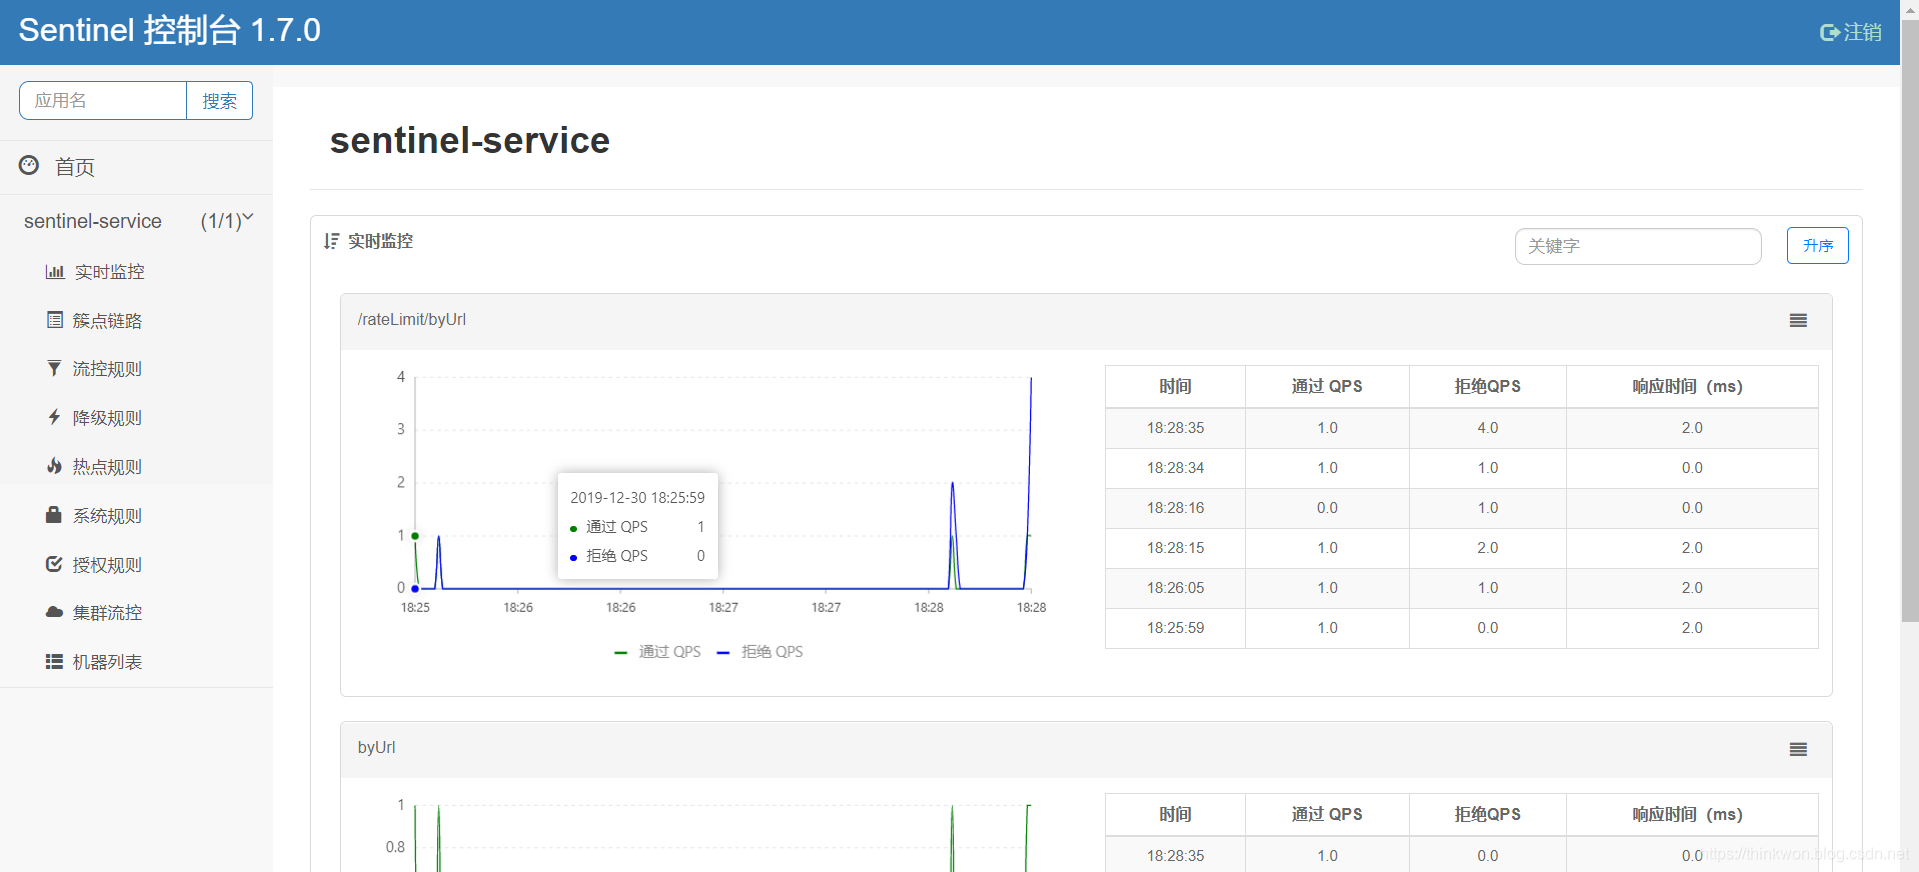
Sentinel控制台可以查看单台机器的实时监控数据。
创建sentinel-service模块
这里我们创建一个sentinel-service模块,用于演示Sentinel的熔断与限流功能。
在pom.xml中添加相关依赖,这里我们使用Nacos作为注册中心,所以需要同时添加Nacos的依赖:
<dependency>
<groupId>org.springframework.boot</groupId>
<artifactId>spring-boot-starter-web</artifactId>
</dependency>
<dependency>
<groupId>com.alibaba.cloud</groupId>
<artifactId>spring-cloud-starter-alibaba-nacos-discovery</artifactId>
</dependency>
<dependency>
<groupId>com.alibaba.cloud</groupId>
<artifactId>spring-cloud-starter-alibaba-sentinel</artifactId>
</dependency>
<dependency>
<groupId>org.springframework.cloud</groupId>
<artifactId>spring-cloud-starter-netflix-ribbon</artifactId>
</dependency>
<dependency>
<groupId>org.springframework.cloud</groupId>
<artifactId>spring-cloud-starter-openfeign</artifactId>
</dependency>
在application.yml中添加相关配置,主要是配置了Nacos和Sentinel控制台的地址:
server:
port: 8401

spring:
application:
name: sentinel-service
cloud:
nacos:
# 配置Nacos地址
server-addr: http://localhost:8848
sentinel:
transport:
# 配置Sentinel dashborad地址
dashboard: http://localhost:8080
port: 8719

service-url:
user-service: http://nacos-user-service

management:
endpoints:
web:
exposure:
include: '*'
限流功能
Sentinel Starter 默认为所有的 HTTP 服务提供了限流埋点,我们也可以通过使用@SentinelResource来自定义一些限流行为。
创建RateLimitController类
用于测试熔断和限流功能。
@RestController
@RequestMapping("/rateLimit")
public class RateLimitController {

/**
* 按资源名称限流,需要指定限流处理逻辑
*
* @return
*/
@GetMapping("/byResource")
@SentinelResource(value = "byResource", blockHandler = "handleException")
public Result byResource() {
return new Result("按资源名称限流", 200);
}

/**
* 按url限流,有默认的限流处理逻辑
*
* @return
*/
@GetMapping("byUrl")
@SentinelResource(value = "byUrl", blockHandler = "handleException")
public Result byUrl() {
return new Result("按url限流", 200);
}

public Result handleException(BlockException exception) {
return new Result(exception.getClass().getCanonicalName(), 200);
}

@GetMapping("/customBlockHandler")
@SentinelResource(value = "customBlockHandler", blockHandler = "handleException", blockHandlerClass = CustomBlockHandler.class)
public Result blockHandler() {
return new Result("限流成功", 200);
}

}
根据资源名称限流
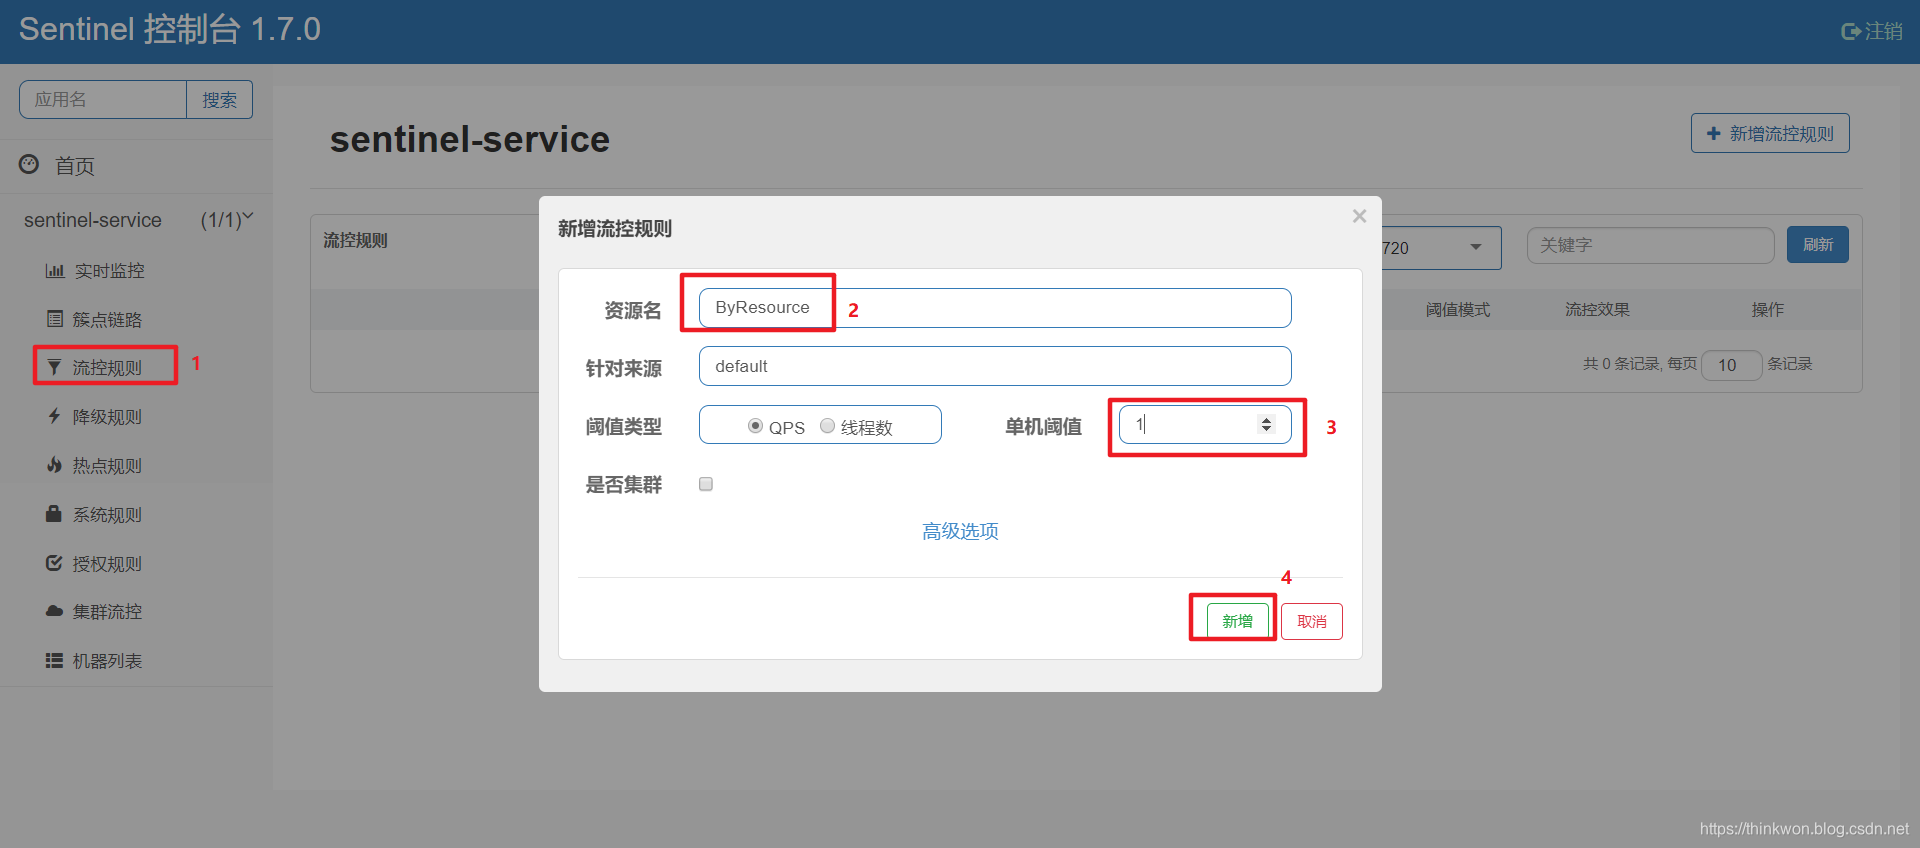
我们可以根据@SentinelResource注解中定义的value(资源名称)来进行限流操作,但是需要指定限流处理逻辑。
流控规则可以在Sentinel控制台进行配置,由于我们使用了Nacos注册中心,我们先启动Nacos和sentinel-service;
由于Sentinel采用的懒加载规则,需要我们先访问下接口,Sentinel控制台中才会有对应服务信息,我们先访问下该接口:http://localhost:8401/rateLimit/byResource
在Sentinel控制台配置流控规则,根据@SentinelResource注解的value值:
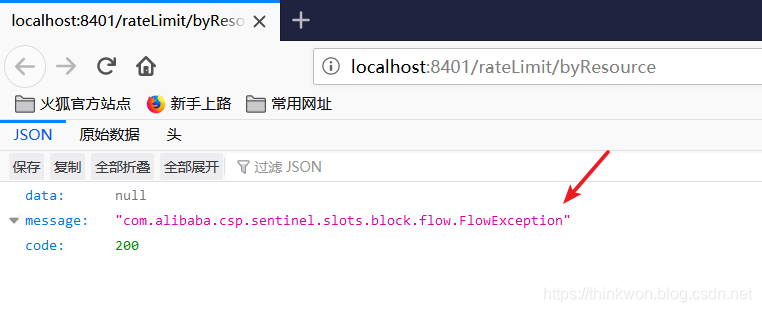
快速访问上面的接口,可以发现返回了自己定义的限流处理信息:
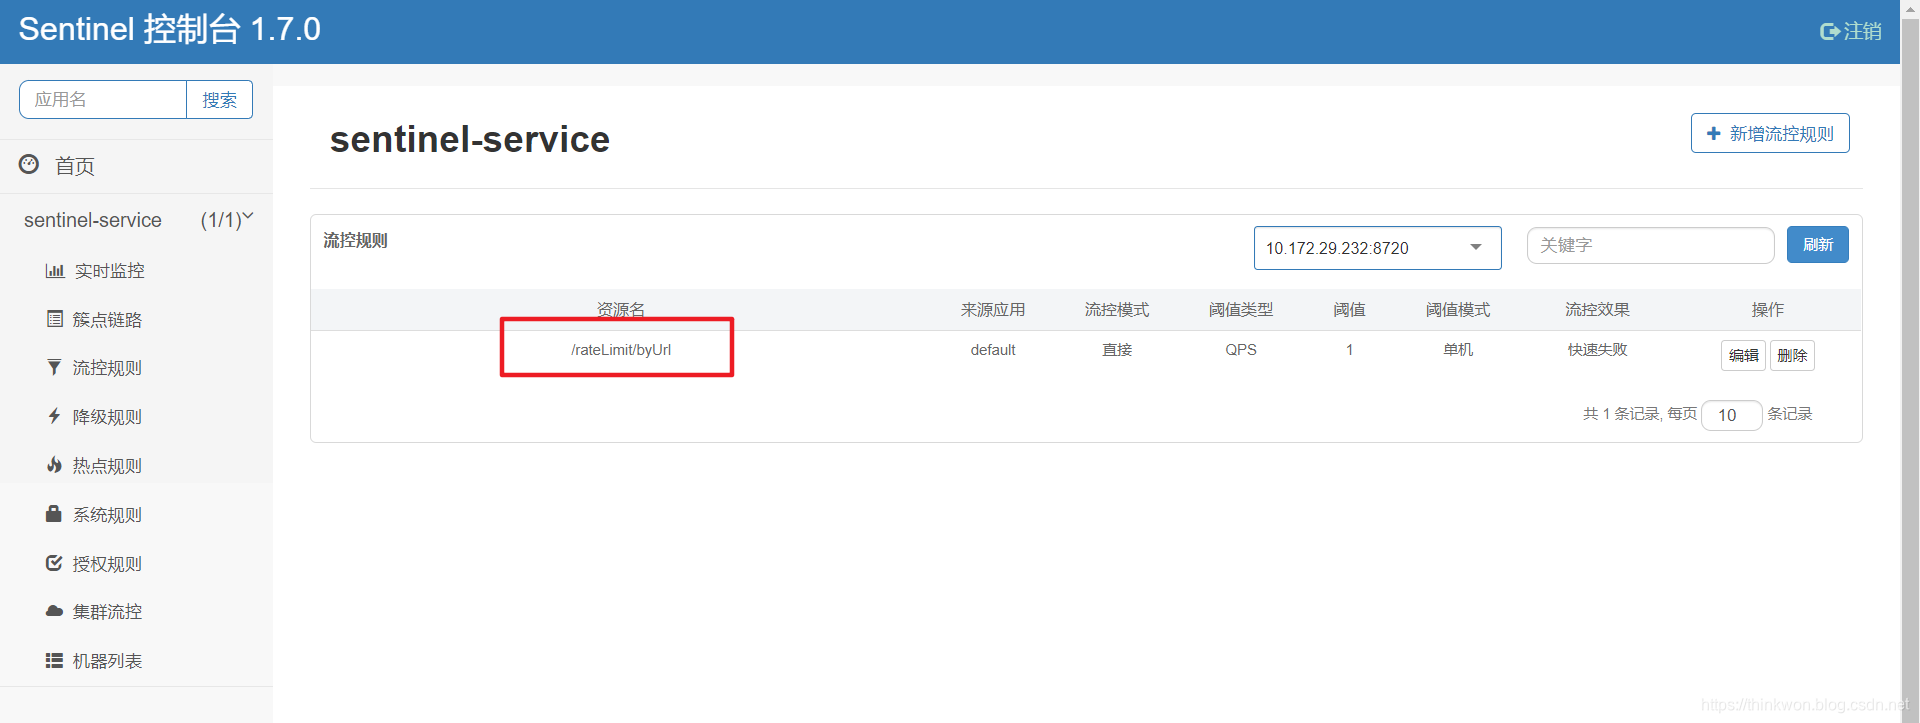
根据URL限流
我们还可以通过访问的URL来限流,会返回默认的限流处理信息。
在Sentinel控制台配置流控规则,使用访问的URL:

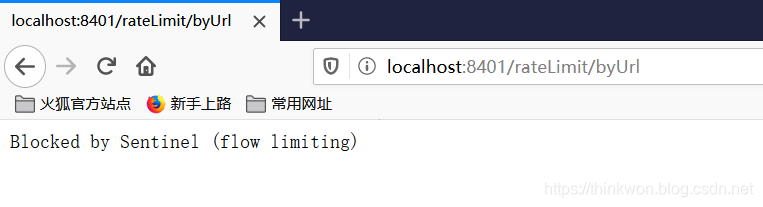
多次访问该接口,会返回默认的限流处理结果:http://localhost:8401/rateLimit/byUrl

自定义限流处理逻辑
我们可以自定义通用的限流处理逻辑,然后在@SentinelResource中指定。
创建CustomBlockHandler类用于自定义限流处理逻辑:
public class CustomBlockHandler {

public Result handleException(BlockException exception) {
return new Result("自定义限流信息", 200);
}

}
在RateLimitController中使用自定义限流处理逻辑:
@RestController
@RequestMapping("/rateLimit")
public class RateLimitController {

/**
* 自定义通用的限流处理逻辑
*/
@GetMapping("/customBlockHandler")
@SentinelResource(value = "customBlockHandler", blockHandler = "handleException", blockHandlerClass = CustomBlockHandler.class)
public Result blockHandler() {
return new Result("限流成功", 200);
}

}
熔断功能
Sentinel 支持对服务间调用进行保护,对故障应用进行熔断操作,这里我们使用RestTemplate来调用nacos-user-service服务所提供的接口来演示下该功能。
首先我们需要使用@SentinelRestTemplate来包装下RestTemplate实例:
@Bean
@LoadBalanced
@SentinelRestTemplate
public RestTemplate restTemplate() {
return new RestTemplate();
}
添加CircleBreakerController类,定义对nacos-user-service提供接口的调用:
@RestController
@RequestMapping("/breaker")
public class CircleBreakerController {

private static final Logger LOGGER = LoggerFactory.getLogger(CircleBreakerController.class);

@Autowired
private RestTemplate restTemplate;

@Value("${service-url.user-service}")
private String userServiceUrl;

@GetMapping("/fallback/{id}")
// @SentinelResource(value = "fallback", fallback = "handleFallback")
public Result fallback(@PathVariable Long id) {
Result forObject = restTemplate.getForObject(userServiceUrl + "/user/{1}", Result.class, id);
System.out.println(forObject);
return forObject;
}

@GetMapping("/fallbackException/{id}")
@SentinelResource(value = "fallbackException", fallback = "handleFallback2", exceptionsToIgnore = {NullPointerException.class})
public Result fallbackException(@PathVariable Long id) {
if (id == 1) {
throw new IndexOutOfBoundsException();
} else if (id == 2) {
throw new NullPointerException();
}

return restTemplate.getForObject(userServiceUrl + "/user/{1}", Result.class, id);
}

public Result handleFallback(Long id) {
return new Result("服务降级返回", 200);
}

public Result handleFallback2(Long id, Throwable e) {
LOGGER.error("handleFallback2 id:{},throwable class:{}", id, e.getClass());
return new Result("服务降级返回", 200);
}

}
启动nacos-user-service和sentinel-service服务:
由于我们并没有在nacos-user-service中定义id为4的用户,所有访问如下接口会返回服务降级结果:http://localhost:8401/breaker/fallback/4
{
"data": null,
"message": "服务降级返回",
"code": 200
}
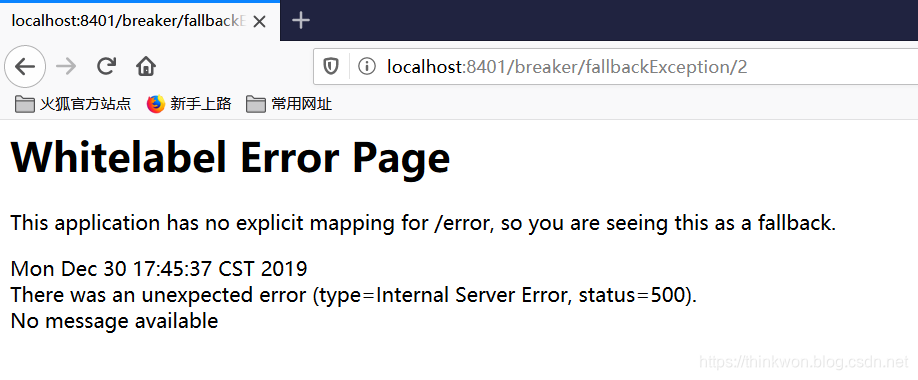
由于我们使用了exceptionsToIgnore参数忽略了NullPointerException,所以我们访问接口报空指针时不会发生服务降级:http://localhost:8401/breaker/fallbackException/2
与Feign结合使用
Sentinel也适配了Feign组件,我们使用Feign来进行服务间调用时,也可以使用它来进行熔断。
首先我们需要在pom.xml中添加Feign相关依赖:
<dependency>
<groupId>org.springframework.cloud</groupId>
<artifactId>spring-cloud-starter-openfeign</artifactId>
</dependency>
在application.yml中打开Sentinel对Feign的支持:
# 打开sentinel对feign的支持
feign:
sentinel:
enabled: true
在应用启动类上添加@EnableFeignClients启动Feign的功能;
创建一个UserService接口,用于定义对nacos-user-service服务的调用:
@FeignClient(value = "nacos-user-service", fallback = UserFallbackService.class)
public interface UserService {

@PostMapping("/user/insert")
Result insert(@RequestBody User user);

@GetMapping("/user/{id}")
Result<User> getUser(@PathVariable Long id);

@GetMapping("/user/listUsersByIds")
Result<List<User>> listUsersByIds(@RequestParam List<Long> ids);

@GetMapping("/user/getByUsername")
Result<User> getByUsername(@RequestParam String username);

@PostMapping("/user/update")
Result update(@RequestBody User user);

@PostMapping("/user/delete/{id}")
Result delete(@PathVariable Long id);

}
创建UserFallbackService类实现UserService接口,用于处理服务降级逻辑:
@Component
public class UserFallbackService implements UserService {

@Override
public Result insert(User user) {
return new Result("调用失败,服务被降级",500);
}

@Override
public Result<User> getUser(Long id) {
return new Result("调用失败,服务被降级",500);
}

@Override
public Result<List<User>> listUsersByIds(List<Long> ids) {
return new Result("调用失败,服务被降级",500);
}

@Override
public Result<User> getByUsername(String username) {
return new Result("调用失败,服务被降级",500);
}

@Override
public Result update(User user) {
return new Result("调用失败,服务被降级",500);
}

@Override
public Result delete(Long id) {
return new Result("调用失败,服务被降级",500);
}

}
在UserFeignController中使用UserService通过Feign调用nacos-user-service服务中的接口:
@RestController
@RequestMapping("/user")
public class UserFeignController {

@Autowired
private UserService userService;

@PostMapping("/insert")
public Result insert(@RequestBody User user) {
return userService.insert(user);
}

@GetMapping("/{id}")
public Result<User> getUser(@PathVariable Long id) {
return userService.getUser(id);
}

@GetMapping("/listUsersByIds")
public Result<List<User>> listUsersByIds(@RequestParam List<Long> ids) {
return userService.listUsersByIds(ids);
}

@GetMapping("/getByUsername")
public Result<User> getByUsername(@RequestParam String username) {
return userService.getByUsername(username);
}

@PostMapping("/update")
public Result update(@RequestBody User user) {
return userService.update(user);
}

@PostMapping("/delete/{id}")
public Result delete(@PathVariable Long id) {
return userService.delete(id);
}

}
在启动类SentinelServiceApplication添加@EnableFeignClients注解
@EnableFeignClients
@EnableDiscoveryClient
@SpringBootApplication
public class SentinelServiceApplication {

public static void main(String[] args) {
SpringApplication.run(SentinelServiceApplication.class, args);
}

}
调用如下接口会发生服务降级,返回服务降级处理信息:http://localhost:8401/user/4
{
"data": null,
"message": "调用失败,服务被降级",
"code": 500
}
使用Nacos存储规则
默认情况下,当我们在Sentinel控制台中配置规则时,控制台推送规则方式是通过API将规则推送至客户端并直接更新到内存中。一旦我们重启应用,规则将消失。下面我们介绍下如何将配置规则进行持久化,以存储到Nacos为例。
原理示意图
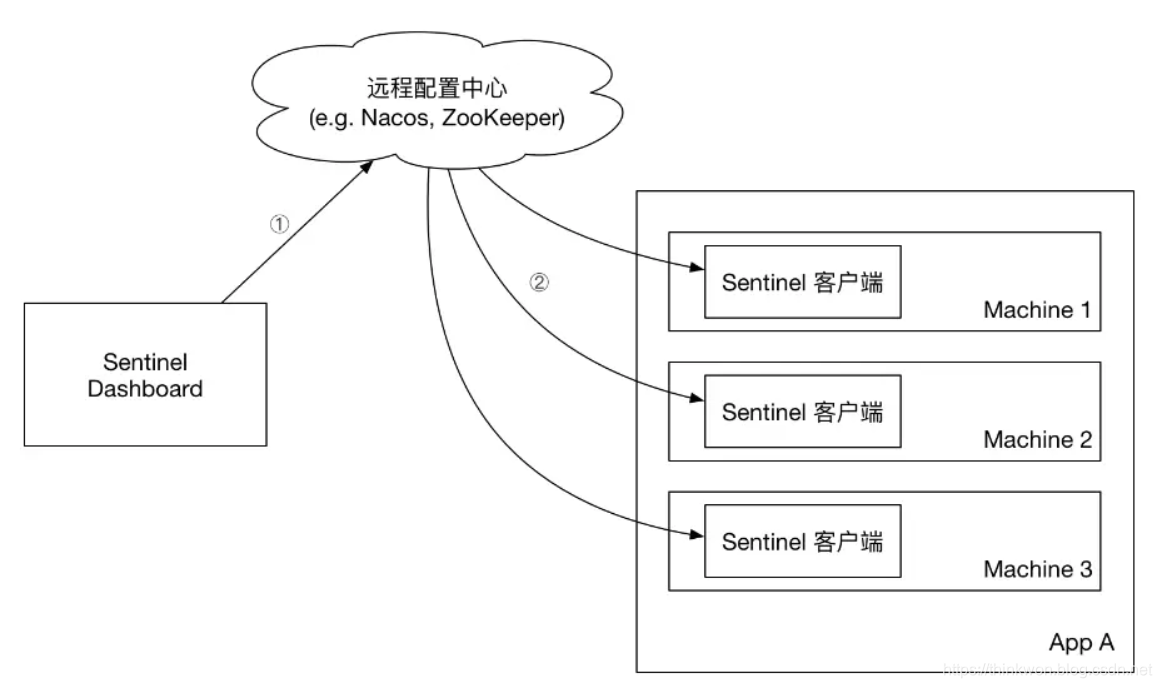
首先我们直接在配置中心创建规则,配置中心将规则推送到客户端;
Sentinel控制台也从配置中心去获取配置信息。
功能演示
先在pom.xml中添加相关依赖:
<dependency>
<groupId>com.alibaba.csp</groupId>
<artifactId>sentinel-datasource-nacos</artifactId>
</dependency>
修改application.yml配置文件,添加Nacos数据源配置:
spring:
application:
name: sentinel-service
cloud:
nacos:
# 配置Nacos地址
server-addr: http://localhost:8848
sentinel:
transport:
# 配置Sentinel dashborad地址
dashboard: http://localhost:8080
port: 8719
# 添加Nacos数据源配置
datasource:
ds1:
nacos:
server-addr: localhost:8848
dataId: ${spring.application.name}-sentinel
groupId: DEFAULT_GROUP
data-type: json
rule-type: flow
在Nacos中添加配置:

添加配置信息如下:
[
{
"resource": "/rateLimit/byUrl",
"limitApp": "default",
"grade": 1,
"count": 1,
"strategy": 0,
"controlBehavior": 0,
"clusterMode": false
}
]
相关参数解释:
-
resource:资源名称;
-
limitApp:来源应用;
-
grade:阈值类型,0表示线程数,1表示QPS;
-
count:单机阈值;
-
strategy:流控模式,0表示直接,1表示关联,2表示链路;
-
controlBehavior:流控效果,0表示快速失败,1表示Warm Up,2表示排队等待;
-
clusterMode:是否集群。
发现Sentinel控制台已经有了如下限流规则:
快速访问测试接口,可以发现返回了限流处理信息:
参考资料
Spring Cloud Alibaba 官方文档:https://github.com/alibaba…
使用到的模块
springcloud-learning
├── nacos-user-service -- 注册到nacos的提供User对象CRUD接口的服务
└── sentinel-service -- sentinel功能测试服务
项目源码地址
- 点赞 2
- 收藏
- 分享
- 文章举报
 ThinkWon
博客专家
发布了227 篇原创文章 · 获赞 3167 · 访问量 34万+
他的留言板
关注
ThinkWon
博客专家
发布了227 篇原创文章 · 获赞 3167 · 访问量 34万+
他的留言板
关注

- Spring Cloud Alibaba从入门到放弃-Nacos集成Sentinel实现限流降级熔断
- Spring Cloud Alibaba从入门到放弃-Nacos注解实现熔断限流降级
- 这个注解一次搞定限流与熔断降级:@SentinelResource
- 服务熔断、降级、限流、异步RPC -- HyStrix
- 微服务入门 雪崩 降级与熔断
- Dubbo使用Sentinel来对服务进行降级与限流
- Spring Cloud入门-汇总篇(Hoxton版本)
- Spring Cloud入门-Seata处理分布式事务问题(Hoxton版本)
- Spring Cloud实战之初级入门(四)— 利用Hystrix实现服务熔断与服务监控
- Dubbo使用Sentinel来对服务进行降级与限流
- 微服务从零到一 限流、熔断和降级利器Hystrix
- Spring Cloud实践:降级、限流、滚动、灰度、AB、金丝雀的实现思路
- 服务熔断、降级、限流、异步RPC -- HyStrix
- 服务熔断、降级、限流、异步RPC -- HyStrix
- .NET Core微服务之基于Polly+AspectCore实现熔断与降级机制
- 这个注解一次搞定限流与熔断降级:@SentinelResource
- 何时进行服务熔断、服务降级、服务限流?
- 服务熔断、降级、限流、异步RPC -- HyStrix
- 7、何时进行服务熔断、服务降级、服务限流?
- .NET Core微服务之基于Polly+AspectCore实现熔断与降级机制