SpringBoot中的MybatisPlus的使用——入门
2020-02-29 19:30
405 查看
MybatisPlus的入门
MybatisPlus是对于Mybatis的一种继承增强,在不改变Mybatis的基础上,增强了Mybatis的使用效率。
1.Jar包的导入
使用IDEA创建一个SpringBoot项目,选择以下的jar包安装。
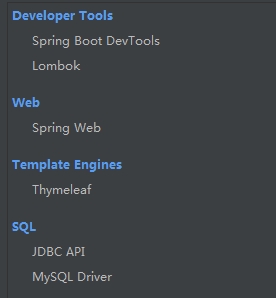
在项目创建成功之后,在pom.xml中添加:MybatisPlus、druid依赖。
//这是MybatisPlus的依赖Jar包
<dependency>
<groupId>com.baomidou</groupId>
<artifactId>mybatis-plus-boot-starter</artifactId>
<version>3.1.0</version>
</dependency>
// 这是druid连接池的依赖
<dependency>
<groupId>com.alibaba</groupId>
<artifactId>druid-spring-boot-starter</artifactId>
<version>1.1.20</version>
</dependency>
2.SpringBoot的配置
SpringBoot的
application.properties配置内容如下:
// 访问端口号
server.port=8080
// 防止页面显示时出现乱码
server.tomcat.uri-encoding=UTF-8
spring.http.encoding.force=true
spring.http.encoding.charset=UTF-8
spring.http.encoding.enabled=true
// 数据库的配置
spring.datasource.url=jdbc:mysql://localhost:3306/test
spring.datasource.username=root
spring.datasource.password=root
spring.datasource.driver-class-name=com.mysql.jdbc.Driver
3.数据库SQL代码(MySQL)
SET FOREIGN_KEY_CHECKS=0;

-- ----------------------------
-- Table structure for `t_one`
-- ----------------------------
DROP TABLE IF EXISTS `t_one`;
CREATE TABLE `t_one` (
`id` int(11) unsigned NOT NULL AUTO_INCREMENT,
`name` varchar(30) CHARACTER SET utf8 NOT NULL,
`value` int(11) NOT NULL,
`is_delete` int(2) unsigned NOT NULL DEFAULT '0',
PRIMARY KEY (`id`)
) ENGINE=InnoDB AUTO_INCREMENT=7 DEFAULT CHARSET=latin1;

-- ----------------------------
-- Records of t_one
-- ----------------------------
INSERT INTO <
1bb8c
span class="token punctuation">`t_one` VALUES ('1', '苹果', '20', '0');
INSERT INTO `t_one` VALUES ('2', '梨', '30', '0');
INSERT INTO `t_one` VALUES ('3', '菠萝', '50', '1');
INSERT INTO `t_one` VALUES ('4', '哈密瓜', '100', '0');
INSERT INTO `t_one` VALUES ('5', '西瓜', '60', '0');
INSERT INTO `t_one` VALUES ('6', '凤梨', '65', '1');
4.实体类的实现
实体类的代码中使用了lombok,但是仅仅在pom.xml中添加lombok的依赖还是不能使用lombok。还需要在编辑器中添加Lombok插件。
File->选择settings->选择plusins->在输入框输入lombok(以下是已经安装):

安装完成之后,会有一个Restart按钮,要重启IDEA。此时可以选择重启之后再进行以下步骤,也可以先进行以下步骤再重启编辑器。
File->选择Build、Execution、Deployment->选择Compiler->将Enable annotation processing选上即可。

完成以上步骤之后,即可使用Lombok。Lombok是为了节省toString、get、set等的一种工具。
/*
自动为所有字段添加@ToString, @EqualsAndHashCode, @Getter方法,
为非final字段添加@Setter,和@RequiredArgsConstructor
*/
@Data
// 自动生成无参数构造函数。
@NoArgsConstructor
// 自动生成全参数构造函数。
@AllArgsConstructor
@ToString
// 映射的表名
@TableName("t_one")
public class One {
// 主键,自增,需要指定,否则无法新增后拿到回调的id,以及进行删除等操作
@TableId(type = IdType.AUTO)
private Integer id;
private String name;
private int value;
/**
注意:如果数据表中存在有下划线的字段时,如:is_delete
此时,实体类的属性名不再是is_delete,而是isDelete
*/
// TableField注释是指定字段名
@TableField(value = "is_delete")
private int isDelete;

public One(String name,int value){
this.name = name;
this.value = value;
}
}
5.Mapper的实现
此时的Mapper只需要继承MybatisPlus中的BaseMapper,就可以实现简单的增、删、改、查。(如果要自己编写SQL代码,则需要创建Mapper.xml,同时在application.properties中进行mybatis的配置)
import com.baomidou.mybatisplus.core.mapper.BaseMapper;
import com.example.domain.One;
import org.apache.ibatis.annotations.Mapper;
@Mapper
public interface OneMapper extends BaseMapper<One> {
}
6.Controller的测试
@Controller
@RequestMapping("test")
public class TestController {
@Autowired
private OneMapper oneMapper;

@RequestMapping("test")
@ResponseBody
public List<One> test(){
// 调用的是BaseMapper中的方法,返回的是一个List
List<One> ones = oneMapper.selectList(null);
return ones;
}
}
7.页面数据

8.总结
到此,MybatisPlus的简单入门已经结束了,虽然没有尝试自己编写SQL代码,但是plus是有这个功能的。
- 点赞
- 收藏
- 分享
- 文章举报
 阿萨德非
发布了1 篇原创文章 · 获赞 0 · 访问量 50
私信
关注
阿萨德非
发布了1 篇原创文章 · 获赞 0 · 访问量 50
私信
关注

相关文章推荐
- SpringBoot和mybatisplus的入门使用
- spring boot多数据源mybatis-plus的baseMapper的里面的方法无法使用
- SpringBoot整合mybatis-plus入门
- SpringBoot中Mybatis Plus的使用
- spring boot,mybatis plus,layui,后台使用sql语句进行特殊的增删改查,不用封装的方法和mapper
- springboot入门(三)-- springboot集成mybatis及mybatis generator工具使用
- spring-boot-mybatis-plus使用心得
- 架构实战项目心得(七):使用SpringBoot+Dubbo+Mybatisplus+Oracle搭建后台项目框架(一)
- springboot使用-Mybatis-Plus 的自动生成代码功能
- Spring Boot + Mybatis-Plus 集成与使用(六)
- Spring Boot + Mybatis-Plus 集成与使用(七)
- Spring Boot入门教程2-1、使用Spring Boot+MyBatis访问数据库(CURD)注解版
- 使用Springboot + Gradle快速整合Mybatis-Plus
- Spring Boot使用mybatis 入门
- SpringBoot 使用Mybatis入门
- 架构实战项目心得(七):使用SpringBoot+Dubbo+Mybatisplus+Oracle搭建后台项目框架(二)
- SpringBoot 整合 MyBatis-Plus 入门体验
- Spring Boot 入门 使用MyBatis简单的CRUD
- Spring Boot + Mybatis-Plus 集成与使用(四)
- Spring Boot + Mybatis-Plus 集成与使用(五)