开发基于SpringBoot和BootStrap的全栈论坛网站(八):完成回复通知的功能
当有人回复了你的问题时,肯定需要有通知能让我们看到,今天就来完成最后一个大功能--回复通知。具体的效果如下:

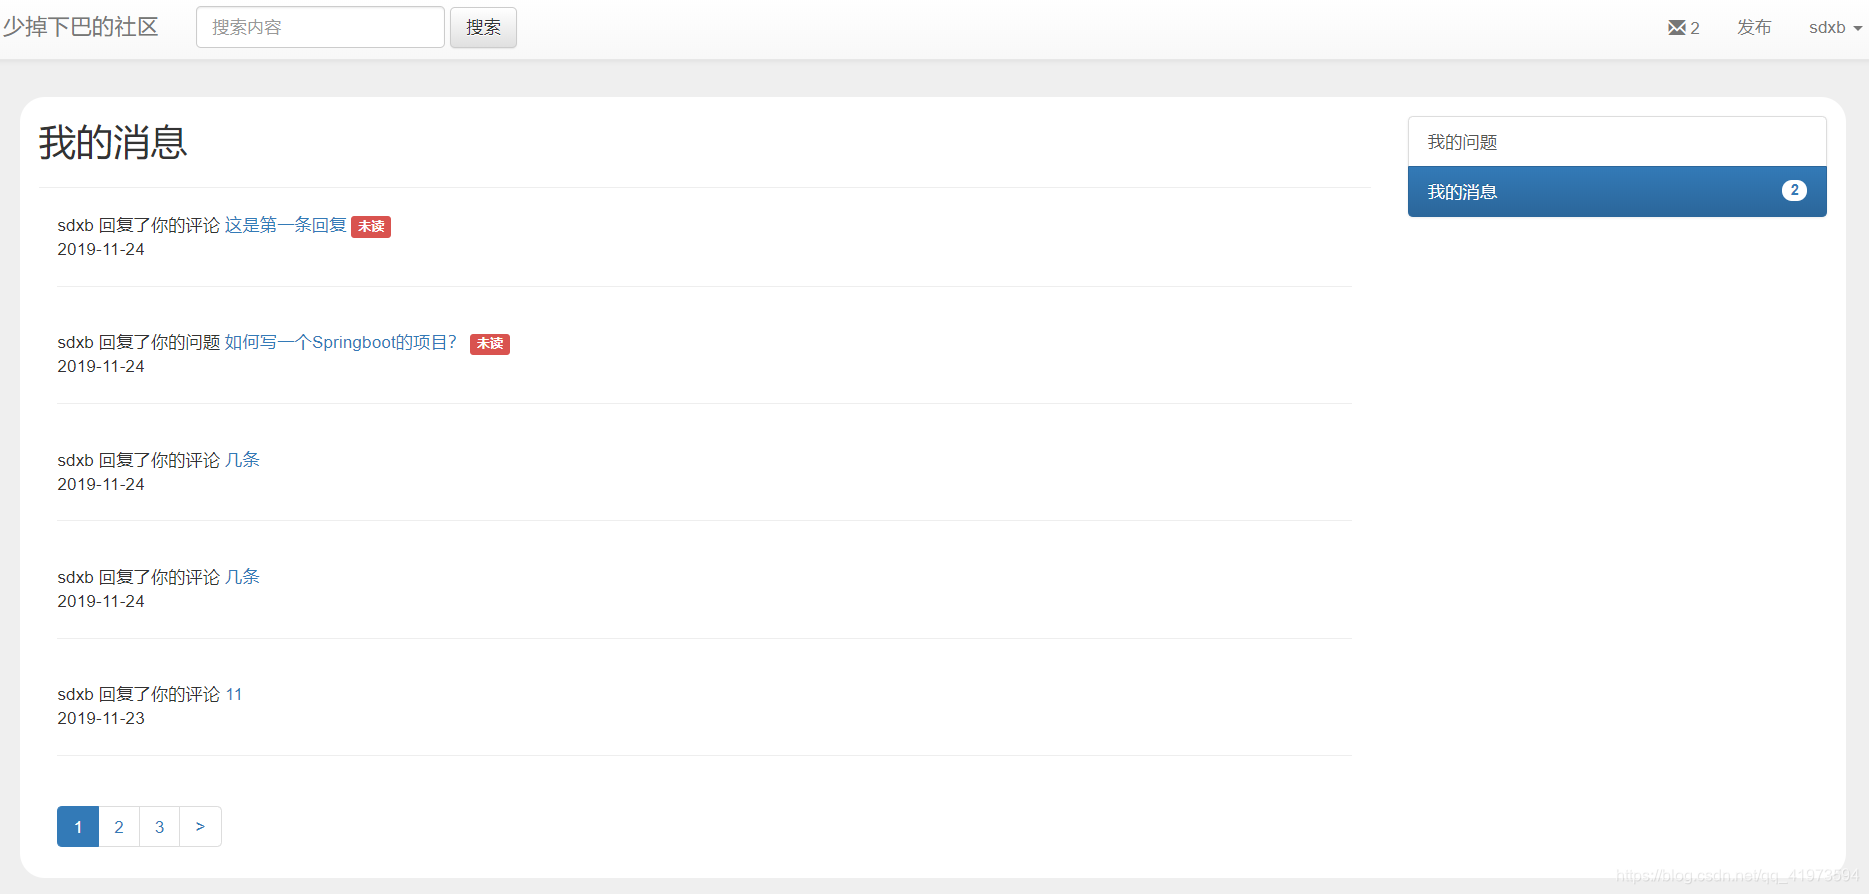
当有未读通知时,在导航栏上会显示未读通知的数量,点进去后能看到未读的信息,点击每条未读信息后,未读标志就会消失,通知上的数字也相应减少,通知的数据还是以分页的方式给出,这里就可以使用前面写好的分页代码。
(一)搭建Notification数据库
我们需要为通知搭建一个数据库,里面需要包含的数据有:id(主键,唯一标识通知),notifier(发起通知的人,也就是评论的人),receiver(收到通知的用户,也就是问题的发起者),outerid(当用户评论问题时,outerid为问题的id;当用户回复评论时,outerid就是评论的id),type(用来标识用户回复的是问题还是评论),createtime(通知的时间),status(该通知是否已读)
[code]CREATE TABLE `notification` (
`id` int(11) NOT NULL AUTO_INCREMENT,
`notifier` int(11) NOT NULL,
`receiver` int(11) NOT NULL,
`outerid` int(11) NOT NULL,
`type` int(11) NOT NULL,
`createtime` bigint(20) NOT NULL,
`status` int(11) NOT NULL DEFAULT '0',
PRIMARY KEY (`id`)
)
写完数据库后下一步就是建实体类了,新建notification.class,里面包含上面的所有属性和setter and getter方法,代码就不放了。
我们最终需要把数据拿给前端使用,因此需要封装一个NotificationDto,里面包含了所有给到前端的数据,在notification的基础上,加上了User类型的notifier(发起通知者的所有信息,通过id查到)和String类型的outercontent(通过拿到的outerid读取到具体的内容),再加上questionid,用于点击后跳转到具体的问题详情页。
[code]public class NotificationDto {
private int id;
private int receiver;
private int type;
private long createtime;
private int status;
private User notifier;
private String outercontent;
private int questionid;
//省略了setter and getter方法
}
(二)将通知数据传递给前端
我的通知和我的消息放在一起,之前是在PersonalController中写的,我们回到PersonalController中,增加两条代码:
[code]PageDto<NotificationDto> notifications= notificationService.list(user.getId(),page,size);
model.addAttribute("notifications",notifications);
notifications中包含的内容有NotificationDto里的所有东西,还包括了之前写的页面信息,是否显示上一页,是否显示下一页等等。对于这个功能具体的实现形式我放在了notificationService里去写。传入三个数据,当前用户的id,当前的page页码和每一页要展示的内容数量,分页的代码基本上和之前首页的分页代码一致,就不再详细讲了,大家可以看第五篇博客。
[code]@Service
public class NotificationService {
@Resource
private NotificationMapper notificationMapper;
@Resource
private UserMapper userMapper;
@Resource
private QuestionMapper questionMapper;
@Resource
private CommentMapper commentMapper;
//返回一个PageDto
public PageDto list(int id, int page, int size) {
PageDto pageDto = new PageDto();
int totalcount = notificationMapper.count(id);
pageDto.setPagination(totalcount, page, size);
int offset = size * (page - 1);
List<Notification> notifications = notificationMapper.list(id, offset, size);
List<NotificationDto> notificationDtoList = new ArrayList<>();

//将notification插入到notificationDto中,再将user信息也插入到notificationDto中
//最后插入到notificationDtoList列表里
for (Notification notification : notifications) {
User user = userMapper.findById(notification.getNotifier());
NotificationDto notificationDto = new NotificationDto();
BeanUtils.copyProperties(notification, notificationDto);
notificationDto.setNotifier(user);
String outercontent;
if (notification.getType() == notificationEnum.NOTIFICATION_QUESTION.getType()) {
outercontent = questionMapper.gettitlebyid(notification.getOuterid());
//插入问题的id
notificationDto.setQuestionid(notification.getOuterid());
} else {
outercontent = commentMapper.getcontentbyid(notification.getOuterid());
//插入问题的id
Comment comment=commentMapper.getparentbyid(notification.getOuterid());
notificationDto.setQuestionid(comment.getParent_id());
}
notificationDto.setOutercontent(outercontent);
notificationDtoList.add(notificationDto);
}
//在pageDto中插入notificationDtoList
pageDto.setData(notificationDtoList);
return pageDto;
}
}
(三)前端页面对收到的数据进行展示
前端数据的展示依旧用到Thymeleaf展示,用th:each的方式循环所有内容,用th:text打印内容,如果查到notification.status=0,则显示未读标签,当点击问题后,通过具体的通知id进入NotificationController处理逻辑。
[code]<div class="media" th:each="notification:${notifications.data}">
<span th:text="${notification.notifier.name}"></span>
<span th:if="${notification.type==1}">回复了你的评论</span>
<span th:if="${notification.type==2}">回复了你的问题</span>
<a th:href="@{'/notification/'+${notification.id}}">
<span th:text="${notification.outercontent}"></span>
</a>
<span class="label label-danger" th:if="${notification.status==0}">未读</span>
<br>
<span th:text="${#dates.format(notification.createtime,'yyyy-MM-dd')}"></span>
<hr>
</div>
新建NotificationController用来处理通知的后端逻辑,主要的思路是当用户点击这条通知时,把该通知的status修改1(已读),并且根据outerid跳转到相应的问题详情页面
[code]//将通知设置为已读,并且跳转到问题页面
@Controller
public class NotificationController {

@Resource
private NotificationMapper notificationMapper;
@Resource
private CommentMapper commentMapper;

@GetMapping("/notification/{action}")
public String notification(@PathVariable("action")int id,
HttpServletRequest request){
//将通知设置为已读
notificationMapper.updatestatus(id);
//获取type,检验是回复评论还是回复问题
int type=notificationMapper.gettypebyid(id);
int outerid=notificationMapper.getouteridbyid(id);
int questionid;
if(type== notificationEnum.NOTIFICATION_QUESTION.getType()){
questionid=outerid;
}else {
questionid=commentMapper.getparentidbyid(id);
}
return "redirect:/question/"+questionid;
}
}
最后还需要展示给用户有几条未读信息,为了能在任何地方都看到未读信息,我把它放进session里,修改session相关的代码,添加这样两行:
[code]//获取未读的消息数量
int unreadnum=notificationMapper.getunreadcount(user.getId());
request.getSession().setAttribute("unreadnum",unreadnum);
}
最后在前端需要用到的地方直接从session中调取即可。
至此,关于论坛的所有大功能就全部完成了,接下来的任务就是一些页面的布局和小功能的修复,
源码如下:github源码
- 点赞 1
- 收藏
- 分享
- 文章举报
 少掉下巴
发布了64 篇原创文章 · 获赞 907 · 访问量 11万+
私信
关注
少掉下巴
发布了64 篇原创文章 · 获赞 907 · 访问量 11万+
私信
关注

- 基于SpringBoot和BootStrap的全栈论坛网站(附上源码)
- 基于SpringBoot从零构建博客网站 - 开发设置主页标识和修改个人信息功能
- 基于SpringBoot从零构建博客网站 - 整合ehcache和开发注册登录功能
- 基于SpringBoot从零构建博客网站 - 开发设置主页标识和修改个人信息功能
- 基于SpringBoot从零构建博客网站 - 设计可扩展上传模块和开发修改头像密码功能
- 基于SpringBoot从零构建博客网站 - 开发设置主页标识和修改个人信息功能
- [置顶] 基于springboot+mybatis的微信公众号开发第三篇-消息的接收与回复
- 基于SpringBoot开发一个Restful服务,实现增删改查功能
- 基于SpringBoot从零构建博客网站 - 技术选型和整合开发环境
- 基于springboot+redis+bootstrap+mysql开发一套属于自己的分布式springcloud云权限架构(十)【权限架构生产者(用户管理)】
- 基于springboot+redis+bootstrap+mysql开发一套属于自己的分布式springcloud云权限架构(十七)【权限架构系统(基础框架搭建)】
- 基于SpringBoot开发一个Restful服务,实现增删改查功能
- 基于springboot+redis+bootstrap+mysql开发一套属于自己的分布式springcloud云权限架构(十一)【权限架构生产者(组织架构)】
- [置顶] 基于SpringBoot开发一个Restful服务,实现增删改查功能
- 基于springboot+redis+bootstrap+mysql开发一套属于自己的分布式springcloud云权限架构(二)【构建实体模型】
- 基于springboot+bootstrap+mysql+redis搭建一套完整的权限架构【四】【编写基础开发工具】
- 基于Spring Boot框架企业级应用系统开发全面实战(Spring Boot,Spring MVC,Maven,bootstrap,angular js)
- 基于springboot+redis+bootstrap+mysql开发一套属于自己的分布式springcloud云权限架构(十四)【权限架构消费者(通用类编写)】
- 基于springboot+mybatis的微信公众号开发第三篇-消息的接收与回复
- 基于springboot+redis+bootstrap+mysql开发一套属于自己的分布式springcloud云权限架构(四)【构建链路调用监控系统】