SpringCloud 基础教程(十二)-Zipkin 分布式链路追踪系统搭建
我的博客:程序员笑笑生,欢迎浏览博客!
上一章 SpringCloud 基础教程(十一)-Sleuth 调用链追踪简介当中,我们将介绍了Spring Cloud Sleuth在分布式环境中实现了调用链路信息的打印,本章将在此基础之上结合Zikpin搭建完整的实时数据追踪系统。
前言
Zipkin是一款分布式追踪系统,是用来收集并诊断微服务体系中系统延时问题,主要功能就是收集和查找这些问题,Spring Cloud Sleuth实现了Dapper(Google 分布式跟踪系统的论文),生成了一系列的追踪数据,当然也能集成Zipkin,聚集日志到Zipkin中,由Zipkin收集并存储,以及提供查询等功能
一、Zipkin简介
Zipkin主要由4个部分组成,如下图:
- 收集器:Collector
- 存储器:Storage,默认是内存存储,我们可以改成数据库如Mysql等
- 查询:提供RESTful的api提供查询
- Web界面:单独的UI组件

二、快速使用
Zipkin分为服务端和客户端,服务端就是单独的一个Zipkin服务,用来收集、展示信息用的,而客户端在微服务架构中就是每个微服务的组件,我们在每个组件中配置Zipkin服务端的连接地址URL,就可以将追踪信息传输给Zipkin。传输采用的事HTTP请求,当然也可以改成消息总线的方式.
2.1 搭建Zipkin服务端
新建Maven项目,在pom中引入zipkin的依赖,zipkin-server为服务端依赖,zipkin-autoconfigure-ui为web依赖:
<dependency>
<groupId>io.zipkin.java</groupId>
<artifactId>zipkin-server</artifactId>
<version>2.11.9</version>
</dependency>
<dependency>
<groupId>io.zipkin.java</groupId>
<artifactId>zipkin-autoconfigure-ui</artifactId>
<version>2.11.9</version>
</dependency>
创建启动类:SleuthServeApplication,添加@EnableZipkinServer注解,表示允许启动Zipkin服务:
import org.springframework.boot.SpringApplication;
import org.springframework.boot.autoconfigure.SpringBootApplication;
import zipkin2.server.internal.EnableZipkinServer;

@SpringBootApplication
@EnableZipkinServer
public class SleuthServeApplication {
public static void main(String[] args) {
SpringApplication.run(SleuthServeApplication.class, args);
}
}
配置applicaiton.yml,注意如果没有添加 management.metrics.web.server.auto-time-requests=false ,则请求web UI时出现错误,这个是表示关闭自动监测;
server:
port: 8242
management:
metrics:
web:
server:
auto-time-requests: false
启动项目后,请求http://localhost:8242/,出现以下的页面:
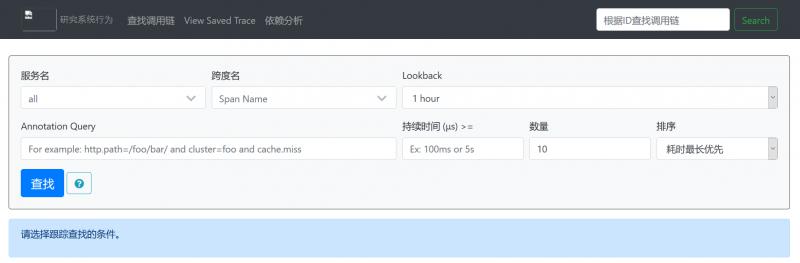
可以根据服务名称,Span等其他条件查询链路追踪的情况.
2.2、收集客户端信息到Zipkin服务端
搭建好了Zipkin服务端后,我们需要在客户端(开发微服务组件)中配置相关的信息,我们回顾一下我们的服务组件:
- Eureka注册中心:eureka-server
- 服务提供者:server-provider实例2个
- 服务消费者:server-consumer实例1个
我们在上一章中为每个组件都引入了sleuth依赖:
<dependency>
<groupId>org.springframework.cloud</groupId>
<artifactId>spring-cloud-starter-sleuth</artifactId>
</dependency>
现在同样为每一个服务添加spring Cloud sleuth对Zipkin支持的依赖
<dependency>
<groupId>org.springframework.cloud</groupId>
<artifactId>spring-cloud-sleuth-zipkin</artifactId>
</dependency>
接着在服务提供者:server-provider和服务消费者:server-consumer的application.yml中配置:
spring:
zipkin:
base-url: http://localhost:8242/
enabled: true
sleuth:
sampler:
probability: 1.0
- spring.zipkin.base-url: zipkin服务端连接地址url
- spring.zipkin.enabled: 允许开启zipkin
- spring.sleuth.sampler.probability:表示采样率,1.0表示日志全量传递到服务端
接下来,我们启动所有的服务以及Zipkin的服务端,并通过服务消费者接口调用服务消费者接口:
http://localhost:5168/hystrix/sayHello?name=test,接口成功的返回了信息,日志同样打出了调用链的信息:
我们通过zipkin服务端的web UI查看到了一条请求:

注意:当前采用的是HTTP方式传输数据
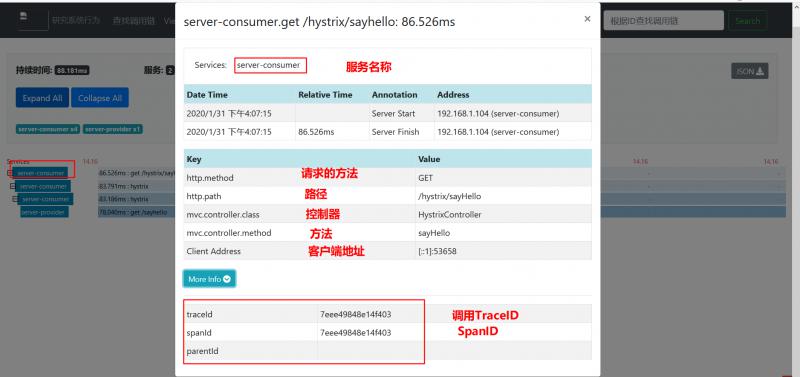
双击之后显示调用链的具体信息,这是一个完整的Trace在Web页面的显示,这条调用链经过了服务消费者,
Hystrix,为什么经过Hyxtrix呢,我们知道Hystrix为每一个资源维护了一个线程池,所以有一个单独的Span
,同时经过了服务提供者,这样我们可以查看到服务调用的关系依赖了:

点击应用名称,我们还可以看到更多的信息,请求耗时等信息:
2.3 其他支持
- 默认情况下,Spring Cloud Sleuth 提供对Feign的支持,通过 TraceFeignClientAutoConfigration,可以通过设置 srping.sleuth.feign.enabled=false 禁用
- 对于Zuul的调用,同样支持调用追踪,可以通过设置spring.sleuth.zuul.enabled=false,禁用支持
三、整合MYSQL
Zipkin对数据的存储默认是在内存中的,在企业生产环境中,我们需要持久化这些数据,同样我们可以将其与Mysql进行整合:
在Zipkin服务端的pom文件中,我们再添加以下依赖:
<!--自动注入配置-->
<dependency>
<groupId>io.zipkin.java</groupId>
<artifactId>zipkin-autoconfigure-storage-mysql</artifactId>
<version>2.11.9</version>
</dependency>

<!--mysql驱动-->
<dependency>
<groupId>mysql</groupId>
<artifactId>mysql-connector-java</artifactId>
<version>5.1.38</version>
</dependency>

<!--spring boot 数据源-->
<dependency>
<groupId>org.springframework.boot</groupId>
<artifactId>spring-boot-starter-jdbc</artifactId>
</dependency>
application.yml配置中:
server:
port: 8242
management:
metrics:
web:
server:
auto-time-requests: falsespring:
datasource:
username: root
url: jdbc:mysql://localhost:3306/zipkin
password: 123456
driver-class-name:  com.mysql.jdbc.Driver
schema: classpath:/mysql.sql
//项目启动时候 初始化数据库
initialization-mode: always
zipkin:
storage:
type : mysql
mysql:
host : localhost
port : 3306
username :  root
password : 123456
//数据库名称
db  :      zipkin
注意:
- 当前的springCloud版本: Greenwich.SR3
- zipkin-autoconfigure-storage-mysql:当项目中引入了该依赖,并且配置了zipkin.storage.type=mysql,就会自动装配Zipkin相关组件;zipkin2.autoconfigure.storage.mysql.ZipkinMySQLStorageProperties通过 zipkin.storage.mysql前缀可以配置mysql的属性,默认的DB是zipkin,数据库是本地的

启动项目后,会在mysql数据库中创建三张表:zipkin_annotations、zipkin_spans、zipkin_dependencies保存相关的信息,当我们发起一次请求后,所有的信息都会记录在数据库中:

通过以上的过程就可以持久化追踪信息到数据库了。
四、总结
本章在上一章的基础之上,结合了Spring Cloud Sleuth和Zipkin,实现了分布式链路追踪解决方案,同时可以根据需求将信息保存在Mysql中,当然我们还可以保存在其他的存储系统中,如elasticsearch等,需要我们自己去定义。
----END----
以就是本期的分享,你还可以关注公众号: 程序员笑笑生,关注更多精彩内容!


SpringCloud基础教程(一)-微服务与SpringCloud
SpringCloud基础教程(二)-服务发现 Eureka
SpringCloud基础教程(五)-配置中心热生效和高可用
SpringCloud 基础教程(六)-负载均衡Ribbon
SpringCloud 基础教程(七)-Feign声明式服务调用
SpringCloud 基础教程(八)-Hystrix熔断器(上)
SpringCloud 基础教程(九)-Hystrix服务监控(下)
SpringCloud 基础教程(十一)- Sleuth 调用链追踪简介
SpringCloud 基础教程(十二)-Zipkin 分布式链路追踪系统搭建
更多精彩内容,请期待...
本文由博客一文多发平台 OpenWrite 发布!
(window.slotbydup = window.slotbydup || []).push({ id: "u5894387", container: "_0hv0l6ey3zro", async: true });我的博客地址兰陵笑笑生,欢迎浏览!

- Spring Boot + Spring Cloud 构建微服务系统(八):分布式链路追踪(Sleuth、Zipkin)
- Spring Cloud搭建微服务架构----使用Zipkin做服务链路追踪
- Spring Boot + Spring Cloud 实现权限管理系统 后端篇(二十二):链路追踪(Sleuth、Zipkin)
- springcloud(十二):使用Spring Cloud Sleuth和Zipkin进行分布式链路跟踪
- springcloud(十二):使用Spring Cloud Sleuth和Zipkin进行分布式链路跟踪
- Spring Cloud 5分钟搭建教程(附上一个分布式日志系统项目作为参考)
- springcloud(十二):使用Spring Cloud Sleuth和Zipkin进行分布式链路跟踪
- 史上最简单的SpringCloud教程 | 第九篇: 服务链路追踪(Spring Cloud Sleuth)
- SpringCloud-sleuth-zipkin链路追踪
- 史上最简单的SpringCloud教程 | 第九篇: 服务链路追踪(Spring Cloud Sleuth)
- Spring Cloud 分布式链路跟踪 Sleuth + Zipkin + Elasticsear
- 史上最简单的SpringCloud教程 | 第九篇: 服务链路追踪(Spring Cloud Sleuth)
- Spring Cloud 分布式链路跟踪 Sleuth + Zipkin + Elasticsear
- Spring Cloud Sleuth-Zipkin链路追踪使用说明
- 使用Spring Cloud Sleuth和Zipkin进行分布式链路跟踪
- 跟我学SpringCloud | 第十一篇:使用Spring Cloud Sleuth和Zipkin进行分布式链路跟踪
- dubbo分布式系统链路追踪_zipkin
- Kubernetes 开发 SpringCloud (四)、Kubnernetes 部署 Zipkin 搭配 Kafka+ElasticSearch 实现链路追踪...
- 史上最简单的SpringCloud教程 | 第九篇: 服务链路追踪(Spring Cloud Sleuth)
- 史上最简单的SpringCloud教程 | 第九篇: 服务链路追踪(Spring Cloud Sleuth)