Spring Cloud Stream - 构建消息事件驱动的微服务
Spring Cloud Stream简介
Spring Cloud Stream是什么:
Spring Cloud Stream是Spring Cloud的一个子项目,是一个能让我们更加方便操作MQ的框架,其目的用于构建与消息中间件连接的高度可伸缩的消息事件驱动的微服务
简单来说Spring Cloud Stream就是一个简化了MQ操作的框架,其架构图如下:
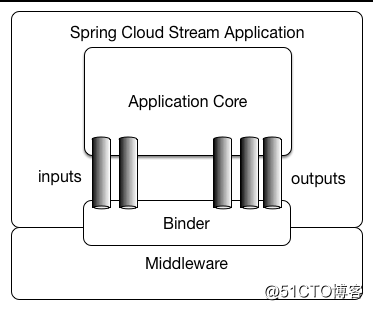
- 图片来自官方文档,从图中可以看到应用通过input和output与Binder进行交互,而Binder是一个让我们的微服务与MQ集成的组件。图中的Middleware即是消息中间件,目前支持Kafka、RabbitMQ以及RocketMQ
Spring Cloud Stream编程模型:

- 图片来自官方文档,微服务(Application)集成了Stream后,Stream的Destination Binder会创建两个Binding,左边的Binding连接着RabbitMQ,右边的Binding连接着Kafka。左边的Binding从RabbitMQ消费消息,然后经过图中代码的处理后,把处理结果通过右边的Binding投递到Kafka。简单来说,就是这个微服务消费了RabbitMQ里的消息并对其进行处理,最后将处理的结果投递到Kafka中。Input和Output是消息相对与微服务的走向,input表示微服务接收消息,output表示微服务投递消息或发送消息
关于图中的概念:
- Destination Binder(目标绑定器):与消息中间件通信的组件,用于实现消息的消费和投递
- Destination Bindings(目标绑定):Binding是连接应用程序跟消息中间件的桥梁,用于消息的消费和生产,由binder创建
使用Spring Cloud Stream
现在有一个微服务项目:content-center,该微服务作为生产者,我们来为这个微服务集成Spring Cloud Stream,第一步添加stream依赖:
<dependency>
<groupId>com.alibaba.cloud</groupId>
<artifactId>spring-cloud-starter-stream-rocketmq</artifactId>
</dependency>
- Tips:该项目的Spring Cloud版本为:Greenwich.SR1;Spring Cloud Alibaba版本为:2.1.0.RELEASE
第二步,在启动类上添加
@EnableBinding注解,如下:
import org.springframework.cloud.stream.annotation.EnableBinding;
import org.springframework.cloud.stream.messaging.Source;

@EnableBinding(Source.class)
...
第三步,在配置文件中,添加与stream相关的配置项:
spring:
cloud:
stream:
rocketmq:
binder:
name-server: 192.168.190.129:9876
bindings:
# 生产者为output
output:
# 用于指定topic
destination: stream-test-topic
完成以上步骤后,项目就已经集成了Spring Cloud Stream,现在我们来使用Spring Cloud Stream编写生产者,具体代码如下:
package com.zj.node.contentcenter.controller.content;

import lombok.RequiredArgsConstructor;
import org.springframework.cloud.stream.messaging.Source;
import org.springframework.messaging.Message;
import org.springframework.messaging.support.MessageBuilder;
import org.springframework.web.bind.annotation.GetMapping;
import org.springframework.web.bind.annotation.RestController;

/**
* 生产者
*
* @author 01
* @date 2019-08-10
**/
@RestController
@RequiredArgsConstructor
public class TestProducerController {

private final Source source;

@GetMapping("/test-stream")
public String testStream(){
Message<String> message = MessageBuilder
.withPayload("消息体")
.build();
source.output()
.send(message);

return "send message success!";
}
}
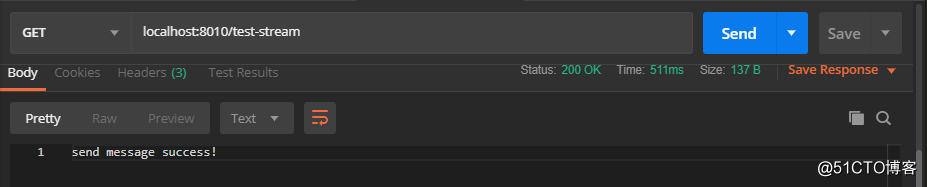
启动项目,测试该接口是否能成功执行:

然后为另一个作为消费者的微服务项目:user-center,集成Spring Cloud Stream,由于依赖配置是一样的,这里就不进行重复了,但是配置和注解里的类需要更改一下。首先是配置如下:
spring:
cloud:
stream:
rocketmq:
binder:
name-server: 192.168.190.129:9876
bindings:
# 消费者为input
input:
# 用于指定topic
destination: stream-test-topic
# rocketmq必须配置group,否则启动会报错
# 如果使用的是其他MQ,则不是必须配置的
group: binder-group
启动类的注解如下:
import org.springframework.cloud.stream.annotation.EnableBinding;
import org.springframework.cloud.stream.messaging.Sink;

@EnableBinding(Sink.class)
...
完成集成后,使用Spring Cloud Stream编写消费者,具体代码如下:
package com.zj.node.usercenter.rocketmq;

import lombok.extern.slf4j.Slf4j;
import org.springframework.cloud.stream.annotation.StreamListener;
import org.springframework.cloud.stream.messaging.Sink;
import org.springframework.stereotype.Service;

/**
* 消费者
*
* @author 01
* @date 2019-08-10
**/
@Slf4j
@Service
public class TestStreamConsumer {

@StreamListener(Sink.INPUT)
public void receive(String messageBody) {
log.info("通过stream收到了消息,messageBody = {}", messageBody);
}
}
完成代码的编写后启动项目,由于先前我们已经通过生产者往RocketMQ投递了消息,所以此时控制台会输出接收到的消息,如下:

Spring Cloud Stream自定义接口
通过以上小节的学习,我们已经了解了Spring Cloud Stream的基本使用。从以上示例可以得知,input用于绑定一个topic消费消息,output则反之,用于绑定一个topic投递消息。
但在实际的项目中,可能会有多个topic,甚至在极端场景下,不同的topic可能使用不同的MQ实现,而stream默认提供的input和output都只能绑定一个topic,所以这个时候就需要用到stream的自定义接口来实现多个“input”和“output”绑定不同的topic了。
在以上小节的示例中可以得知,生产者发送消息时使用的是
Source接口里的
output方法,而消费者发送消息时使用的是
Sink接口里的
input方法,并且都需要配置到启动类的
@EnableBinding注解里。所以实际上我们需要自定义接口的源码与这两个接口的源码几乎一致,只是名称有所不同而已,使用上也只是将
Source和
Sink改为自定义的接口即可。
接下来简单演示一下如何自定义接口并使用,我们基于上一小节的例子进行改造。首先是生产者,定义一个用于发送消息的接口,具体代码如下:
package com.zj.node.contentcenter.rocketmq;

import org.springframework.cloud.stream.annotation.Output;
import org.springframework.messaging.MessageChannel;

/**
* 自定义发送消息接口,与stream默认提供的Source源码是类似的
*
* @author 01
* @date 2019-08-10
**/
public interface MySource {

/**
* Name of the output channel.
*/
String MY_OUTPUT = "my-output";

/**
* @return output channel
*/
@Output(MY_OUTPUT)
MessageChannel output();
}
然后在启动类的
@EnableBinding中,添加这个接口:
import org.springframework.cloud.stream.annotation.EnableBinding;
import org.springframework.cloud.stream.messaging.Source;

@EnableBinding({Source.class, MySource.class})
...
在配置文件中添加如下配置:
spring:
cloud:
stream:
rocketmq:
binder:
name-server: 192.168.190.129:9876
bindings:
# 生产者为output
output:
# 用于指定topic
destination: stream-test-topic
# 自定义的”output“,这里的名称需要与MySource接口里的MY_OUTPUT相对应
my-output:
# 绑定不同的topic
destination: stream-my-topic
修改生产者的代码如下即可:
package com.zj.node.contentcenter.controller.content;

import com.zj.node.contentcenter.rocketmq.MySource;
import lombok.RequiredArgsConstructor;
import org.springframework.messaging.Message;
import org.springframework.messaging.support.MessageBuilder;
import org.springframework.web.bind.annotation.GetMapping;
import org.springframework.web.bind.annotation.RestController;

/**
* 生产者
*
* @author 01
* @date 2019-08-03
**/
@RestController
@RequiredArgsConstructor
public class TestProducerController {

private final MySource mySource;

@GetMapping("/test-stream")
public String testStream(){
Message<String> message = MessageBuilder
.withPayload("消息体")
.build();
mySource.output()
.send(message);

return "send message success!";
}
}
然后启动项目访问该接口,测试消息是否能正常发送:
改造完生产者后接着改造消费者,首先定义一个用于消费消息的接口,具体代码如下:
package com.zj.node.usercenter.rocketmq;

import org.springframework.cloud.stream.annotation.Input;
import org.springframework.messaging.SubscribableChannel;

/**
* 自定义消费消息接口,与stream默认提供的Sink源码是类似的
*
* @author 01
* @date 2019-08-10
**/
public interface MySink {

/**
* Input channel name.
*/
String MY_INPUT = "my-input";

/**
* @return input channel.
*/
@Input(MY_INPUT)
SubscribableChannel input();
}
同样需要在启动类的
@EnableBinding中,添加这个接口:
import org.springframework.cloud.stream.annotation.EnableBinding;
import org.springframework.cloud.stream.messaging.Sink;

@EnableBinding({Sink.class, MySink.class})
...
在配置文件中添加如下配置:
spring:
cloud:
stream:
rocketmq:
binder:
name-server: 192.168.190.129:9876
bindings:
# 消费者为input
input:
# 用于指定topic
destination: stream-test-topic
# rocketmq必须配置group,否则启动会报错
# 如果使用的是其他MQ,则不是必须配置的
group: binder-group
# 自定义的”input“,这里的名称需要与MySink接口里的MY_INPUT相对应
my-input:
# 绑定不同的topic
destination: stream-my-topic
group: my-group
修改消费者的代码如下:
package com.zj.node.usercenter.rocketmq;

import lombok.extern.slf4j.Slf4j;
import org.springframework.cloud.stream.annotation.StreamListener;
import org.springframework.stereotype.Service;

/**
* 消费者
*
* @author 01
* @date 2019-08-10
**/
@Slf4j
@Service
public class TestStreamConsumer {

@StreamListener(MySink.MY_INPUT)
public void receive(String messageBody) {
log.info("自定义接口 - 通过stream收到了消息,messageBody = {}", messageBody);
}
}
启动项目,由于先前我们已经通过生产者往RocketMQ投递了消息,所以此时控制台会输出接收到的消息,如下:

Spring Cloud Stream的监控
我们都知道Spring Boot Actuator组件用于暴露监控端点,很多监控工具都需要依赖该组件的监控端点实现监控。而项目集成了Stream及Actuator后也会暴露相应的监控端点,首先需要在项目里集成Actuator,添加依赖如下:
<!-- actuator -->
<dependency>
<groupId>org.springframework.boot</groupId>
<artifactId>spring-boot-starter-actuator</artifactId>
</dependency>
在配置文件中添加如下配置:
management:
endpoints:
web:
exposure:
# 暴露所有监控端点
include: '*'
endpoint:
health:
# 显示健康检测详情
show-details: always
访问
http://127.0.0.1:{项目端口}/actuator可以获取所有暴露出来的监控端点,Stream的相关监控端点也在其列,如下图: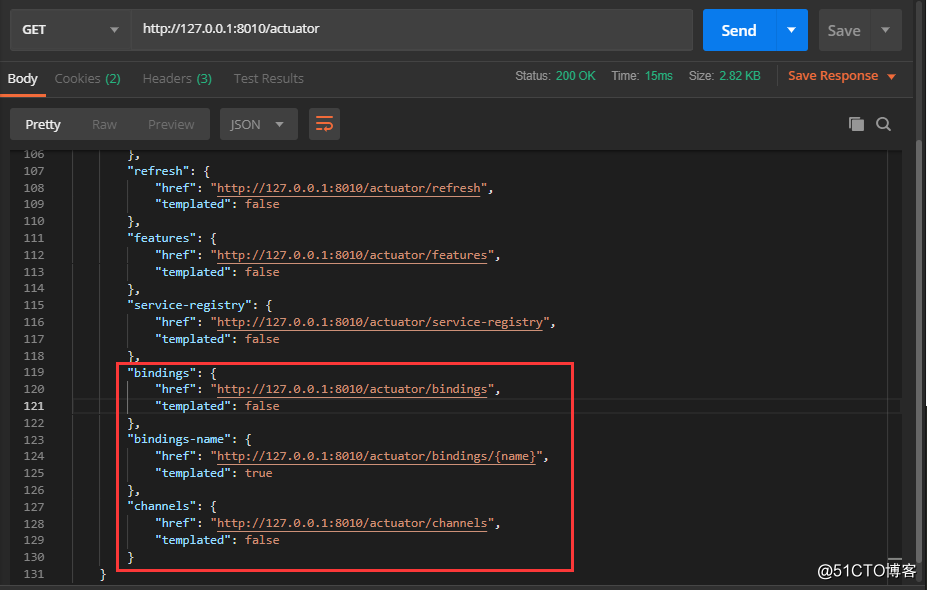
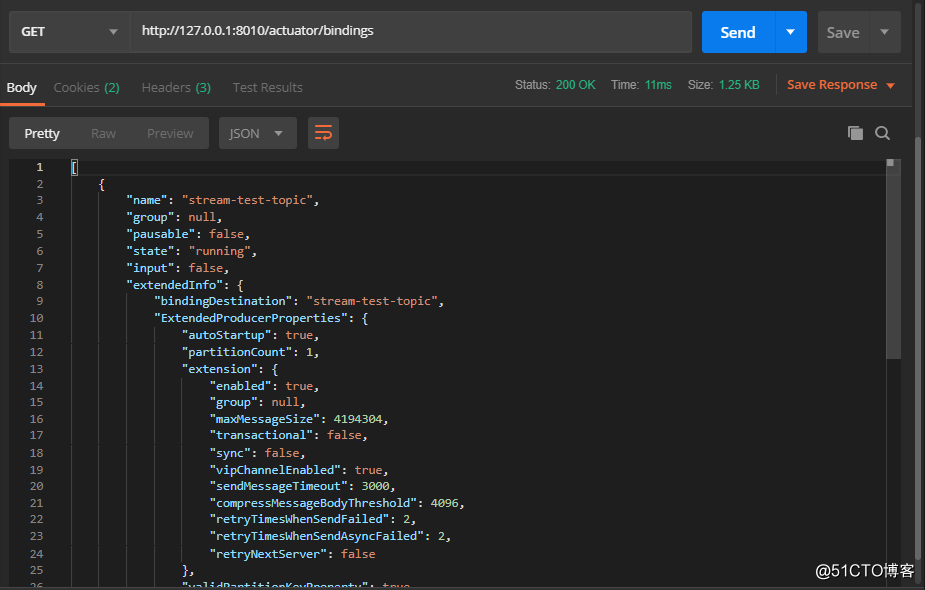
/actuator/bindings端点可以用于查看bindings相关信息:
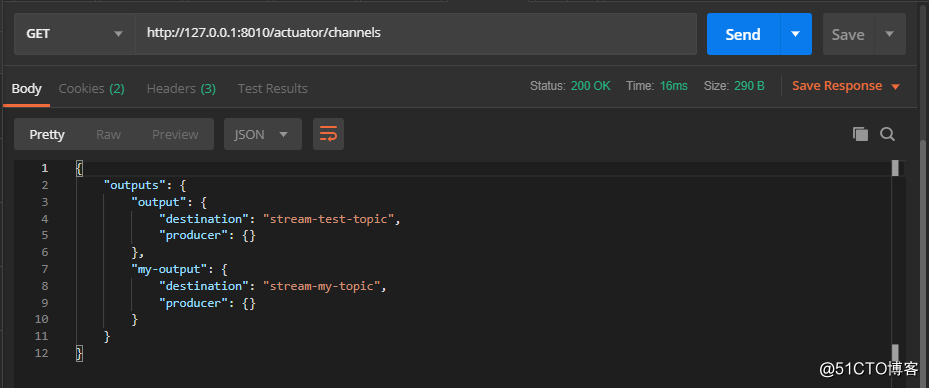
/actuator/channels端点用于查看channels的相关信息,而“input”和“output”就是所谓的channel,可以认为这些channel是topic的抽象:
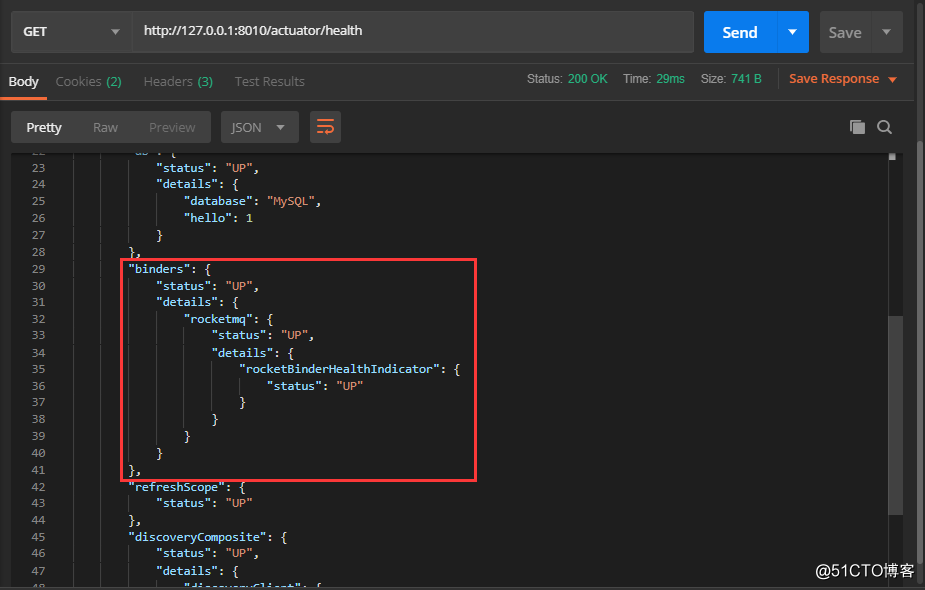
在
/actuator/health端点中可以查看binder及RocketMQ的状态,主要是用于查看MQ的连接情况,如果连接不上其status则为DOWN:
Spring Cloud Stream + RocketMQ实现事务消息
先前在Spring Cloud Alibaba RocketMQ - 构建异步通信的微服务一文的末尾中,我们介绍了RocketMQ的事务消息并且也演示了如何编码实现。在本文学习了Spring Cloud Stream之后,我们来结合Stream对之前实现事务消息的代码进行重构。
首先修改配置文件如下:
spring:
cloud:
stream:
rocketmq:
binder:
name-server: 192.168.190.129:9876
bindings:
output:
producer:
# 开启事务消息,这样通过output这个channel发送的消息都是半消息
transactional: true
# 生产者所在的事务组名称
group: tx-test-producer-group
bindings:
# 生产者为output
output:
# 用于指定topic
destination: stream-test-topic
然后重构
TestProducerService,具体代码如下:
package com.zj.node.contentcenter.service.test;

import com.alibaba.fastjson.JSON;
import com.zj.node.contentcenter.dao.content.NoticeMapper;
import com.zj.node.contentcenter.dao.log.RocketmqTransactionLogMapper;
import com.zj.node.contentcenter.domain.entity.content.Notice;
import com.zj.node.contentcenter.domain.entity.log.RocketmqTransactionLog;
import lombok.RequiredArgsConstructor;
import org.apache.rocketmq.spring.support.RocketMQHeaders;
import org.springframework.cloud.stream.messaging.Source;
import org.springframework.messaging.support.MessageBuilder;
import org.springframework.stereotype.Service;
import org.springframework.transaction.annotation.Transactional;

import java.util.UUID;

/**
* @author 01
* @date 2019-08-08
**/
@Service
@RequiredArgsConstructor
public class TestProducerService {

private final NoticeMapper noticeMapper;
private final RocketmqTransactionLogMapper rocketmqTransactionLogMapper;
private final Source source;

public String testSendMsg(Notice notice) {
// 生成事务id
String transactionId = UUID.randomUUID().toString();
// 通过stream发送消息,这里实际发送的就是半消息
source.output().send(
MessageBuilder.withPayload("消息体")
// header是消息的头部分,可以用作传参
.setHeader(RocketMQHeaders.TRANSACTION_ID, transactionId)
.setHeader("notice_id", notice.getId())
// 对象需要转换成json,否则默认是调用对象的toString方法转换为字符串
.setHeader("notice", JSON.toJSONString(notice))
.build()
);

return "send message success";
}

@Transactional(rollbackFor = Exception.class)
public void updateNotice(Integer noticeId, Notice notice) {
Notice newNotice = new Notice();
newNotice.setId(noticeId);
newNotice.setContent(notice.getContent());

noticeMapper.updateByPrimaryKeySelective(newNotice);
}

@Transactional(rollbackFor = Exception.class)
public void updateNoticeWithRocketMQLog(Integer noticeId, Notice notice, String transactionId) {
updateNotice(noticeId, notice);
// 写入事务日志
rocketmqTransactionLogMapper.insertSelective(
RocketmqTransactionLog.builder()
.transactionId(transactionId)
.log("updateNotice")
.build()
);
}
}
最后是重构
TestTransactionListener,具体代码如下:
package com.zj.node.contentcenter.rocketmq;

import com.alibaba.fastjson.JSON;
import com.zj.node.contentcenter.dao.log.RocketmqTransactionLogMapper;
import com.zj.node.contentcenter.domain.entity.content.Notice;
import com.zj.node.contentcenter.domain.entity.log.RocketmqTransactionLog;
import com.zj.node.contentcenter.service.test.TestProducerService;
import lombok.RequiredArgsConstructor;
import lombok.extern.slf4j.Slf4j;
import org.apache.rocketmq.spring.annotation.RocketMQTransactionListener;
import org.apache.rocketmq.spring.core.RocketMQLocalTransactionListener;
import org.apache.rocketmq.spring.core.RocketMQLocalTransactionState;
import org.apache.rocketmq.spring.support.RocketMQHeaders;
import org.springframework.messaging.Message;
import org.springframework.messaging.MessageHeaders;

/**
* 本地事务监听器
*
* @author 01
* @date 2019-08-08
**/
@Slf4j
@RequiredArgsConstructor
// 这里的txProducerGroup需要与配置文件里配置的一致
@RocketMQTransactionListener(txProducerGroup = "tx-test-producer-group")
public class TestTransactionListener implements RocketMQLocalTransactionListener {

private final TestProducerService service;
private final RocketmqTransactionLogMapper rocketmqTransactionLogMapper;

/**
* 用于执行本地事务的方法
*/
@Override
public RocketMQLocalTransactionState executeLocalTransaction(Message msg, Object arg) {
MessageHeaders headers = msg.getHeaders();
String transactionId = (String) headers.get(RocketMQHeaders.TRANSACTION_ID);
log.info("执行本地事务方法. 事务id: {}", transactionId);
Integer noticeId = Integer.parseInt((String) headers.get("notice_id"));
// 由于从header里获取的对象是json格式所以需要进行转换
Notice notice = JSON.parseObject((String) headers.get("notice"), Notice.class);

try {
// 执行带有事务注解的方法
service.updateNoticeWithRocketMQLog(noticeId, notice, transactionId);
// 正常执行向MQ Server发送commit消息
return RocketMQLocalTransactionState.COMMIT;
} catch (Exception e) {
log.error("本地事务方法发生异常,消息将被回滚", e);
// 发生异常向MQ Server发送rollback消息
return RocketMQLocalTransactionState.ROLLBACK;
}
}

/**
* 用于回查本地事务的执行结果
*/
@Override
public RocketMQLocalTransactionState checkLocalTransaction(Message msg) {
MessageHeaders headers = msg.getHeaders();
String transactionId = (String) headers.get(RocketMQHeaders.TRANSACTION_ID);
log.warn("回查本地事务状态. 事务id: {}", transactionId);

// 按事务id查询日志数据
RocketmqTransactionLog transactionLog = rocketmqTransactionLogMapper.selectOne(
RocketmqTransactionLog.builder()
.transactionId(transactionId)
.build()
);

// 如果能按事务id查询出来数据表示本地事务执行成功,没有数据则表示本地事务执行失败
if (transactionLog == null) {
log.warn("本地事务执行失败,事务日志不存在,消息将被回滚. 事务id: {}", transactionId);
return RocketMQLocalTransactionState.ROLLBACK;
}
return RocketMQLocalTransactionState.COMMIT;
}
}
扩展文章:
- 点赞
- 收藏
- 分享
- 文章举报

 beishuibo1517
发布了0 篇原创文章 · 获赞 0 · 访问量 1224
私信
关注
beishuibo1517
发布了0 篇原创文章 · 获赞 0 · 访问量 1224
私信
关注

- 使用 Spring Cloud Stream 构建消息驱动微服务
- Spring Cloud Stream:基于事件(消息)驱动的微服务框架
- 使用 Spring Cloud Stream 构建消息驱动微服务
- SpringCloudStream 构建消息驱动的微服务框架 集成kafka_http://blog.spring-cloud.io/blog/sc-stream.html
- SpringCloudStream 构建消息驱动的微服务框架
- SpringCloud学习笔记(10)——消息驱动的微服务:Spring Cloud Stream
- Spring Cloud构建微服务架构:消息驱动的微服务(核心概念)【Dalston版】
- SpringCloud Stream-----1、消息驱动的微服务概念
- Spring Cloud构建微服务架构:消息驱动的微服务(消费分区)【Dalston版】
- Spring Cloud构建微服务架构:消息驱动的微服务(消费组)【Dalston版】
- SpringCloud微服务知识整理十:消息驱动的微服务:Spring Cloud Stream
- 消息驱动式微服务:Spring Cloud Stream & RabbitMQ
- 消息驱动式微服务:Spring Cloud Stream & RabbitMQ
- Spring Cloud构建微服务架构:消息驱动的微服务(消费分区)【Dalston版】
- SpringCloud微服务实战之消息驱动Stream
- Spring Cloud构建微服务架构(七)消息总线
- Spring Cloud Stream(消息驱动)介绍
- Spring Cloud构建微服务架构(七)消息总线(续:Kafka)
- SpringCloud——Stream(消息驱动)
- Spring Cloud架构教程 (八)消息驱动的微服务(消费组)【Dalston版】