全套SpringBoot2.x入门到项目实战课程系列(第3章 Spring Boot 核心配置)
2019-08-25 18:20
891 查看
版权声明:本文为博主原创文章,遵循 CC 4.0 BY-SA 版权协议,转载请附上原文出处链接和本声明。
本文链接:https://blog.csdn.net/baidu_33267079/article/details/100065200
3.3 yaml 配置文件注入值 3.4 properties 配置文件注入值 3.5比较@Value和@ConfigurationProperties获取值 3.6 JSR303数据校验_配置文件注入的值 3.7 加载指定配置文件 3.8 Profile 多环境支持 3.9 配置文件加载位置 My GitHub
配置文件的作用:修改 Spring Boot 自动配置的默认值;
yml 是 YAML(YAML Ain’t Markup Language)不是一个标记语言;
YAML:以数据为中心,配置数据的时候具有面向对象的特征;比 json、xml 等更适合做配置文件;
对象 & Map
行内写法:
数组(List、Set)
用 - 值表示数组中的一个元素
行内写法
演示案例:我们的项目环境分为 开发 (dev)和 生产(prod)环境 ,开发环境下端口号为 8082,生产环境下端口号为8888 。
方式3: 虚拟机参数指定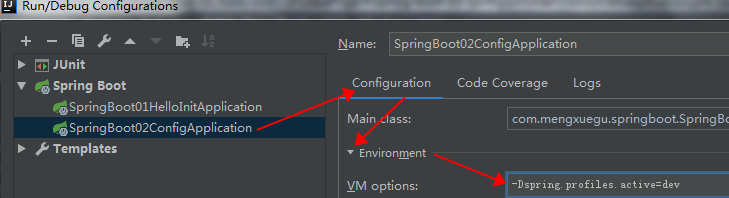
全套SpringBoot2.x入门到项目实战课程系列
第3章 Spring Boot 核心配置
3.1 Spring Boot的配置文件
- Spring Boot 使用一个全局配置文件,放置在 src/main/resources 目录或类路径的 /config 下; application.properties
- application.yml
-
标记语言:以前的配置文件;大多都使用的是 xxxxx.xml文件;
<server>
<port>8081</port>
</server>
server:
port: 8081
3.2 YAML语法格式
3.2.1 YAML基本语法
- key: value 表示一对键值对(冒号后面必须要有空格)
- 使用空格缩进表示层级关系
- 左侧缩进的空格数目不重要,只要同一层级的元素左侧对齐即可
- key 与 value 大小写敏感
server:
port: 8081contextPath: /info
3.2.2 YMAL常用写法
- 字面量: 数值,字符串,布尔,日期 字符串 默认不用加上引号; “” 使用 双引号 不会转义特殊字符,特殊字符最终会转成本来想表示含义输出name: “mengxuegu \n jiaoyu” 输出: mengxuegu 换行 jiaoyu
- ‘’ 使用 单引号 会转义特殊字符,特殊字符当作一个普通的字符串输name: 'mengxuegu \n jiaoyu 输出: mengxuegu \n jiaoyu
-
key: value value存储对象,每个值换一行写,注意值要左对齐
emp:
lastName: xiaomeng
age: 22
salary: 10000
emp: {lastName: xiaomeng, age: 22, salary: 10000}
fortes:
- java
- python
- hadoop
fortes: [java, python, hadoop]
3.3 yaml 配置文件注入值
- 编写 JavaBean
/** * 1、@ConfigurationProperties 告诉SpringBoot将配置文件中对应属性的值,映射到这个组件类中,进 行一一绑定 * prefix = "emp":配置文件中的前缀名,哪个前缀与下面的所有属性进行一一映射 * 2、@Component 必须将当前组件作为SpringBoot中的一个组件,才能使用容器提供的 @ConfigurationProperties功能; * * @Auther: www.mengxuegu.com */ @Component @ConfigurationProperties(prefix = "emp") public class Emp { private String lastName; private Integer age; private Double salary; private Boolean boss; private Date birthday; private Map map; private List list; //特长 private Forte forte; getter/setter…… } public class Forte { private String name; private Integer time; getter/setter…… } - 编写 application.yml 配置文件使用
emp:
lastName: zhangsan
age: 28
salary: 20000
boss: true
birthday: 1991/10/10
map:
key1: value1
key2: value2
list:
- one
- two
- three
forte:
name: java
time: 8
- 使用 SpringBoot 单元测试类进行测试
/** * SpringBoot单元测试: * 在测试时,可以直接将对象注入到容器中使用 */ @RunWith(SpringRunner.class) @SpringBootTest public class SpringBoot02ConfigApplicationTests { @Autowired Emp emp; @Test public void contextLoads() { System.out.println(emp); } } - 导入配置文件处理器,然后重新运行测试类,在编写配置文件时就会提示
<!--导入配置文件处理器,在编写配置文件时就会提示-->
<dependency>
<groupId>org.springframework.boot</groupId>
<artifactId>spring-boot-configuration-processor</artifactId>
<optional>true</optional>
</dependency>
3.4 properties 配置文件注入值
- 将 application.yml 配置文件中的内容注释掉
- 编写 application.properties 配置文件
#配置emp的值
emp.last-name=李四
emp.age=30
emp.birthday=1989/9/12
emp.boss=false
emp.salary=23000
emp.map.key1=value1
emp.map.key2=value2
emp.list=one, two, three
emp.forte.name=python
emp.forte.time=3
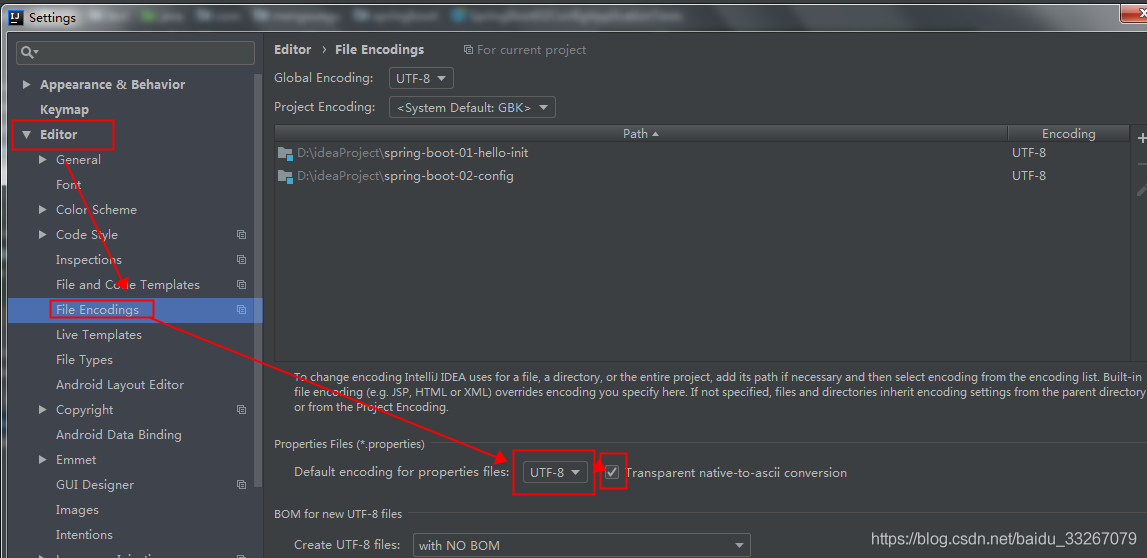
- 运行后,发现 properties 文件在 idea 上中文乱码, 进行如下设置就会不会乱码
3.5比较@Value和@ConfigurationProperties获取值
- 使用 @Value 获取值,把 Emp 类中的 @ConfigurationProperties 注释掉
@Component //@ConfigurationProperties(prefix = "emp") public class Emp { /** * 类似于 Spring 中的 xml 配制文件中的数据注入方式: * <bean class="Emp"> * <property name="lastName" value="字面量/ #{SpEL}Spring表达式/ ${key}从 配制文件取值"> * </property> * </bean> */ @Value("${emp.last-name}") private String lastName; @Value("#{10*2}") private Integer age; @Value("8000") private Double salary; private Boolean boss; private Date birthday; private Map map; private List list; //特长 private Forte forte; - 总结 @Value 与 @ConfigurationProperties 获取值的差异

3.6 JSR303数据校验_配置文件注入的值
- 校验是否为合法的邮箱地址: 取消 @ConfigurationProperties(prefix = “emp”) 前面的注释
- 在Emp 类上添加 @Validated 数据校验注解
- 在 lastName 属性上添加 @Email 注解
- 验证 @ConfigurationProperties 会进行校验, 而 @Value 不会进行校验值
// Email是这个包下面的类
import javax.validation.constraints.Email;
@Component
@ConfigurationProperties(prefix = "emp")
@Validated
public class Emp {
/**
* 类似于 Spring 中的 xml 配制文件中的数据注入方式:
* <bean class="Emp">
* <property name="name" value="普通数据类型/ #{SpEL}Spring表达式/ ${key}从配制
文件取值">
* </property>
* </bean>
*/
// @Value("${emp.last-name}")
@Email
private String lastName;
// @Value("#{10*2}")
private Integer age;
// @Value("8000")
private Double salary;
private Boolean boss;
private Date birthday;
private Map map;
private List list;
//特长
private Forte forte;
- 总结 使用场景: 如果只是在某个业务逻辑中需要获取配置文件中的某个属性值,就使用 @Value
@Controller
public class EmpController {

@Value("${emp.last-name}")
private String name;

@ResponseBody
@RequestMapping("/say")
public String sayHello() {
return "hello " + name;
}
}
- 如果专门使用javaBean和配置文件进行映射,就使用@ConfigurationProperties
3.7 加载指定配置文件
3.7.1 @PropertySource加载局部配置文件
@ConfigurationProperties 默认从全局配置文件(application.properties/application.yml)中获取值,
所有配置数据写在全局配置文件中,显得太臃肿了, 可将它们抽取出来,放到其他局部配置文件中。
- @PropertySource :用于加载局部配置文件;
将 全局配置文件 中的emp相关配置数据 抽取 到 resources/ emp.properties 文件中
emp.last-name=李四
emp.age=30
emp.birthday=1989/9/12
emp.boss=false
emp.salary=23000
emp.map.key1=value1
emp.map.key2=value2
emp.list=one, two, three
emp.forte.name=python
emp.forte.time=3
- @PropertySource :加载指定的配置文件; value 属性是数组类型, 用于指定文件位置
@PropertySource(value = {"classpath:emp.properties"})
@Component
@ConfigurationProperties(prefix = "emp")
@Validated
public class Emp {
/**
* 类似于 Spring 中的 xml 配制文件中的数据注入方式:
* <bean class="Emp">
* <property name="name" value="普通数据类型/ #{SpEL}Spring表达式/ ${key}从配制
文件取值">
* </property>
* </bean>
*/
// @Value("${emp.last-name}")
//@Email
private String lastName;
// @Value("#{10*2}")
private Integer age;
// @Value("8000")
private Double salary;
private Boolean boss;
private Date birthday;
private Map map;
private List list;
//特长
private Forte forte;
3.7.2 @ImportResource 使用xml配置
- SpringBoot提倡零配置, 即无xml配置,但是在实际开发中,可能有一些特殊要求必须使用 xml 配置;这时我们可以通过 Spring 提供的 @ImportResource 来加载 xml 配置文件。
- @ImportResource :加载Spring的xml配置文件内容加载到容器中使用;
创建业务类: com.mengxuegu.springboot.service.EmpService
public class EmpService { public void add(){} } - 创建 resources/spring01.xml 文件,添以下内容
<?xml version="1.0" encoding="UTF-8"?>
<beans xmlns="http://www.springframework.org/schema/beans"
xmlns:xsi="http://www.w3.org/2001/XMLSchema-instance"
xsi:schemaLocation="http://www.springframework.org/schema/beans
http://www.springframework.org/schema/beans/spring-beans.xsd">
<bean id="empService"
class="com.mengxuegu.springboot.service.EmpService">
</bean>
</beans>
- 将Spring的配置文件加载到容器中, 使用@ImportResource 标注在一个配置类上,下面是主配置类
- 将Spring的配置文件加载到容器中, 使用@ImportResource 标注在一个配置类上,下面是主配置类
@ImportResource(locations = {"classpath:spring01.xml"}) @SpringBootApplication public class SpringBoot02ConfigApplication { public static void main(String[] args) { SpringApplication.run(SpringBoot02ConfigApplication.class, args); } } - 单元测试
@RunWith(SpringRunner.class)
@SpringBootTest
public class SpringBoot02ConfigApplicationTests {

@Autowired
ApplicationContext context;

@Test
public void testXml(){
//没有找到就报错
System.out.println("empService: " + context.getBean("empService"));
}

@Autowired
Emp emp;

@Test
public void contextLoads() {
System.out.println(emp);
}
}
3.7.3 自定义配置类向容器注入组件
- Spring Boot 推荐使用注解的方式向容器中注入组件, 操作如下: 使用 @Configuration 配置类,来表示对应Spring配置文件
- 使用 @Bean 向容器中注入组件对象
- 把 上面 @importResource 注解注释掉测试
/** * @Configuration 用于标识当前类是一个配置类, 来表示对应的Spring配置文件 * @Auther: www.mengxuegu.com */ @Configuration public class EmpConfig { /** * @Bean 标识的方法用于向容器注入组件 * 1. 方法的返回值就是注入容器中的组件对象, * 2. 方法名是这个组件对象的 id 值 */ @Bean public EmpService empService2() { System.out.println(" @Bean 注解已经将 EmpService 组件注入"); return new EmpService(); } } - 再次测试
@RunWith(SpringRunner.class)
@SpringBootTest
public class SpringBoot02ConfigApplicationTests {

@Autowired
ApplicationContext context;

@Test
public void testXml(){
// System.out.println("empService: " + context.getBean("empService"));
System.out.println("empService2: " + context.getBean("empService2"));
}
3.8 Profile 多环境支持
3.8.1 Profile介绍
- Profile 是 Spring 用来针对不同的环境要求,提供不同的配置支持, 全局 Profile 配置使用的文件名可以是
application-{profile}.properties / application-{profile}.yml ; 如: application-dev.properties / application-prod.properties
3.8.2 properties 文件演示案例
- 创建两个文件 application-dev.properties 与 application-prod.properties


- 激活指定profile
在主配置文件 application.properties 中指定 spring.profiles.active=dev

- 未指定哪个profile文件时, 默认使用 application.properties 中的配置 。
3.8.3 yml 文件演示案例
- 在 application.yml 中配置
yml 支持多文档块方式 —
server:
port: 8081 # 默认端口号
spring:
profiles:
active: prod #激活哪个profile , 当前激活的是 dev 开发环境
------------------------------------------------------------------------
server:
port: 8082
spring:
profiles: dev #指定属于哪个环境, dev 环境时使用
------------------------------------------------------------------------
server:
port: 8888
spring:
profiles: prod #指定属于哪个环境, prod 环境时使用
3.8.4 多种方式激活指定profile
- 方式1: 在主配置文件中指定
#application.properties
spring.profiles.active=dev
#application.yml
spring:
profiles:
active: prod
- 方式2: 命令行参数指定
可以直接在测试的时候,配置传入命令行参数 --spring.profiles.active=dev


- 打jar包运行
java -jar spring-boot-02-1 config-0.0.1-SNAPSHOT.jar --spring.profiles.active=dev
-Dspring.profiles.active=dev
3.9 配置文件加载位置
- SpringBoot 启动时,会扫描以下位置的 application.properties 或者 application.yml 文件作为Spring Boot的默认配置文件:

- 以上按照优先级从低到高的顺序,将所有位置的配置文件全部加载,高优先级的配置内容会覆盖低优先级的配置内容。
- 演示效果如下:

- 注意:如果使用IDEA创建的项目是 Module (如果是 Project 则忽略),当前项目的根目录不是你这个项目所有目录(是Project所在目录) ,这样使用 file: 存放配置文件时会找不到配置
解决方式:更改工作路径直接为Module所有目录 MODULEDIRMODULE_DIRMODULEDIR
通过通过 1 System.getProperty("user.dir") 获取的是module的路径

- 配置文件到底能写什么?怎么写?
配置文件能配置的属性参照
https://docs.spring.io/spring-boot/docs/2.0.6.RELEASE/reference/htmlsingle/#common-application-properties
My GitHub

相关文章推荐
- springboot视频教程系列(三)SpringBoot的核心配置文件-王勇-专题视频课程
- SpringBoot学习 —— 1、项目入门配置编
- Spring Boot 2.0 WebFlux 上手系列课程:快速入门(一)
- Spring boot 系列 入门--配置
- Sping Boot入门到实战之入门篇(三):Spring Boot属性配置
- 读懂这些spring boot的核心注解,快速配置完成项目搭建
- 企业级Hadoop 2.x入门系列之九Hadoop核心配置文件的默认配置解读
- Spring Boot实战(六)Spring Boot核心 6.1 基本配置
- SpringBoot 实战 (一) :如何创建SpringBoot项目 --入门篇
- SpringBoot入门系列:eclipse如何构建一个最简单的springBoot项目。
- 搜索引擎solr系列---与java的springboot项目连接配置
- springboot快速入门(二)——项目属性配置
- SpringCloud Finchley 实战入门(基于springBoot 2.0.3)【八 config 微服务配置中心】
- Spring Boot实战(六)Spring Boot核心 6.4 Profile配置
- 基于微服务的秒杀项目实战使用Spring Boot2.x Actuator监控应用
- Spring Boot实战(六)Spring Boot核心 6.2 外部配置
- 3 微服务实战系列 - SpringBoot项目实战
- SpringBoot系列三:SpringBoot基本概念(统一父 pom 管理、SpringBoot 代码测试、启动注解分析、配置访问路径、使用内置对象、项目打包发布)
- 使用Gradle构建SpringBoot工程系列:第四篇:项目初始化(编辑build.gradle文件,引入项目基本配置及依赖)
- 4 微服务实战系列 - SpringBoot RabbitMQ 实战解决项目中实践