【Linux】一步一步学Linux——chmod命令(110)
2019-08-06 20:41
1381 查看
 版权声明:署名,允许他人基于本文进行创作,且必须基于与原先许可协议相同的许可协议分发本文 (Creative Commons)
00. 目录
文章目录
01. 命令概述
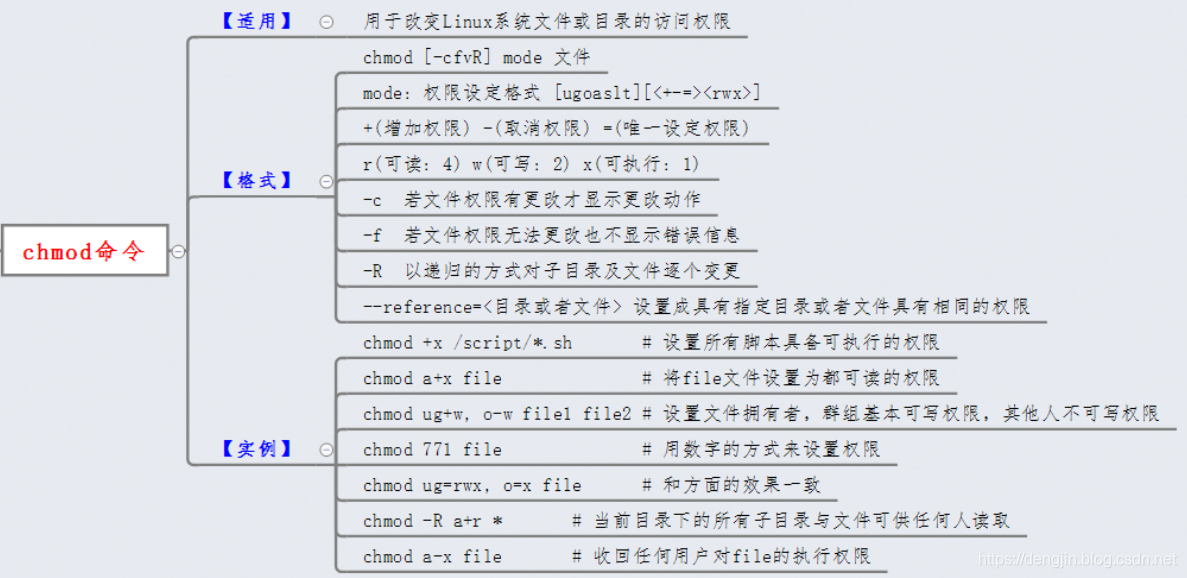
chmod - 改变文件的访问权限
chmod命令的英文原意是“change the permissions mode of a file”,我们简称为“change mode”,意为用来改变文件或目录权限的命令,但是只有文件的属主和超级用户root才能执行这个命令。有两种模式,一种是采用权限字母和操作符表达式;另一种是采用数字。
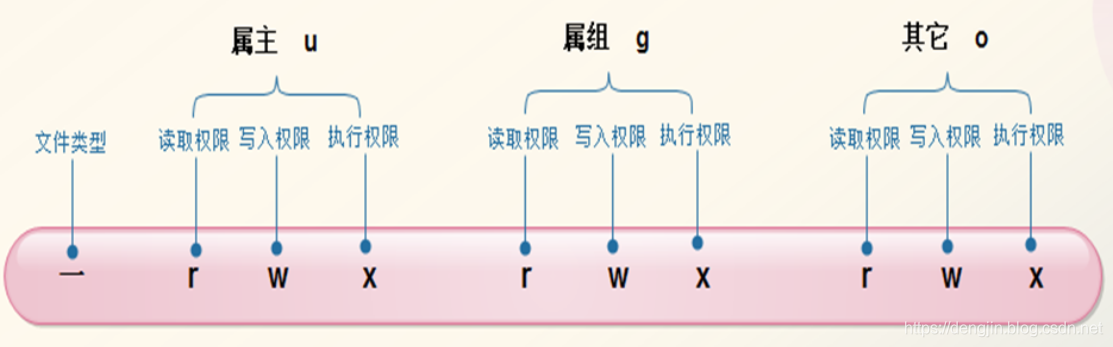
文件十个字符意义如下图所示
权限进制表示
rwx对文件意义如下:
r:可以使用内容查看类的命令来显示文件相关内容
w: 可以使用编辑器修改文件内容,但需要配置r权限一起使用
x:可以将文件发起一个进程进行执行
rwx对目录意义如下:
r:可以使用ls命令查看目录内容的文件信息,但使用cd切换不了其它目录
w:可以创建、删除目录里的文件,也可以删除当前目录,但需要配合rx两个权限一起使用
x:可以使用ls -l命令来查看目录内容的文件信息,并且可以使用cd命令切换此目录为工作目录,但需配合r权限一起使用
权限范围的表示法如下:
uUser,即文件或目录的拥有者;
gGroup,即文件或目录的所属群组;
oOther,除了文件或目录拥有者或所属群组之外,其他用户皆属于这个范围;
aAll,即全部的用户,包含拥有者,所属群组以及其他用户;
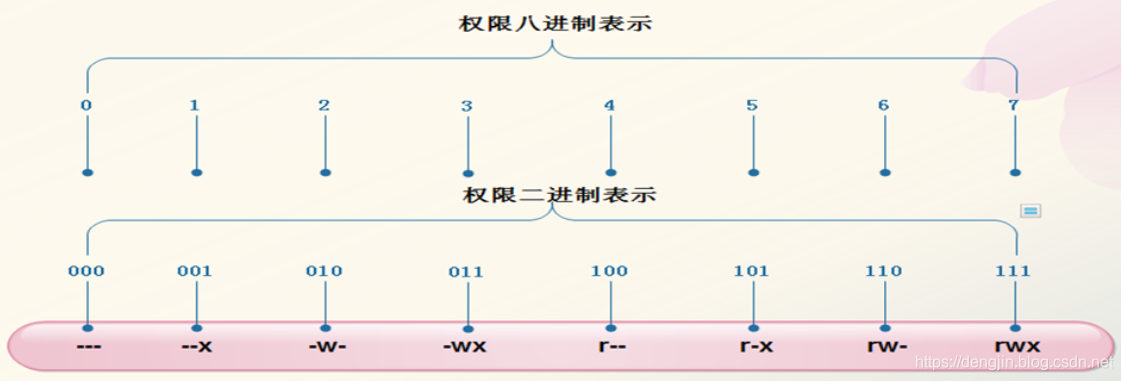
r读取权限,数字代号为“4”;
w写入权限,数字代号为“2”;
x执行或切换权限,数字代号为“1”;
-不具任何权限,数字代号为“0”;
s特殊功能说明:变更文件或目录的权限。
权限设定
- 增加权限
- 取消权限 =
- 唯一设定权限
02. 命令格式
用法:chmod [选项]... 模式[,模式]... 文件...
 或:chmod [选项]... 八进制模式 文件...
 或:chmod [选项]... --reference=参考文件 文件...
03. 常用选项
将每个文件的模式更改为指定值。

-c, --changes         类似 --verbose,但只在有更改时才显示结果
--no-preserve-root        不特殊对待根目录(默认)
--preserve-root           禁止对根目录进行递归操作
-f, --silent, --quiet 去除大部份的错误信息
-v, --verbose         为处理的所有文件显示诊断信息
--reference=参考文件      使用指定参考文件的模式,而非自行指定权限模式
-R, --recursive               以递归方式更改所有的文件及子目录
--help            显示此帮助信息并退出
--version         显示版本信息并退出

每种 MODE 都应属于这类形式"[ugoa]*([-+=]([rwxXst]*|[ugo]))+"。
04. 参考示例
4.1 全部用户增加读权限
[deng@itcast test]$ chmod a+r file
[deng@itcast test]$ ls -l file
-rw-rw-r-- 1 deng deng 0 8月   6 20:06 file
[deng@itcast test]$

#或者
[deng@itcast test]$ chmod  ugo+r file
4.2 所有用户减去读权限
[deng@itcast test]$ chmod ugo-r file
[deng@itcast test]$ ls -l file
--w--w---- 1 deng deng 0 8月   6 20:06 file
[deng@itcast test]$

#或者
[deng@itcast test]$ chmod a-r file
4.3 文件所属者和所属组增加读写权限
[deng@itcast test]$ chmod ug+rw file
[deng@itcast test]$ ls -l file
-rw-rw---- 1 deng deng 0 8月   6 20:06 file
[deng@itcast test]$
4.4 文件其它设置权限为rw
[deng@itcast test]$ chmod o=rw file
[deng@itcast test]$ ls -l file
-rw-rw-rw- 1 deng deng 0 8月   6 20:06 file
[deng@itcast test]$
4.5 文件所属组设置权限为rwx,所属组设置为rw,其它设置为r
[deng@itcast test]$ chmod u=rwx,g=rw,o=r file
[deng@itcast test]$ ls -l file
-rwxrw-r-- 1 deng deng 0 8月   6 20:06 file
[deng@itcast test]$
4.6 文件所属者和所属组追加写,其它撤销写权限
[deng@itcast test]$ chmod ug+w,o-w file
[deng@itcast test]$ ls -l file
-rwxrw-r-- 1 deng deng 0 8月   6 20:06 file
[deng@itcast test]$
4.7 文件所属者增加可执行权限
[deng@itcast test]$ chmod  u+x file
[deng@itcast test]$ ls -l file
-rwxrw-r-- 1 deng deng 0 8月   6 20:06 file
[deng@itcast test]$
4.8 递归将test目录下所有的文件和目录追加读权限
[deng@itcast test]$ chmod -R a+r test/
4.9 文件所有用户撤销执行权限
[deng@itcast test]$ chmod a-x file
4.10 所有人追加可执行权限
[deng@itcast test]$ chmod +x file
[deng@itcast test]$ ls -l file
-rwxrwxr-x 1 deng deng 0 8月   6 20:06 file
[deng@itcast test]$

#等价于
[deng@itcast test]$ chmod a+x file
4.11 设置文件所属者读写,所属组和其它读权限
[deng@itcast test]$ chmod 644 file
[deng@itcast test]$ ls -l file
-rw-r--r-- 1 deng deng 0 8月   6 20:06 file
[deng@itcast test]$
4.12 将所有用户设置为只读权限
[deng@itcast test]$ chmod 444 file
[deng@itcast test]$ ls -l file
-r--r--r-- 1 deng deng 0 8月   6 20:06 file
[deng@itcast test]$
等价于
[deng@itcast test]$ chmod a-wx,a+r file
[deng@itcast test]$ ls -l file
-r--r--r-- 1 deng deng 0 8月   6 20:06 file
[deng@itcast test]$
4.13 将所有的用户设置为只读权限
[deng@itcast test]$ chmod =r file
[deng@itcast test]$ ls -l file
-r--r--r-- 1 deng deng 0 8月   6 20:06 file
[deng@itcast test]$
4.14 文件所属者读写执行权限,文件所属组读和执行权限,文件其它执行权限
[deng@itcast test]$ chmod 751 file
[deng@itcast test]$ ls -l file
-rwxr-x--x 1 deng deng 0 8月   6 20:06 file
[deng@itcast test]$
等价于
[deng@itcast test]$ chmod u=rwx,g=rx,o=x file
[deng@itcast test]$ ls -l file
-rwxr-x--x 1 deng deng 0 8月   6 20:06 file
[deng@itcast test]$
05. 总结
06. 附录

相关文章推荐
- Linux 系统使用chmod命令权限说明。
- 每天一个linux命令(27):linux chmod命令
- 在Linux中, 用C语言简单实现chmod命令
- 每日一linux命令(29)-------linux chmod命令
- Ubuntu_Linux chmod 命令
- linux命令——chmod/chown
- Linux初学笔记之<chmod命令>
- 重新认知 linux chmod 命令
- linux中chmod与chown两个命令详解
- (转)每天一个linux命令(27):linux chmod命令
- linux的chmod,chown命令 详解
- linux常用命令2 chmod、chown
- Linux一天三条命令系列——第一天 chmod chgrp chown
- Linux命令——chmod
- Linux学习22_每天一个linux命令(27):chmod命令
- linux文件权限修改命令之chmod
- Linux—chmod命令用法
- Linux命令之chmod(修改文件权限)
- Linux常用命令(二十二) - chmod
- 【每天一个Linux命令】chmod