SpringBoot__自定义一个简单的Starter
在SpringBoot的源码中可以看到很多不同的Stater,Stater与很多的自动化配置有关,Stater是通过Spring以及SpringMVC的知识点实现的。
@Conditional这个注解是条件注解,
@profile特殊的条件注解,这个
@Conditional条件注解就是Starter 的核心。当 classpath 下存在某一个 Class 时,某个配置才会生效。
结合代码来理解吧。
Starter就是普通的Maven项目,这里记住了这里是一个普通的Maven,不能是一个SpringBoot项目(SpringBoot不能被依赖)。
结构

依赖
<dependency>
<groupId>org.springframework.boot</groupId>
<artifactId>spring-boot-autoconfigure</artifactId>
<version>2.1.4.RELEASE</version>
</dependency>
HelloProperties
通过在application.yml中配置进行属性注入,你要是愿意也可以在
application.properties中进行配置进行属性注入,也可以给配置文件改名改路径但是要使用
@PropertySource(value="classpath:xxx.properties"),这都是可以的。
/**
* @author ZSL
* @ClassName HelloYaml
* @description
*
*  @ConfigurationProperties 类型安全的属性注入,
*  即将 application.yml 文件中前缀为 helloyaml 的属性注入到这个类对应的属性上
*
* @date 2019/8/6
*/
@ConfigurationProperties(prefix = "helloyaml")
public class HelloYaml {

private String name;
private Integer age;

public HelloYaml(String name, Integer age) {
this.name = name;
this.age = age;
}

public HelloYaml() {
}

public String getName() {
return name;
}

public void setName(String name) {
this.name = name;
}

public Integer getAge() {
return age;
}

public void setAge(Integer age) {
this.age = age;
}

@Override
public String toString() {
return "HelloYaml{" +
"name='" + name + '\'' +
", age=" + age +
'}';
}
}
将 application.yml 中配置的属性值直接注入到这个实例中, @ConfigurationProperties 类型安全的属性注入,即将 application.yml 文件中前缀为 helloyaml 的属性注入到这个类对应的属性上,这里要注意的是前缀存在中文或者大写都会报错
application.yml
hellyaml:
name: zsl
age: 18
HelloService
自定义一个类,用于当自动装配类HelloServiceAutoConfiguration
的返回对象
/**
* @author ZSL
* @ClassName HelloService
* @description
* @date 2019/8/6
*/
public class HelloService {

private String name;
private Integer age;

public String getName() {
return name;
}

public void setName(String name) {
this.name = name;
}

public Integer getAge() {
return age;
}

public void setAge(Integer age) {
this.age = age;
}

public HelloService(String name, Integer age) {
this.name = name;
this.age = age;
}

public HelloService() {
}

@Override
public String toString() {
return "HelloService{" +
"name='" + name + '\'' +
", age=" + age +
'}';
}
}
HelloServiceAutoConfiguration
自定义一个自动装配类,首先它是一个配置类,它要是和我们的配置文件类HelloProperties相关,然后如何存在HelloService类才可以生效,HelloProperties需要在自动装配类中注入HelloService类中。
/**
* @author ZSL
* @ClassName HelloServiceAutoConfiguration
* @description:
*
* @Configuration 注解表明这是一个配置类
*
* @EnableConfigurationProperties 注解是使我们之前配置的 @ConfigurationProperties 生效,让配置的属性成功的进入 Bean 中
*
* @ConditionalOnClass 表示当项目当前 classpath 下存在 HelloService 时,后面的配置才生效
*
* @date 2019/8/6
*/
@Configuration
@EnableConfigurationProperties(HelloYaml.class)
@ConditionalOnClass(HelloService.class)
public class HelloServiceAutoConfiguration {

@Autowired
private HelloYaml helloYaml;

@Bean
HelloService helloService(){
HelloService helloService = new HelloService();
helloService.setName(helloYaml.getName());
helloService.setAge(helloYaml.getAge());
return helloService;
}
}
- @Configuration 注解表明这是一个配置类
- @EnableConfigurationProperties注解的作用是:使使用
@ConfigurationProperties 注解的类生效。
如果一个配置类只配置@ConfigurationProperties注解,而没有使用@Component,那么在IOC容器中是获取不到properties 配置文件转化的bean。
@EnableConfigurationProperties 相当于把使用 @ConfigurationProperties 的类进行了一次注入。
@EnableConfigurationProperties 文档中解释:
当@EnableConfigurationProperties注解应用到你的@Configuration时, 任何被@ConfigurationProperties注解的beans将自动被Environment属性配置。
这和我们前面的博客讲配置文件的位置问题和命名问题的在启动时在环境属性中进行配置类似。
- @ConditionalOnClass 表示当项目当前 classpath 下存在 HelloService 时,后面的配置才生效
SpringBoot框架还提供了很多@Condition
@ConditionalOnBean(仅仅在当前上下文中存在某个对象时,才会实例化一个Bean)
@ConditionalOnClass(某个class位于类路径上,才会实例化一个Bean)
@ConditionalOnExpression(当表达式为true的时候,才会实例化一个Bean)
@ConditionalOnMissingBean(仅仅在当前上下文中不存在某个对象时,才会实例化一个Bean)
@ConditionalOnMissingClass(某个class类路径上不存在的时候,才会实例化一个Bean)
@ConditionalOnNotWebApplication(不是web应用)
接下来在resources 目录下创建一个名为 META-INF 的文件夹,在META-INF 的文件夹下新建一个spring.factories 的文件
org.springframework.boot.autoconfigure.EnableAutoConfiguration=config.HelloServiceAutoConfiguration
那么我们要这个文件干嘛用了?
我们来看SpringBoot的启动类(这里随便拿了一个启动类来分析)

@SpringBootApplication
public class FreemarkerdemoApplication {

public static void main(String[] args) {
SpringApplication.run(FreemarkerdemoApplication.class, args);
}

}
启动类都有一个 @SpringBootApplication 注解
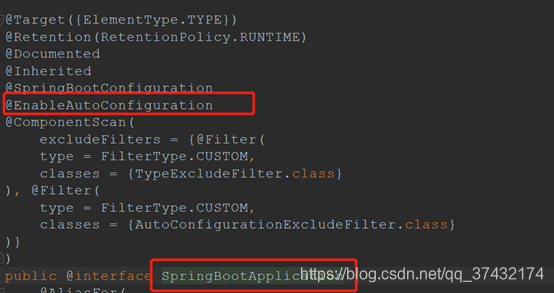
@Target({ElementType.TYPE})
@Retention(RetentionPolicy.RUNTIME)
@Documented
@Inherited
@SpringBootConfiguration
@EnableAutoConfiguration
@ComponentScan(
excludeFilters = {@Filter(
type = FilterType.CUSTOM,
classes = {TypeExcludeFilter.class}
), @Filter(
type = FilterType.CUSTOM,
classes = {AutoConfigurationExcludeFilter.class}
)}
)
public @interface SpringBootApplication {
@AliasFor(
annotation = EnableAutoConfiguration.class
)
Class<?>[] exclude() default {};

@AliasFor(
annotation = EnableAutoConfiguration.class
)
String[] excludeName() default {};

@AliasFor(
annotation = ComponentScan.class,
attribute = "basePackages"
)
String[] scanBasePackages() default {};

@AliasFor(
annotation = ComponentScan.class,
attribute = "basePackageClasses"
)
Class<?>[] scanBasePackageClasses() default {};
}
这个@SpringBootApplication 注解是一个组合注解,这里我们来看@EnableAutoConfiguration:
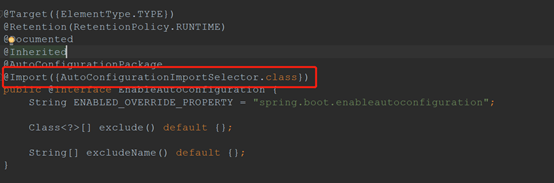
@EnableAutoConfiguration 表示启用 Spring 应用程序上下文的自动配置,该注解会自动导入一个名为 AutoConfigurationImportSelector 的类,而这个类会去读取一个名为 spring.factories 的文件, spring.factories 中则定义需要加载的自动化配置类
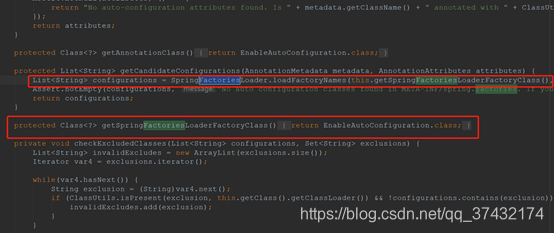
这里大概跟踪一下上面说的源码
任意一个框架的 Starter ,都能看到它有一个 spring.factories 文件.

安装
因为是普通的Maven项目,所以我们打包安装一下,在本地仓库可以找到。
Install一下。
测试
新建一个SpringBoot项目,把刚刚打包的项目,依赖到这新建一个SpringBoot中,在输出自动装配类中的bean的返回值,也就是HelloService看看。

- 创建一个自定义的Spring Boot Starter
- Spring boot 自定义一个starter pom
- 关于springboot自动化配置,创建一个spring-boot-starter的简单实现
- 自定义spring boot starter三部曲之二:实战开发
- 一个简单的SpringBoot整合Mybatis项目
- [bidata-102] 一个最简单的spring boot[1.3.8/1.5.4]的web应用
- 用spring boot搭建一个最简单的用户登录界面,其艰难历程!
- SpringBoot系列(二):创建一个简单的SpringBoot项目
- SpringBoot专题(1) 一个的简单的SpringBoot例子
- 创建一个简单的SpringBoot项目
- 实现一个无需配置的SpringBoot的简单Demo
- SpringBoot自定义注解作为starter引入pom
- 使用搬瓦工VPS搭建一个简单的spring-boot应用
- 仿照spring-boot实现一个简单的ioc容器(一)
- spring boot 自定义starter的实现教程
- Spring Boot整合logback:一个简单的日志集成架构
- 使用eclipse工具搭建一个简单的Spring boot。
- SpringBoot学习之DAY_01 springboot介绍以及创建一个简单的springboot工程
- 使用RethinkDB与SpringBoot 搭建一个简单的聊天
- Spring boot如何写一个自定义的auto-configuration(上)