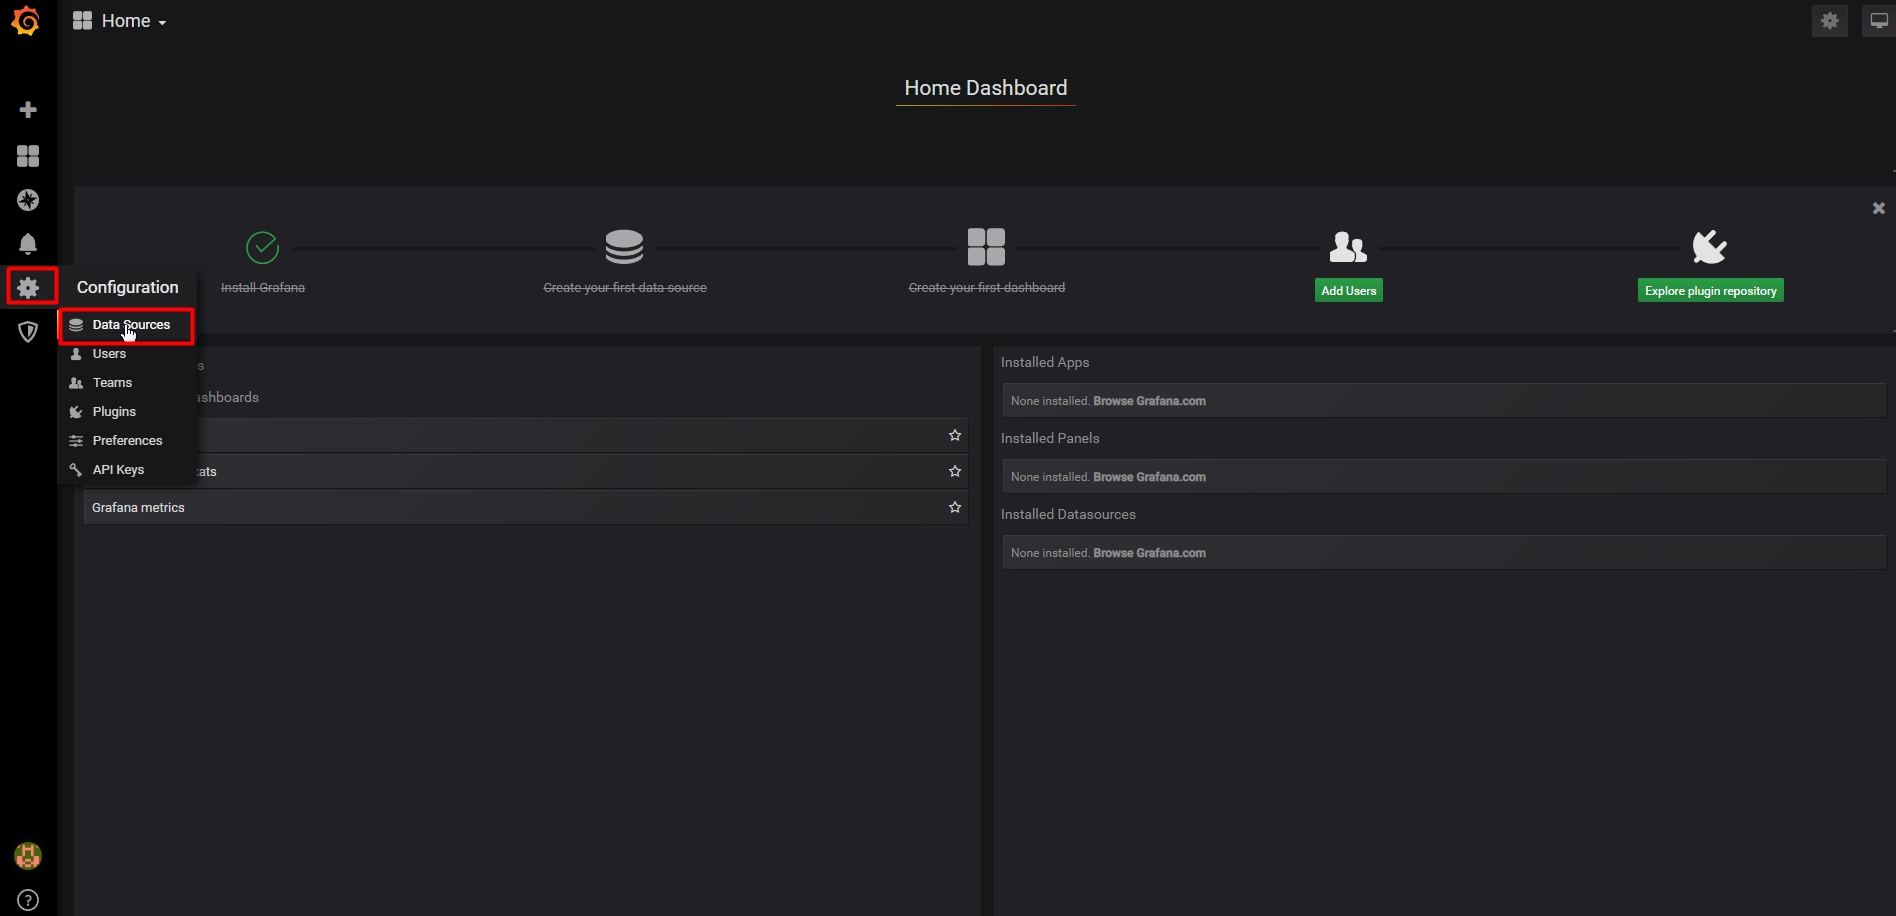
Nacos 安装
Nacos
一、Spring Cloud 、Spring Cloud Alibaba 、Nacos版本对应关系
版本说明
format edited this page 2019/7/1 · 13 revisions
版本依赖关系
| Spring Cloud Version | Spring Cloud Alibaba Version | Spring Boot Version |
|---|---|---|
| Spring Cloud Greenwich | 0.9.0.RELEASE | 2.1.X.RELEASE |
| Spring Cloud Finchley | 0.2.X.RELEASE | 2.0.X.RELEASE |
| Spring Cloud Edgware | 0.1.X.RELEASE | 1.5.X.RELEASE |
| Note | 请注意, Spring Cloud Edgware 最低支持 Edgware.SR5 版本 |
|---|---|
组件版本关系
| Spring Cloud Alibaba Version | Sentinel Version | Nacos Version | RocketMQ Version | Dubbo Version | Seata Version |
|---|---|---|---|---|---|
| 0.9.0.RELEASE or 0.2.2.RELEASE or 0.1.2.RELEASE | 1.5.2 | 1.0.0 | 4.4.0 | 2.7.1 | 0.4.2 |
| 0.2.1.RELEASE or 0.1.1.RELEASE | 1.4.0 | 0.6.2 | 4.3.1 | ❌ | ❌ |
| 0.2.0.RELEASE or 0.1.0.RELEASE | 1.3.0-GA | 0.3.0 | ❌ | ❌ | ❌ |
依赖管理
Spring Cloud Alibaba BOM 包含了它所使用的所有依赖的版本。
RELEASE 版本
Spring Cloud Greenwich
如果需要使用 Spring Cloud Greenwich 版本,请在 dependencyManagement 中添加如下内容
<dependency>
<groupId>org.springframework.cloud</groupId>
<artifactId>spring-cloud-alibaba-dependencies</artifactId>
<version>0.9.0.RELEASE</version>
<type>pom</type>
<scope>import</scope>
</dependency>
Spring Cloud Finchley
如果需要使用 Spring Cloud Finchley 版本,请在 dependencyManagement 中添加如下内容
<dependency>
<groupId>org.springframework.cloud</groupId>
<artifactId>spring-cloud-alibaba-dependencies</artifactId>
<version>0.2.2.RELEASE</version>
<type>pom</type>
<scope>import</scope>
</dependency>
Spring Cloud Edgware
如果需要使用 Spring Cloud Edgware 版本,请在 dependencyManagement 中添加如下内容
<dependency>
<groupId>org.springframework.cloud</groupId>
<artifactId>spring-cloud-alibaba-dependencies</artifactId>
<version>0.1.2.RELEASE</version>
<type>pom</type>
<scope>import</scope>
</dependency>
BUILD-SNAPSHOT 版本
如果您想使用最近的 SNAPSHOT 版本,首先需要在你的 maven 配置中加入 Spring BUILDSNAPSHOT 仓库,可以在 Maven 配置文件中的 settings.xml 或者 Java 工程的 pom.xml 中配置,
<repositories>
<repository>
<id>spring-snapshot</id>
<name>Spring Snapshot Repository</name>
<url>https://repo.spring.io/snapshot</url>
<snapshots>
<enabled>true</enabled>
</snapshots>
</repository>
</repositories>
| Note | 请注意, BUILD-SNAPSHOT 版本随时可能更新 |
|---|---|
Spring Cloud Greenwich
如果需要使用 Spring Cloud Greenwich 版本,请在 dependencyManagement 中添加如下内容
<dependency>
<groupId>org.springframework.cloud</groupId>
<artifactId>spring-cloud-alibaba-dependencies</artifactId>
<version>0.9.1.BUILD-SNAPSHOT</version>
<type>pom</type>
<scope>import</scope>
</dependency>
Spring Cloud Finchley
如果需要使用 Spring Cloud Finchley 版本,请在 dependencyManagement 中添加如下内容
<dependency>
<groupId>org.springframework.cloud</groupId>
<artifactId>spring-cloud-alibaba-dependencies</artifactId>
<version>0.2.3.BUILD-SNAPSHOT</version>
<type>pom</type>
<scope>import</scope>
</dependency>
Spring Cloud Edgware
如果需要使用 Spring Cloud Edgware 版本,请在 dependencyManagement 中添加如下内容
<dependency>
<groupId>org.springframework.cloud</groupId>
<artifactId>spring-cloud-alibaba-dependencies</artifactId>
<version>0.1.3.BUILD-SNAPSHOT</version>
<type>pom</type>
<scope>import</scope>
</dependency>
二、 单机部署Nacos
1. 使用docker部署
1.1 下载镜像
注意:需要github中的分支版本号和docker镜像地址版本一致,如:nacos-server:0.6.0不支持prometheus和grafana,而最新版本支持
#如果使用最新版
git clone --depth 1 https://github.com/nacos-group/nacos-docker.git
如果使用的不是最新版本的docker镜像
那么需要在github中查找相应的版本,然后下载zip文件,并使用ftp上传到centos服务器
1.2 部署镜像
-
Standalone Derby(单机部署,使用Derby)
Derby是Java编写的内嵌数据库,不要引入mysql
docker-compose -f example/standalone-derby.yaml up -d
配置文件
version: "3.7"
services:
nacos:
image: nacos/nacos-server:1.1.0 #一般不要使用latest
container_name: nacos-standalone #容器实例命名
environment:
- PREFER_HOST_MODE=hostname
- MODE=standalone #部署模式
volumes:
- ./standalone-logs/:/home/nacos/logs
- ./init.d/custom.properties:/home/nacos/init.d/custom.properties #配置使用prometheus、fluxdb、ES
ports:
- "8848:8848"
prometheus:
container_name: prometheus
image: prom/prometheus:v2.11.1
volumes:
- ./prometheus/prometheus-standalone.yaml:/etc/prometheus/prometheus.yml #配置监控点
ports:
- "9090:9090"
depends_on:
- nacos #服务映射
restart: on-failure
grafana:
container_name: grafana
image: grafana/grafana:6.2.5
ports:
- 3000:3000
restart: on-failure
version是docker-compose文件格式与docker的版本对应关系
Compose file format Docker Engine release 3.7 18.06.0+ 3.6 18.02.0+ 3.5 17.12.0+ 3.4 17.09.0+ 3.3 17.06.0+ 3.2 17.04.0+ 3.1 1.13.1+ 3.0 1.13.0+ 2.4 17.12.0+ 2.3 17.06.0+ 2.2 1.13.0+ 2.1 1.12.0+ 2.0 1.10.0+ 1.0 1.9.1.+ -
Standalone Mysql(单机部署,使用Mysql)
docker-compose -f example/standalone-mysql.yaml up -d
配置文件
version: "3.7"
services:
nacos:
image: nacos/nacos-server:1.1.0
container_name: nacos-standalone-mysql
environment:
- PREFER_HOST_MODE=hostname
- MODE=standalone
- SPRING_DATASOURCE_PLATFORM=mysql
- MYSQL_MASTER_SERVICE_HOST=mysql-master
- MYSQL_MASTER_SERVICE_DB_NAME=nacos_devtest
- MYSQL_MASTER_SERVICE_PORT=3306
- MYSQL_SLAVE_SERVICE_HOST=mysql-slave
- MYSQL_SLAVE_SERVICE_PORT=3305
- MYSQL_MASTER_SERVICE_USER=nacos
- MYSQL_MASTER_SERVICE_PASSWORD=nacos
volumes:
- ./standalone-logs/:/home/nacos/logs
- ./init.d/custom.properties:/home/nacos/init.d/custom.properties
ports:
- "8848:8848"
- "9555:9555"
depends_on:
- mysql-slave
restart: on-failure
mysql-master:
container_name: mysql-master
image: nacos/nacos-mysql-master:latest
env_file:
- ../env/mysql-common.env
- ../env/mysql-master.env
volumes:
- ./mysql-master:/var/lib/mysql
ports:
- "3306:3306"
mysql-slave:
container_name: mysql-slave
image: nacos/nacos-mysql-slave:latest
env_file:
- ../env/mysql-common.env
- ../env/mysql-slave.env
volumes:
- ./mysql-slave:/var/lib/mysql
ports:
- "3305:3306"
depends_on:
- mysql-master
prometheus:
container_name: prometheus
image: prom/prometheus:v2.11.1
volumes:
- ./prometheus/prometheus-standalone.yaml:/etc/prometheus/prometheus.yml
ports:
- "9090:9090"
depends_on:
- nacos
restart: on-failure
grafana:
container_name: grafana
image: grafana/grafana:6.2.5
ports:
- 3000:3000
restart: on-failure
三、 集群部署Nacos
-
Cluster(集群部署)
需要5G的内存预留
docker-compose -f example/cluster-hostname.yaml up -d
配置文件
version: "3.7"
services:
nacos1:
hostname: nacos1
container_name: nacos1
image: nacos/nacos-server:1.1.0
volumes:
- /usr/local/use_data/nacos/nacos-cluster/nacos-1/data/logs:/home/nacos/logs
- ./init.d/custom.properties:/home/nacos/init.d/custom.properties
ports:
- "8849:8848"
- "9555:9555"
env_file:
- ../env/nacos-hostname.env
restart: on-failure
depends_on:
- mysql-master
- mysql-slave

nacos2:
hostname: nacos2
image: nacos/nacos-server:latest
container_name: nacos2
volumes:
- /usr/local/use_data/nacos/nacos-cluster/nacos-2/data/logs:/home/nacos/logs
- ./init.d/custom.properties:/home/nacos/init.d/custom.properties
ports:
- "8850:8848"
env_file:
- ../env/nacos-hostname.env
restart: on-failure
depends_on:
- mysql-master
- mysql-slave
nacos3:
hostname: nacos3
image: nacos/nacos-server:latest
container_name: nacos3
volumes:
- /usr/local/use_data/nacos/nacos-cluster/nacos-3/data/logs:/home/nacos/logs
- ./init.d/custom.properties:/home/nacos/init.d/custom.properties
ports:
- "8851:8848"
env_file:
- ../env/nacos-hostname.env
restart: on-failure
depends_on:
- mysql-master
- mysql-slave
mysql-master:
container_name: mysql-master
image: nacos/nacos-mysql-master:latest
env_file:
- ../env/mysql-common.env
- ../env/mysql-master.env
volumes:
- /usr/local/use_data/nacos/nacos-cluster/mysql-master:/var/lib/mysql
ports:
- "3306:3306"
mysql-slave:
container_name: mysql-slave
image: nacos/nacos-mysql-slave:latest
env_file:
- ../env/mysql-common.env
- ../env/mysql-slave.env
volumes:
- /usr/local/use_data/nacos/nacos-cluster/mysql-slave:/var/lib/mysql
ports:
- "3305:3306"
depends_on:
- mysql-master
prometheus:
container_name: prometheus
image: prom/prometheus:v2.11.1
volumes:
- ./prometheus/prometheus-cluster.yaml:/etc/prometheus/prometheus.yml
ports:
- "9091:9090"
depends_on:
- nacos1
- nacos2
- nacos3
restart: on-failure
grafana:
container_name: grafana
image: grafana/grafana:6.2.5
ports:
- 3000:3000
restart: on-failure
四、 测试
-
服务注册
curl -X PUT 'http://{ip}:8848/nacos/v1/ns/instance?serviceName=nacos.naming.serviceName&ip=20.18.7.10&port=8080' -
服务发现
curl -X GET 'http://{ip}:8848/nacos/v1/ns/instances?serviceName=nacos.naming.serviceName' -
发布配置
curl -X POST "http://{ip}:8848/nacos/v1/cs/configs?dataId=nacos.cfg.dataId&group=test&content=helloWorld" -
获取配置
curl -X GET "http://{ip}:8848/nacos/v1/cs/configs?dataId=nacos.cfg.dataId&group=test" -
使用浏览器打开

账号:nacos/nacos
-
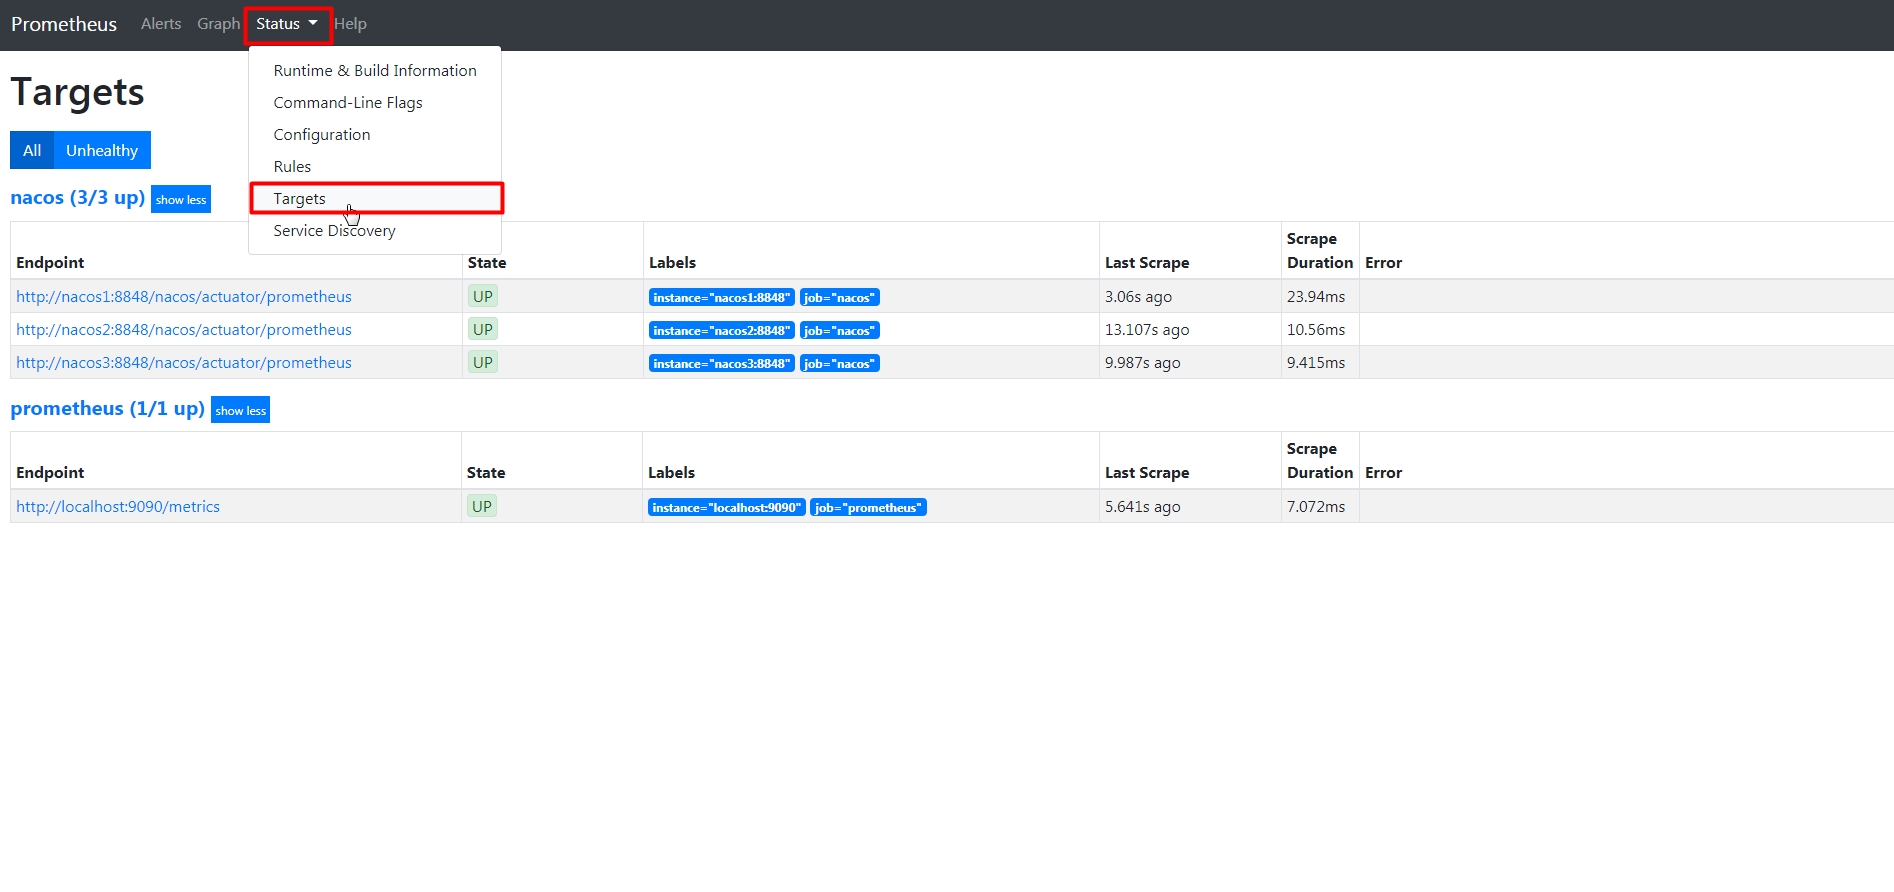
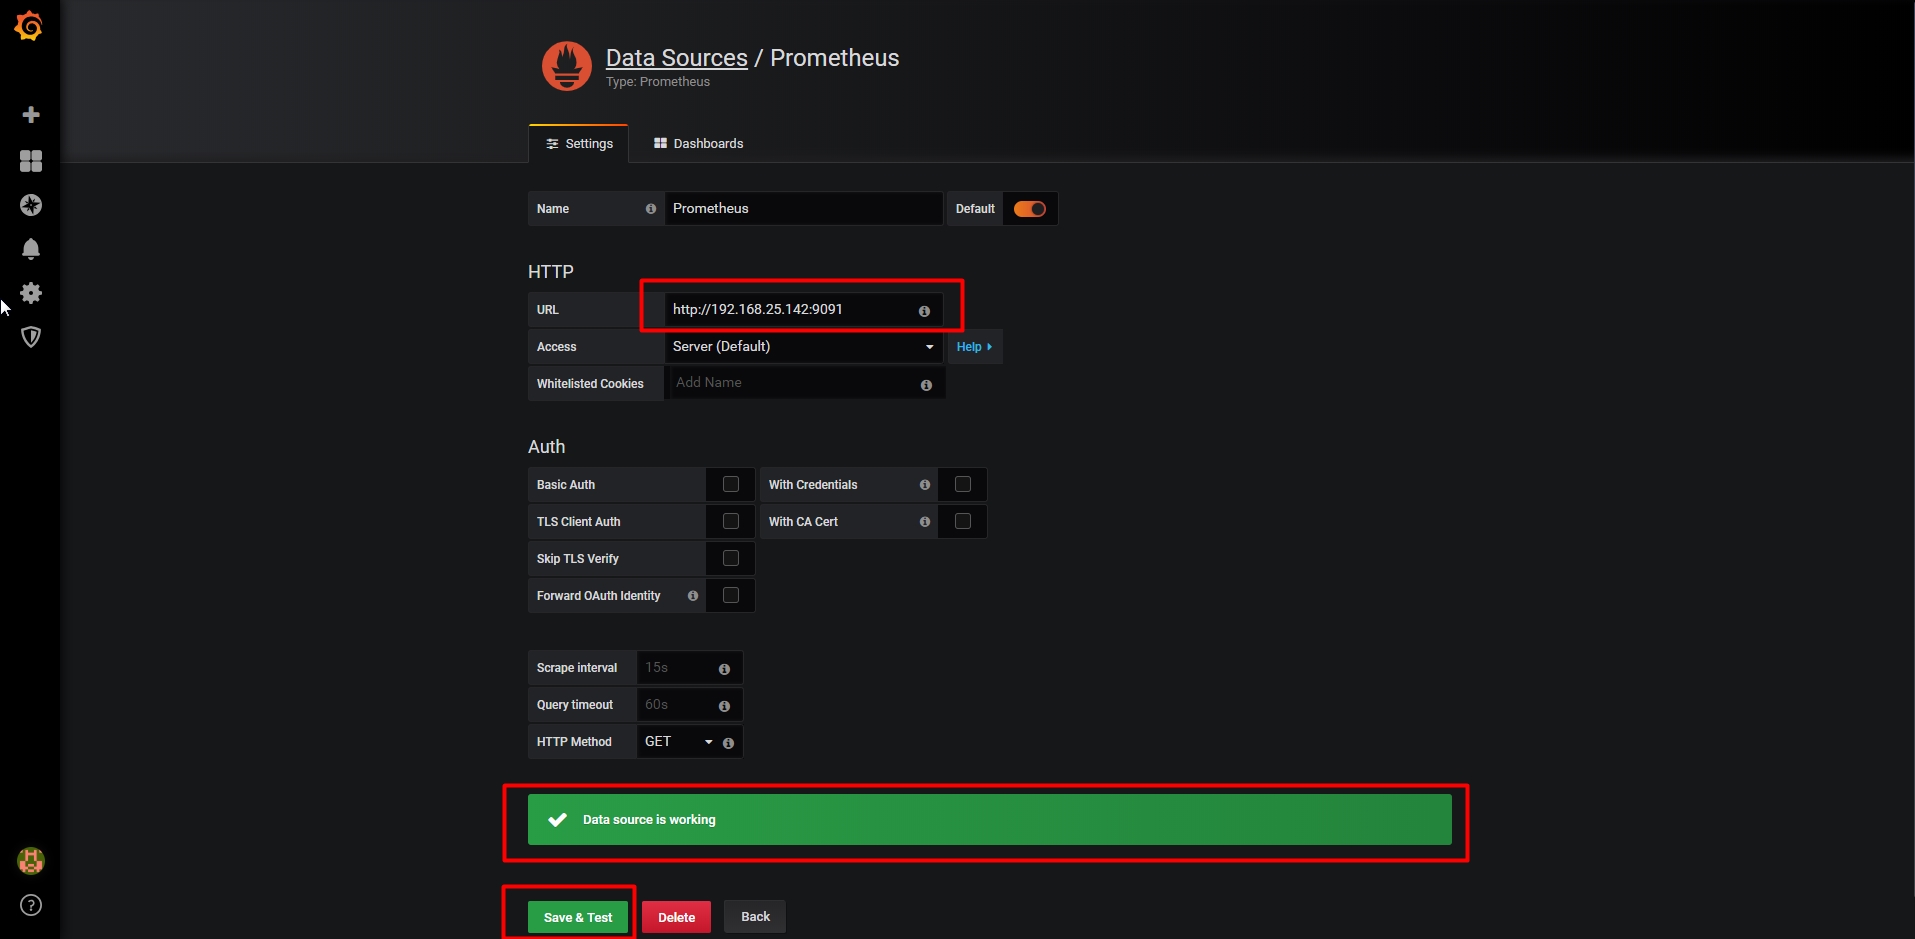
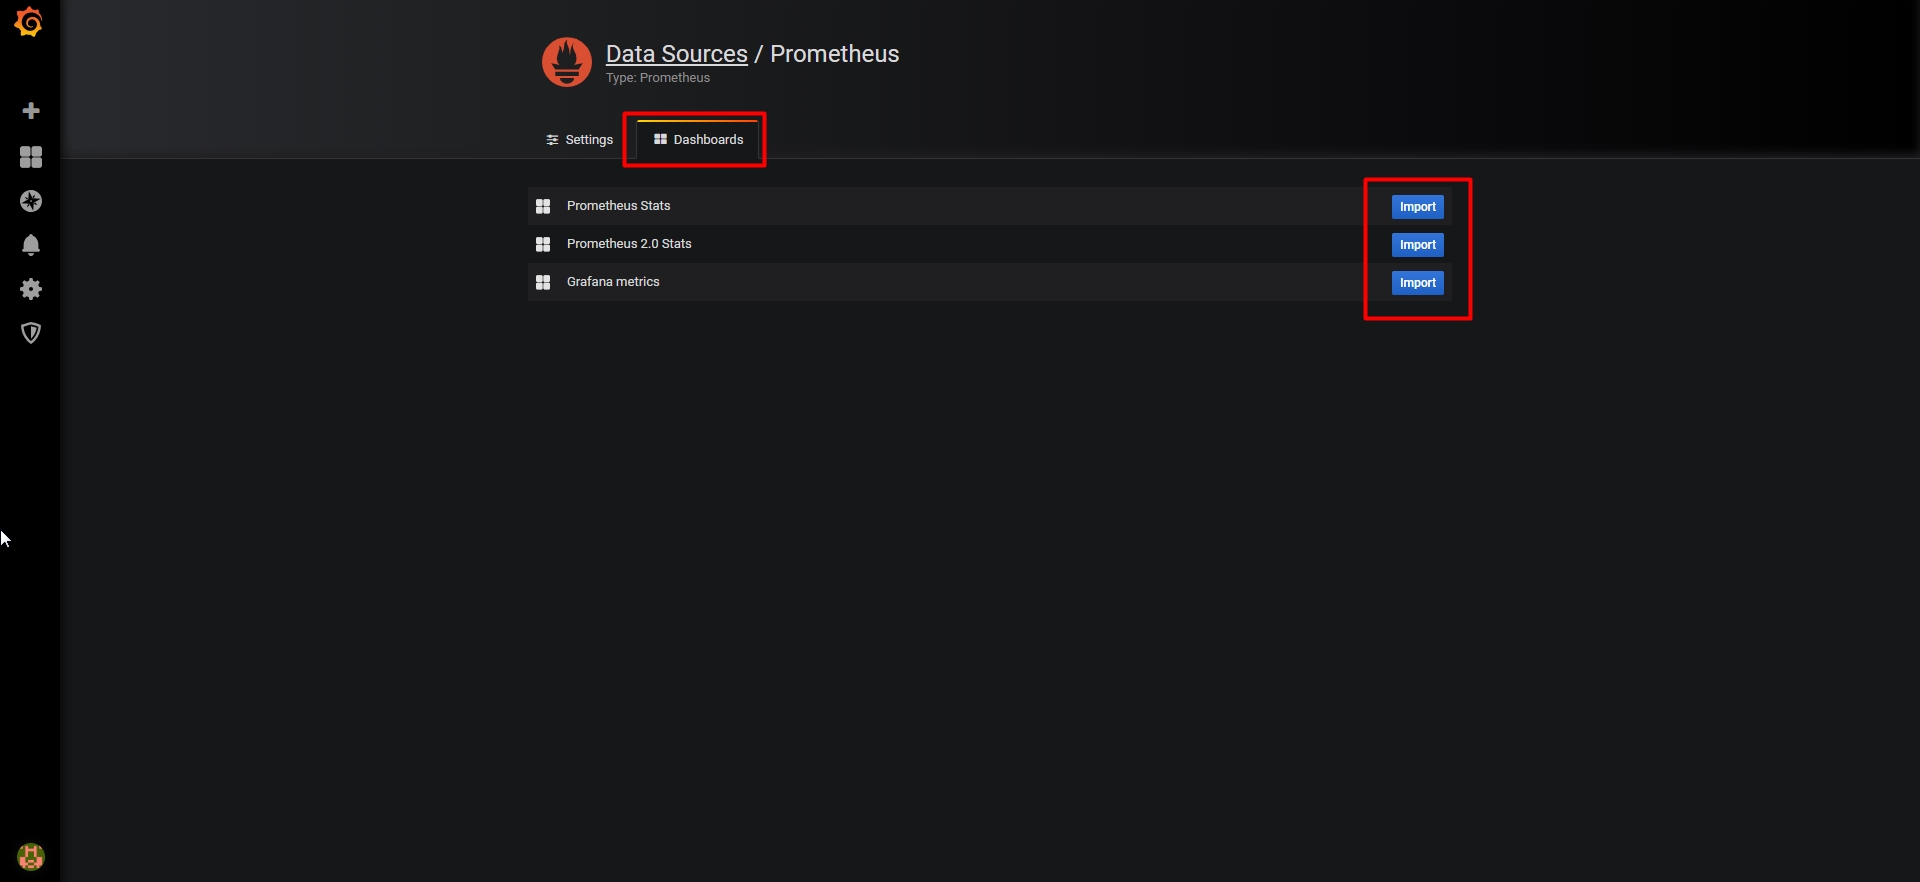
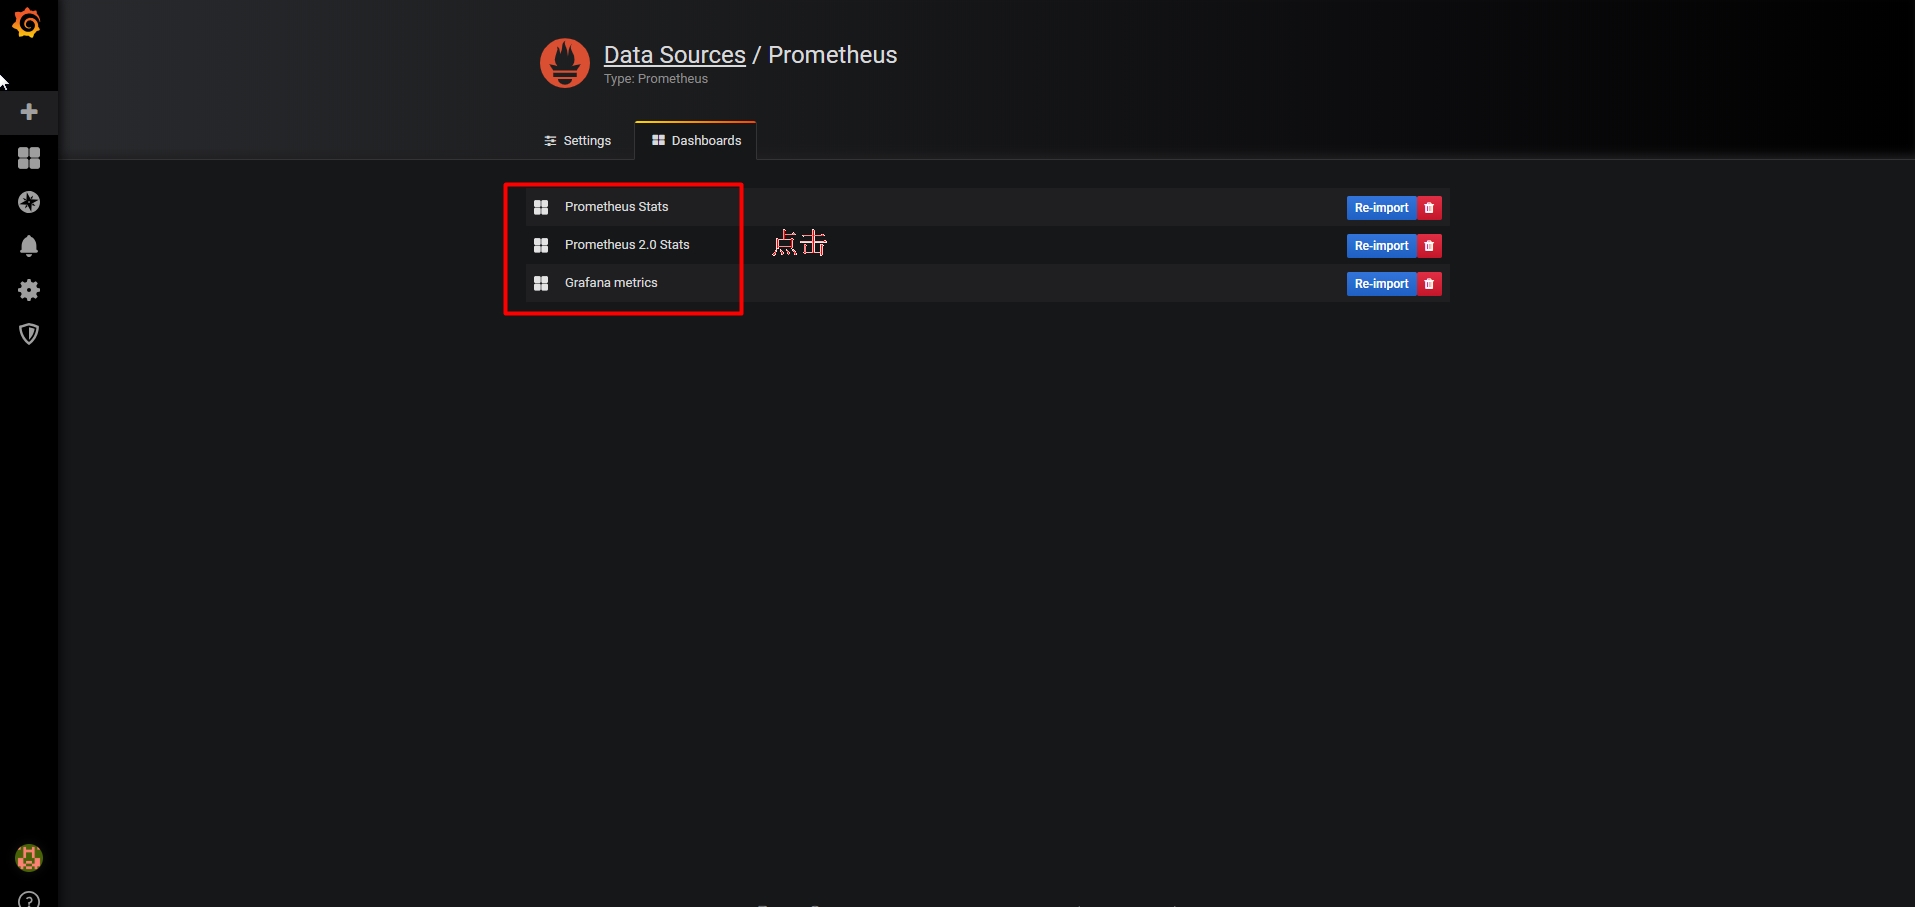
使用prometheus查看监控数据
link:http://${ip}:9090
-
使用grafana监控ui面板
link:http://${ip}:3000

五、 停止和启动nacos
因为使用的是docker-compose编排,故使用docker-compose命令
#查询运行的容器
docker-compose -f example/cluster-hostname.yaml ps
#停止运行的容器
docker-compose -f example/cluster-hostname.yaml stop
#启动容器
docker-compose -f example/cluster-hostname.yaml start
#重启容器
docker-compose -f example/cluster-hostname.yaml restart
#删除容器
docker-compose -f example/cluster-hostname.yaml rm

- ubuntu安装nacos
- 代替 ZooKeeper,Eureka.阿里巴巴开源力作--Nacos安装所遇到的坑
- 系统补丁自动批量安装
- windows2003上安装oracle
- 在Win7上安装Oracle
- [转]Visual Studio 2010帮助文件MSDN安装说明
- macbook pro安装 fedora14
- ubuntu常用软件安装
- 小红伞中小企业版安装文档
- hp刀片安装经历
- 图解FCKeditor在asp.net环境的安装(上)
- 安装多个版本的JDK
- FireFox4.0.1安装“新标签页(空白)”安装8格火狐主页插件
- 解决Vmware Workstation7上安装Linux系统不能SSH远程连接的问题
- ubuntu10.04安装wine
- 自己写的读取注册表判断主机安装了哪些浏览器
- linux安装
- VS2010安装MVC3
- windows xp下如何安装SQL server2000企业版
- Eclipse 3.4.1 新版尝试 插件安装