【0716】NoSQL——mogodb
21.26 mongodb介绍
介绍:
官网www.mongodb.com, 当前最新版3.4
C++ 编写,基于分布式的,属于 NoSQL 的一种
在 NoSQL 中是最像关系型数据库的
MongoDB 将数据存储为一个文档,数据结构由键值(key=>value)对组成。MongoDB 文档类似于 JSON 对象。字段值可以包含其他文档、数组及文档数组。
关于JSON http://www.w3school.com.cn/json/index.asp
因为基于分布式,所以很容易扩展
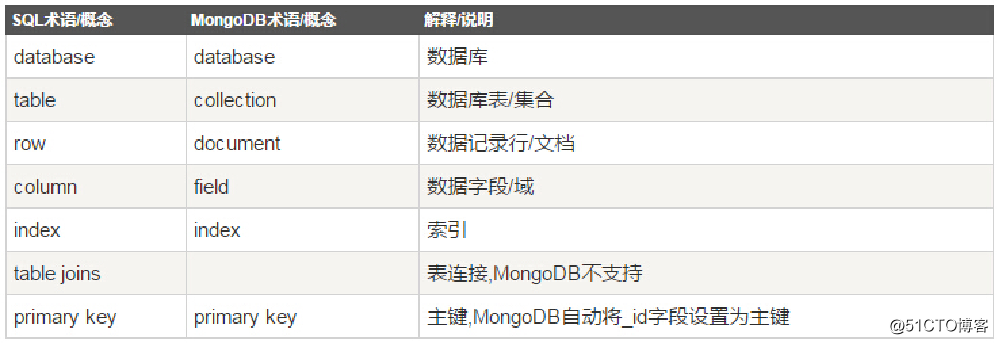
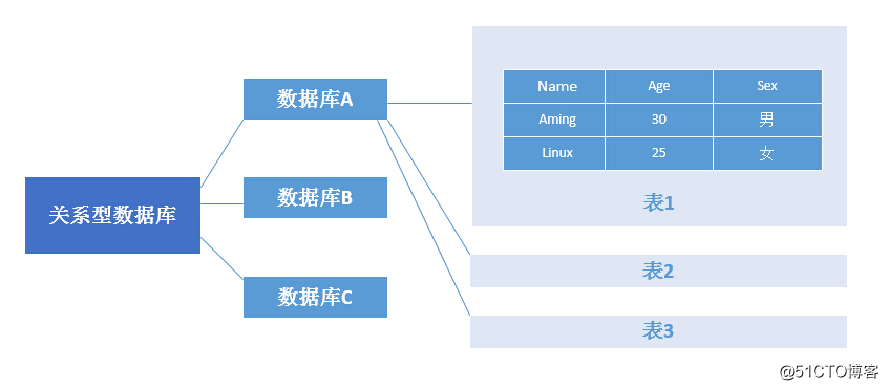
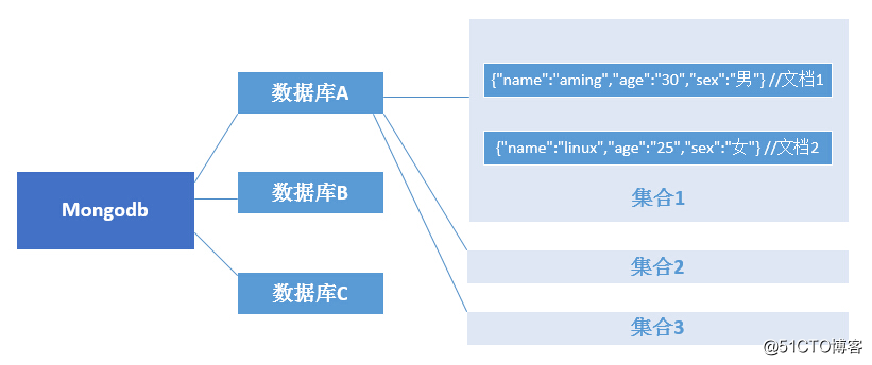
MongoDB和关系型数据库对比:
关系型数据库数据结构:
MongoDB数据结构:
21.27 mongodb安装
epel自带的mongodb版本为2.6,我们需要安装3.4版本
官方安装文档 docs.mongodb.com/manual/tutorial/install-mongodb-on-red-hat/
1、制作 yum 源
[root@arslinux-01 ~]# cd /etc/yum.repos.d/
[root@arslinux-01 yum.repos.d]# vim mongo.repo
[mongodb-org-3.4]
name=MongoDB Repository
baseurl=https://repo.mongodb.org/yum/redhat/$releasever/mongodb-org/3.4/x86_64/
gpgcheck=1
enabled=1
gpgkey=https://www.mongodb.org/static/pgp/server-3.4.asc
2、查看可安装的 mogodb 版本
[root@arslinux-01 yum.repos.d]# yum list |grep mongodb
mongodb-org.x86_64                      3.4.21-1.el7                   mongodb-org-3.4
mongodb-org-mongos.x86_64               3.4.21-1.el7                   mongodb-org-3.4
mongodb-org-server.x86_64               3.4.21-1.el7                   mongodb-org-3.4
mongodb-org-shell.x86_64                3.4.21-1.el7                   mongodb-org-3.4
mongodb-org-tools.x86_64                3.4.21-1.el7                   mongodb-org-3.4
mongodb-server.x86_64                   2.6.12-6.el7                   epel
mongodb-test.x86_64                     2.6.12-6.el7                   epel
nodejs-mongodb.noarch                   1.4.7-1.el7                    epel
php-mongodb.noarch                      1.0.4-1.el7                    epel
php-pecl-mongodb.x86_64                 1.1.10-1.el7                   epel
poco-mongodb.x86_64                     1.6.1-3.el7                    epel
3、yum 安装
[root@arslinux-01 yum.repos.d]# yum install mongodb-org
21.28 连接mongodb
1、启动 MongoDB
[root@arslinux-01 ~]# systemctl start mongod
[root@arslinux-01 ~]# ps aux|grep mongo
mongod     8597  1.7  3.8 973456 38076 ?        Sl   12:39   0:00 /usr/bin/mongod -f /etc/mongod.conf
root       8620  0.0  0.0 112724   988 pts/0    R+   12:39   0:00 grep --color=auto mongo
[root@arslinux-01 ~]# netstat -lntp|grep mongo
tcp        0      0 127.0.0.1:27017         0.0.0.0:*               LISTEN      8597/mongod
2、进入 MongoDB
[root@arslinux-01 ~]# mongo
MongoDB shell version v3.4.21
connecting to: mongodb://127.0.0.1:27017
MongoDB server version: 3.4.21
Welcome to the MongoDB shell.
For interactive help, type "help".
For more comprehensive documentation, see
http://docs.mongodb.org/
Questions? Try the support group
http://groups.google.com/group/mongodb-user
Server has startup warnings:
2019-07-16T12:39:35.723+0800 I CONTROL  [initandlisten]
2019-07-16T12:39:35.723+0800 I CONTROL  [initandlisten] ** WARNING: Access control is not enabled for the database.
2019-07-16T12:39:35.723+0800 I CONTROL  [initandlisten] **          Read and write access to data and configuration is unrestricted.
2019-07-16T12:39:35.723+0800 I CONTROL  [initandlisten]
2019-07-16T12:39:35.723+0800 I CONTROL  [initandlisten]
2019-07-16T12:39:35.723+0800 I CONTROL  [initandlisten] ** WARNING: /sys/kernel/mm/transparent_hugepage/enabled is 'always'.
2019-07-16T12:39:35.723+0800 I CONTROL  [initandlisten] **        We suggest setting it to 'never'
2019-07-16T12:39:35.723+0800 I CONTROL  [initandlisten]
2019-07-16T12:39:35.723+0800 I CONTROL  [initandlisten] ** WARNING: /sys/kernel/mm/transparent_hugepage/defrag is 'always'.
2019-07-16T12:39:35.723+0800 I CONTROL  [initandlisten] **        We suggest setting it to 'never'
2019-07-16T12:39:35.723+0800 I CONTROL  [initandlisten]
>
3、如果mongodb监听端口并不是默认的27017,则在连接的时候需要加--port 选项
例如:mongo --port 27018
连接远程mongodb,需要加--host,例如
mongo --host 127.0.0.1
4、如果设置了验证,则在连接的时候需要带用户名和密码
mongo -uusername -ppasswd --authenticationDatabase db //这个和 MySQL挺像
21.29 mongodb用户管理
1、创建用户,添加密码
> use admin
switched to db admin
> db.createUser( { user: "admin", customData: {description: "superuser"}, pwd: "admin122", roles: [ { role: "root", db: "admin" } ] } )
Successfully added user: {
    "user" : "admin",
    "customData" : {
        "description" : "superuser"
    },
    "roles" : [
        {
            "role" : "root",
            "db" : "admin"
        }
    ]
}
user 指定用户;customData 为说明字段,可以省略;pwd 为密码;roles 指定用户的角色;db 指定库名
2、列出所有用户,需要切换到admin库
> use admin
switched to db admin
> db.system.users.find()
{ "_id" : "admin.admin", "user" : "admin", "db" : "admin", "credentials" : { "SCRAM-SHA-1" :
{ "iterationCount" : 10000, "salt" : "JeDsJTa/kJYAXFhd9CKb2A==", "storedKey" :
"YW+dUA7OTWw5ZmA8AN+HqHz677U=", "serverKey" : "LjyBIPucqbf0vqz6+5dTfmpVFqE=" } },
"customData" : { "description" : "superuser" }, "roles" : [ { "role" : "root", "db" : "admin" } ] }
3、查看当前库下所有的用户
> show users
{
    "_id" : "admin.admin",
    "user" : "admin",
    "db" : "admin",
    "customData" : {
    "description" : "superuser"
    },
    "roles" : [
        {
            "role" : "root",
            "db" : "admin"
        }
    ]
}
4、删除用户 db.dropUser('admin')
> db.createUser( { user: "arslinux",  pwd: "123456", roles: [ { role: "read", db: "testdb" } ] } )
Successfully added user: {
    "user" : "arslinux",
    "roles" : [
        {
            "role" : "read",
            "db" : "testdb"
        }
    ]
}
> db.dropUser('arslinux')
true> show users
{
"_id" : "admin.admin",
"user" : "admin",
"db" : "admin",
"customData" : {
"description" : "superuser"
},
"roles" : [
{
"role" : "root",
"db" : "admin"
}
]
}5、用户生效
1)先重新创建回用户 arslinux
> db.createUser({user:"arslinx",pwd:"123456",roles:[{role:"read",db:"testdb"}]})
Successfully added user: {
    "user" : "arslinx",
    "roles" : [
        {
            "role" : "read",
            "db" : "testdb"
        }
    ]
}
2)编辑启动脚本 /usr/lib/systemd/system/mongod.service,在OPTIONS= 后面增 --auth
[root@arslinux-01 ~]# vim /usr/lib/systemd/system/mongod.service
Environment="OPTIONS=--auth -f /etc/mongod.conf"
[root@arslinux-01 ~]# systemctl restart mongod
Warning: mongod.service changed on disk. Run 'systemctl daemon-reload' to reload units.
[root@arslinux-01 ~]# systemctl daemon-reload
[root@arslinux-01 ~]# systemctl restart mongod
3)加了 --auth 后,普通方法登录后,出现没有授权(not authorized)
[root@arslinux-01 ~]# mongo --host 127.0.0.1 --port 27017
MongoDB shell version v3.4.21
connecting to: mongodb://127.0.0.1:27017/
MongoDB server version: 3.4.21
> use admin
switched to db admin
> show users
2019-07-16T20:25:00.524+0800 E QUERY    [thread1] Error: not authorized on admin to execute command { usersInfo: 1.0 } :
_getErrorWithCode@src/mongo/shell/utils.js:25:13
DB.prototype.getUsers@src/mongo/shell/db.js:1539:1
shellHelper.show@src/mongo/shell/utils.js:797:9
shellHelper@src/mongo/shell/utils.js:704:15
@(shellhelp2):1:1
4)重新登录,做认证
[root@arslinux-01 ~]# mongo --host 127.0.0.1 --port 27017 -u admin -p admin122 --authenticationDatabase "admin"
可以登录成功
5)哪个库中创建的用户,需要先到哪个库认证后再操作,否则会提示验证失败
> db.createUser({user:"test1",pwd:"123aaa",roles:[{role:"readWrite",db:"db1"},{role:"read",db:"db2"}]})
Successfully added user: {
    "user" : "test1",
    "roles" : [
        {
            "role" : "readWrite",
            "db" : "db1"
        },
        {
            "role" : "read",
            "db" : "db2"
        }
    ]
}
> show users
{
"_id" : "db1.test1",
"user" : "test1",
"db" : "db1",
"roles" : [
{
"role" : "readWrite",
"db" : "db1"
},
{
"role" : "read",
"db" : "db2"
}
]
}test1 用户对 db1 库读写,对 db2 库只读。
之所以先 use db1,表示用户在 db1 库中创建,就一定要 db1 库验证身份,即用户的信息跟随数据库。比如上述 test1 虽然有 db2 库的读取权限,但是一定要先在 db1 库进行身份验证,直接访问会提示验证失败。
> use db2
switched to db db2
> db.auth('test1','123aaa')
Error: Authentication failed.
0
> use db1
switched to db db1
> db.auth('test1','123aaa')
1
MongoDB用户角色:
·Read:允许用户读取指定数据库
·readWrite:允许用户读写指定数据库
·dbAdmin:允许用户在指定数据库中执行管理函数,如索引创建、删除,查看统计或访问·system.profile
·userAdmin:允许用户向system.users集合写入,可以找指定数据库里创建、删除和管理用户
·clusterAdmin:只在admin数据库中可用,赋予用户所有分片和复制集相关函数的管理权限。
·readAnyDatabase:只在admin数据库中可用,赋予用户所有数据库的读权限
·readWriteAnyDatabase:只在admin数据库中可用,赋予用户所有数据库的读写权限
·userAdminAnyDatabase:只在admin数据库中可用,赋予用户所有数据库的userAdmin权限
·dbAdminAnyDatabase:只在admin数据库中可用,赋予用户所有数据库的dbAdmin权限。
·root:只在admin数据库中可用。超级账号,超级权限
21.30 mongodb创建集合、数据管理
创建集合:
db.version() 查看版本
use userdb 如果库存在就切换,不存在就创建
show dbs 查看库,此时userdb并没有出现,这是因为该库是空的,还没有任何集合,只需要创建一个集合就能看到了
db.createCollection(name,options) 创建集合,在当前库下面创建
> db.createCollection("mycol",{capped:true,size:6142800,max:10000})
{ "ok" : 1 }
name 就是集合的名字,options 可选,用来配置集合的参数,参数如下
capped true/false (可选)如果为 true,则启用封顶集合。封顶集合是固定大小的集合,当它达到其最大大小,会自动覆盖最早的条目。如果指定 true,则也需要指定尺寸参数。
size(可选)指定最大大小字节封顶集合。如果封顶如果是 true,那么你还需要指定这个字段。单位 B
max(可选)指定封顶集合允许在文件的最大数量
数据管理:
show collections 或 show tables 查看集合
> show collections
mycol
> show tables
mycol
db.集合名.insert({格式:...........}) 插入数据,定义格式。Account 是库名
如果集合不存在,直接插入数据,则 mongodb 会自动创建集合
> db.Account.insert({AccountID:1,UserName:"123",password:"123456"})
WriteResult({ "nInserted" : 1 })
> show tables
Account
mycol
> db.Account.insert({AccountID:2,UserName:"zhangsan",password:"abcde"})
WriteResult({ "nInserted" : 1 })db.集合名.update({集合名ID:...},{动作}:{"字段":值}) 更新
> db.Account.update({AccountID:1},{"$set":{"Age":20}})
WriteResult({ "nMatched" : 1, "nUpserted" : 0, "nModified" : 1 })
db.集合名.find() 查看所有文档
{ "_id" : ObjectId("5d2dd565a1976b473ed539f8"), "AccountID" : 1, "UserName" : "123", "password" : "123456", "Age" : 20 }
{ "_id" : ObjectId("5d2dd5c6a1976b473ed539f9"), "AccountID" : 2, "UserName" : "zhangsan", "password" : "abcde" }
db.集合名.find({条件}) 根据条件查询
> db.Account.find({AccountID:1})
{ "_id" : ObjectId("5d2dd565a1976b473ed539f8"), "AccountID" : 1, "UserName" : "123", "password" : "123456", "Age" : 20 }
> db.Account.find({AccountID:2})
{ "_id" : ObjectId("5d2dd5c6a1976b473ed539f9"), "AccountID" : 2, "UserName" : "zhangsan", "password" : "abcde" }
db.集合名.remove({条件}) 根据条件删除
> db.Account.remove({AccountID:1})
WriteResult({ "nRemoved" : 1 })
> db.Account.find()
{ "_id" : ObjectId("5d2dd5c6a1976b473ed539f9"), "AccountID" : 2, "UserName" : "zhangsan", "password" : "abcde" }
db.集合名.drop() 删除所有文档,即删除集合
> db.Account.drop()
true
> show tables
mycol
db.printCollectionStats() 查看集合状态
> db.printCollectionStats()
21.31 php的mongodb扩展
方法一:
[root@arslinux-01 ~]# cd /usr/local/src/
[root@arslinux-01 src]# git clone https://github.com/mongodb/mongo-php-driver
[root@arslinux-01 src]# cd mongo-php-driver
[root@arslinux-01 mongo-php-driver]# git submodule update --init
[root@arslinux-01 mongo-php-driver]# /usr/local/php/bin/phpize
[root@arslinux-01 mongo-php-driver]# ./configure --with-php-config=/usr/local/php/bin/php-config
[root@arslinux-01 mongo-php-driver]# make && make install
[root@arslinux-01 src]# vi /usr/local/php/etc/php.ini //增加 extension = mongodb.so
[root@arslinux-01 src]# /usr/local/php/bin/php -m
方法二:
1、下载、解压
[root@arslinux-01 ~]# cd /usr/local/src/
[root@arslinux-01 ~]# wget https://pecl.php.net/get/mongodb-1.3.0.tgz
[root@arslinux-01 ~]# tar xvf mongodb-1.3.0.tgz
[root@arslinux-01 ~]# cd mongodb-1.3.0/
2、生成 configure 文件
[root@arslinux-01 mongodb-1.3.0]# /usr/local/php-fpm/bin/phpize
Configuring for:
PHP Api Version:         20131106
Zend Module Api No:      20131226
Zend Extension Api No:   220131226
3、编译安装
[root@arslinux-01 mongodb-1.3.0]# ./configure --with-php-config=/usr/local/php-fpm/bin/php-config
[root@arslinux-01 mongodb-1.3.0]# make && make install
Installing shared extensions:     /usr/local/php-fpm/lib/php/extensions/no-debug-non-zts-20131226/
[root@arslinux-01 mongodb-1.3.0]# ls /usr/local/php-fpm/lib/php/extensions/no-debug-non-zts-20131226/
memcache.so  mongodb.so  opcache.a  opcache.so  redis.so
4、编辑 php.ini,添加 mongodb.so,检测是否存在
[root@arslinux-01 mongodb-1.3.0]# vim /usr/local/php-fpm/etc/php.ini
extension=mongodb.so
[root@arslinux-01 mongodb-1.3.0]# /usr/local/php-fpm/bin/php -m |grep mongodb
mongodb
5、重启 php-fpm
[root@arslinux-01 mongodb-1.3.0]# /etc/init.d/php-fpm restart
Gracefully shutting down php-fpm . done
Starting php-fpm  done
21.32 php的mongo扩展
mongo.so 扩展适用于 php 5.x 的版本,比较老,以后就不在使用了
1、下载、解压
[root@arslinux-01 src]# wget https://pecl.php.net/get/mongo-1.6.16.tgz
[root@arslinux-01 src]# tar xvf mongo-1.6.16.tgz
[root@arslinux-01 src]# cd mongo-1.6.16/
2、生成 configure 文件
[root@arslinux-01 mongo-1.6.16]# /usr/local/php-fpm/bin/phpize
Configuring for:
PHP Api Version:         20131106
Zend Module Api No:      20131226
Zend Extension Api No:   220131226
3、编译安装
[root@arslinux-01 mongo-1.6.16]# ./configure --with-php-config=/usr/local/php-fpm/bin/php-config
[root@arslinux-01 mongo-1.6.16]# make && make install
Installing shared extensions:     /usr/local/php-fpm/lib/php/extensions/no-debug-non-zts-20131226/
[root@arslinux-01 mongo-1.6.16]# ls /usr/local/php-fpm/lib/php/extensions/no-debug-non-zts-20131226/
memcache.so  mongodb.so  mongo.so  opcache.a  opcache.so  redis.so
4、编辑 php.ini,添加 mongo.so,检测是否存在
[root@arslinux-01 mongo-1.6.16]# vim /usr/local/php-fpm/etc/php.ini
extension=mongo.so
[root@arslinux-01 mongo-1.6.16]# /usr/local/php-fpm/bin/php -m |grep mongo
mongo
mongodb
5、重启 php-fpm
[root@arslinux-01 mongo-1.6.16]# /etc/init.d/php-fpm restart
Gracefully shutting down php-fpm . done
Starting php-fpm  done
测试:
1、去掉 mongodb 的认证,重启 mongod
[root@arslinux-01 src]# vim /usr/lib/systemd/system/mongod.service
去掉 --auth
重启:
[root@arslinux-01 src]# systemctl restart mongod
Warning: mongod.service changed on disk. Run 'systemctl daemon-reload' to reload units.
[root@arslinux-01 src]# systemctl daemon-reload
[root@arslinux-01 src]# systemctl restart mongod
2、是否能正常解析,php命令是创建 test 库中 runoob 的集合
[root@arslinux-01 src]# vim /data/wwwroot/default.com/mongo.php
<?php
$m = new MongoClient();         // 连接
$db = $m->test;                 // 获取名称为 "test" 的数据库
$collection = $db->createCollection("runoob");
echo "集合创建成功";
?>
[root@arslinux-01 src]# curl localhost/mongo.php
集合创建成功
3、查看 mongodb 库里有没有 test 库、runoob 集合
[root@arslinux-01 src]# mongo --host 127.0.0.1 --port 27017
略
> use test
switched to db test
> show tables
runoob
成功!!
只安装 mongodb.so,不安装 mongo.so,是会失败的
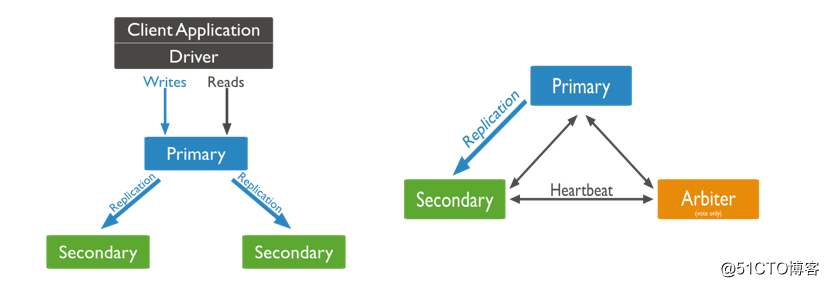
21.33 mongodb副本集介绍
早期版本使用 master-slave,一主一从和 MySQL 类似,但 slave 在此架构中为只读,当主库宕机后,从库不能自动切换为主
目前已经淘汰 master-slave 模式,改为副本集,这种模式下有一个主(primary),和多个从(secondary),只读。支持给它们设置权重,当主宕掉后,权重最高的从切换为主
在此架构中还可以建立一个仲裁(arbiter)的角色,它只负责裁决,而不存储数据
再此架构中读写数据都是在主上,要想实现负载均衡的目的需要手动指定读库的目标 server
副本集架构图:

21.34 mongodb副本集搭建
1、准备:
三台机器:
192.168.194.130(primary)
192.168.194.132(secondary)
192.168.194.133(secondary)
三台机器全部安装 mongodb:
[root@arslinux-02 ~]# vim /etc/yum.repos.d/mongo.repo
[mongodb-org-3.4]
name=MongoDB Repository
baseurl=https://repo.mongodb.org/yum/redhat/$releasever/mongodb-org/3.4/x86_64/
gpgcheck=1
enabled=1
gpgkey=https://www.mongodb.org/static/pgp/server-3.4.asc
[root@arslinux-02 ~]# yum install mongodb-org/
2、编辑三台机器配置文件 /etc/mongod.conf
[root@arslinux-01 ~]# vim /etc/mongod.conf
bindIp: 127.0.0.1,192.168.194.130
replication:
oplogSizeMB: 20              //oplog 大小
replSetName: arslinux        // 定义副本集名称
同样方法编辑另外两台机器参数,注意 ip 要是本机 ip
编辑完重启 mongod
3、连接主
[root@arslinux-01 ~]# mongo
MongoDB shell version v3.4.21
connecting to: mongodb://127.0.0.1:27017
MongoDB server version: 3.4.21
> use admin
switched to db admin
> config={_id:"arslinux",members:[{_id:0,host:"192.168.194.130:27017"},{_id:1,host:"192.168.194.132:27017"},{_id:2,host:"192.168.194.133:27017"}]}
{
    "_id" : "arslinux",
    "members" : [
        {
            "_id" : 0,
            "host" : "192.168.194.130:27017"
        },
        {
            "_id" : 1,
            "host" : "192.168.194.132:27017"
        },
        {
            "_id" : 2,
            "host" : "192.168.194.133:27017"
        }
    ]
}
> rs.initiate(config)                //初始化
{ "ok" : 1 }
arslinux:OTHER> rs.status() //查看状态
{
"set" : "arslinux",
"date" : ISODate("2019-07-20T11:13:02.115Z"),
"myState" : 1,
"term" : NumberLong(1),
"syncingTo" : "",
"syncSourceHost" : "",
"syncSourceId" : -1,
"heartbeatIntervalMillis" : NumberLong(2000),
"optimes" : {
"lastCommittedOpTime" : {
"ts" : Timestamp(1563621178, 1),
"t" : NumberLong(1)
},
"appliedOpTime" : {
"ts" : Timestamp(1563621178, 1),
"t" : NumberLong(1)
},
"durableOpTime" : {
"ts" : Timestamp(1563621178, 1),
"t" : NumberLong(1)
}
},
"members" : [
{
"_id" : 0,
"name" : "192.168.194.130:27017",
"health" : 1,
"state" : 1,
"stateStr" : "PRIMARY",
"uptime" : 497,
"optime" : {
"ts" : Timestamp(1563621178, 1),
"t" : NumberLong(1)
},
"optimeDate" : ISODate("2019-07-20T11:12:58Z"),
"syncingTo" : "",
"syncSourceHost" : "",
"syncSourceId" : -1,
"infoMessage" : "could not find member to sync from",
"electionTime" : Timestamp(1563621157, 1),
"electionDate" : ISODate("2019-07-20T11:12:37Z"),
"configVersion" : 1,
"self" : true,
"lastHeartbeatMessage" : ""
},
{
"_id" : 1,
"name" : "192.168.194.132:27017",
"health" : 1,
"state" : 2,
"stateStr" : "SECONDARY",
"uptime" : 35,
"optime" : {
"ts" : Timestamp(1563621178, 1),
"t" : NumberLong(1)
},
"optimeDurable" : {
"ts" : Timestamp(1563621178, 1),
"t" : NumberLong(1)
},
"optimeDate" : ISODate("2019-07-20T11:12:58Z"),
"optimeDurableDate" : ISODate("2019-07-20T11:12:58Z"),
"lastHeartbeat" : ISODate("2019-07-20T11:13:01.095Z"),
"lastHeartbeatRecv" : ISODate("2019-07-20T11:13:02.073Z"),
"pingMs" : NumberLong(0),
"lastHeartbeatMessage" : "",
"syncingTo" : "192.168.194.133:27017",
"syncSourceHost" : "192.168.194.133:27017",
"syncSourceId" : 2,
"infoMessage" : "",
"configVersion" : 1
},
{
"_id" : 2,
"name" : "192.168.194.133:27017",
"health" : 1,
"state" : 2,
"stateStr" : "SECONDARY",
"uptime" : 35,
"optime" : {
"ts" : Timestamp(1563621178, 1),
"t" : NumberLong(1)
},
"optimeDurable" : {
"ts" : Timestamp(1563621178, 1),
"t" : NumberLong(1)
},
"optimeDate" : ISODate("2019-07-20T11:12:58Z"),
"optimeDurableDate" : ISODate("2019-07-20T11:12:58Z"),
"lastHeartbeat" : ISODate("2019-07-20T11:13:01.087Z"),
"lastHeartbeatRecv" : ISODate("2019-07-20T11:13:02.054Z"),
"pingMs" : NumberLong(0),
"lastHeartbeatMessage" : "",
"syncingTo" : "192.168.194.130:27017",
"syncSourceHost" : "192.168.194.130:27017",
"syncSourceId" : 0,
"infoMessage" : "",
"configVersion" : 1
}
],
"ok" : 1
}在哪一台机器上操作 config ,哪一台就会被自动定位 Primary
21.35 mongodb副本集测试
主上建库,建集合
arslinux:PRIMARY> use mydb
switched to db mydb
arslinux:PRIMARY> db.acc.insert({AccountID:1,UserName:"123",password:"123456"})
WriteResult({ "nInserted" : 1 })
arslinux:PRIMARY> show dbs;
admin  0.000GB
db1    0.000GB
local  0.000GB
mydb   0.000GB
test   0.000GB
arslinux:PRIMARY> use mydb
switched to db mydb
arslinux:PRIMARY> show tables
acc
从 1 上查看 192.168.194.132
arslinux:SECONDARY> show dbs;
2019-07-20T19:44:16.286+0800 E QUERY    [thread1] Error: listDatabases failed:{
    "ok" : 0,
    "errmsg" : "not master and slaveOk=false",
    "code" : 13435,
    "codeName" : "NotMasterNoSlaveOk"
} :
_getErrorWithCode@src/mongo/shell/utils.js:25:13
Mongo.prototype.getDBs@src/mongo/shell/mongo.js:62:1
shellHelper.show@src/mongo/shell/utils.js:814:19
shellHelper@src/mongo/shell/utils.js:704:15
@(shellhelp2):1:1
若出现以上错误需要执行 rs.slaveOk()
arslinux:SECONDARY> rs.slaveOk()
arslinux:SECONDARY> show dbs
admin  0.000GB
db1    0.000GB
local  0.000GB
mydb   0.000GB
test   0.000GB
arslinux:SECONDARY> use mydb
switched to db mydb
arslinux:SECONDARY> show tables
acc
从 2 上查看 192.168.194.133
arslinux:SECONDARY> rs.slaveOK()
2019-07-20T19:50:06.677+0800 E QUERY    [thread1] TypeError: rs.slaveOK is not a function :
@(shell):1:1
arslinux:SECONDARY> rs.slaveOk()
arslinux:SECONDARY> show tables
acc
副本集更改权重模拟主宕机:
默认三台机器权重都为1,如果任何一个权重设置为比其他的高,则该台机器马上切换为primary角色
所以我们预设三台机器的权重分别为:130:3,132:2,133:1
1、查看机器权重,priority 即为权重
arslinux:PRIMARY> rs.config()
{
    "_id" : "arslinux",
    "version" : 1,
    "protocolVersion" : NumberLong(1),
    "members" : [
        {
            "_id" : 0,
            "host" : "192.168.194.130:27017",
            "arbiterOnly" : false,
            "buildIndexes" : true,
            "hidden" : false,
            "priority" : 1,
            "tags" : {

            },
            "slaveDelay" : NumberLong(0),
            "votes" : 1
        },
        {
            "_id" : 1,
            "host" : "192.168.194.132:27017",
            "arbiterOnly" : false,
            "buildIndexes" : true,
            "hidden" : false,
            "priority" : 1,
            "tags" : {

            },
            "slaveDelay" : NumberLong(0),
            "votes" : 1
        },
        {
            "_id" : 2,
            "host" : "192.168.194.133:27017",
            "arbiterOnly" : false,
            "buildIndexes" : true,
            "hidden" : false,
            "priority" : 1,
            "tags" : {

            },
            "slaveDelay" : NumberLong(0),
            "votes" : 1
        }
    ],
    "settings" : {
        "chainingAllowed" : true,
        "heartbeatIntervalMillis" : 2000,
        "heartbeatTimeoutSecs" : 10,
        "electionTimeoutMillis" : 10000,
        "catchUpTimeoutMillis" : 60000,
        "getLastErrorModes" : {

        },
        "getLastErrorDefaults" : {
            "w" : 1,
            "wtimeout" : 0
        },
        "replicaSetId" : ObjectId("5d32f71aa3c7c7bdec0d9e86")
    }
}
2、设置权重
在主上执行
arslinux:PRIMARY> cfg = rs.conf()
arslinux:PRIMARY> cfg.members[0].priority = 3
3
arslinux:PRIMARY> cfg.members[1].priority = 2
2
arslinux:PRIMARY> cfg.members[2].priority = 1
1
arslinux:PRIMARY> rs.reconfig(cfg)            //让参数生效
{ "ok" : 1 }
3、查看修改后的权重
arslinux:PRIMARY> rs.config()
{
    "_id" : "arslinux",
    "version" : 2,
    "protocolVersion" : NumberLong(1),
    "members" : [
        {
            "_id" : 0,
            "host" : "192.168.194.130:27017",
            "arbiterOnly" : false,
            "buildIndexes" : true,
            "hidden" : false,
            "priority" : 3,
            "tags" : {

            },
            "slaveDelay" : NumberLong(0),
            "votes" : 1
        },
        {
            "_id" : 1,
            "host" : "192.168.194.132:27017",
            "arbiterOnly" : false,
            "buildIndexes" : true,
            "hidden" : false,
            "priority" : 2,
            "tags" : {

            },
            "slaveDelay" : NumberLong(0),
            "votes" : 1
        },
    {
            "_id" : 2,
            "host" : "192.168.194.133:27017",
            "arbiterOnly" : false,
            "buildIndexes" : true,
            "hidden" : false,
            "priority" : 1,
            "tags" : {

            },
            "slaveDelay" : NumberLong(0),
            "votes" : 1
        }
    ],
    "settings" : {
        "chainingAllowed" : true,
        "heartbeatIntervalMillis" : 2000,
        "heartbeatTimeoutSecs" : 10,
        "electionTimeoutMillis" : 10000,
        "catchUpTimeoutMillis" : 60000,
        "getLastErrorModes" : {

        },
        "getLastErrorDefaults" : {
            "w" : 1,
            "wtimeout" : 0
        },
        "replicaSetId" : ObjectId("5d32f71aa3c7c7bdec0d9e86")
    }
}
权重越高,优先级越高
4、模拟主机宕机
[root@arslinux-01 ~]# iptables -I INPUT -p tcp --dport 27017 -j DROP
5、从1上查看,主已经切换到从1上了
21.36 mongodb分片介绍
分片就是将数据库进行拆分,将大型集合分隔到不同服务器上。比如,本来100G的数据,可以分割成10份存储到10台服务器上,这样每台机器只有10G的数据。
通过一个mongos的进程(路由)实现分片后的数据存储与访问,也就是说mongos是整个分片架构的核心,对客户端而言是不知道是否有分片的,客户端只需要把读写操作转达给mongos即可。
虽然分片会把数据分隔到很多台服务器上,但是每一个节点都是需要有一个备用角色的,这样能保证数据的高可用。
当系统需要更多空间或者资源的时候,分片可以让我们按需方便扩展,只需要把mongodb服务的机器加入到分片集群中即可
MongoDB 分片架构图:
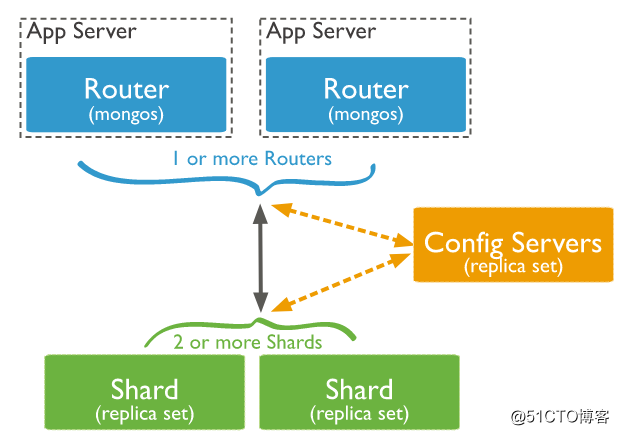
MongoDB 分片相关概念:
mongos: 数据库集群请求的入口,所有的请求都通过mongos进行协调,不需要在应用程序添加一个路由选择器,mongos自己就是一个请求分发中心,它负责把对应的数据请求请求转发到对应的shard服务器上。在生产环境通常有多mongos作为请求的入口,防止其中一个挂掉所有的mongodb请求都没有办法操作。
config server: 配置服务器,存储所有数据库元信息(路由、分片)的配置。mongos本身没有物理存储分片服务器和数据路由信息,只是缓存在内存里,配置服务器则实际存储这些数据。mongos第一次启动或者关掉重启就会从 config server 加载配置信息,以后如果配置服务器信息变化会通知到所有的 mongos 更新自己的状态,这样 mongos 就能继续准确路由。在生产环境通常有多个 config server 配置服务器,因为它存储了分片路由的元数据,防止数据丢失!
shard: 存储了一个集合部分数据的MongoDB实例,每个分片是单独的mongodb服务或者副本集,在生产环境中,所有的分片都应该是副本集。
21.37/21.38/21.39 mongodb分片搭建
1、准备
三台机器 A B C
A 搭建:mongos、config server、副本集 1 主节点、副本集 2 仲裁、副本集 3 从节点
B 搭建:mongos、config server、副本集 1 从节点、副本集 2 主节点、副本集 3 仲裁
C 搭建:mongos、config server、副本集 1 仲裁、副本集 2 从节点、副本集 3 主节点
端口分配:mongos 20000、config 21000、副本集1 27001、副本集2 27002、副本集3 27003
三台机器全部关闭 firewalld 和 selinux,或者增加对应端口的规则
2、三台机器上分别创建各角色所需要的目录
[root@arslinux-01 ~]# mkdir -p /data/mongodb/mongos/log
[root@arslinux-01 ~]# mkdir -p /data/mongodb/config/{data,log}
[root@arslinux-01 ~]# mkdir -p /data/mongodb/shard1/{data,log}
[root@arslinux-01 ~]# mkdir -p /data/mongodb/shard2/{data,log}
[root@arslinux-01 ~]# mkdir -p /data/mongodb/shard3/{data,log}
3、分片搭建——config server 配置
1)对 config sever 创建副本集,添加配置文件(三台机器都要操作,ip 要改)
[root@arslinux-01 ~]# mkdir /etc/mongod/
[root@arslinux-01 ~]# vim /etc/mongod/config.conf
pidfilepath = /var/run/mongodb/configsrv.pid
dbpath = /data/mongodb/config/data
logpath = /data/mongodb/config/log/congigsrv.log
logappend = true
bind_ip = 192.168.194.130
port = 21000
fork = true
configsvr = true                 //表示这是一个config server
replSet=configs                  //副本集名称
maxConns=20000                   //设置最大连接数
2、分别启动三台机器 config server:mongod -f /etc/mongod/config.conf
[root@arslinux-01 ~]# mongod -f /etc/mongod/config.conf
about to fork child process, waiting until server is ready for connections.
forked process: 15501
child process started successfully, parent exiting
3、登录任意一台机器的21000端口,初始化副本集
[root@arslinux-01 ~]# mongo --host 192.168.194.130 --port 21000
MongoDB shell version v3.4.21
connecting to: mongodb://192.168.194.130:21000/
MongoDB server version: 3.4.21
Server has startup warnings:
2019-07-21T10:45:47.344+0800 I CONTROL  [initandlisten]
2019-07-21T10:45:47.344+0800 I CONTROL  [initandlisten] ** WARNING: Access control is not enabled for the database.
2019-07-21T10:45:47.344+0800 I CONTROL  [initandlisten] **          Read and write access to data and configuration is unrestricted.
2019-07-21T10:45:47.344+0800 I CONTROL  [initandlisten] ** WARNING: You are running this process as the root user, which is not recommended.
2019-07-21T10:45:47.344+0800 I CONTROL  [initandlisten]
2019-07-21T10:45:47.345+0800 I CONTROL  [initandlisten]
2019-07-21T10:45:47.345+0800 I CONTROL  [initandlisten] ** WARNING: /sys/kernel/mm/transparent_hugepage/enabled is 'always'.
2019-07-21T10:45:47.345+0800 I CONTROL  [initandlisten] **        We suggest setting it to 'never'
2019-07-21T10:45:47.345+0800 I CONTROL  [initandlisten]
2019-07-21T10:45:47.345+0800 I CONTROL  [initandlisten] ** WARNING: /sys/kernel/mm/transparent_hugepage/defrag is 'always'.
2019-07-21T10:45:47.345+0800 I CONTROL  [initandlisten] **        We suggest setting it to 'never'
2019-07-21T10:45:47.345+0800 I CONTROL  [initandlisten]
> config={_id:"configs",members:[{_id:0,host:"192.168.194.130:21000"},{_id:1,host:"192.168.194.132:21000"},{_id:2,host:"192.168.194.133:21000"}]}
{
    "_id" : "configs",
    "members" : [
        {
            "_id" : 0,
            "host" : "192.168.194.130:21000"
        },
        {
            "_id" : 1,
            "host" : "192.168.194.132:21000"
        },
        {
            "_id" : 2,
            "host" : "192.168.194.133:21000"
        }
    ]
}
> rs.initiate(config)
{ "ok" : 1 }
rs.status()
{
"set" : "configs",
"date" : ISODate("2019-07-21T02:53:52.177Z"),
"myState" : 1,
"term" : NumberLong(1),
"syncingTo" : "",
"syncSourceHost" : "",
"syncSourceId" : -1,
"configsvr" : true,
"heartbeatIntervalMillis" : NumberLong(2000),
"optimes" : {
"lastCommittedOpTime" : {
"ts" : Timestamp(1563677627, 1),
"t" : NumberLong(1)
},
"readConcernMajorityOpTime" : {
"ts" : Timestamp(1563677627, 1),
"t" : NumberLong(1)
},
"appliedOpTime" : {
"ts" : Timestamp(1563677627, 1),
"t" : NumberLong(1)
},
"durableOpTime" : {
"ts" : Timestamp(1563677627, 1),
"t" : NumberLong(1)
}
},
"members" : [
{
"_id" : 0,
"name" : "192.168.194.130:21000",
"health" : 1,
"state" : 1,
"stateStr" : "PRIMARY",
"uptime" : 486,
"optime" : {
"ts" : Timestamp(1563677627, 1),
"t" : NumberLong(1)
},
"optimeDate" : ISODate("2019-07-21T02:53:47Z"),
"syncingTo" : "",
"syncSourceHost" : "",
"syncSourceId" : -1,
"infoMessage" : "could not find member to sync from",
"electionTime" : Timestamp(1563677587, 1),
"electionDate" : ISODate("2019-07-21T02:53:07Z"),
"configVersion" : 1,
"self" : true,
"lastHeartbeatMessage" : ""
},
{
"_id" : 1,
"name" : "192.168.194.132:21000",
"health" : 1,
"state" : 2,
"stateStr" : "SECONDARY",
"uptime" : 55,
"optime" : {
"ts" : Timestamp(1563677627, 1),
"t" : NumberLong(1)
},
"optimeDurable" : {
"ts" : Timestamp(1563677627, 1),
"t" : NumberLong(1)
},
"optimeDate" : ISODate("2019-07-21T02:53:47Z"),
"optimeDurableDate" : ISODate("2019-07-21T02:53:47Z"),
"lastHeartbeat" : ISODate("2019-07-21T02:53:51.665Z"),
"lastHeartbeatRecv" : ISODate("2019-07-21T02:53:50.695Z"),
"pingMs" : NumberLong(0),
"lastHeartbeatMessage" : "",
"syncingTo" : "192.168.194.130:21000",
"syncSourceHost" : "192.168.194.130:21000",
"syncSourceId" : 0,
"infoMessage" : "",
"configVersion" : 1
},
{
"_id" : 2,
"name" : "192.168.194.133:21000",
"health" : 1,
"state" : 2,
"stateStr" : "SECONDARY",
"uptime" : 55,
"optime" : {
"ts" : Timestamp(1563677627, 1),
"t" : NumberLong(1)
},
"optimeDurable" : {
"ts" : Timestamp(1563677627, 1),
"t" : NumberLong(1)
},
"optimeDate" : ISODate("2019-07-21T02:53:47Z"),
"optimeDurableDate" : ISODate("2019-07-21T02:53:47Z"),
"lastHeartbeat" : ISODate("2019-07-21T02:53:51.684Z"),
"lastHeartbeatRecv" : ISODate("2019-07-21T02:53:50.756Z"),
"pingMs" : NumberLong(0),
"lastHeartbeatMessage" : "",
"syncingTo" : "192.168.194.130:21000",
"syncSourceHost" : "192.168.194.130:21000",
"syncSourceId" : 0,
"infoMessage" : "",
"configVersion" : 1
}
],
"ok" : 1
}
configs:PRIMARY>4、分片搭建——分片配置
1)添加 shard1 配置文件(三台机器都操作)
[root@arslinux-01 ~]# vim /etc/mongod/shard1.conf
pidfilepath = /var/run/mongodb/shard1.pid
dbpath = /data/mongodb/shard1/data
logpath = /data/mongodb/shard1/log/shard1.log
logappend = true
bind_ip = 192.168.194.130            //ip可以是0.0.0.0,安全起见分别设置对应 ip 比较好
port = 27001
fork = true
httpinterface=true                   //打开web监控
rest=true
replSet=shard1                       //副本集名称
shardsvr = true                      //定义这是一个 shard 副本集
maxConns=20000                       //设置最大连接数
2)添加 shard2 配置文件(三台机器都操作)
[root@arslinux-01 ~]# vim /etc/mongod/shard2.conf
pidfilepath = /var/run/mongodb/shard2.pid
dbpath = /data/mongodb/shard2/data
logpath = /data/mongodb/shard2/log/shard2.log
logappend = true
bind_ip = 192.168.194.130            //不同机器,ip 不同
port = 27002
fork = true
httpinterface=true                   //打开web监控
rest=true
replSet=shard2                       //副本集名称
shardsvr = true                      //定义这是一个 shard 副本集
maxConns=20000                       //设置最大连接数
3)添加 shard3 配置文件(三台机器都操作)
[root@arslinux-01 ~]# vim /etc/mongod/shard3.conf
pidfilepath = /var/run/mongodb/shard3.pid
dbpath = /data/mongodb/shard3/data
logpath = /data/mongodb/shard3/log/shard3.log
logappend = true
bind_ip = 192.168.194.130            //不同机器,ip 不同
port = 27003
fork = true
httpinterface=true                   //打开web监控
rest=true
replSet=shard3                       //副本集名称
shardsvr = true                      //定义这是一个 shard 副本集
maxConns=20000                       //设置最大连接数
4)启动 shard1(三台机器都需要操作)
[root@arslinux-01 ~]# mongod -f /etc/mongod/shard1.conf
[root@arslinux-02 ~]# mongod -f /etc/mongod/shard1.conf
[root@arslinux-03 ~]# mongod -f /etc/mongod/shard1.conf
5)初始化副本集 shard1
登陆 A 或 B 机器,初始化副本集,因为 C 机器是仲裁节点
[root@arslinux-01 ~]# mongo --host 192.168.194.130 --port 27001
> use admin
switched to db admin
> config = { _id: "shard1", members: [ {_id : 0, host : "192.168.194.130:27001"}, {_id: 1,host : "192.168.194.132:27001"},{_id : 2, host : "192.168.194.133:27001",arbiterOnly:true}] }
{
    "_id" : "shard1",
    "members" : [
        {
            "_id" : 0,
            "host" : "192.168.194.130:27001"
        },
        {
            "_id" : 1,
            "host" : "192.168.194.132:27001"
        },
        {
            "_id" : 2,
            "host" : "192.168.194.133:27001",
            "arbiterOnly" : true
        }
    ]
}
> rs.initiate(config)
{ "ok" : 1 }
shard1:OTHER>
shard1:PRIMARY>
6)启动 shard2(三台机器都需要操作)
[root@arslinux-01 ~]# mongod -f /etc/mongod/shard2.conf
[root@arslinux-02 ~]# mongod -f /etc/mongod/shard2.conf
[root@arslinux-03 ~]# mongod -f /etc/mongod/shard2.conf
7)初始化副本集 shard2
登陆 B 或 C 机器,初始化副本集,因为 A 机器是仲裁节点
[root@arslinux-02 ~]# mongo --host 192.168.194.132 --port 27002
> use admin
switched to db admin
> config = { _id: "shard2", members: [ {_id : 0, host : "192.168.194.130:27002" ,arbiterOnly:true},{_id : 1, host : "192.168.194.132:27002"},{_id : 2, host : "192.168.194.133:27002"}] }
{
    "_id" : "shard2",
    "members" : [
        {
            "_id" : 0,
            "host" : "192.168.194.130:27002",
            "arbiterOnly" : true
        },
        {
            "_id" : 1,
            "host" : "192.168.194.132:27002"
        },
        {
            "_id" : 2,
            "host" : "192.168.194.133:27002"
        }
    ]
}
> rs.initiate(config)
{ "ok" : 1 }
shard2:OTHER>
shard2:PRIMARY>
8)启动 shard3(三台机器都需要操作)
[root@arslinux-01 ~]# mongod -f /etc/mongod/shard3.conf
[root@arslinux-02 ~]# mongod -f /etc/mongod/shard3.conf
[root@arslinux-03 ~]# mongod -f /etc/mongod/shard3.conf
9)初始化副本集 shard3
登陆 A 或 C 机器,初始化副本集,因为 B 机器是仲裁节点
[root@arslinux-02 ~]# mongo --host 192.168.194.132 --port 27002
> use admin
switched to db admin
> config = { _id: "shard3", members: [ {_id : 0, host : "192.168.194.130:27003" },{_id : 1, host : "192.168.194.132:27003",arbiterOnly:true},{_id : 2, host : "192.168.194.133:27003"}] }
{
    "_id" : "shard3",
    "members" : [
        {
            "_id" : 0,
            "host" : "192.168.194.130:27003"
        },
        {
            "_id" : 1,
            "host" : "192.168.194.132:27003",
            "arbiterOnly" : true
        },
        {
            "_id" : 2,
            "host" : "192.168.194.133:27003"
        }
    ]
}
> rs.initiate(config)
{ "ok" : 1 }
shard3:OTHER>
shard3:PRIMARY>
5、分片搭建——配置路由服务器
1)编辑配置文件(三台机器都操作)
[root@arslinux-01 ~]# vim /etc/mongod/mongos.conf
dfilepath = /var/run/mongodb/mongos.pid
logpath = /data/mongodb/mongos/log/mongos.log
logappend = true
bind_ip = 0.0.0.0                            //ip 最好是本机 ip,0.0.0.0 可能不安全
port = 20000
fork = true
configdb = configs/192.168.194.130:21000,192.168.194.132:21000,192.168.194.133:21000
#监听的配置服务器,只能有1个或者3个,configs为配置服务器的副本集名字
maxConns=20000                              //设置最大连接数
2)启动 mongos(三台机器都操作)
[root@arslinux-01 ~]# mongos -f /etc/mongod/mongos.conf
[root@arslinux-02 ~]# mongos -f /etc/mongod/mongos.conf
[root@arslinux-03 ~]# mongos -f /etc/mongod/mongos.conf
6、分片搭建——启用分片
1)登录任何一台机器的 20000 端口
[root@arslinux-01 ~]# mongo --host 192.168.194.130 --port 20000
mongos>
2)把所有分片和路由器串联(ip中间不能有空格)
mongos> sh.addShard("shard1/192.168.194.130:27001,192.168.194.132:27001,192.168.194.133:27001")
{ "shardAdded" : "shard1", "ok" : 1 }
mongos> sh.addShard("shard2/192.168.194.130:27002,192.168.194.132:27002,192.168.194.133:27002")
{ "shardAdded" : "shard2", "ok" : 1 }
mongos> sh.addShard("shard3/192.168.194.130:27003,192.168.194.132:27003,192.168.194.133:27003")
{ "shardAdded" : "shard3", "ok" : 1 }
3)查看集群状态
mongos> sh.status()
--- Sharding Status ---
    sharding version: {
         "_id" : 1,
         "minCompatibleVersion" : 5,
         "currentVersion" : 6,
         "clusterId" : ObjectId("5d33d395fb77650f834a9fef")
    }
    shards:
        {  "_id" : "shard1",  "host" : "shard1/192.168.194.130:27001,192.168.194.132:27001",  "state" : 1 }
        {  "_id" : "shard2",  "host" : "shard2/192.168.194.132:27002,192.168.194.133:27002",  "state" : 1 }
        {  "_id" : "shard3",  "host" : "shard3/192.168.194.130:27003,192.168.194.133:27003",  "state" : 1 }
    active mongoses:
        "3.4.21" : 3
    autosplit:
        Currently enabled: yes
    balancer:
        Currently enabled:  yes
        Currently running:  no
    NaN
        Failed balancer rounds in last 5 attempts:  0
        Migration Results for the last 24 hours:
            No recent migrations
    databases:
创建成功!!!
21.40 mongodb分片测试
1、登录任一台机器 20000 端口
use admin
db.runCommand({ enablesharding : "testdb"}) 或者
sh.enableSharding("testdb") //指定要分片的数据库
db.runCommand( { shardcollection : "testdb.table1",key : {id: 1} } ) 或者
sh.shardCollection("testdb.table1",{"id":1} ) //#指定数据库里需要分片的集合和片键
[root@arslinux-01 ~]# mongo --host 192.168.194.130 --port 20000
mongos> use admin
switched to db admin
mongos> sh.enableSharding("testdb")
{ "ok" : 1 }
mongos> sh.shardCollection("testdb.table1",{"id":1} )
{ "collectionsharded" : "testdb.table1", "ok" : 1 }
mongos> sh.status()
--- Sharding Status ---
sharding version: {
     "_id" : 1,
     "minCompatibleVersion" : 5,
     "currentVersion" : 6,
     "clusterId" : ObjectId("5d33d395fb77650f834a9fef")
}
shards:
    {  "_id" : "shard1",  "host" : "shard1/192.168.194.130:27001,192.168.194.132:27001",  "state" : 1 }
    {  "_id" : "shard2",  "host" : "shard2/192.168.194.132:27002,192.168.194.133:27002",  "state" : 1 }
    {  "_id" : "shard3",  "host" : "shard3/192.168.194.130:27003,192.168.194.133:27003",  "state" : 1 }
active mongoses:
    "3.4.21" : 2
autosplit:
    Currently enabled: yes
balancer:
    Currently enabled:  yes
    Currently running:  no
NaN
    Failed balancer rounds in last 5 attempts:  0
    Migration Results for the last 24 hours:
        No recent migrations
databases:
    {  "_id" : "testdb",  "primary" : "shard2",  "partitioned" : true }
        testdb.table1
            shard key: { "id" : 1 }
            unique: false
            balancing: true
            chunks:
                shard21
            { "id" : { "$minKey" : 1 } } -->> { "id" : { "$maxKey" : 1 } } on : shard2 Timestamp(1, 0)
2)插入测试数据
mongos> use testdb
switched to db testdb
mongos> for (var i = 1; i <= 10000; i++) db.table1.save({id:i,"test1":"testval1"})
WriteResult({ "nInserted" : 1 })
3)继续创建多个库
{ "ok" : 1 }
mongos> sh.shardCollection("db2.cl2",{"id":1} )
{ "collectionsharded" : "db2.cl2", "ok" : 1 }
mongos> sh.enableSharding("db3")
{ "ok" : 1 }
mongos> sh.shardCollection("db3.cl3",{"id":1} )
{ "collectionsharded" : "db3.cl3", "ok" : 1 }
4)查看状态
mongos> sh.status()
--- Sharding Status ---
sharding version: {
     "_id" : 1,
     "minCompatibleVersion" : 5,
     "currentVersion" : 6,
     "clusterId" : ObjectId("5d33d395fb77650f834a9fef")
}
    shards:
        {  "_id" : "shard1",  "host" : "shard1/192.168.194.130:27001,192.168.194.132:27001",  "state" : 1 }
        {  "_id" : "shard2",  "host" : "shard2/192.168.194.132:27002,192.168.194.133:27002",  "state" : 1 }
        {  "_id" : "shard3",  "host" : "shard3/192.168.194.130:27003,192.168.194.133:27003",  "state" : 1 }
most recently active mongoses:
    "3.4.21" : 2
autosplit:
    Currently enabled: yes
balancer:
    Currently enabled:  yes
    Currently running:  no
NaN
        Failed balancer rounds in last 5 attempts:  0
        Migration Results for the last 24 hours:
            No recent migrations
databases:
    {  "_id" : "testdb",  "primary" : "shard2",  "partitioned" : true }
        testdb.table1
            shard key: { "id" : 1 }
            unique: false
            balancing: true
            chunks:
                shard21
            { "id" : { "$minKey" : 1 } } -->> { "id" : { "$maxKey" : 1 } } on : shard2 Timestamp(1, 0)
    {  "_id" : "db2",  "primary" : "shard3",  "partitioned" : true }
        db2.cl2
            shard key: { "id" : 1 }
            unique: false
            balancing: true
            chunks:
                shard31
            { "id" : { "$minKey" : 1 } } -->> { "id" : { "$maxKey" : 1 } } on : shard3 Timestamp(1, 0)
    {  "_id" : "db3",  "primary" : "shard3",  "partitioned" : true }
            db3.cl3
            shard key: { "id" : 1 }
            unique: false
            balancing: true
            chunks:
                shard31
        { "id" : { "$minKey" : 1 } } -->> { "id" : { "$maxKey" : 1 } } on : shard3 Timestamp(1, 0)
可以看到,数据被分到了 shard2、shard3 下
数据量非常大的情况下,才会均匀分布
21.41 mongodb备份恢复
1、备份指定库
mongodump --host --port -d 数据库 -o 备份到哪里
[root@arslinux-01 ~]# mongodump --host 192.168.194.130 --port 20000 -d testdb -o /tmp/mongobak/
2019-07-21T16:23:27.581+0800writing testdb.table1 to
2019-07-21T16:23:27.769+0800done dumping testdb.table1 (10000 documents)
[root@arslinux-01 ~]# ls /tmp/mongobak/
testdb
[root@arslinux-01 ~]# ls /tmp/mongobak/testdb/
table1.bson  table1.metadata.json
[root@arslinux-01 ~]# du -sh /tmp/mongobak/testdb/*
528K/tmp/mongobak/testdb/table1.bson
4.0K/tmp/mongobak/testdb/table1.metadata.json
[root@arslinux-01 ~]# cat /tmp/mongobak/testdb/table1.metadata.json
{"options":{},"indexes":[{"v":2,"key":{"_id":1},"name":"_id_","ns":"testdb.table1"},{"v":2,"key":{"id":1.0},"name":"id_1","ns":"testdb.table1"}]}
2、备份所有库
mongodump --host --port -o 备份到哪里
[root@arslinux-01 ~]# mongodump --host 192.168.194.130 --port 20000 -o /tmp/mongobak2/
[root@arslinux-01 ~]# ll /tmp/mongobak2/
总用量 0
drwxrwxr-x 2 root root  80 7月  21 16:31 admin
drwxrwxr-x 2 root root 480 7月  21 16:31 config
drwxrwxr-x 2 root root  80 7月  21 16:31 db2
drwxrwxr-x 2 root root  80 7月  21 16:31 db3
drwxrwxr-x 2 root root  80 7月  21 16:31 testdb
3、备份指定的集合
mongodump --host --port -d 数据库 -c 集合 -o 备份到哪里
[root@arslinux-01 ~]# mongodump --host 192.168.194.130 --port 20000 -d testdb -c table1 -o /tmp/mongobak3/
2019-07-21T16:34:17.219+0800writing testdb.table1 to
2019-07-21T16:34:17.414+0800done dumping testdb.table1 (10000 documents)
[root@arslinux-01 ~]# ll /tmp/mongobak3/
总用量 0
drwxrwxr-x 2 root root 80 7月  21 16:34 testdb
4、导出集合为 json 文件
[root@arslinux-01 ~]# mongoexport --host 192.168.194.130 --port 20000 -d testdb -c table1 -o /tmp/table1.json
2019-07-21T16:38:59.255+0800connected to: 192.168.194.130:20000
2019-07-21T16:38:59.581+0800exported 10000 records
table1.json 中就是我们插入的一条一条的数据
5、恢复所有库
1)先删除几个库
[root@arslinux-01 ~]# mongo --host 192.168.194.130 --port 20000
mongos> use testdb
switched to db testdb
mongos> db.dropDatabase()
{ "dropped" : "testdb", "ok" : 1 }
mongos> use db2
switched to db db2
mongos> db.dropDatabase()
{ "dropped" : "db2", "ok" : 1 }
mongos> use db3
switched to db db3
mongos> db.dropDatabase()
{ "dropped" : "db3", "ok" : 1
mongos> show databases
admin   0.000GB
config  0.001GB
2)config 是没办法恢复的,备份中先删除 config 和 admin
[root@arslinux-01 ~]# rm -rf /tmp/mongobak2/admin/
[root@arslinux-01 ~]# rm -rf /tmp/mongobak2/config/
3)恢复
[root@arslinux-01 ~]# mongorestore --host 192.168.194.130 --port 20000 --drop /tmp/mongobak2/
[root@arslinux-01 ~]# mongo --host 192.168.194.130 --port 20000
mongos> show databases
admin   0.000GB
config  0.001GB
db2     0.000GB
db3     0.000GB
testdb  0.000GB
6、恢复指定库
[root@arslinux-01 ~]# mongorestore --host 192.168.194.130 --port 20000 -d testdb --drop
7、恢复集合(这里要指定 bson 文件)
[root@arslinux-01 ~]# mongorestore --host 192.168.194.130 --port 20000 -d testdb -c table1 --drop /tmp/mongobak/testdb/table1.bson
8、导入集合
[root@arslinux-01 ~]# mongoimport --host 192.168.194.130 --port 20000 -d testdb -c table1 --file /tmp/mongobak/testdb/table1.metadata.json
2019-07-21T16:55:31.703+0800connected to: 192.168.194.130:20000
2019-07-21T16:55:31.756+0800imported 1 document
之前写的博客被删掉了,说是使用了外链。。。

- No property editor [javax.sql.DataSourceEditor] found for type javax.sql.DataSource
- mysql sql no cache
- java.sql.SQLException: Access denied for user 'sa'@'localhost' (using password: NO)
- sqljdbc4和sqljdbc.jar或No suitable driver found for jdbc:sqlserver......DatabaseName=sql_database01
- 装入本机库 db2jcct2, java.lang.UnsatisfiedLinkError: no db2jcct2 in java.library.path 时产生故障: ERRORCODE=-4472, SQLSTATE=null
- NO-SQL(非关系型)数据库性能横向比较
- Failed to load the sqljdbc_auth.dll cause :- no sqljdbc_auth in java.library.path
- Slave_SQL_Running: No mysql同步故障解决方法
- Slave_SQL_Running: No mysql同步故障解决方法
- CDH安装SQOOP错误:Caused by: java.sql.SQLException: No suitable driver found for jdbc:derby:/var/lib/sqoo
- sql外键约束NO ACTION,CASCADE,SET NULL,SET DEFAULT
- Springmvc报错(二)java.sql.SQLException: No suitable driver
- 更新MySQL数据库( java.sql.SQLException: No value specified for parameter 1) 异常 解决方法
- Slave_SQL_Running: No mysql同步故障解决方法
- Sql 中 SET NOCOUNT ON的含义与作用
- 连接数据库出错:java.sql.SQLException: No suitable driver found for jdbc:mysql://localhost:3306/
- Caused by: java.sql.SQLException: Access denied for user 'root'@'localhost' (using password: NO)
- java.sql.SQLException: No operations allowed after
- T-SQL 中 SET NOCOUNT ON 的含义
- MySQL的SLAVE状态:Slave_IO_Running: NO和Slave_SQL_Running: No