使用scrapy-redis实现分布式爬取知乎
文章目录
1.scrapy概述
1)Scrapy 是一个为了爬取网站数据,提取结构性数据而编写的应用框架。 可以应用在包括数据挖掘,信息处理或存储历史数据等一系列的程序中
架构概览:

2)安装方式:
我使用的是win10环境,建议采用Anaconda方式安装,

2.单机爬取知乎用户信息
1)思路:

2)创建一个scrapy项目、

3)用pycharm打开创建的项目

首先将settings中的ROBOTSTXT_OBEY值改为False.
在pycharm中的terminal中新建知乎爬取模板文件。

把知乎网页的请求头user-agent复制进settings.py中:

4)编写 items.py程序如下:
# -*- coding: utf-8 -*-

# Define here the models for your scraped items
#
# See documentation in:
# https://doc.scrapy.org/en/latest/topics/items.html

from scrapy import Item,Field

class UserItem(Item):
# define the fields for your item here like:
# name = scrapy.Field()
allow_message=Field()
answer_count=Field()
articles_count=Field()
avatar_url=Field()
avatar_url_template=Field()
badge=Field()
employments=Field()
follower_count=Field()
gender=Field()
headline=Field()
id=Field()
is_advertiser=Field()
is_blocking=Field()
is_followed=Field()
is_following=Field()
is_org=Field()
name=Field()
type=Field()
url=Field()
url_token=Field()
use_default_avatar=Field()
user_typ=Field()
5)编写 zhihu.py程序如下:
import json

from scrapy import Spider, Request
from zhihuuser.items import UserItem

class ZhihuSpider(Spider):
name = "zhihu"
allowed_domains = ["www.zhihu.com"]
user_url = 'https://www.zhihu.com/api/v4/members/{user}?include={include}'
follows_url = 'https://www.zhihu.com/api/v4/members/{user}/followees?include={include}&offset={offset}&limit={limit}'
followers_url = 'https://www.zhihu.com/api/v4/members/{user}/followers?include={include}&offset={offset}&limit={limit}'
start_user = 'excited-vczh'
user_query = 'locations,employments,gender,educations,business,voteup_count,thanked_Count,follower_count,following_count,cover_url,following_topic_count,following_question_count,following_favlists_count,following_columns_count,answer_count,articles_count,pins_count,question_count,commercial_question_count,favorite_count,favorited_count,logs_count,marked_answers_count,marked_answers_text,message_thread_token,account_status,is_active,is_force_renamed,is_bind_sina,sina_weibo_url,sina_weibo_name,show_sina_weibo,is_blocking,is_blocked,is_following,is_followed,mutual_followees_count,vote_to_count,vote_from_count,thank_to_count,thank_from_count,thanked_count,description,hosted_live_count,participated_live_count,allow_message,industry_category,org_name,org_homepage,badge[?(type=best_answerer)].topics'
follows_query = 'data[*].answer_count,articles_count,gender,follower_count,is_followed,is_following,badge[?(type=best_answerer)].topics'
followers_query = 'data[*].answer_count,articles_count,gender,follower_count,is_followed,is_following,badge[?(type=best_answerer)].topics'

def start_requests(self):
yield Request(self.user_url.format(user=self.start_user, include=self.user_query), self.parse_user)
yield Request(self.follows_url.format(user=self.start_user, include=self.follows_query, limit=20, offset=0),
self.parse_follows)
yield Request(self.followers_url.format(user=self.start_user, include=self.followers_query, limit=20, offset=0),
self.parse_followers)

def parse_user(self, response):
result = json.loads(response.text)
item = UserItem()

for field in item.fields:
if field in result.keys():
item[field] = result.get(field)
yield item

yield Request(
self.follows_url.format(user=result.get('url_token'), include=self.follows_query, limit=20, offset=0),
self.parse_follows)

yield Request(
self.followers_url.format(user=result.get('url_token'), include=self.followers_query, limit=20, offset=0),
self.parse_followers)

def parse_follows(self, response):
results = json.loads(response.text)

if 'data' in results.keys():
for result in results.get('data'):
yield Request(self.user_url.format(user=result.get('url_token'), include=self.user_query),
self.parse_user)

if 'paging' in results.keys() and results.get('paging').get('is_end') == False:
next_page = results.get('paging').get('next')
yield Request(next_page,
self.parse_follows)

def parse_followers(self, response):
results = json.loads(response.text)

if 'data' in results.keys():
for result in results.get('data'):
yield Request(self.user_url.format(user=result.get('url_token'), include=self.user_query),
self.parse_user)

if 'paging' in results.keys() and results.get('paging').get('is_end') == False:
next_page = results.get('paging').get('next')
yield Request(next_page,
self.parse_followers)
6)编写pipelines.py程序将爬虫数据存进mongodb中。
a.mongodb安装:下载地址

打开下载的软件,配置参数并连接:

b.安装pymongo
pip install pymongo
c .pipelines.py 程序如下:
# -*-
4000
coding: utf-8 -*-

# Define your item pipelines here
#
# Don't forget to add your pipeline to the ITEM_PIPELINES setting
# See: https://doc.scrapy.org/en/latest/topics/item-pipeline.html

import pymongo

class ZhihuPipeline(object):
def process_item(self, item, spider):
return item

class MongoPipeline(object):
collection_name = 'users'

def __init__(self, mongo_uri, mongo_db):
self.mongo_uri = mongo_uri
self.mongo_db = mongo_db

@classmethod
def from_crawler(cls, crawler):
return cls(
mongo_uri=crawler.settings.get('MONGO_URI'),
mongo_db=crawler.settings.get('MONGO_DATABASE')
)

def open_spider(self, spider):
self.client = pymongo.MongoClient(self.mongo_uri)
self.db = self.client[self.mongo_db]

def close_spider(self, spider):
self.client.close()

def process_item(self, item, spider):
self.db[self.collection_name].update({'url_token': item['url_token']}, dict(item), True)
return item
d.在settings中配置mongodb的url和pipeline:

7)运行爬虫文件:
scrapy crawl zhihu
可发现本地mongodb中已经存储到了爬虫的数据:

3.分布式爬取知乎
一.scapy-redis简介:
1)单机爬取效率太低,为了提高效率,采用分布式爬虫技术scrapy-redis:

2)
MasterSpider 对 start_urls 中的 urls 构造 request,获取 response
MasterSpider 将 response 解析,获取目标页面的 url, 利用 redis 对 url 去重并生成待爬 request 队列
SlaveSpider 读取 redis 中的待爬队列,构造 request
SlaveSpider 发起请求,获取目标页面的 response
Slavespider 解析 response,获取目标数据,写入生产数据库
3)关于 Redis
Redis 是目前公认的速度最快的基于内存的键值对数据库
Redis 作为临时数据的缓存区,可以充分利用内存的高速读写能力大大提高爬虫爬取效率。
4)关于 scrapy-redis
scrapy-redis 是为了更方便地实现 Scrapy 分布式爬取,而提供的一些以 Redis 为基础的组件。
scrapy 使用 python 自带的 collection.deque 来存放待爬取的 request。scrapy-redis 提供了一个解决方案,把 deque 换成 redis 数据库,能让多个 spider 读取同一个 redis 数据库里,解决了分布式的主要问题。
二。分布式程序编写
1)本地安装scrapy-redis;
pip install scrapy-redis
2)配置master远程主机:
a.安装redis:
sudo apt-get install redis-server
b.配置reids配置文件使redis可远程访问。
注释掉 bind 127.0.0.1这一行使得可远程访问
找到requirepass一行设置密码
c.重新启动redis服务:
sudo service redis restart
3)本地下载redis-desktop manager
[下载地址](https://github.com/uglide/RedisDesktopManager/releases)

下载完成后配置参数连接上我们上面配置的远程主机:

3)本地配置settings.py程序如下:
# -*- coding: utf-8 -*-
# Scrapy settings for zhihuuser project
#
# For simplicity, this file contains only settings considered important or
# commonly used. You can find more settings consulting the documentation:
#
# https://doc.scrapy.org/en/latest/topics/settings.html
# https://doc.scrapy.org/en/latest/topics/downloader-middleware.html
# https://doc.scrapy.org/en/latest/topics/spider-middleware.html
BOT_NAME = 'zhihuuser'
SPIDER_MODULES = ['zhihuuser.spiders']
NEWSPIDER_MODULE = 'zhihuuser.spiders'
# Crawl responsibly by identifying yourself (and your website) on the user-agent
#USER_AGENT = 'zhihuuser (+http://www.yourdomain.com)'
# Obey robots.txt rules
ROBOTSTXT_OBEY = False
# Configure maximum concurrent requests performed by Scrapy (default: 16)
#CONCURRENT_REQUESTS = 32
# Configure a delay for requests for the same website (default: 0)
# See https://doc.scrapy.org/en/latest/topics/settings.html#download-delay
# See also autothrottle settings and docs
#DOWNLOAD_DELAY = 3
# The download delay setting will honor only one of:
#CONCURRENT_REQUESTS_PER_DOMAIN = 16
#CONCURRENT_REQUESTS_PER_IP = 16
# Disable cookies (enabled by default)
#COOKIES_ENABLED = False
# Disable Telnet Console (enabled by default)
#TELNETCONSOLE_ENABLED = False
# Override the default request headers:
DEFAULT_REQUEST_HEADERS = {
'Accept': 'text/html,application/xhtml+xml,application/xml;q=0.9,*/*;q=0.8',
'Accept-Language': 'en',
'User-Agent':'Mozilla/5.0 (Windows NT 10.0; Win64; x64) AppleWebKit/537.36 (KHTML, like Gecko) Chrome/75.0.3770.100 Safari/537.36'
}
# Enable or disable spider middlewares
# See https://doc.scrapy.org/en/latest/topics/spider-middleware.html
#SPIDER_MIDDLEWARES = {
# 'zhihuuser.middlewares.ZhihuuserSpiderMiddleware': 543,
#}
# Enable or disable downloader middlewares
# See https://doc.scrapy.org/en/latest/topics/downloader-middleware.html
#DOWNLOADER_MIDDLEWARES = {
# 'zhihuuser.middlewares.ZhihuuserDownloaderMiddleware': 543,
#}
# Enable or disable extensions
# See https://doc.scrapy.org/en/latest/topics/extensions.html
#EXTENSIONS = {
# 'scrapy.extensions.telnet.TelnetConsole': None,
#}
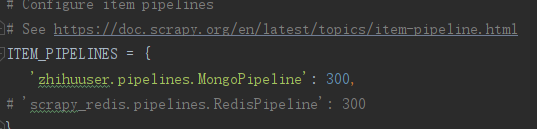
# Configure item pipelines
# See https://doc.scrapy.org/en/latest/topics/item-pipeline.html
ITEM_PIPELINES = {
'zhihuuser.pipelines.MongoPipeline': 300,
'scrapy_redis.pipelines.RedisPipeline': 300
}
# Enable and configure the AutoThrottle extension (disabled by default)
# See https://doc.scrapy.org/en/latest/topics/autothrottle.html
#AUTOTHROTTLE_ENABLED = True
# The initial download delay
#AUTOTHROTTLE_START_DELAY = 5
# The maximum download delay to be set in case of high latencies
#AUTOTHROTTLE_MAX_DELAY = 60
# The average number of requests Scrapy should be sending in parallel to
# each remote server
#AUTOTHROTTLE_TARGET_CONCURRENCY = 1.0
# Enable showing throttling stats for every response received:
#AUTOTHROTTLE_DEBUG = False
# Enable and configure HTTP caching (disabled by default)
# See https://doc.scrapy.org/en/latest/topics/downloader-middleware.html#httpcache-middleware-settings
#HTTPCACHE_ENABLED = True
#HTTPCACHE_EXPIRATION_SECS = 0
#HTTPCACHE_DIR = 'httpcache'
#HTTPCACHE_IGNORE_HTTP_CODES = []
#HTTPCACHE_STORAGE = 'scrapy.extensions.httpcache.FilesystemCacheStorage'
MONGO_URI = 'localhost'
MONGO_DATABASE = 'zhihu'
SCHEDULER = "scrapy_redis.scheduler.Scheduler"
DUPEFILTER_CLASS = "scrapy_redis.dupefilter.RFPDupeFilter"
REDIS_URL = 'redis://zoupeng:123@192.168.254.129:6379'
三.将本地的爬虫项目拷贝到另一台远程主机上
1)远程主机环境配置:
pip install scrapy scrapy-redis redis pymongo
vi /etc/mongodb.conf:
将bind 127.0.0.1注释掉,使其可远程访问。
4000
sudo service mongodb restart重启服务
mongod启动服务
2)远程主机运行爬虫:

以上就实现了两台主机的分布式爬取。
master主机的items

slave主机的items

由于redis也要存储items,效率不高,所以可以把settings中redis-pipeline注释掉。
4.分布式部署
1)由于上面远程主机需要拷贝爬虫项目,才能实现分布式爬取,当有很多远程 slave主机时,每个都要拷贝项目代码,不方便,为此可以将爬虫项目部署到网络,成为一个网络服务,然后各slave主机只要请求这个网络服务即可。
2)远程主机Scrapyd安装
pip install scrapyd
配置scrapyd:

将里面的conf文件中:
bind 127.0.0.1改为bind 0.0.0.0.即可远程访问。
启动scrapyd:

启动完后,输入主机ip地址和端口即可远程访问scrapyd服务:

3)本地安装scrapyd-client
在windows系统上,推荐不使用pip进行scrapyd-client的安装,在scrapyd-client的Github上下载源码,而后通过cmd进行安装。安装方法为进入到下载的scrapyd-client源码路径下,输入以下指令进行scrapyd-client的安装。
python setup.py install
4)本地部署爬虫项目
a.配置scrapy.cfg:
# Automatically created by: scrapy startproject
#
# For more information about the [deploy] section see:
# https://scrapyd.readthedocs.io/en/latest/deploy.html

[settings]
default = zhihuuser.settings

[deploy]
url =http://192.168.254.129:6800/addversion.json
project = zhihuuser
b.终端输入
scrapyd-deploy开始部署,成功后界面如下:

5)API测试:
请求产生一个爬虫job:
curl http://192.168.254.129:6800/schedule.json -d project=zhihuuser -d spider=zhihu
{"status": "ok", "jobid": "332d0fd4a87311e9b02a000c2907043a", "node_name": "ubuntu"}

请求三次,就相当于在本地启动了三个进程运行爬虫。

取消任务:

6)api封装python库:

- 基于Python使用scrapy-redis框架实现分布式爬虫 注
- 使用scrapy,redis, mongodb实现的一个分布式网络爬虫
- Scrapy框架-分布式爬虫实现及scrapy_redis使用
- 使用scrapy-redis实现分布式爬虫
- 分布式中使用Redis实现Session共享(二)
- 使用 Redis 实现分布式系统轻量级协调技术
- 使用 Redis 实现分布式锁
- 分布式中使用Redis实现Session共享(二)
- java使用redis实现分布式锁
- 使用redis 实现分布式锁
- redis中使用java脚本实现分布式锁
- 分布式中使用 Redis 实现 Session 共享(下)
- 分布式缓存技术redis学习系列(五)——spring-data-redis与JedisPool的区别、使用ShardedJedisPool与spring集成的实现及一致性哈希分析
- 分布式架构学习之:032--使用Redis3.0集群实现Tomcat集群的Session共享
- 基于Redis实现分布式锁,Redisson使用及源码分析
- 基于Redis实现分布式锁,Redisson使用及源码分析
- 如何使用 redis 实现分布式幂等服务中间件
- 使用 Redis 如何设计分布式锁?使用 Zookeeper 来设计分布式锁可以吗?以上两种分布式锁的实现方式哪种效率比较高?
- 使用Redis实现分布式锁及其优化
- Scrapy通过redis实现分布式抓取