【一文读懂】Spring Boot组件自动装配详解
【ANYTHING & WHY 序言】
面试官:说一下Spring boot和Spring的区别
小白:没用过Spring
面试官:那为什么选型要选择Spring Boot而不是Spring Framework呢?
小白:(架构师选的,我哪知道为啥...)因为Spring Boot能完全兼容Spring,并且提供了减少开发工作量的核心特性
面试官:好,那说一下Spring Boot的核心特性
Features
-
Create stand-alone Spring applications
-
Embed Tomcat, Jetty or Undertow directly (no need to deploy WAR files)
-
Provide opinionated 'starter' dependencies to simplify your build configuration
-
Automatically configure Spring and 3rd party libraries whenever possible
-
Provide production-ready features such as metrics, health checks and externalized configuration
-
Absolutely no code generation and no requirement for XML configuration
小白:组件自动装配,Production-Ready,独立运行等
面试官:详细说一下组件自动装配
小白:(哼哼,标配套路,还好我有准备)好的,那我就按照3W原则介绍一下~
【WHAT】何为组件自动装配
“组件自动装配”其实包含了三个子概念,即组件,自动和装配:
组件:所谓组件在Spring中并没有明确的定义,就像rest一样是一种规范,容器可以称为一种组件,Core, Context和Bean等都是Spring的组件,以及第三方的Jpa,rabbitmq等都是组件。所以,只要其符合Spring规范,能完成某些功能就可以是组件。
自动:此处基于约定大于配置来代替传统SSM的显式在XML配置的方式。
装配:将组件注入容器管理
Spring Boot auto-configuration attempts to automatically configure your Spring application based on the jar dependencies that you have added.
所以,“组件自动装配”的意思就是自动将依赖的Jar包(包含pom本身配置的自动依赖jar包和这些jar包的依赖)注入容器管理。
【HOW SPRING BOOT】Spring Boot自动装配
完成Spring Boot约定的组件自动装配需要包含下面三个因素:
-
激活@EnableAutoConfiguration注解(全流程管理)
-
配置/META-INF/spring.factories(约定,是否将组件下某个class加入自动装配管理)
-
实现xxxAutoConfiguration组件配置类(符合什么条件才加入自动装配)
整体流程是@EnableAutoConfiguration中的实现类扫描“classpath下即Pom依赖”中所有包含/META-INF/spring.factories的包,并根据其xxxAutoConfiguration和/META-INF/spring-autoconfigure-metadata.properties中的条件判断来决定是否进行自动装配。
Talk is cheap, Show me the code
主类设置如下
[code]@SpringBootApplication(exclude={DataSourceAutoConfiguration.class, HibernateJpaAutoConfiguration.class})
@EnableScheduling
@EnableConfigurationProperties({GlobalConfig.class})
public class ProxyApplication {
public static void main(String[] args) {
SpringApplication.run(ProxyApplication.class, args);
}
}
我们知道,注解SpringBootApplication是一系列注解的组合,其中包含@EnableAutoConfiguration注解
[code]@Target(ElementType.TYPE)
@Retention(RetentionPolicy.RUNTIME)
@Documented
@Inherited
@SpringBootConfiguration
@EnableAutoConfiguration
@ComponentScan(excludeFilters = {
@Filter(type = FilterType.CUSTOM, classes = TypeExcludeFilter.class),
@Filter(type = FilterType.CUSTOM,
classes = AutoConfigurationExcludeFilter.class) })
public @interface SpringBootApplication {}
而根据@Enable模块驱动设计模式,@EnableAutoConfiguration必然Import了“实现ImportSelector接口的实现类”,并实现其selectImport方法
[code]// 1. Import了AutoConfigurationImportSelector类
@Target(ElementType.TYPE)
@Retention(RetentionPolicy.RUNTIME)
@Documented
@Inherited
@AutoConfigurationPackage
@Import(AutoConfigurationImportSelector.class)
public @interface EnableAutoConfiguration {
}

//2. 实现了DeferredImportSelector接口,并重写selectImports方法
public class AutoConfigurationImportSelector
implements DeferredImportSelector, BeanClassLoaderAware, ResourceLoaderAware,
BeanFactoryAware, EnvironmentAware, Ordered {
}

//3. 继承ImportSelector接口
public interface DeferredImportSelector extends ImportSelector {}
基于@Enable和selectImports装配的方式我们知道,通过selectImports方法返回需要装配的对象数组,整个搜索流程如下:
[code]	@Override
public String[] selectImports(AnnotationMetadata annotationMetadata) {
if (!isEnabled(annotationMetadata)) {
return NO_IMPORTS;
}
AutoConfigurationMetadata autoConfigurationMetadata = AutoConfigurationMetadataLoader
.loadMetadata(this.beanClassLoader);//1. 获取classpath下自动加载配置的元数据
AutoConfigurationEntry autoConfigurationEntry = getAutoConfigurationEntry(
autoConfigurationMetadata, annotationMetadata);
return StringUtils.toStringArray(autoConfigurationEntry.getConfigurations());
}

protected AutoConfigurationEntry getAutoConfigurationEntry(
AutoConfigurationMetadata autoConfigurationMetadata,
AnnotationMetadata annotationMetadata) {
if (!isEnabled(annotationMetadata)) {
return EMPTY_ENTRY;
}
AnnotationAttributes attributes = getAttributes(annotationMetadata);//2.获取注解的属性信息
List<String> configurations = getCandidateConfigurations(annotationMetadata,
attributes);//3. 获取classpath下所有enable的候装配组件
configurations = removeDuplicates(configurations); //4. 组件去重
Set<String> exclusions = getExclusions(annotationMetadata, attributes);//5. exclude去重
checkExcludedClasses(configurations, exclusions);//6. 组件去exclude
configurations.removeAll(exclusions);//6. 组件去exclude
configurations = filter(configurations, autoConfigurationMetadata);//7. 组件过滤
fireAutoConfigurationImportEvents(configurations, exclusions);//8. 触发自动装配监听
return new AutoConfigurationEntry(configurations, exclusions);
}
整体流程:
1. 获取自动加载配置的元数据:主要是获取classpath下所有META-INF/spring-autoconfigure-metadata.properties中的配置信息,该文件里面配置的作用等同于在xxxAutoConfiguration上面的@ConditionalOnClass等注解,这么做的好处就是参考官网说明(Spring Boot uses an annotation processor to collect the conditions on auto-configurations in a metadata file (META-INF/spring-autoconfigure-metadata.properties). If that file is present, it is used to eagerly filter auto-configurations that do not match, which will improve startup time.)总而言之,加速启动时间。
2.获取注解的属性信息:这里的注解是指在主类上的注解,所以获取出来的属性信息如图所示:
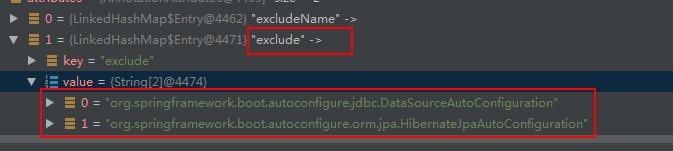
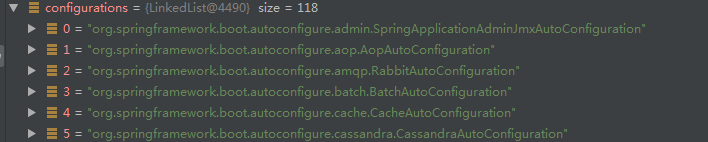
3. 获取classpath下所有enable的候装配组件:获取的是META-INF/spring.factories中key为EnableAutoConfiguration的Value值的集合,此处META-INF/spring.factories可以是多个,EnableAutoConfiguration也可以是多个,此处原始数据DEBUG为118个(在spring.factories中定义的是)
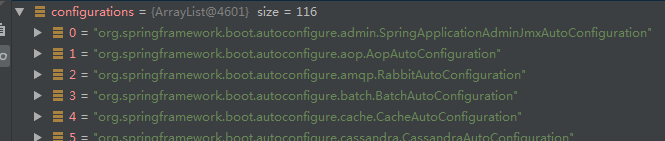
4.5.6去重(此处无重复),去exclude(共2个)后,剩余116个
7.组件过滤:过滤对象是configurations,过滤条件是1中获取的autoConfigurationMetadata,过滤后,可被自动装配对象变为35个,比对删除的configurations,此处可以猜到autoConfigurationMetadata作用是配合configurations去除不符合条件的(比如当前classloader下不存在的class)configurations,同时也表明META-INF/spring-autoconfigure-metadata.properties中的Key-Value是对META-INF/spring.factories定义自动配置条件的提取。

8. 触发自动装配监听
至此,selectImports流程结束,返回需要加载对象,@Enable驱动模块完成bean的装配
【HOW CUSTOM】自定义自动装配组件
那么,如何自定义一个自动装配组件呢?首先,我们先要创建个普通的maven工程,并且采用{name}-spring-boot-starter 的命名风格[自定义第三方均采取此风格],也就是我们平常常说的starter启动器,引入maven依赖
[code]<?xml version="1.0" encoding="UTF-8"?>
<project xmlns="http://maven.apache.org/POM/4.0.0"
xmlns:xsi="http://www.w3.org/2001/XMLSchema-instance"
xsi:schemaLocation="http://maven.apache.org/POM/4.0.0 http://maven.apache.org/xsd/maven-4.0.0.xsd">
<modelVersion>4.0.0</modelVersion>

<groupId>com.zyq</groupId>
<artifactId>arthorn-spring-boot-starter</artifactId>
<version>0.1.2.Release</version>

<dependencies>
<dependency>
<groupId>org.springframework.boot</groupId>
<artifactId>spring-boot-autoconfigure</artifactId>
<version>2.1.4.RELEASE</version>
</dependency>

<dependency>
<groupId>org.springframework.boot</groupId>
<artifactId>spring-boot-configuration-processor</artifactId>
<version>2.1.4.RELEASE</version>
<optional>true</optional>
</dependency>
</dependencies>

<build>
<plugins>
<plugin>
<groupId>org.springframework.boot</groupId>
<artifactId>spring-boot-maven-plugin</artifactId>
</plugin>
</plugins>
</build>

</project>
项目的工程目录如图所示:

ArthornProperties用于接收在application.properties配置的属性
[code]/**
* @author zyq
* @description 亚索属性配置
*/
@ConfigurationProperties(prefix = "arthorn")
public class ArthornProperties {
private String killNum;

public String getKillNum() {
return killNum;
}

public void setKillNum(String killNum) {
this.killNum = killNum;
}
}
ArthornAutoconfiguration用于进行Enable的条件判断,在此处决定是否装载ArthornService.class,比如,此处只有当classpath下存在ArthornService.class,且不存在该Bean,且存在属性arthorn.enabled=true三个条件时,才装配ArthornService.class组件.
[code]@Configuration
@EnableConfigurationProperties(ArthornProperties.class)
@ConditionalOnClass(ArthornService.class)
public class ArthornAutoconfiguration {

@Autowired
private ArthornProperties arthornProperties;

@Bean
@ConditionalOnMissingBean(ArthornService.class)
@ConditionalOnProperty(name = "enabled",prefix = "arthorn", havingValue = "true")
public ArthornService arthornService(){
ArthornService arthornService = new ArthornService(arthornProperties);
return arthornService;
}

}
ArthornService是我们要装配的业务组件,主要是组件的业务逻辑
[code]public class ArthornService {

private ArthornProperties arthornProperties;

public ArthornService(ArthornProperties arthornProperties){
this.arthornProperties = arthornProperties;
}

public String kill(String blood){
if  ("first".equals(blood))
return "Death is like the wind; always by my side";
else if ("second".equals(blood))
return "A sword's poor company for a long road.";
else
return "My honor left a long time ago.";
}

}
在resources/META-INF/spring.factories下面添加
[code]org.springframework.boot.autoconfigure.EnableAutoConfiguration=\
com.zyq.ArthornAutoconfiguration
执行maven install安装该组件到本地repository,完成starter启动器的制作,IDEA操作如图

接下来,就是在我们的Spring Boot项目中引入该依赖,并完成自动装配,新建Spring Boot项目testdemo,并引入我们的arthorn-spring-boot-starter依赖
[code]<?xml version="1.0" encoding="UTF-8"?>
<project xmlns="http://maven.apache.org/POM/4.0.0" xmlns:xsi="http://www.w3.org/2001/XMLSchema-instance"
xsi:schemaLocation="http://maven.apache.org/POM/4.0.0 http://maven.apache.org/xsd/maven-4.0.0.xsd">
<modelVersion>4.0.0</modelVersion>
<parent>
<groupId>org.springframework.boot</groupId>
<artifactId>spring-boot-starter-parent</artifactId>
<version>2.1.4.RELEASE</version>
<relativePath/> <!-- lookup parent from repository -->
</parent>
<groupId>com.example</groupId>
<artifactId>testdemo</artifactId>
<version>0.0.1-SNAPSHOT</version>
<name>testdemo</name>
<description>Demo project for Spring Boot</description>

<properties>
<java.version>1.8</java.version>
</properties>

<dependencies>
<dependency>
<groupId>org.springframework.boot</groupId>
<artifactId>spring-boot-starter-web</artifactId>
</dependency>

<dependency>
<groupId>org.springframework.boot</groupId>
<artifactId>spring-boot-starter-test</artifactId>
<scope>test</scope>
</dependency>

<dependency>
<groupId>com.zyq</groupId>
<artifactId>arthorn-spring-boot-starter</artifactId>
<version>0.1.2.Release</version>
</dependency>

</dependencies>

<build>
<plugins>
<plugin>
<groupId>org.springframework.boot</groupId>
<artifactId>spring-boot-maven-plugin</artifactId>
</plugin>
</plugins>
</build>

</project>
在application.properties文件中添加属性配置
[code]arthorn.blood=first
任意写一个接口,调用自动配置的类
[code]@RestController
@RequestMapping("/test")
public class testController {

@Autowired
ArthornService arthornService;

@GetMapping("/{blood}")
public String test(@PathVariable String blood){
return arthornService.kill(blood);
}
}
启动报错,什么鬼?

原来是我们之前配置的条件注解,调用该组件需要在配置属性中添加arthorn.enabled=true,修改后启动成功,调用接口
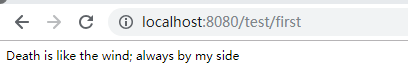

SUCCESS!面对疾风吧
【HOW JPA】JPA自动装配组件
接下来,我们实例化一下通用组件JPA是如何在Spring Boot中完成自动装配的。我们不讨论Jpa的源码,只对实现自动装配的几个元素进行研究
- spring-boot-starter-data-jpa的starter启动器结构
- spring-boot-starter-data-jpa的xxxAutoConfiguration
随便创建一个Spring Boot项目,并引入jpa依赖

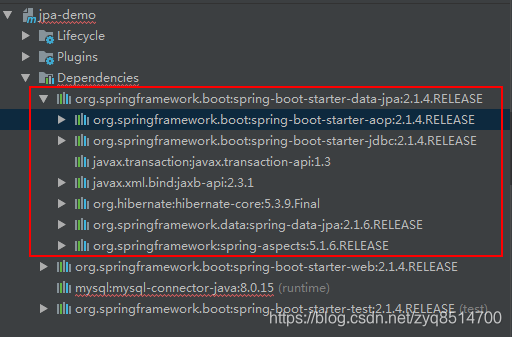
首先,来看下整个项目的maven依赖和Jpa的依赖,可以看到spring-boot-starter-data-jpa本身依赖于spring-data-jpa(注意区别,真正的服务实体在这个jar包里面,spring-boot-starter-data-jpa只是作为一个启动依赖),hibernate依赖,aop依赖等。
到maven仓库解压这个jar包,会发现里面有效信息只有一个pom,我们这里可以把spring-boot-starter-data-jpa看成是依赖多个jar包的空组件,它的作用主要是提供spring boot jpa自动注册需要的依赖。我们看到所有的官方自动配置组件的starter启动器都在该目录下

接下来,我们看下在IDEA双击shift,输入spring.factories来查看类路径下面所有的spring.factories文件,发现只有spring-boot-autoconfigure下面的spring.factories文件存在XXXEnableAutoConfiguration类,找到其中Jpa相关的XXXEnableAutoConfiguration,

该类的路径存在于spring-boot-starter-data-jpa的路径下,所有官方配置组件的XXXEnableAutoConfiguration类都在该路径下


其中,spring-boot-starter-data-jpa的路径下只存在对组件的自动注册类实现等,看一下具体的JpaRepositoriesAutoConfiguration
[code]/*
* Copyright 2012-2019 the original author or authors.
*
* Licensed under the Apache License, Version 2.0 (the "License");
* you may not use this file except in compliance with the License.
* You may obtain a copy of the License at
*
*      https://www.apache.org/licenses/LICENSE-2.0
*
* Unless required by applicable law or agreed to in writing, software
* distributed under the License is distributed on an "AS IS" BASIS,
* WITHOUT WARRANTIES OR CONDITIONS OF ANY KIND, either express or implied.
* See the License for the specific language governing permissions and
* limitations under the License.
*/

package org.springframework.boot.autoconfigure.data.jpa;

import java.util.Map;

import javax.sql.DataSource;

import org.springframework.boot.autoconfigure.AutoConfigureAfter;
import org.springframework.boot.autoconfigure.EnableAutoConfiguration;
import org.springframework.boot.autoconfigure.condition.AnyNestedCondition;
import org.springframework.boot.autoconfigure.condition.ConditionalOnBean;
import org.springframework.boot.autoconfigure.condition.ConditionalOnClass;
import org.springframework.boot.autoconfigure.condition.ConditionalOnMissingBean;
import org.springframework.boot.autoconfigure.condition.ConditionalOnProperty;
import org.springframework.boot.autoconfigure.orm.jpa.EntityManagerFactoryBuilderCustomizer;
import org.springframework.boot.autoconfigure.orm.jpa.HibernateJpaAutoConfiguration;
import org.springframework.boot.autoconfigure.task.TaskExecutionAutoConfiguration;
import org.springframework.context.annotation.Bean;
import org.springframework.context.annotation.Conditional;
import org.springframework.context.annotation.Configuration;
import org.springframework.context.annotation.Import;
import org.springframework.core.task.AsyncTaskExecutor;
import org.springframework.data.jpa.repository.JpaRepository;
import org.springframework.data.jpa.repository.config.EnableJpaRepositories;
import org.springframework.data.jpa.repository.config.JpaRepositoryConfigExtension;
import org.springframework.data.jpa.repository.support.JpaRepositoryFactoryBean;

/**
* {@link EnableAutoConfiguration Auto-configuration} for Spring Data's JPA Repositories.
* <p>
* Activates when there is a bean of type {@link javax.sql.DataSource} configured in the
* context, the Spring Data JPA
* {@link org.springframework.data.jpa.repository.JpaRepository} type is on the classpath,
* and there is no other, existing
* {@link org.springframework.data.jpa.repository.JpaRepository} configured.
* <p>
* Once in effect, the auto-configuration is the equivalent of enabling JPA repositories
* using the {@link org.springframework.data.jpa.repository.config.EnableJpaRepositories}
* annotation.
* <p>
* This configuration class will activate <em>after</em> the Hibernate auto-configuration.
*
* @author Phillip Webb
* @author Josh Long
* @see EnableJpaRepositories
*/
@Configuration
@ConditionalOnBean(DataSource.class)
@ConditionalOnClass(JpaRepository.class)
@ConditionalOnMissingBean({ JpaRepositoryFactoryBean.class,
JpaRepositoryConfigExtension.class })
@ConditionalOnProperty(prefix = "spring.data.jpa.repositories", name = "enabled",
havingValue = "true", matchIfMissing = true)
@Import(JpaRepositoriesAutoConfigureRegistrar.class)
@AutoConfigureAfter({ HibernateJpaAutoConfiguration.class,
TaskExecutionAutoConfiguration.class })
public class JpaRepositoriesAutoConfiguration {

@Bean
@Conditional(BootstrapExecutorCondition.class)
public EntityManagerFactoryBuilderCustomizer entityManagerFactoryBootstrapExecutorCustomizer(
Map<String, AsyncTaskExecutor> taskExecutors) {
return (builder) -> {
AsyncTaskExecutor bootstrapExecutor = determineBootstrapExecutor(
taskExecutors);
if (bootstrapExecutor != null) {
builder.setBootstrapExecutor(bootstrapExecutor);
}
};
}

//省略
}
可以看到,只有满足上面定义的条件(@ConditionalOnBean等注解的含义请自行百度)才会自动装配,装配的时候采取调用原始的spring-data-jpa的jar包。这样设计既不侵入spring-data-jpa等原生组件的逻辑,又完成了spring-boot的自动装配。所以,这符合哪种设计模式呢?~~~~~
[code]

- springboot自动装配(1)---@SpringBootApplication注解怎么自动装配各种组件
- springboot自动装配原理详解
- spring boot自动装配之@EnableAutoConfiguration详解
- spring boot自动装配之@ComponentScan详解
- 深入理解SpringBoot之自动装配
- Spring装配Bean之组件扫描和自动装配
- Spring boot中@Conditional和spring boot的自动配置实例详解
- springboot自动装配原理-以redis为例
- 深入理解SpringBoot之自动装配
- 关于SpringBoot中基于条件的自动装配
- 读懂Spring核心系列3(自动装配属性)
- 浅谈Spring装配Bean之组件扫描和自动装配
- 【译】Spring 4 自动装配、自动检测、组件扫描示例
- spring boot 之自动装配
- Spring 注入集合、依赖检查、自动组件扫描、过滤组件自动扫描、自动装配属性
- Spring组件自动扫描详解及实例代码
- Spring/SpringBoot自动装配的三种方式
- Spring Boot自动配置详解
- Spring依赖注入,自动扫描组件,自动装配,注解注入
- spring 组件扫描自动装配默认构造器的问题