Yolov3代码分析与训练自己数据集
现在要针对我们需求引入检测模型,只检测人物,然后是图像能侧立,这样人物在里面占比更多,也更清晰,也不需要检测人占比小的情况,如下是针对这个需求,用的yolov3-tiny模型训练后的效果。
//在yolov3中,n=3 total=9(mask在yolov3中分三组,分别是[0,1,2/3,4,5/6,7,8],n表示分组里几个数据,n*3=total)
//608*608下,第一组是19*19,第二组是38*38,第三组是76*76,每组检查对应索引里的anchors
layer make_yolo_layer(int batch, int w, int h, int n, int total, int *mask, int classes)
{
//在这假设在主支中,其中缩小5次,608/(2^5)=19,这个分支中,w=h=19
int i;
layer l = { 0 };
l.type = YOLO;
//检测几种类型边框(这分支对应上面anchors[6,7,8]这个用来检测大边框)
l.n = n;
//如上,在yolov3中,有大中小分别有三个边框聚合,一共是3*3=9
//而在yolov3-tiny中,有大小分别三个边框聚合,一共是3*2=6
l.total = total;
//一般来说,训练为32,预测为1
l.batch = batch;
//主支,608/(2^5)=19
l.h = h;
l.w = w;
//如上在主支中,每张特征图有19*19个元素,c表示特征图个数,n表示对应的anchors[6,7,8]这三个
//4表示box坐标,1是Po(预测机率与IOU正确率)的概率,classes是预测的类别数
l.c = n * (classes + 4 + 1);
l.out_w = l.w;
l.out_h = l.h;
l.out_c = l.c;
//检测一共有多少个类别
l.classes = classes;
//计算代价(数据集整体的误差描述)
l.cost = calloc(1, sizeof(float));
//对应表示anchors
l.biases = calloc(total * 2, sizeof(float));
//对应如上anchors中n对应需要用到的索引
if (mask) l.mask = mask;
else {
l.mask = calloc(n, sizeof(int));
for (i = 0; i < n; ++i) {
l.mask[i] = i;
}
}
l.bias_updates = calloc(n * 2, sizeof(float));
//当前层batch为1的所有输出特征图包含的元素个数,每个元素为一个float
l.outputs = h * w*n*(classes + 4 + 1);
//当前层batch为1时所有输入特征图包含的元素个数,每个元素为一个float
l.inputs = l.outputs;
//标签(真实)数据,这里90表示如上w*h(19*19中)每个格子最多有90个label。
//而每个label前面4个float表示box的四个点,后面1个float表示当前类别
l.truths = 90 * (4 + 1);
//计算误差(数据单个的误差描述),用来表示 期望输出-真实输出
l.delta = calloc(batch*l.outputs, sizeof(float));
l.output = calloc(batch*l.outputs, sizeof(float));
for (i = 0; i < total * 2; ++i) {
l.biases[i] = .5;
}

l.forward = forward_yolo_layer;
l.backward = backward_yolo_layer;
#ifdef GPU
l.forward_gpu = forward_yolo_layer_gpu;
l.backward_gpu = backward_yolo_layer_gpu;
l.output_gpu = cuda_make_array(l.output, batch*l.outputs);
l.delta_gpu = cuda_make_array(l.delta, batch*l.outputs);
#endif

fprintf(stderr, "yolo\n");
srand(0);

return l;
}
make_yolo_layer
以主支来做分析,每张特征图有19*19个元素,c表示特征图个数,结合上图,一共有3*(80+4+1)=255,简单来说,分别对应116,90, 156,198, 373,326这三个聚类簇,其中前85个就是116,90这框的结果,前4个是边框坐标,1个置信度,80个类别概率,一共三个,还有标签(真实)数据,这里90表示如上w*h(19*19中)每个格子最多有90个label,而每个label前面4个float表示box的四个点,后面1个float表示当前类别,搞清楚这二个对应排列,在如下的forward_yolo_layer里,我们才能明白如何计算的delta,代码加上注释有点多,这段就不贴了,代码部分说明下。
主要有二部分,还是先说下,在这里delta表示 期望输出-out(不同框架可能不同,我看caffe里的yolo实现,就是out-期望输出)。
第一部分,前面查找所有特征图(在这1batch是三张)里的所有元素(19*19)里的所有confidence,准确来说在第三分支19*19个元素,每个元素有三个大框预测,检测对应所有框里真实数据最好的box的iou,如果iou大于设定的ignore_thresh,则设delta为0,否则就是0-out(0表示没有,我们期望输出是0)。
第二部分,在对照所有真实label中,先找到这个label是否是大框,如果不是,这个yolo层不管,如果是,继续看是上面6,7,8中的那一个,我们假设是8,根据真实框的位置确定在特征图的位置(19*19中),其8对应255张特征图中间的85-170这85张图,然后比较真实的BOX与对应特征图预测的box,算出对应box的 delta,然后是confidence的delta(可以知道,正确的box位置上的元素会算二次confidence损失),然后是类别的delta。各delta比较简单,如果认为是真的,delta=1-out,如果是错的,delta=0-out,简单来说就是期望输出-out,最后网络cost就是每层yolo的delta的平方和加起来的均值。
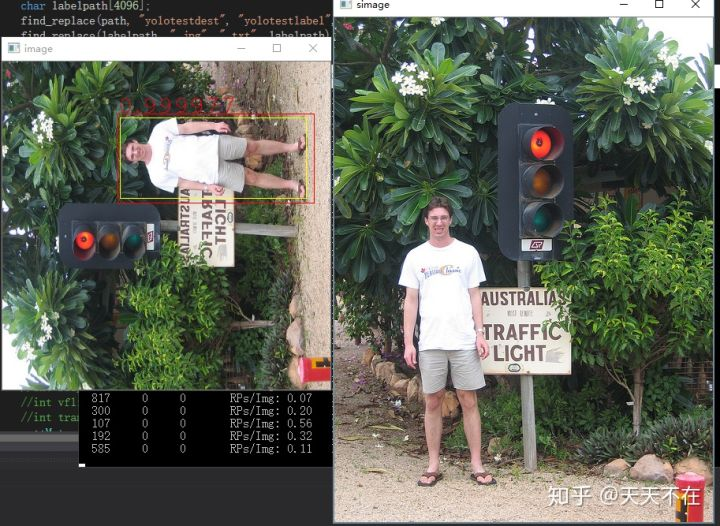
然后是yolo训练时输出的各项参数(这图用的是yolov3-tiny训练,所以只有16和23这二个yolo层),对比如上16层检测大的,23检测小的。
/// <summary>
/// 数据经过funcFilterLabel过滤,过滤后的数据需要全部满足discardFilterLabel
/// </summary>
/// <param name="instData"></param>
/// <param name="funcFilterLabel">满足条件就采用</param>
/// <param name="discardFilterLabel">需要所有标签满足的条件</param>
/// <returns></returns>
public List<ImageLabel> CreateYoloLabel(instances instData,
Func<annotationOD, image, bool> funcFilterLabel,
Func<annotationOD, image, bool> discardFilterLabel)
{
List<ImageLabel> labels = new List<ImageLabel>();
//foreach (var image in instData.images)
Parallel.ForEach(instData.images, (image image) =>
{
var anns = instData.annotations.FindAll(p => p.image_id == image.id && funcFilterLabel(p, image));
bool bReserved = anns.TrueForAll((annotationOD ao) => discardFilterLabel(ao, image));
if (anns.Count > 0 && bReserved)
{
ImageLabel iml = new ImageLabel();
iml.imageId = image.id;
iml.name = image.file_name;
float dw = 1.0f / image.width;
float dh = 1.0f / image.height;
foreach (var ann in anns)
{
BoxIndex boxIndex = new BoxIndex();
boxIndex.box.xcenter = (ann.bbox[0] + ann.bbox[2] / 2.0f) * dw;
boxIndex.box.ycenter = (ann.bbox[1] + ann.bbox[3] / 2.0f) * dh;

boxIndex.box.width = ann.bbox[2] * dw;
boxIndex.box.height = ann.bbox[3] * dh;
//注册
boxIndex.catId = findCategoryId(instData.categories, ann.category_id);
if (boxIndex.catId >= 0)
iml.boxs.Add(boxIndex);
}
if (iml.boxs.Count > 0)
{
lock (labels)
{
labels.Add(iml);
}
}
}

});
return labels;
}

public async void BuildYoloData(DataPath dataPath, string txtListName)
{
instances instance = new instances();
if (!File.Exists(dataPath.AnnotationPath))
{
setText(dataPath.AnnotationPath + " 路径不存在.");
return;
}
setText("正在读取文件中:" + Environment.NewLine + dataPath.AnnotationPath);
var jsonTex = await Task.FromResult(File.ReadAllText(dataPath.AnnotationPath));
setText("正在解析文件中:" + Environment.NewLine + dataPath.AnnotationPath);
instance = await Task.FromResult(JsonConvert.DeserializeObject<instances>(jsonTex));
setText("正在分析文件包含人物图像:" + instance.images.Count + "个");
List<ImageLabel> labels = await Task.FromResult(COCODataManager.Instance.CreateYoloLabel(
instance,
(annotationOD at, image image) =>
{
//是否人类
return at.category_id == 1;
},
(annotationOD at, image image) =>
{
//是否满足所有人类标签都面积占比都大于十分之一
return (at.bbox[2] / image.width) * (at.bbox[3] / image.height) > 0.1f;
}));
setText("正在生成label文件:" + Environment.NewLine + dataPath.LabelPath);
if (!Directory.Exists(dataPath.LabelPath))
{
Directory.CreateDirectory(dataPath.LabelPath);
}
await Task.Run(() =>
{
Parallel.ForEach(labels, (ImageLabel imageLabel) =>
{
string fileName = Path.Combine(dataPath.LabelPath,
Path.GetFileNameWithoutExtension(imageLabel.name) + ".txt");
using (var file = new StreamWriter(Path.Combine(dataPath.LabelPath, fileName), false))
{
foreach (var label in imageLabel.boxs)
{
file.WriteLine(label.catId + " " + label.box.xcenter + " " + label.box.ycenter +
" " + label.box.width + " " + label.box.height + " ");
}
}
});
string path = Path.Combine(Directory.GetParent(dataPath.LabelPath).FullName,
txtListName + ".txt");
using (var file = new StreamWriter(path, false))
{
foreach (var label in labels)
{
string lpath = Path.Combine(dataPath.DestImagePath, label.name);
file.WriteLine(lpath);
}
}
});
setText("正在复制需要的文件到指定目录:" + dataPath.AnnotationPath);
await Task.Run(() =>
{
Parallel.ForEach(labels, (ImageLabel imageLabel) =>
{
string spath = Path.Combine(dataPath.SourceImagePath, imageLabel.name);
string dpsth = Path.Combine(dataPath.DestImagePath, imageLabel.name);
if (File.Exists(spath))
File.Copy(spath, dpsth, true);
});
});
setText("全部完成");
}
CreateYoloLabel
只有一点需要注意,我们只记录人类box标签数据,但是这些标签需要全部大于特定面积的图,如果你选择的上面还有小面积人物,又不给box标签训练,最后yolo层并没面板的损失函数,会造成干扰,在这本来也没有检查小面积人物的需求,yolov3-tiny层数本也不多,需求泛化后精度很低。
darknet本身并没有针对侧立做适配,我们需要修改相应逻辑来完成,很简单,一张图四个方向旋转后,同样修改相应的truth box就行了是,darknet数据加载主要在data.c这部分,找到我们使用的加载逻辑load_data_detection里,主要针对如下修改。
data load_data_detection(int n, char **paths, int m, int w, int h, int boxes, int classes,
float jitter, float hue, float saturation, float exposure)
{
....................
random_distort_image(sized, hue, saturation, exposure);

int flip = rand() % 2;
if (flip)
flip_image(sized);
int vflip = rand() % 2;
if (vflip)
vflip_image(sized);
int trans = rand() % 2;
if (trans)
transpose_image(sized);
d.X.vals[i] = sized.data;

fill_truth_detection(random_paths[i], boxes, d.y.vals[i], classes, flip,
-dx / w, -dy / h, nw / w, nh / h, vflip, trans);

free_image(orig);
....................
}

void correct_boxes(box_label *boxes, int n, float dx, float dy, float sx,
float sy, int flip, int vflip, int trans)
{
int i;
for (i = 0; i < n; ++i) {
if (boxes[i].x == 0 && boxes[i].y == 0) {
boxes[i].x = 999999;
boxes[i].y = 999999;
boxes[i].w = 999999;
boxes[i].h = 999999;
continue;
}
boxes[i].left = boxes[i].left  * sx - dx;
boxes[i].right = boxes[i].right * sx - dx;
boxes[i].top = boxes[i].top   * sy - dy;
boxes[i].bottom = boxes[i].bottom* sy - dy;

if (flip)
{
float swap = boxes[i].left;
boxes[i].left = 1. - boxes[i].right;
boxes[i].right = 1. - swap;
}
if (vflip)
{
float swap = boxes[i].top;
boxes[i].top = 1. - boxes[i].bottom;
boxes[i].bottom = 1. - swap;
}

boxes[i].left = constrain(0, 1, boxes[i].left);
boxes[i].right = constrain(0, 1, boxes[i].right);
boxes[i].top = constrain(0, 1, boxes[i].top);
boxes[i].bottom = constrain(0, 1, boxes[i].bottom);

boxes[i].x = (boxes[i].left + boxes[i].right) / 2;
boxes[i].y = (boxes[i].top + boxes[i].bottom) / 2;
boxes[i].w = (boxes[i].right - boxes[i].left);
boxes[i].h = (boxes[i].bottom - boxes[i].top);

boxes[i].w = constrain(0, 1, boxes[i].w);
boxes[i].h = constrain(0, 1, boxes[i].h);

if (trans)
{
float temp = boxes[i].x;
boxes[i].x = boxes[i].y;
boxes[i].y = temp;
temp = boxes[i].w;
boxes[i].w = boxes[i].h;
boxes[i].h = temp;
}
}
}
load_data_detection
然后拿到yolov3-tiny.cfg文件,先把burn_in修改成1,我们没有预精确数据,最开始就以原始学习率开始训练,对应二个yolo层里的classes改成一,记的前面说过,这个层就是分析上面的卷积层,故上面的输出filters=3*(4+1+1)=18,第一次训练后发现五W次就没怎么收敛了,分析了下,应该是anchors导致的,当图像侧立后,这里的也应该有类似数据,故选择全大面积人物二种特定框,分别取侧立,这里正确的搞法应该是用k-means再重新取K=2算一下所有现在特定图的框,分别对应大框与小框,然后侧立下,大框就有二个,小框二个,num=4,mask每层设二个索引,或是K=4,然后让上面来,后面抽出时间完善这步,现暂时用如下数据anchors = 100,100, 119,59, 59,119, 200,200, 326,373, 373,326,这些调整后,现训练21W次,也还一直收敛中。
训练与验证根据他自身的train_yolo/validata_yolo修改下,自己可以打印出自己想要的信息,验证可以结合opencv显示我们想要的各种图形比对效果。

- 【学习笔记—Yolov3】Yolov3训练VOC数据集&训练自己的数据集
- yolov3训练自己数据集可参考文章
- Mask R-CNN+tensorflow/keras的配置介绍、代码详解与训练自己的数据集演示
- fast-rcnn训练自己数据集以及demo代码解读和总结(面向fast-rcnn初学者)
- YoLov3训练自己的数据集
- 用darknet框架中的YOLOv3对自己的数据集进行训练和预测
- yolov3 训练自己的数据集
- ubuntu下训练自己的yolov3数据集
- YOLOv3(keras)训练自己的数据集(voc)
- Pytorch tutorials 实战教程(1)——训练自己的数据集(代码详解)
- fast-rcnn训练自己数据集以及demo代码解读和总结(面向fast-rcnn初学者)
- Yolov3训练自己的数据集完整步骤
- 在win10下用yolov3训练自己的数据集
- caffe训练自己的数据集——2. 开始训练
- YOLO模型训练自己数据-VOC格式数据集制作-ubuntu c++文件夹内图片批量读取与重命名
- Tenosorflow基础学习---------Tensorflow训练自己的数据集
- tensorflow学习(1)——训练自己的数据集并进行物体检测(object detection)
- FastRCNN 训练自己数据集(二)——修改读写接口
- TensorFlow Object Detection API教程——利用自己制作的数据集进行训练预测和测试
- Fast RCNN 训练自己的数据集(3训练和检测)