SpringBoot项目实现文件上传和邮件发送
前言
本篇文章主要介绍的是SpringBoot项目实现文件上传和邮件发送的功能。
SpringBoot 文件上传
说明:如果想直接获取工程那么可以直接跳到底部,通过链接下载工程代码。
开发准备
环境要求
JDK:1.8
SpringBoot:1.5.9.RELEASE
首先还是Maven的相关依赖:
pom.xml文件如下:
<properties>
<project.build.sourceEncoding>UTF-8</project.build.sourceEncoding>
<java.version>1.8</java.version>
<maven.compiler.source>1.8</maven.compiler.source>
<maven.compiler.target>1.8</maven.compiler.target>
</properties>
<parent>
<groupId>org.springframework.boot</groupId>
<artifactId>spring-boot-starter-parent</artifactId>
<version>1.5.9.RELEASE</version>
<relativePath />
</parent>
<dependencies>
<!-- Spring Boot Web 依赖 核心 -->
<dependency>
<groupId>org.springframework.boot</groupId>
<artifactId>spring-boot-starter-web</artifactId>
</dependency>
<!-- Spring Boot Test 依赖 -->
<dependency>
<groupId>org.springframework.boot</groupId>
<artifactId>spring-boot-starter-test</artifactId>
<scope>test</scope>
</dependency>
<!-- Spring Boot thymeleaf 模板 -->
<dependency>
<groupId>org.springframework.boot</groupId>
<artifactId>spring-boot-starter-thymeleaf</artifactId>
</dependency>
</dependencies>
然后就是application.properties的文件配置。
application.properties:
banner.charset=UTF-8
server.tomcat.uri-encoding=UTF-8
spring.http.encoding.charset=UTF-8
spring.http.encoding.enabled=true
spring.http.encoding.force=true
spring.messages.encoding=UTF-8
server.port=8182

spring.http.multipart.maxFileSize=100Mb
spring.http.multipart.maxRequestSize=100Mb

filePath=F:/test/
注:其中
spring.http.multipart.maxFileSize和
spring.http.multipart.maxRequestSize是设置上传文件的大小,这里我设置的是100Mb,
filePath是文件上传的路径,因为个人使用的是Windows系统,所以将路径设置在
F:/test/。
代码编写
SpringBoot自身对于文件上传可以说是非常的友好了,只需要在控制层的参数中使用
MultipartFile这个类,然后接受
file类型的数据上传就可以了,至于将上传得到的文件如何处理就是我们开发者自己决定了。
首先我们先写一个前端界面,在界面上新增一个按钮用于上传文件。由于SpringBoot对thymeleaf的支持非常友好,所以这里我们就直接使用thymeleaf编写一个简单的界面,用于上传文件。
html代码如下:
<!DOCTYPE html>
<html>
<head>
<title>uploading.html</title>

<meta name="keywords" content="keyword1,keyword2,keyword3"></meta>
<meta name="description" content="this is my page"></meta>
<meta name="content-type" content="text/html; charset=UTF-8"></meta>

</head>

<body>
<form enctype="multipart/form-data" method="post" action="/uploading">
<input type="file" name="file"/>
<input type="submit" value="上传"/>
</form>
</body>
</html>
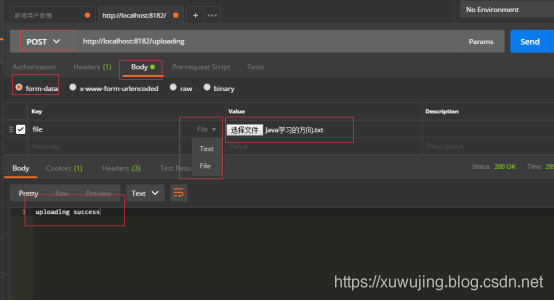
注: 如果不想编写前端界面的话,也可以通过Postman等工具实现。
Postman的操作方式为:
填写url路径,选择post方式 -> body 选择form-data 格式-> key选择file类型,选择文件,然后点击send就可以实现文件上传。
因为我们这里只进行文件上传,并不做其它的业务逻辑处理,因此我们只用在控制层实现即可。定义一个文件上传的接口,然后使用
MultipartFile类进行接收即可。
代码如下:
@Controller
public class FileUploadController {

@Value("${filePath}")
private String filePath;

@GetMapping("/upload")
public String uploading() {
//跳转到 templates 目录下的 uploading.html
return "uploading";
}

//处理文件上传
@PostMapping("/uploading")
public @ResponseBody String uploading(@RequestParam("file") MultipartFile file,
HttpServletRequest request) {
try {
uploadFile(file.getBytes(), filePath, file.getOriginalFilename());
} catch (Exception e) {
e.printStackTrace();
System.out.println("文件上传失败!");
return "uploading failure";
}
System.out.println("文件上传成功!");
return "uploading success";
}

public void  uploadFile(byte[] file, String filePath, String fileName) throws Exception {
File targetFile = new File(filePath);
if(!targetFile.exists()){
targetFile.mkdirs();
}
FileOutputStream out = new FileOutputStream(filePath+fileName);
out.write(file);
out.flush();
out.close();
}

}
注:上述的代码只是一个示例,实际的情况下请注意异常的处理!上述的流关闭理应放在finally中,实际为了方便才如此的编写。
App 入口
和普通的SpringBoot项目基本一样。
代码如下:
@SpringBootApplication
public class FileUploadApplication {

public static void main(String[] args)  {
SpringApplication.run(FileUploadApplication.class, args);
System.out.println("FileUploadApplication 程序启动成功!");
}
}
功能测试
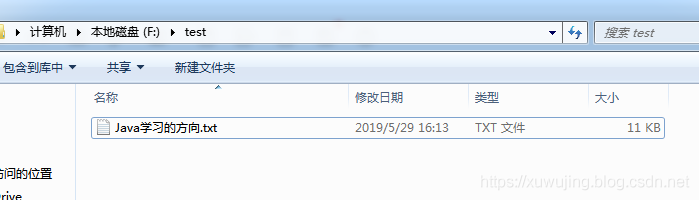
我们成功启动该程序之后,在浏览器上输入:
http://localhost:8182/upload,然后选择一个文件进行上传,最后我们再到
F:/test/路径下查看是否有该文件。
示例图如下:


使用Postman上传的示例图:
最后说明一下,如果文件重复上传,后面上传的文件会替换掉之前的那个文件。
SpringBoot 邮件发送
说明:如果想直接获取工程那么可以直接跳到底部,通过链接下载工程代码。
开发准备
环境要求
JDK:1.8
SpringBoot:1.5.9.RELEASE
首先还是Maven的相关依赖:
pom.xml文件如下:
<properties>
<project.build.sourceEncoding>UTF-8</project.build.sourceEncoding>
<java.version>1.8</java.version>
<maven.compiler.source>1.8</maven.compiler.source>
<maven.compiler.target>1.8</maven.compiler.target>
</properties>
<parent>
<groupId>org.springframework.boot</groupId>
<artifactId>spring-boot-starter-parent</artifactId>
<version>1.5.9.RELEASE</version>
<relativePath />
</parent>
<dependencies>
<!-- Spring Boot Web 依赖 核心 -->
<dependency>
<groupId>org.springframework.boot</groupId>
<artifactId>spring-boot-starter-web</artifactId>
</dependency>
<!-- Spring Boot Test 依赖 -->
<dependency>
<groupId>org.springframework.boot</groupId>
<artifactId>spring-boot-starter-test</artifactId>
<scope>test</scope>
</dependency>
<!-- Spring Boot thymeleaf 模板 -->
<dependency>
<groupId>org.springframework.boot</groupId>
<artifactId>spring-boot-starter-thymeleaf</artifactId>
</dependency>
<dependency>
<groupId>org.springframework.boot</groupId>
<artifactId>spring-boot-starter-mail</artifactId>
</dependency>
<dependency>
<groupId>org.springframework</groupId>
<artifactId>spring-context-support</artifactId>
</dependency>

</dependencies>
然后就是application.properties的文件配置,这里我们需要根据自己的实际情况进行填写。如下述的配置文件示例中,个人使用的是qq邮箱,因此
spring.mail.host配置的是
smtp.qq.com。下述的示例中,只需填写个人邮箱的账号和密码即可。如果出现了535 错误,则需要该邮箱开启POP3/SMTP服务,并且使用授权码替换密码进行发送。
application.properties:
server.port = 8182
spring.mail.host=smtp.qq.com
spring.mail.username=xxx@qq.com
spring.mail.password=xxx
spring.mail.default-encoding=UTF-8
spring.mail.properties.mail.smtp.auth=true
spring.mail.properties.mail.smtp.starttls.enable=true
spring.mail.properties.mail.smtp.starttls.required=true
代码编写
SpringBoot这块已经集成了mail邮件发送的功能,我们引入相关架包之后,只需使用
JavaMailSender这个类中的send方法即可完成邮件的发送。如果还想发送静态资源和附件的邮件,在
JavaMailSender这个类中的方法也可以实现。如果想使用自定义的模板内容发送的话,则需要使用
TemplateEngine该类中的方法。
在我们使用邮件发送的时候,这四样最为重要,发件人、收件人、发送主题和发送的消息。因此我们可以根据这四样来创建一个简答的邮件实体类,方便进行相关的业务处理。
实体类代码
代码如下:
public class Mail {

/** 发送者*/
private String sender;

/** 接受者  */
private String receiver;

/** 主题 */
private String subject;

/** 发送 消息*/
private String text;

//getter 和 setter 略
}
这里我们还是定义接口来进行邮件的发送,我们发送邮件的时候依旧只需要知道发件人、收件人、发送主题和发送的消息这四点就可以了,其余的可以在代码中完成。这里我们就简单的定义几个接口,用于实现上述的要求
控制层代码:
代码如下:
@RestController
@RequestMapping("/api/mail")
public class MailController {
private static Logger LOG=LoggerFactory.getLogger(MailController.class);

@Autowired
private JavaMailSender mailSender;

@Autowired
private TemplateEngine templateEngine;
/*
* 发送普通邮件
*/
@PostMapping("/sendMail")
public String sendMail(@RequestBody Mail mail) {
SimpleMailMessage message = new SimpleMailMessage();
message.setFrom(mail.getSender());
message.setTo(mail.getReceiver());
message.setSubject(mail.getSubject());
message.setText(mail.getText());
mailSender.send(message);
LOG.info("发送成功!");
return "发送成功!";
}

/*
*  发送附件
*/
@PostMapping("/sendAttachments")
public String sendAttachmentsMail(@RequestBody Mail mail) throws MessagingException  {

MimeMessage mimeMessage = mailSender.createMimeMessage();
MimeMessageHelper helper = new MimeMessageHelper(mimeMessage, true);
helper.setFrom(mail.getSender());
helper.setTo(mail.getReceiver());
helper.setSubject(mail.getSubject());
helper.setText(mail.getText());
FileSystemResource file = new FileSystemResource(new File("1.png"));
helper.addAttachment("附件.jpg", file);
mailSender.send(mimeMessage);
return "发送成功!";

}

/*
* 发送文件
*/
@PostMapping("/sendInlineMail")
public String sendInlineMail(@RequestBody Mail mail) throws Exception {

MimeMessage mimeMessage = mailSender.createMimeMessage();

MimeMessageHelper helper = new MimeMessageHelper(mimeMessage, true);
helper.setFrom(mail.getSender());
helper.setTo(mail.getReceiver());
helper.setSubject(mail.getSubject());
//这里的text 是html
helper.setText(mail.getText(), true);
FileSystemResource file = new FileSystemResource(new File("1.png"));
helper.addInline("文件", file);
mailSender.send(mimeMessage);
return "发送成功!";
}

/*
* 发送模板
*/
@PostMapping("/sendTemplateMail")
public void sendTemplateMail(@RequestBody Mail mail) throws Exception {

MimeMessage mimeMessage = mailSender.createMimeMessage();

MimeMessageHelper helper = new MimeMessageHelper(mimeMessage, true);
helper.setFrom(mail.getSender());
helper.setTo(mail.getReceiver());
helper.setSubject(mail.getSubject());

//创建邮件正文
Context context = new Context();
context.setVariable("id", "1");
context.setVariable("name", "xuwujing");
String emailContent = templateEngine.process("emailTemplate", context);
helper.setText(emailContent, true);
mailSender.send(mimeMessage);
}

}
App 入口
和普通的SpringBoot项目基本一样。
代码如下:
@SpringBootApplication
public class MailApp
{
public static void main( String[] args )
{
SpringApplication.run(MailApp.class, args);
System.out.println("MailApp启动成功!");
}
}
功能测试
我们成功启动该程序之后,我们使用Postman工具进行测试。
使用POST方式进行请求
POST http://localhost:8182/api/mail/sendMail
Body参数为:
{
"sender":"xxx@qq.com",
"receiver":"xxx@qq.com",
"subject":"测试主题",
"text":"测试消息"
}
注:当然这里的参数填写你自己的邮箱即可!
返回参数为:
发送成功!
示例图:

可以看到邮件已经发送成功了!
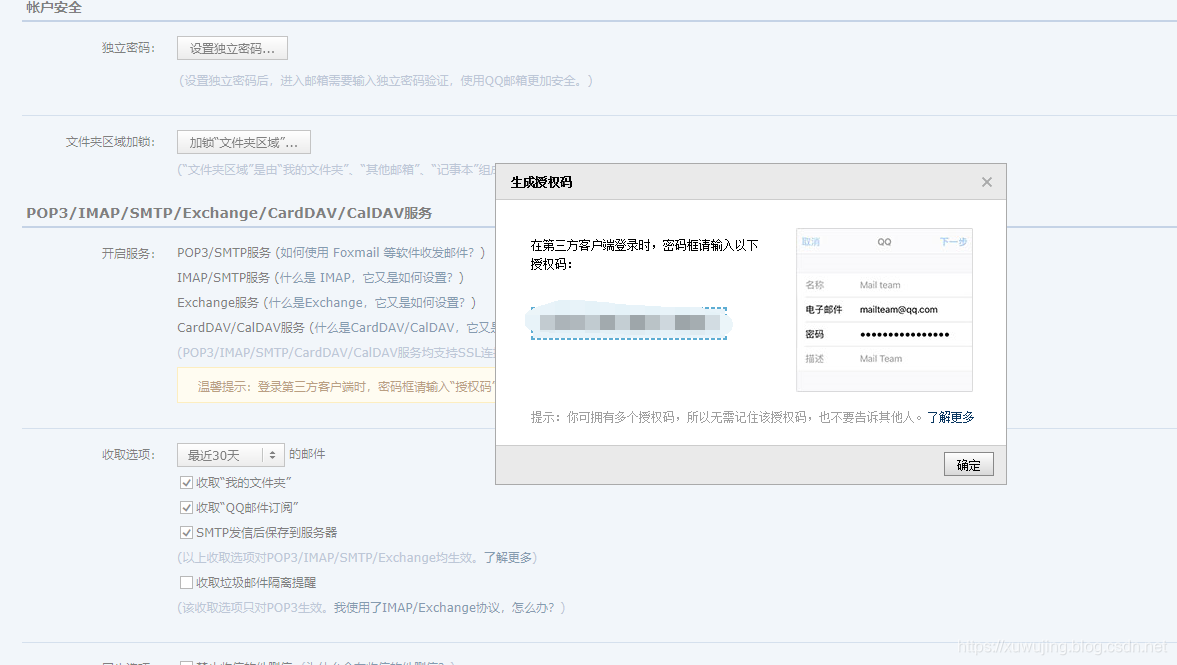
有的同学可能不知道授权码如何生成,这里我就用QQ邮箱生成授权码的一张示例图来说明。
示例图:
其它
关于SpringBoot项目实现文件上传和邮件发送的功能的文章就讲解到这里了,如有不妥,欢迎指正!
项目地址
SpringBoot实现文件上传的项目工程地址:
https://github.com/xuwujing/springBoot-study/tree/master/springboot-fileUpload
SpringBoot实现邮件发送的项目工程地址:
https://github.com/xuwujing/springBoot-study/tree/master/springboot-mail
SpringBoot整个集合的地址:
https://github.com/xuwujing/springBoot-study
SpringBoot整合系列的文章
音乐推荐
推荐一首在静下心来看书的纯音乐!
原创不易,如果感觉不错,希望给个推荐!您的支持是我写作的最大动力!
版权声明:
作者:虚无境
博客园出处:http://www.cnblogs.com/xuwujing
CSDN出处:http://blog.csdn.net/qazwsxpcm
个人博客出处:http://www.panchengming.com

- SpringBoot 简单文件上传实现以及jar包方式运行项目
- 基于SpringBoot上传任意文件功能的实现
- spring boot 实际应用(三)发送邮件实现
- ActiveMQ入门系列之应用:Springboot+ActiveMQ+JavaMail实现异步邮件发送
- SpringBoot下文件上传与下载的实现
- SpringBoot中发送QQ邮件功能的实现代码
- SpringBoot + SFTP 实现文件上传与下载实战
- SpringBoot下文件上传与下载的实现
- spring boot+angularjs实现文件上传
- Springboot项目关于上传文件的大小限制
- 前台:layui 后台:springboot(MultipartFile)实现多文件上传
- SpringBoot+ACE 实现文件上传
- springboot+jquery实现文件异步上传——浅谈SOA
- SpringBoot下文件上传与下载的实现
- springboot和fastdfs实现文件ajax上传
- springboot+bootstrap fileupinput 插件实现文件上传
- Java Springboot结合FastDFS实现文件上传以及根据图片url将图片上传至图片服务器
- Spring Boot项目实现下载项目根目录下指定目录(doc)里的文件
- spring boot 实现文件上传和下载,以及多文件上传
- 【JAVA-OSS】如何在spring-boot项目中使用oss上传下载文件