微信小程序人脸识别功能代码实例
2019-05-08 07:01
645 查看
前几天偶然看见一个人脸识别的小程序demo,觉得很有趣下载下来想玩玩,结果只是一个框架而已用不了的,花了点时间完善一下
吐槽一下wx.uploadFile这个接口,真是个大坑,最开始调用时候,我以为它和同期的wx.downloadFile一样,只需要填入必须的参数就可以用,结果还是要配合后台php的
首先,upload这个接口的url和request一样指的是php的路径,而不是download一样文件路径
其次,我在最开始一直没弄懂这个"name"到底应该填什么,上传功能不好用我一直觉得是"name"的原因,官方对于name给的解释很迷,这里我就给个结论,大家不要纠结这个属性,直接写file就好,图片属性是能用的
最后,人脸识别功能的功能本身是第三方提供的,比如我用的就是阿里云的人脸识别功能,不到一分钱一张图片充值一块钱就可以玩的很嗨
那么,上代码,我的代码基本就是网上的demo+自己修改
首先是wxml
<view class="container">
<view class="userinfo">
<image class="userinfo-avatar" mode="aspectFit" src="{{tempFilePaths}}" background-size="cover"></image>
<text class="userinfo-tips">{{userInfo.tips}}</text>
</view>
<view class="usermotto">
<button class="button" type="primary" bindtap="chooseimage">{{motto}}</button>
</view>
</view>
然后js代码
var app = getApp()
Page({
data: {
motto: '上传靓照',
userInfo: {},
tempFilePaths: ''
},
chooseimage: function () {
var that = this;
wx.chooseImage({   //选择图片
count: 1,
sizeType: ['original', 'compressed'], // 可以指定是原图还是压缩图,默认二者都有
sourceType: ['album', 'camera'],
success: function (res) {
var tempFilePaths = res.tempFilePaths
that.setData({
tempFilePaths: tempFilePaths[0]
})
wx.uploadFile({   //上传图片
url: '', //这里是你php的路径!!
filePath: tempFilePaths[0],
name: 'file',
header: {
'content-type': 'multipart/form-data'
},
success: function (res) {
console.log("add success", res.data);
that.uploadImage(res.data);
wx.showToast({
title: "图片上传成功",
icon: 'success',
duration: 700
})
}
})
}
})
},
//事件处理函数
uploadImage: function(picName) {
var that = this
wx.showToast({
title: '鉴定中,请稍候',
icon: 'loading',
duration: 2000
})
wx.request({
url: '',        //这里是阿里云人脸识别功能php的路径
data: {
type: 0,
image_url: picName,
},
header: {
'Content-Type': 'application/json'
},
// filePath: tempFilePaths[0],
name: 'file',
success: function(res){
console.log(res.data)
wx.hideToast()
var data = res.data;
var sex = data.gender;
const genders = {
'Male': '基佬',
'Female': '小仙女'
}
if(data.face_num == 0){
that.setData({
userInfo:{
tips:'未检测到人脸'
}
})
return
} else {
if (sex == 0) {
that.setData({
userInfo: {
tips: data.face_num + '位' + data.age + '岁的' + genders.Female
}
})
} else {
that.setData({
userInfo: {
tips: data.face_num + '位' + data.age + '岁的' + genders.Male
}
})
}
return
}
}
})
},
onLoad: function () {
console.log('onLoad');

},
onShareAppMessage: function () {

}
})
最后上php
首先是阿里云人脸识别功能代码
<?php
$akId = "";
$akSecret = "";
$image_url = "";
//更新api信息
$url = "https://dtplus-cn-shanghai.data.aliyuncs.com/face/attribute";
$content = array(
'type' => 0,
'image_url' => $image_url
);
$options = array(
'http' => array(
'header' => array(
'accept'=> "application/json",
'content-type'=> "application/json",
'date'=> gmdate("D, d M Y H:i:s \G\M\T"),
'authorization' => ''
),
'method' => "POST", //可以是 GET, POST, DELETE, PUT
'content' => json_encode($content)//如有数据,请用json_encode()进行编码
)
);
$http = $options['http'];
$header = $http['header'];
$urlObj = parse_url($url);
if(empty($urlObj["query"]))
$path = $urlObj["path"];
else
$path = $urlObj["path"]."?".$urlObj["query"];
$body = $http['content'];
if(empty($body))
$bodymd5 = $body;
else
$bodymd5 = base64_encode(md5($body,true));
$stringToSign = $http['method']."\n".$header['accept']."\n".$bodymd5."\n".$header['content-type']."\n".$header['date']."\n".$path;
$signature = base64_encode(
hash_hmac(
"sha1",
$stringToSign,
$akSecret, true));
$authHeader = "Dataplus "."$akId".":"."$signature";
$options['http']['header']['authorization'] = $authHeader;
$options['http']['header'] = implode(
array_map(
function($key, $val){
return $key.":".$val."\r\n";
},
array_keys($options['http']['header']),
$options['http']['header']));
$context = stream_context_create($options);
$file = file_get_contents($url, false, $context );
echo($file);
?>
然后是后台图片上传服务器功能,这里的代码也是我参考大佬,然后自己修改的【侵删】
<?php
date_default_timezone_set("Asia/Suzhou"); //设置时区
$code = $_FILES['file'];//获取小程序传来的图片
if(is_uploaded_file($_FILES['file']['tmp_name'])) {
//把文件转存到你希望的目录(不要使用copy函数)
$uploaded_file=$_FILES['file']['tmp_name'];
$username = "image";
//我们给每个用户动态的创建一个文件夹
$user_path=$_SERVER['DOCUMENT_ROOT']."/WeChatphp/".$username;  //  DOCUMENT_ROOT是你域名配置的根目录,后面的目录可自己调整

//判断该用户文件夹是否已经有这个文件夹
if(!file_exists($user_path)) {
mkdir($user_path);
}
$file_true_name=$_FILES['file']['name'];
$move_to_file_1 = time().rand(1,1000)."-".date("Y-m-d").substr($file_true_name,strrpos($file_true_name,"."));
$move_to_file=$user_path."/".$move_to_file_1;//strrops($file_true,".")查找“.”在字符串中最后一次出现的位置
if(move_uploaded_file($uploaded_file,iconv("utf-8","gb2312",$move_to_file))) {
echo $move_to_file_1;
} else {
echo "上传失败".date("Y-m-d H:i:sa");

}
} else {
echo "上传失败".date("Y-m-d H:i:sa");
}
?>
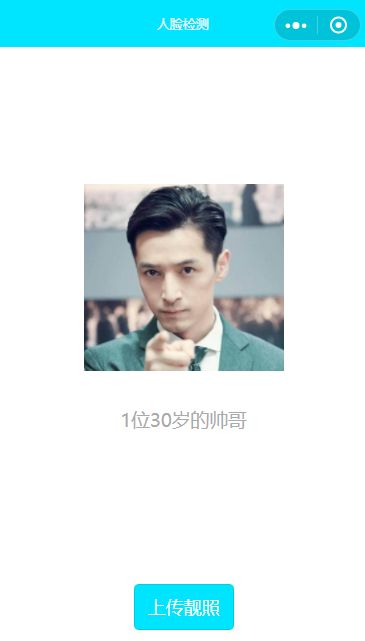
人脸识别的功能就完成了,最后上效果图,帅气的我胡,打call
以上所述是小编给大家介绍的微信小程序人脸识别功能详解整合,希望对大家有所帮助,如果大家有任何疑问请给我留言,小编会及时回复大家的。在此也非常感谢大家对脚本之家网站的支持!
您可能感兴趣的文章:

相关文章推荐
- 微信小程序实现即时通信聊天功能的实例代码
- 微信小程序实现人脸识别登陆的示例代码
- PHP实现微信小程序人脸识别刷脸登录功能
- 微信小程序手机号码验证功能的实例代码
- 微信小程序实现之手势锁功能实例代码
- PHP实现微信小程序人脸识别刷脸登录功能
- 微信小程序下拉框功能的实例代码
- 微信小程序实现简单搜索功能含c#后台解析和部分代码
- 微信小程序 蓝牙的实现实例代码
- 微信小程序底部功能栏的实现代码
- 微信小程序 canvas API详解及实例代码
- 微信小程序 WXDropDownMenu组件详解及实例代码
- 微信小程序车牌号码模拟键盘输入功能的实现代码
- 微信小程序 video组件详解及实例代码
- 微信小程序获取微信运动步数的实例代码
- 微信小程序 仿猫眼实现实例代码
- 微信小程序收藏功能的实现代码
- 微信小程序上传图片到服务器实例代码
- python 调用海康linux下demo的可执行程序,设置回调,实现人脸识别 以及实现抓拍功能