Android SQLite数据库的简单理解与基本使用,增删查改并列表显示数据
一、SQLite 数据库简介
SQLite由D.Richard Hipp 于2000年开发的高性能的、轻量级的关系数据库,以非常可靠而著称。
SQLite文件格式是稳定的,跨平台的、向后兼容的,开发人员承诺至少在2050年以前保持这种格式。
SQLite数据库是一个进程内库,它实现了一个独立的、无服务器的、零配置的事务性SQL数据库引擎。
SQLite数据库没有单独的服务器进程。直接读写普通磁盘文件。
二、SQLite数据库优点
-
不需要单独的服务器进程或者操作的系统(无服务器)
-
自给自足,不需要添加依赖;也不需要配置,不需要安装或者管理
-
一个完整的 SQLite 是存储在一个单一的跨平台的磁盘文件,并支持多种操作系统
-
隔离性,全部在一个文件夹系统
-
安全性,多个进程可以在同一时间内从同一数据库读取数据,但只要一个可以写入数据
-
SQLite 非常小,轻量级的,完全配置时小于400kib
-
SQLite 支持 SQL92(SQL2)标准的大多数查询语言的功能
-
SQLite 使用 ANSI-C 编写的,并提供了简单和易于使用的 API
-
接口,SQLite 数据库为 C、JAVA、PHP、Python 等多种语言设置API 接口,所有应用程序都必须通过接口来访问 SQLite 数据库
其流程为:接口 ——> 编译器 ——> 数据库引擎 ——> 后台 ——> 数据库

编译器-----编译器由词法分析、语法分析和中间代码生成三个模块组成。其中,词法分析模块和语法分模块负
责检查SQL语句的语法,然后把生成的语法树传递给中间代码生成模块。中间代码生成模块负责生成SQLite引擎可
以识别的中间代码。
数据库引擎-----为SQLite数据库核心,负责运行中间代码,指挥数据库的具体操作。
后台-----由B数,页缓存和系统调用三个模块组成,其中,B数负责维护索引,页缓存负责页面数据的传送,系
统调用负责和操作系统的交互,最终实现数据库的访问。
三、SQLite数据库的相关命令
SQLite 命令
与关系数据库进行交互的标准 SQLite 命令类似于 SQL。命令包括 CREATE、SELECT、INSERT、UPDATE、DELETE 和 DROP。这些命令基于它们的操作性质可分为以下几种:
DDL - 数据定义语言
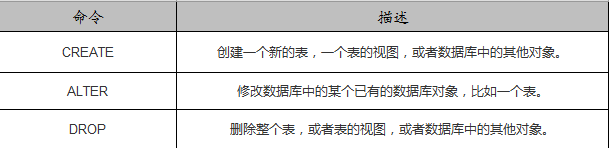
DML - 数据操作语言
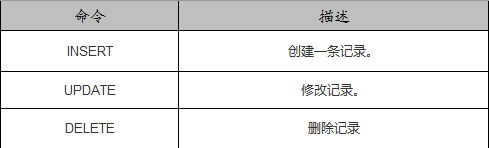
DQL - 数据查询语言

四、SQLite数据库的简单使用
首先我们需要新建一个类继承 SQLiteOpenHelper ,然后重写里面的两个方法 onCreate() 和 onUpgrade()。
onCreate() ----- 在第一次创建表格时调用;
onUpgrade() ----- 更新数据库版本时用。
public class DataBaseHelper extends SQLiteOpenHelper {

private Context context;
private static final String DATABASE_NAME = "mySqlite"; //数据库名称
public static int version = 1; //数据库版本

public DataBaseHelper(Context context) {
super(context, DATABASE_NAME, null, version);
this.context = context;
}

@Override
public void onCreate(SQLiteDatabase db) {
db.execSQL("CREATE TABLE IF NOT EXISTS "
+ DATABASE_NAME + "(_id INTEGER PRIMARY KEY AUTOINCREMENT, name TEXT, phone TEXT, address TEXT)");
}

@Override
public void onUpgrade(SQLiteDatabase db, int oldVersion, int newVersion) {

}
}
然后只需要实例化就可以创建我们需要的表格。
当要获取数据库对象时(通过 SQLiteOPenHelper 中自带的方法 getWriteableDatabase 或者getReadableDatabase),如果数据库文件不存在,这个类里面的 onCreate() 方法会被调用来创建一个新的数据库文件,如果数据库文件已经存在,那么 onCreate() 方法将不会被调用。
数据库增删查改和版本更新用法:
首先加入布局文件:
activity_main.xml
<?xml version="1.0" encoding="utf-8"?>
<LinearLayout xmlns:android="http://schemas.android.com/apk/res/android"
xmlns:tools="http://schemas.android.com/tools"
android:layout_width="match_parent"
android:layout_height="match_parent"
android:orientation="vertical">

<LinearLayout
android:layout_width="match_parent"
android:layout_height="wrap_content"
android:orientation="horizontal">

<EditText
android:id="@+id/edit_"
android:layout_width="match_parent"
android:layout_height="wrap_content"
android:layout_weight="1"
android:hint="增加、删除、查找" />

<Button
android:id="@+id/btn_create"
android:layout_width="match_parent"
android:layout_height="wrap_content"
android:layout_weight="1"
android:text="显示数据" />
</LinearLayout>

<LinearLayout
android:layout_width="match_parent"
android:layout_height="wrap_content"
android:orientation="horizontal">

<Button
android:id="@+id/btn_add"
android:layout_width="match_parent"
android:layout_height="wrap_content"
android:layout_weight="1"
android:text="增加一条数据并显示" />

<Button
android:id="@+id/btn_delete"
android:layout_width="match_parent"
android:layout_height="wrap_content"
android:layout_weight="1"
android:text="删除一条数据并显示" />

<Button
android:id="@+id/btn_search"
android:layout_width="match_parent"
android:layout_height="wrap_content"
android:layout_weight="1"
android:text="查找一条数据并显示" />
</LinearLayout>

<LinearLayout
android:layout_width="match_parent"
android:layout_height="wrap_content"
android:orientation="horizontal">

<EditText
android:id="@+id/edit_before"
android:layout_width="match_parent"
android:layout_height="wrap_content"
android:layout_weight="1"
android:hint="被替换的名字" />

<EditText
android:id="@+id/edit_after"
android:layout_width="match_parent"
android:layout_height="wrap_content"
android:layout_weight="1"
android:hint="新的名字" />

<Button
android:id="@+id/btn_update"
android:layout_width="match_parent"
android:layout_height="wrap_content"
android:layout_weight="1"
android:text="更新一条数据并显示" />
</LinearLayout>

<LinearLayout
android:layout_width="match_parent"
android:layout_height="wrap_content"
android:orientation="horizontal">

<Button
android:id="@+id/btn_update_sqlite"
android:layout_width="match_parent"
android:layout_height="wrap_content"
android:layout_weight="1"
android:text="更新数据库" />

<Button
android:id="@+id/btn_down_sqlite"
android:layout_width="match_parent"
android:layout_height="wrap_content"
android:layout_weight="1"
android:text="降级数据库" />
</LinearLayout>

<ListView
android:id="@+id/lv_data"
android:layout_width="match_parent"
android:layout_height="match_parent" />

</LinearLayout>
然后创建Helper类
public class DataBaseHelper extends SQLiteOpenHelper {
private Context context;
private static final String DATABASE_NAME = "mySqlite"; //数据库名称
public static int version = 1; //数据库版本

public DataBaseHelper(Context context) {
super(context, DATABASE_NAME, null, version);
this.context = context;
}

@Override
public void onCreate(SQLiteDatabase db) {
db.execSQL("CREATE TABLE IF NOT EXISTS "
+ DATABASE_NAME + "(_id INTEGER PRIMARY KEY AUTOINCREMENT, name TEXT, phone TEXT, address TEXT)");
}

@Override
public void onUpgrade(SQLiteDatabase db, int oldVersion, int newVersion) {
Log.e("----onUpgrade----", "----oldVersion-----" + oldVersion);
Log.e("----onUpgrade----", "----newVersion-----" + newVersion);
if (newVersion > oldVersion) {
//第一、先把t_message 未来的表,改名
String rename_sql = "alter table " + DATABASE_NAME + " rename to mySqliteTwo";
db.execSQL(rename_sql);
Log.e("onUpgrade", "1.改名成功");

//第二、建立新表结构
onCreate(db);
Log.e("onUpgrade", "2.建立1.0表结构成功");

//第三、把备份的数据,copy到 新建表
String sql_copy = "insert into " + DATABASE_NAME + " select _id, name, phone, address from mySqliteTwo";
db.execSQL(sql_copy);
Log.e("onUpgrade", "3.copy到用户数据到 1.0的表");

//第四、把备份表drop掉
String drop_sql = "drop table if exists mySqliteTwo";
db.execSQL(drop_sql);
Log.e("onUpgrade", "4.把备份表drop掉");

Toast.makeText(context, "数据库当前版本" + db.getVersion(), Toast.LENGTH_LONG).show();

}
}

@Override
public void onDowngrade(SQLiteDatabase db, int oldVersion, int newVersion) {
Log.e("--onDowngrade------", "---oldVersion-----" + oldVersion);
Log.e("--onDowngrade------", "---newVersion------" + newVersion);
if (oldVersion > newVersion) {
//降级版本,和升级版本方法类似
}
}

//查找所有数据
public Cursor findAll() {
StringBuilder builder = new StringBuilder("SELECT _id, name, phone, address FROM " + DATABASE_NAME);
return getReadableDatabase().rawQuery(builder.toString(), null);
}

//根据名字查找
public Cursor find(String name) {
StringBuilder builder = new StringBuilder("SELECT _id, name, phone, address FROM " + DATABASE_NAME + " where name =? ");
return getReadableDatabase().rawQuery(builder.toString(), new String[]{name});
}

//插入数据
public void insert(String name, String phone, String address) {
ContentValues values = new ContentValues();
values.put("name", name);
values.put("phone", phone);
values.put("address", address);
getWritableDatabase().insert(DATABASE_NAME, "name", values);
}

//	根据名字 删除数据
public void delete(String name) {
getWritableDatabase().delete(DATABASE_NAME, "name =? ", new String[]{name});
}

/根据名字更新数据
public void update(String beforeName, String name, String phone, String address) {
ContentValues values = new ContentValues();
values.put("name", name);
values.put("phone", phone);
values.put("address", address);
getWritableDatabase().update(DATABASE_NAME, values, "name =? ", new String[]{beforeName});
}

public String getName(Cursor cursor) {
return cursor.getString(1);
}

public String getPhone(Cursor cursor) {
return cursor.getString(2);
}

public String getAddress(Cursor cursor) {
return cursor.getString(3);
}
}
MainActivity.java为:
public class MainActivity extends AppCompatActivity implements View.OnClickListener {
private DataBaseHelper helper;
private ListView lv_data;
private Cursor cursor;
private MySqliteAdapter adapter;
private EditText edit_;
private EditText edit_before;
private EditText edit_after;

@Override
protected void onCreate(Bundle savedInstanceState) {
super.onCreate(savedInstanceState);
setContentView(R.layout.activity_main);

helper = new DataBaseHelper(this);

edit_ = findViewById(R.id.edit_);
edit_before = findViewById(R.id.edit_before);
edit_after = findViewById(R.id.edit_after);
lv_data = findViewById(R.id.lv_data);
findViewById(R.id.btn_create).setOnClickListener(this);
findViewById(R.id.btn_add).setOnClickListener(this);
findViewById(R.id.btn_delete).setOnClickListener(this);
findViewById(R.id.btn_search).setOnClickListener(this);
findViewById(R.id.btn_update).setOnClickListener(this);
findViewById(R.id.btn_update_sqlite).setOnClickListener(this);
findViewById(R.id.btn_down_sqlite).setOnClickListener(this);

}

private void show() {
cursor = helper.findAll();
adapter = new MySqliteAdapter(this, helper, cursor);
lv_data.setAdapter(adapter);
}

@Override
public void onClick(View v) {
String editStr = edit_.getText().toString();
switch (v.getId()) {
case R.id.btn_create:
show();
break;

case R.id.btn_add:
helper.insert(editStr, "1111", "AAAA" + editStr);
show();
break;

case R.id.btn_delete:
helper.delete(editStr);
show();
break;

case R.id.btn_search:
cursor = helper.find(editStr);
adapter = new MySqliteAdapter(this, helper, cursor);
lv_data.setAdapter(adapter);
break;

case R.id.btn_update:
String before = edit_before.getText().toString();
String after = edit_after.getText().toString();
helper.update(before, after, "2222", "BBBBB");
show();
break;

case R.id.btn_update_sqlite:
DataBaseHelper.version++;
helper = new DataBaseHelper(this);
show();
break;

case R.id.btn_down_sqlite:
DataBaseHelper.version--;
helper = new DataBaseHelper(this);
show();
break;
}
}
}
ListView显示数据时需要用 CursorAdapter 来逐条显示:
public class MySqliteAdapter extends CursorAdapter {

private Context context;
private DataBaseHelper helper;
private LayoutInflater mInflater;

public MySqliteAdapter(Context context, DataBaseHelper helper, Cursor c) {
super(context, c);
this.context = context;
this.helper = helper;
mInflater = LayoutInflater.from(context);
}

@Override
public View newView(Context context, Cursor cursor, ViewGroup parent) {
return mInflater.inflate(R.layout.layout_adapter, parent, false);
}

@Override
public void bindView(View view, Context context, Cursor cursor) {
TextView tv_name = view.findViewById(R.id.tv_name);
TextView tv_phone = view.findViewById(R.id.tv_phone);
TextView tv_address = view.findViewById(R.id.tv_address);

if (cursor == null) {
return;
}
tv_name.setText(helper.getName(cursor));
tv_phone.setText(helper.getPhone(cursor));
tv_address.setText(helper.getAddress(cursor));
}
}
按照以上步骤就可以简单实现 SQLite 增删查改 的使用。
值得注意的是,查询操作的SQL语句要用 rawQuery方法执行。
另:附上源码链接:
1aa70
http://www.sqlite.org/index.html
和相关介绍:https://developer.android.com/reference/android/database/sqlite/package-summary

- Android中sqlite基本使用1,(创建数据库,升级,对数据进行增、删、改、查)
- 【黑马Android】(04)数据库的创建和sql语句增删改查/LinearLayout展示列表数据/ListView的使用和BaseAdater/内容提供者创建
- 使用Android自带的数据库sqlite进行建库建表,并完成数据的增删改查
- Android sqlite数据库简单使用(修改某一条数据)
- Android中Spinner下拉列表(使用自定义Adapter实现,显示数据取自联系人数据库)
- 【黑马Android】(04)数据库的创建和sql语句增删改查/LinearLayout展示列表数据/ListView的使用和BaseAdater/内容提供者创建
- Android sqlite数据库简单使用(创建和插入,查询数据)
- Android greenDAO 数据库 简单学习之基本使用
- Android SQLite数据库增删改查操作的使用详解
- 2.非关系型数据库(Nosql)之mongodb:mongodb显示所有数据库,使用数据库,集合创建(显示和隐式创建),集合查询,初步数据的增删改查,分页
- VC++使用列表控件显示数据库中的数据(移动记录集指针遍历记录集)
- android数据库sqlite的基本使用
- 用类名做方法的返回值类型 在学习Java的初始阶段,很多同学使用基本数据类型定义变量和引用类型定义变量以及使用类名做方法的返回值类型常常不知所以。今天我以自己的解读方式和个人的理解作一个简单的解释,和
- Android应用中使用ListView实现数据列表显示(传智播客视频笔记)
- Android 数据库SQLite的使用简单Demo
- 使用SQLiteHelper创建数据库并插入数据 分类: H1_ANDROID 2013-11-05 22:44 1398人阅读 评论(0) 收藏
- Android数据库SQLite的简单使用
- Android SQLite数据库增删改查操作的使用详解
- Android数据库的基本使用,增删改查!