手把手教你使用TypeScript开发Node.js应用
为什么要使用TypeScript?
为了减少代码编写过程中出现的错误,以及更好的维护你的项目,本文将手把手教你配置一个简单的开发环境来编写Node.js的应用程序,创建这样的一个开发环境有很多方式,这只是其中一种,希望对你有所帮助!

手把手教你使用TypeScript开发Node.js应用
首先配置package.json
因为要在项目中使用Webpack,所以首先得创建一个package.json文件,我们可以使用npm init来生成
{
"name": "start",
"version": "1.0.0",
"description": "",
"main": "index.js",
"scripts": {
"test": "echo "Error: no test specified" && exit 1"
},
"author": "",
"license": "ISC"
}
后面用到其他的在添加
开始
我们在项目的根目录创建一个src目录,添加一个main.js和information-logger.js文件,我们先使用Javascript来创建:
// src/information-logger.js
const os = require('os');
const { name, version} = require('../package.json');
module.exports = {
logApplicationInformation: () =>
console.log({
application: {
name,
version,
},
}),
logSystemInformation: () =>
console.log({
system: {
platform: process.platform,
cpus: os.cpus().length,
},
}),
};
// src/main.js
const informationLogger = require('./information-logger');
informationLogger.logApplicationInformation();
informationLogger.logSystemInformation();
我们先运行一下:node main.js(先到src目录下),打印了我的笔记本电脑的信息

Webpack
首先第一件事就是要配置Webpack的依赖项,记得用下面的命令,带上 -d,因为我们只在开发环境下
npm i -D webpack webpack-cli
我们没用到webpack-dev-server,安装完成后我们创建webpack.config.js的配置文件
'use strict';
module.exports = (env = {}) => {
const config = {
entry: ['./src/main.js'],
mode: env.development ? 'development' : 'production',
target: 'node',
devtool: env.development ? 'cheap-eval-source-map' : false,
};
return config;
};
最开始我们没那么多的配置需要配置。我们要使用它,先改一下package.json
“scripts”:{
“start”:“webpack --progress --env.development”,
“start :prod”:“webpack --progress”
},
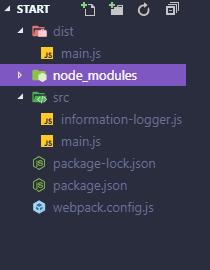
然后我们就可以通过任一命令(npm start)来构建应用程序,它会创建一个dist/main.js,我们可也使用webpack.config.js指定输出不同的名称,现在的目录结构应该如下
nodemon
为什么不用webpack-dev-server,是因为没法用,所以可以使用nodemon来解决,它可以在我们开发期间重新启动Node.js的应用程序,一样我们先来安装,依然需要 -d
npm i -D nodemon-webpack-plugin
然后重新配置webpack.config.js
// webpack.config.js
'use strict';
const NodemonPlugin = require('nodemon-webpack-plugin');
module.exports = (env = {}) => {
const config = {
entry: ['./src/main.js'],
mode: env.development ? 'development' : 'production',
target: 'node',
devtool: env.development ? 'cheap-eval-source-map' : false,
resolve: { // tells Webpack what files to watch.
modules: ['node_modules', 'src', 'package.json'],
},
plugins: [] // required for config.plugins.push(...);
};
if (env.nodemon) {
config.watch = true;
config.plugins.push(new NodemonPlugin());
}
return config;
};
Webpack 监视配置将在我们更改文件时重建应用程序,nodemon在我们构建完成重新启动应用程序,需要重新配置下package.json
"scripts": {
"start": "webpack --progress --env.development --env.nodemon",
"start:prod": "webpack --progress --env.nodemon",
"build": "webpack --progress --env.development",
"build:prod": "webpack --progress",
"build:ci": "webpack"
},
使用TypeScript
先安装依赖项
npm i -D typescript ts-loader @types/node@^10.0.0

ts-loader(ts加载器)
因为要用ts-loader Webpack插件来编译我们的TypeScript,所以得让Webpack知道我们是使用了ts-loader插件来处理TypeScript文件的,更新之前的webpack.config.js
// webpack.config.js
'use strict';
const NodemonPlugin = require('nodemon-webpack-plugin');
module.exports = (env = {}) => {
const config = {
entry: ['./src/main.ts'],
mode: env.development ? 'development' : 'production',
target: 'node',
devtool: env.development ? 'cheap-eval-source-map' : false,
resolve: {
// Tells Webpack what files to watch
extensions: ['.ts', '.js'],
modules: ['node_modules', 'src', 'package.json'],
},
module: {
rules: [
{
test: /.ts$/,
use: 'ts-loader',
},
],
},
plugins: [], // Required for config.plugins.push(...);
};
if (env.nodemon) {
config.watch = true;
config.plugins.push(new NodemonPlugin());
}
return config;
};
tsconfig.json
TypeScript的配置文件
// tsconfig.json
{
"compilerOptions": {
"target": "esnext",
"module": "esnext",
"moduleResolution": "node",
"lib": ["dom", "es2018"],
"allowSyntheticDefaultImports": true,
"noImplicitAny": true,
"noUnusedLocals": true,
"removeComments": true,
"resolveJsonModule": true,
"strict": true,
"typeRoots": ["node_modules/@types"]
},
"exclude": ["node_modules"],
"include": ["src/**/*.ts"]
}
然后更改下之前创建的js文件扩展名
// information-logger.ts
import os from 'os';
import { name, version } from '../package.json';
export class InformationLogger {
static logApplicationInformation(): void {
console.log({
application: {
name,
version,
},
});
}
static logSystemInformation(): void {
console.log({
system: {
platform: process.platform,
cpus: os.cpus().length,
},
});
}
}
// main.ts
import { InformationLogger } from './information-logger';
InformationLogger.logApplicationInformation();
InformationLogger.logSystemInformation();
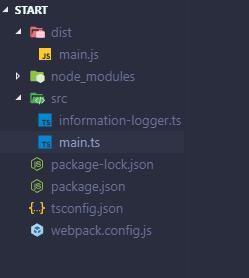
现在目录结构应该是这样的
总结
我们可以使用多种方式来创建TypeScript的Nodejs应用,不必拘泥于这一种,而且可能会有人并不赞同,因为TypeScript比纯Javascript更需要花费更多精力,不过在新项目中,你仍然可以尝试这种方式,如果你有什么好的建议,欢迎在评论区留下你的意见!
以上就是本文的全部内容,希望对大家的学习有所帮助,也希望大家多多支持脚本之家。
您可能感兴趣的文章:

- node.js开发中使用Node Supervisor实现监测文件修改并自动重启应用提高nodejs调试效率
- 使用node.js的开发框架express创建一个web应用
- 使用Node.js开发一个在线聊天应用——编写后台
- 使用React、Node.js、MongoDB、Socket.IO开发一个角色投票应用的学习过程(一)
- node.js开发中使用Node Supervisor实现监测文件修改并自动重启应用
- 使用Express开发node.js应用
- 使用HFC SDK for Node.js 开发 Hyperledger Fabric 客户端应用系统
- 使用 Node.js 开发基于 JavaScript 的 RESTful应用
- 使用React、Node.js、MongoDB、Socket.IO开发一个角色投票应用的学习过程(三)
- node.js开发中使用Node Supervisor实现监测文件修改并自动重启应用
- node.js开发中使用Node Supervisor实现监测文件修改并自动重启应用
- 使用 Node.js 开发基于 JavaScript 的 RESTful 应用
- node.js开发中使用Node Supervisor实现监测文件修改并自动重启应用
- 使用React、Node.js、MongoDB、Socket.IO开发一个角色投票应用的学习过程(二)
- 详解使用Typescript开发node.js项目(简单的环境配置)
- 使用node.js的开发框架express创建一个web应用
- 使用Visual Studio Code + Node.js搭建TypeScript开发环境
- 使用Typescript开发node.js项目——简单的环境配置
- 使用Node.js开发一个在线聊天应用——准备工作
- 详解如何使用node.js的开发框架express创建一个web应用