详解小程序设置缓存并且不覆盖原有数据
2019-04-15 18:02
465 查看
最近在写小程序的小项目,因为是刚上手小程序,这途中遇到了许多问题,所幸在自己的坚持不懈下基本都得到了解决,今天就记录一下怎么设置缓存数据并且不覆盖吧,如果有错误的地方麻烦大家指正,互相学习一下!
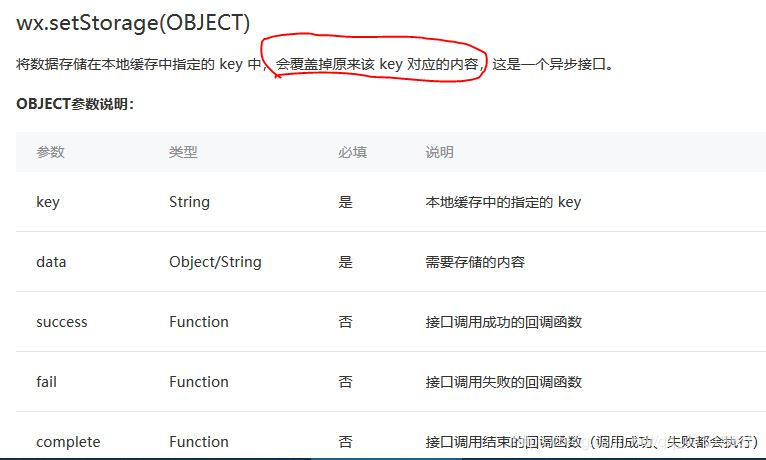
这是官方的关于缓存的说明,它会覆盖掉之前的内容。我还是直接上源码吧
这是writecomment.js文件
Page({
/**
* 页面的初始数据
*/
data: {
},
submit: function (event) {
var writecomment = event.detail.value.writecomment;
console.log(event);
var pages = getCurrentPages();
/***得到页面有两个,一个是总页面,一个是写的页面,我们需要的是总页面 */
var page = pages[2];
var commentlist = page.data.commentlist;
//commentlist是另一个页面设置的数组,这里是取得那个页面定义的commentlist
/***获取总页面data里面的数组 */
if (event.detail.value.writecomment != '') {
commentlist.push(writecomment); /***把新的内容放入数组中去,然后更新 */
page.setData({
commentlist: commentlist,
})
}
//这是缓存设置
wx.setStorage({
key: 'commentStorage',//key的值只是一个名称,可以自己设置
data: commentlist,
//data指的是我们要放入缓存的数值,如果是固定的数据要用“”括起来,如果是变量就直接放变量的值
})
console.log(commentlist);//这是为了更好观察我自己设置的输出语句,可以不用管
wx.navigateBack({}) /***点击完成后跳转回到上一个页面 */
},

onLoad: function (options) {
},
})
接下来是writecomment.wxml文件的代码
<!--pages/comment/writecomment/writecomment.wxml-->
<view class='write-group'>
<form bindsubmit='submit'>
<!-- 文本输入框 -->
<view class='textarea-position'>
<textarea name='writecomment' placeholder='请输入内容!' maxlength='-1' auto-height="true">
</textarea>
</view>
<!-- maxlength='-1'不限制输入字符长度,auto-height="true"输入框可以自动变化大小 -->

<view class='btn-position'>
<button type='primary' form-type='submit'>完成</button>
</view>
</form>
</view>
还有样式文件也一起放上来吧
//这是对应的样式文件
/* pages/comment/writecomment/writecomment.wxss */
/* 最外层样式 */
.write-group{
width: 100%;
height: 1254rpx;
}
/* 输入框层样式 */
.textarea-group{
padding: 10rpx;
width: 98%;
height: 85%;
overflow: scroll;
}
/* 提交表格样式 */
.form{
width: 100%;
height: 100%;
}
textarea {
cursor:auto;
width:95%;
height:150px;
display:block;
position:relative;
padding: 10rpx;
}

.chooseImg{
width:20%;
height: 70rpx;
}
.image{
width: 170rpx;
height: 50rpx;
}
.image-btn-group{
width: 200rpx;
height: 50rpx;
display: flex;
justify-content: space-between;
}
.image-btn{
width: 100rpx;
height: 100rpx;
display: flex;
justify-content: space-between;
}
.text{
font-size: 24rpx;
height: 50rpx;
width: 100rpx;
}
.textarea-position{
overflow: scroll;
height: 1050rpx;
width: 100%;
}
.btn-position{
display: fixed;
margin-bottom: 5rpx;
}
.title {
width: 100%;
height: 96rpx;
line-height: 96rpx;
font-size: 28rpx;
color: #989898;
}
.upload {
width: 100%;
margin-bottom: 30rpx;

}
.uploadImgBox {
width: 212rpx;
height: 144rpx;
margin-right: 33rpx;
margin-bottom: 10rpx;
position: relative;
background: #fff;
}
.uploadImgBox:nth-child(3n) {
margin-right: 0;
}
.uploadPhoto {
width: 212rpx;
height: 144rpx;
}
.closeImg {
width: 30rpx;
height: 30rpx;
border-radius: 50%;
position: absolute;
right: 5rpx;
top: 5rpx;
}

.service {
width: 100%;
height: 208rpx;
border-top: 1rpx solid #ece9e9;
border-bottom: 1rpx solid #ece9e9;
line-height: 30rpx;
font-size: 26rpx;
padding-top: 20rpx;
}
.service textarea {
width: 100%;
height: 100%;
}
接下来是另一个页面,里面有获取缓存的说明
// pages/comment/commentlist/commentlist.js
Page({
/**
* 页面的初始数据
*/
data: {
commentlist: [],//设置缓存的那个数组在这里定义的
},
writecomment: function (event) {
wx.navigateTo({
url: '/pages/comment/writecomment/writecomment',//在页面函数的按钮
})
},
/**
* 生命周期函数--监听页面加载
*/
onLoad: function (options) {
var that = this;
var commentlist = that.data.commentlist//取得commentlist
//获取缓存数据
wx.getStorage({
key: 'commentStorage',//这个key值要与writecomment.js里面设置的key一致
success: function (res) {
for (let i in res.data) {
that.data.commentlist.push(res.data[i])//这里是把缓存数据放入到数组commentlist 里面
};
that.setData({
commentlist: commentlist//刷新commentlist
})
},
})
that.setData({
options: options,
});
},
/**
* 生命周期函数--监听页面初次渲染完成
*/
onReady: function () {
},
/**
* 生命周期函数--监听页面显示
*/
onShow: function () {
},
/**
* 生命周期函数--监听页面隐藏
*/
onHide: function () {
},
/**
* 生命周期函数--监听页面卸载
*/
onUnload: function () {
},
/**
* 页面相关事件处理函数--监听用户下拉动作
*/
onPullDownRefresh: function () {
},
/**
* 页面上拉触底事件的处理函数
*/
onReachBottom: function () {
},
/**
* 用户点击右上角分享
*/
onShareAppMessage: function () {
}
})
commentlist.wxml文件
<!--pages/comment/commentlist/commentlist.wxml-->
<view class='p-list-group'>
<view class='p-list-group-more'>
<!-- 输出输入页面输入的内容 -->
<view class='p-list' wx:for='{{commentlist}}' wx:key="{{index}}">{{item}}</view>
</view>

<!-- 写计划按钮与搜索按钮 -->
<view class='cardclass'>
<button class='btn-search' open-type='' bindtap='search' style="background-image:url(/images/plan/icon-search-1.png);"> 搜索</button>
<!-- 写计划 -->
<button class='btn-write' open-type='primary' bindtap='writecomment' style="background-image:url(/images/plan/icon-pen-1.png);">评论 </button>
</view>
</view>
样式文件
/* pages/comment/commentlist/commentlist.wxss */
.p-list-group{
margin-right: 10rpx;
margin-left: 10rpx;
overflow: scroll;
width:98%;
right:1rpx;
}
.p-list-group-more{
right:1rpx;
overflow: scroll;
height:1000rpx;
width:100%;
margin-top: 10rpx;
}
.p-list{
text-overflow: ellipsis;/***文本太长显示省略号*/
overflow: scroll;
width:99%;
border: 1px solid #ccc;
margin-right: 10rpx;
margin-bottom: 20rpx;
height: 100rpx;
}
.btn-search{
position: fixed;
bottom: 5rpx;
width: 30%;
background-size: 45rpx 45rpx;
background-repeat:no-repeat;
}
.btn-write{
position: fixed;
bottom: 5rpx;
width: 30%;
background-size: 45rpx 45rpx;
background-repeat:no-repeat;
right:10rpx;
}
.cardclass{
display:flex;
font-size:18rpx;
justify-content: space-between;
bottom: 5rpx;
height:25rpx;
}
.image-list{
width:40rpx;
height:30%;
}
好啦,我做的基本就这样,代码有点多,关键就是wx.setStorage()和wx.getStorage(),为了方便我还是把两个页面完整代码全部放这里了
以上所述是小编给大家介绍的小程序设置缓存并且不覆盖原有数据详解整合,希望对大家有所帮助,如果大家有任何疑问请给我留言,小编会及时回复大家的。在此也非常感谢大家对脚本之家网站的支持!
您可能感兴趣的文章:

相关文章推荐
- 微信小程序本地缓存数据增删改查实例详解
- 微信小程序之数据缓存的实例详解
- 微信小程序学习笔记之本地数据缓存功能详解
- jQuery数据缓存方案详解:$.data()的使用
- 【OpenCV3学习笔记 】相机标定函数 calibrateCamera( ) 使用详解(附相机标定程序和数据)
- 微信小程序之数据缓存
- Petshop详解(五): petshop输出缓存设置
- 利用反射获得程序的缓存大小、应用程序大小、数据大小,利用反射清除缓存,全部清理
- android-系统设置中的,清理数据和清理缓存
- 微信小程序里为什么我设置了数据却不显示
- 详解浏览器缓存机制与Apache设置缓存
- 微信小程序 页面跳转和数据传递实例详解
- 栈区,堆区,全局区,文字常量区,程序代码区详解(程序中不同类型数据所在区)
- 使用TCP协议编写一个网络程序,设置服务器端的监听端口是8002,当与客户端建立连接后,服务器端向客户端发送数据“Hello, world”,客户端收到数据后打印输出。
- iOS ijkplayer 数据缓存过程 详解
- 织梦dedeCMS二次开发文档手册 程序目录详解以及数据表结构字段
- redis 一二事 - 设置过期时间,以文件夹形式展示key显示缓存数据
- 平面二维任意椭圆数据拟合算法推导及程序实现详解
- 微信小程序 数据访问实例详解
- 微信小程序url与token设置详解