Redis cluster集群:原理及搭建
1.为什么使用redis?
redis是一种典型的no-sql 即非关系数据库 像python的字典一样 存储key-value键值对 工作在memory中
所以很适合用来充当整个互联网架构中各级之间的cache 比如lvs的4层转发层 nginx的7层代理层
尤其是lnmp架构应用层如php-fpm或者是Tomcat到mysql之间 做一个cache 以减轻db的压力
因为有相当一部分的数据 只是简单的key-value对应关系,而且在实际的业务中常常在短时间内迅速变动
如果用关系数据库mysql之类存储 会大大增加对db的访问 导致db的负担很重 因为所有的require中的大部分最后都要汇聚到db
所以如果想要业务稳定 那么解决db的压力 就是关键 所以现在大部分的解决方案就是在db层之上的各级使用多级的no-sql
像memcache redis 等 来为db提供缓冲
2.为什么使用redis-cluster?
为了在大流量访问下提供稳定的业务,集群化是存储的必然形态
未来的发展趋势肯定是云计算和大数据的紧密结合 只有分布式架构能满足要求
如果没有集群化 何来的分布式?
3.顺带一提总结一波今天的redis原理之数据持久化
虽然redis这种no-sql一般都是作为cache来服务 但是如果完全没有数据可持久化的方法 那么显得有些单薄
就像memcache 由于这种no-sql是工作在memory的 那么由于memory的实体是ram
所以如果重启或者宕机 memory中的数据就全没了 数据的一致性的不到保障
但是 redis不同 redis有相对的数据持久化的方案 由两种方式构成 aof & rdb
aof就像关系数据库中的binlog一样 把每一次写操作以追加的形式记录在其中以文件的形式刷到磁盘里
并且可以使用不同的fsync策略 无fsync,每秒fsync,每次写的时候fsync.
使用默认的每秒fsync策略,Redis的性能依然很好(fsync是由后台线程进行处理的,主线程会尽力处理客户端请求)
一旦出现故障,最多丢失1秒的数据.
但是缺点也随之而来 那就是aof文件的大小会随着时间线性增长 一段时间之后 就会变得很大
如果要在一端以AOF的形式来恢复数据 那么由于AOF文件的巨大体积 可能会让进程如同假死一样 十分的慢
rdb则是一种快照机制
redis工作在内存中 rdb就是每隔一段时间 对内存中的数据做一次快照 保存在rdb文件中
而且redis的主从同步可以实现异步 也是由于rdb的机制 他在做快照时会fork出一个子进程 由子进程来做快照
父进程完全处理请求 毫不影响 很适合数据的备份
但是问题是 如果数据量很大的话 rdb它要保存一个完整的数据集 是一个大的工作 如果时间间隔设置的太短
那么严重影响redis的性能 但是按照常规设置的话 如5分钟一次 那么如果宕机或者重启 就会基于上次做rdb的时间
从而丢失分钟级的数据
point:在redis4.0的新特性中 采用了aof-rdb的混合方案来保障数据的持久性 但是官方的说法是还不成熟
是一个长期的工作 所以有待观察吧
4.redis集群实现方案:
关于redis的集群化方案 目前有三种
(1)Twitter开发的twemproxy
(2)豌豆荚开发的codis
(3)redis官方的redis-cluster
简介:twemproxy架构简单 就是用proxy对后端redis server进行代理 但是由于代理层的消耗性能很低 而且通常涉及多个key的操作都是不支持的 而且本身不支持动态扩容和透明的数据迁移 而且也失去维护 Twitter内部已经不使用了
redis-cluster是三个里性能最强大的 因为他使用去中心化的思想 使用hash slot方式 将16348个hash slot 覆盖到所有节点上 对于存储的每个key值 使用CRC16(KEY)&16348=slot 得到他对应的hash slot 并在访问key时就去找他的hash slot在哪一个节点上 然后由当前访问节点从实际被分配了这个hash slot的节点去取数据 节点之间使用轻量协议通信 减少带宽占用 性能很高 自动实现负载均衡与高可用 自动实现failover 并且支持动态扩展 官方已经玩到可以1000个节点 实现的复杂度低 总之个人比较喜欢这个架构 因为他的去中心化思想免去了proxy的消耗 是全新的思路
但是它也有一些不足 例如官方没有提供图形化管理工具 运维体验差 全手工数据迁移 并且自己对自己本身的redis命令支持也不完全等 但是这些问题 我觉得不能掩盖他关键的新思想所带来的的优势 随着官方的推进 这些问题应该都能在一定时间内得到解决 那么这时候去中心化思想带来的高性能就会表现出他巨大的优势
codis使用的也是proxy思路 但是做的比较好 是这两种之间的一个中间级 而且支持redis命令是最多的 有图形化GUI管理和监控工具 运维友好 这个过段时间会详细另外写出来原理 工作机制和搭建实现
Redis集群
基本介绍
Redis集群是一个可以在多个
Redis节点之间进行数据共享的设施
installation。
Redis集群不支持那些需要同时处理多个键的
Redis命令, 因为执行这些命令需要在多个
Redis节点之间移动数据, 并且在高负载的情况下, 这些命令将降低
Redis集群的性能, 并导致不可预测的行为。
Redis集群通过分区
partition来提供一定程度的可用性
availability: 即使集群中有一部分节点失效或者无法进行通讯, 集群也可以继续处理命令请求。
Redis集群提供了以下两个好处:
- 将数据自动切分
split
到多个节点的能力。当集群中的一部分节点失效或者无法进行通讯时, 仍然可以继续处理命令请求的能力。
集群原理
redis-cluster架构图
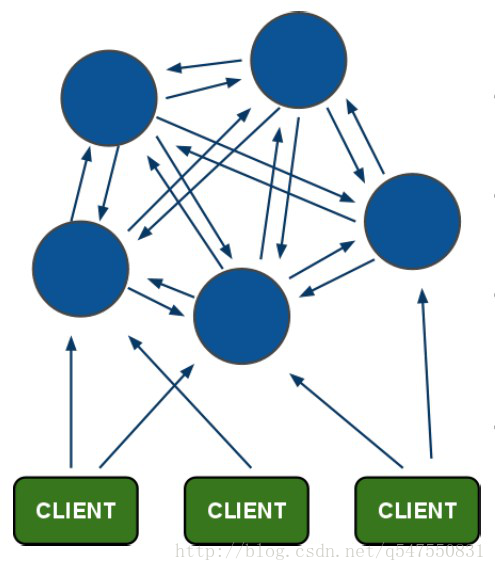
所有的
redis
节点彼此互联(PING
-PONG
机制),内部使用二进制协议优化传输速度和带宽。节点的
fail
是通过集群中超过半数的节点检测失效时才生效。客户端与
redis
节点直连,不需要中间proxy
层.客户端不需要连接集群所有节点,连接集群中任何一个可用节点即可。redis-cluster
把所有的物理节点映射到[0-16383
]slot
上,cluster
负责维护node
<->slot
<->value
Redis集群中内置了
16384个哈希槽,当需要在
Redis集群中放置一个
key-value时,
redis先对
key使用
crc16算法算出一个结果,然后把结果对
16384求余数,这样每个
key都会对应一个编号在
0-16383之间的哈希槽,
redis会根据节点数量大致均等的将哈希槽映射到不同的节点
redis-cluster投票:容错
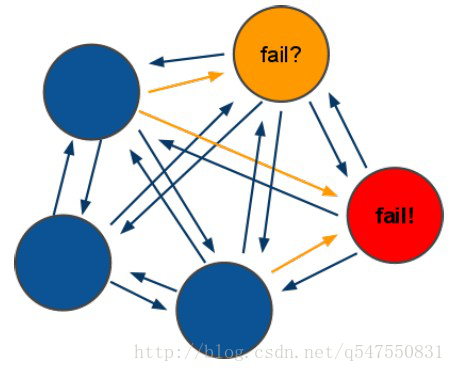
投票过程是集群中所有
master
参与,如果半数以上master
节点与master
节点通信超时(cluster-node-timeout
),认为当前master
节点挂掉.什么时候整个集群不可用(
cluster_state:fail
)?- 如果集群任意
master
挂掉,且当前master
没有slave
.集群进入fail
状态,也可以理解成集群的slot
映射[0-16383
]不完整时进入fail状态.redis-3.0.0.rc1
加入cluster-require-full-coverage
参数,默认关闭,打开集群兼容部分失败.- 如果集群超过半数以上
master
挂掉,无论是否有slave
,集群进入fail
状态.
Redis集群搭建
Redis单机版的安装见博客《redis入门——安装篇》,安装好之后,将
redis复制成
6份,注意要将
.rdb和
.aof后缀的文件删除,如果有的话。
Ruby环境
使用
- yum -y install ruby
- yum -y install rubygems
网上下载
redis-3.0.0.gem,执行
gem install redis-3.0.0.gem安装。
redis配置文件修改
现在已经准备好了,
6份干净的
redis,如下所示
- [root@localhost redis-cluster]# pwd
- /usr/local/redis/redis-cluster
- [root@localhost redis-cluster]# ll
- total 72
- drwxr-xr-x 2 root root 4096 Nov 2 00:17 redis1
- drwxr-xr-x 2 root root 4096 Nov 2 00:25 redis2
- drwxr-xr-x 2 root root 4096 Nov 2 00:25 redis3
- drwxr-xr-x 2 root root 4096 Nov 2 00:25 redis4
- drwxr-xr-x 2 root root 4096 Nov 2 00:25 redis5
- drwxr-xr-x 2 root root 4096 Nov 2 00:25 redis6
- -rwxr-xr-x 1 root root 48141 Nov 2 00:16 redis-trib.rb
- [root@localhost redis-cluster]#
redis源文件
src目录下的
redis-trib.rb文件拷贝过来了。
redis-trib.rb这个文件是
redis集群的管理文件,
ruby脚本。
将六个节点的
redis.conf配置文件按照如下进行修改
- ################################ GENERAL #####################################
- # By default Redis does not run as a daemon. Use 'yes' if you need it.
- # Note that Redis will write a pid file in /var/run/redis.pid when daemonized.
- daemonize yes
- # Accept connections on the specified port, default is 6379.
- # If port 0 is specified Redis will not listen on a TCP socket.
- port *
- ################################ REDIS CLUSTER ###############################
- #
- # ++++++++++++++++++++++++++++++++++++++++++++++++++++++++++++++++++++++++++++
- # WARNING EXPERIMENTAL: Redis Cluster is considered to be stable code, however
- # in order to mark it as "mature" we need to wait for a non trivial percentage
- # of users to deploy it in production.
- # ++++++++++++++++++++++++++++++++++++++++++++++++++++++++++++++++++++++++++++
- #
- # Normal Redis instances can't be part of a Redis Cluster; only nodes that are
- # started as cluster nodes can. In order to start a Redis instance as a
- # cluster node enable the cluster support uncommenting the following:
- #
- cluster-enabled yes
PS:我这里是使用一台主机,所以我将六个节点的端口号修改为
7001-
7006
编写集群启动脚本和停止脚本
启动脚本start-all.sh
- cd redis1
- ./redis-server redis.conf
- cd ..
- cd redis2
- ./redis-server redis.conf
- cd ..
- cd redis3
- ./redis-server redis.conf
- cd ..
- cd redis4
- ./redis-server redis.conf
- cd ..
- cd redis5
- ./redis-server redis.conf
- cd ..
- cd redis6
- ./redis-server redis.conf
- cd ..
停止脚本stop-all.sh
- ./redis1/redis-cli -p 7001 shutdown
- ./redis1/redis-cli -p 7002 shutdown
- ./redis1/redis-cli -p 7003 shutdown
- ./redis1/redis-cli -p 7004 shutdown
- ./redis1/redis-cli -p 7005 shutdown
- ./redis1/redis-cli -p 7006 shutdown
PS:两个脚本都放在如下所属目录
- [root@localhost redis-cluster]# pwd
- /usr/local/redis/redis-cluster
- [root@localhost redis-cluster]# ll
- total 80
- drwxr-xr-x 2 root root 4096 Nov 2 00:52 redis1
- drwxr-xr-x 2 root root 4096 Nov 2 00:51 redis2
- drwxr-xr-x 2 root root 4096 Nov 2 00:53 redis3
- drwxr-xr-x 2 root root 4096 Nov 2 00:53 redis4
- drwxr-xr-x 2 root root 4096 Nov 2 00:53 redis5
- drwxr-xr-x 2 root root 4096 Nov 2 00:53 redis6
- -rwxr-xr-x 1 root root 48141 Nov 2 00:16 redis-trib.rb
- -rw-r--r-- 1 root root 252 Nov 2 00:55 start-all.sh
- -rw-r--r-- 1 root root 216 Nov 2 00:57 stop-all.sh
- [root@localhost redis-cluster]#
修改权限
[root@localhost redis-cluster]# chmod -u+x start-all.sh stop-all.sh[/code]
启动节点
- [root@localhost redis-cluster]# ./start-all.sh
- [root@localhost redis-cluster]# ps aux | grep redis
- root 2924 0.8 0.1 33932 2048 ? Ssl Nov01 3:53 ./redis-server *:6379 [cluster]
- root 11924 0.0 0.1 33936 1948 ? Ssl 01:01 0:00 ./redis-server *:7001 [cluster]
- root 11928 0.0 0.1 33936 1952 ? Ssl 01:01 0:00 ./redis-server *:7002 [cluster]
- root 11932 0.0 0.1 33936 1948 ? Ssl 01:01 0:00 ./redis-server *:7003 [cluster]
- root 11936 0.0 0.1 33936 1952 ? Ssl 01:01 0:00 ./redis-server *:7004 [cluster]
- root 11940 0.0 0.1 33936 1952 ? Ssl 01:01 0:00 ./redis-server *:7005 [cluster]
- root 11944 0.0 0.1 33936 1948 ? Ssl 01:01 0:00 ./redis-server *:7006 [cluster]
- root 11948 0.0 0.0 4360 748 pts/2 S+ 01:01 0:00 grep redis
- [root@localhost redis-cluster]#
执行创建集群命令
- [root@localhost redis-cluster]# pwd
- /usr/local/redis/redis-cluster
- [root@localhost redis-cluster]# ./redis-trib.rb create --replicas 1 192.168.37.131:7001 192.168.37.131:7002 192.168.37.131:7003 192.168.37.131:7004 192.168.37.131:7005 192.168.37.131:7006
成功启动信息
- >>> Creating cluster
- Connecting to node 192.168.37.131:7001: OK
- Connecting to node 192.168.37.131:7002: OK
- Connecting to node 192.168.37.131:7003: OK
- Connecting to node 192.168.37.131:7004: OK
- Connecting to node 192.168.37.131:7005: OK
- Connecting to node 192.168.37.131:7006: OK
- >>> Performing hash slots allocation on 6 nodes...
- Using 3 masters:
- 192.168.37.131:7001
- 192.168.37.131:7002
- 192.168.37.131:7003
- Adding replica 192.168.37.131:7004 to 192.168.37.131:7001
- Adding replica 192.168.37.131:7005 to 192.168.37.131:7002
- Adding replica 192.168.37.131:7006 to 192.168.37.131:7003
- M: 8b153503b52f83634e04b0077f32ef629ad91ee6 192.168.37.131:7001
- slots:0-5460 (5461 slots) master
- M: f89799066dd8ecaaa1430559be4ce9c8c87055d8 192.168.37.131:7002
- slots:5461-10922 (5462 slots) master
- M: 53d698ad56b09f89cfef34850213e2d0a44154dd 192.168.37.131:7003
- slots:10923-16383 (5461 slots) master
- S: e73204399d08c14def1f71d0c5377cbc757dc4b8 192.168.37.131:7004
- replicates 8b153503b52f83634e04b0077f32ef629ad91ee6
- S: 1d5dcc8d1ccb6bce55efc3e3aadc690dc77808d8 192.168.37.131:7005
- replicates f89799066dd8ecaaa1430559be4ce9c8c87055d8
- S: e9458233cb85bd897ff694003e6d8a834eba2b44 192.168.37.131:7006
- replicates 53d698ad56b09f89cfef34850213e2d0a44154dd
- Can I set the above configuration? (type 'yes' to accept): y
- *** Aborting...
- [root@localhost redis-cluster]# ./redis-trib.rb create --replicas 1 192.168.37.131:7001 192.168.37.131:7002 192.168.37.131:7003 192.168.37.131:7004 192.168.37.131:7005 192.168.37.131:7006
- >>> Creating cluster
- Connecting to node 192.168.37.131:7001: OK
- Connecting to node 192.168.37.131:7002: OK
- Connecting to node 192.168.37.131:7003: OK
- Connecting to node 192.168.37.131:7004: OK
- Connecting to node 192.168.37.131:7005: OK
- Connecting to node 192.168.37.131:7006: OK
- >>> Performing hash slots allocation on 6 nodes...
- Using 3 masters:
- 192.168.37.131:7001
- 192.168.37.131:7002
- 192.168.37.131:7003
- Adding replica 192.168.37.131:7004 to 192.168.37.131:7001
- Adding replica 192.168.37.131:7005 to 192.168.37.131:7002
- Adding replica 192.168.37.131:7006 to 192.168.37.131:7003
- M: 8b153503b52f83634e04b0077f32ef629ad91ee6 192.168.37.131:7001
- slots:0-5460 (5461 slots) master
- M: f89799066dd8ecaaa1430559be4ce9c8c87055d8 192.168.37.131:7002
- slots:5461-10922 (5462 slots) master
- M: 53d698ad56b09f89cfef34850213e2d0a44154dd 192.168.37.131:7003
- slots:10923-16383 (5461 slots) master
- S: e73204399d08c14def1f71d0c5377cbc757dc4b8 192.168.37.131:7004
- replicates 8b153503b52f83634e04b0077f32ef629ad91ee6
- S: 1d5dcc8d1ccb6bce55efc3e3aadc690dc77808d8 192.168.37.131:7005
- replicates f89799066dd8ecaaa1430559be4ce9c8c87055d8
- S: e9458233cb85bd897ff694003e6d8a834eba2b44 192.168.37.131:7006
- replicates 53d698ad56b09f89cfef34850213e2d0a44154dd
- Can I set the above configuration? (type 'yes' to accept): yes
- >>> Nodes configuration updated
- >>> Assign a different config epoch to each node
- >>> Sending CLUSTER MEET messages to join the cluster
- Waiting for the cluster to join.....
- >>> Performing Cluster Check (using node 192.168.37.131:7001)
- M: 8b153503b52f83634e04b0077f32ef629ad91ee6 192.168.37.131:7001
- slots:0-5460 (5461 slots) master
- M: f89799066dd8ecaaa1430559be4ce9c8c87055d8 192.168.37.131:7002
- slots:5461-10922 (5462 slots) master
- M: 53d698ad56b09f89cfef34850213e2d0a44154dd 192.168.37.131:7003
- slots:10923-16383 (5461 slots) master
- M: e73204399d08c14def1f71d0c5377cbc757dc4b8 192.168.37.131:7004
- slots: (0 slots) master
- replicates 8b153503b52f83634e04b0077f32ef629ad91ee6
- M: 1d5dcc8d1ccb6bce55efc3e3aadc690dc77808d8 192.168.37.131:7005
- slots: (0 slots) master
- replicates f89799066dd8ecaaa1430559be4ce9c8c87055d8
- M: e9458233cb85bd897ff694003e6d8a834eba2b44 192.168.37.131:7006
- slots: (0 slots) master
- replicates 53d698ad56b09f89cfef34850213e2d0a44154dd
- [OK] All nodes agree about slots configuration.
- >>> Check for open slots...
- >>> Check slots coverage...
- [OK] All 16384 slots covered.
- [root@localhost redis-cluster]#
异常
- >>> Creating cluster
- Connecting to node 192.168.37.131:7001: OK
- [ERR] Node 192.168.37.131:7001 is not empty. Either the node already knows other nodes (check with CLUSTER NODES) or contains some key in database 0.
nodes.conf,如果不行则说明现在创建的结点包括了旧集群的结点信息,需要删除
redis的持久化文件后再重启
redis,比如:
appendonly.aof、
dump.rdb
首先,使用
stop-all.sh停止服务
- [root@localhost redis-cluster]# ./stop-all.sh
- [root@localhost redis-cluster]# ps aux | grep redis
- root 2924 0.8 0.1 33932 2048 ? Ssl Nov01 3:54 ./redis-server *:6379 [cluster]
- root 11969 0.0 0.0 4360 744 pts/2 S+ 01:10 0:00 grep redis
- [root@localhost redis-cluster]#
appendonly.aof、
dump.rdb、
nodes.conf。
- [root@localhost redis-cluster]# rm -f redis*/dump.rdb
- [root@localhost redis-cluster]# rm -f redis*/appendonly.aof
- [root@localhost redis-cluster]# rm -f redis*/nodes.conf
start-all.sh启动,再启动集群管理服务。
- [root@localhost redis-cluster]# ./start-all.sh
- [root@localhost redis-cluster]# ps aux | grep redis
- root 2924 0.8 0.1 33932 2048 ? Ssl Nov01 3:54 ./redis-server *:6379 [cluster]
- root 11980 0.0 0.1 33936 1952 ? Ssl 01:12 0:00 ./redis-server *:7001 [cluster]
- root 11982 0.0 0.1 33936 1952 ? Ssl 01:12 0:00 ./redis-server *:7002 [cluster]
- root 11984 0.0 0.1 33936 1952 ? Ssl 01:12 0:00 ./redis-server *:7003 [cluster]
- root 11986 0.0 0.1 33936 1952 ? Ssl 01:12 0:00 ./redis-server *:7004 [cluster]
- root 11988 0.0 0.1 33936 1948 ? Ssl 01:12 0:00 ./redis-server *:7005 [cluster]
- root 11990 0.0 0.1 33936 1948 ? Ssl 01:12 0:00 ./redis-server *:7006 [cluster]
- root 12004 0.0 0.0 4360 748 pts/2 S+ 01:12 0:00 grep redis
- [root@localhost redis-cluster]# ./redis-trib.rb create --replicas 1 192.168.37.131:7001 192.168.37.131:7002 192.168.37.131:7003 192.168.37.131:7004 192.168.37.131:7005 192.168.37.131:7006
- [root@localhost redis-cluster]#
Redis集群节点的操作
查询集群信息
集群创建成功登陆任意redis结点查询集群中的节点情况。
客户端以集群方式登陆:
- [root@localhost redis-cluster]# ./redis1/redis-cli -c -h 192.168.37.131 -p 7001
- 192.168.37.131:7001>
./redis1/redis-cli -c -h 192.168.37.131 -p 7001,其中
-c表示以集群方式连接
redis,
-h指定
ip地址,
-p指定端口号
cluster nodes查询集群结点信息
- 192.168.37.131:7001> cluster nodes
- 8e1186475f87c928e8a146d3804d9a2697246ad0 192.168.37.131:7003 master - 0 1478085160899 3 connected 10923-16383
- 80de7003738f74134a3403fc939fed253b7774f2 192.168.37.131:7004 master - 0 1478085156858 8 connected 0-5460
- 652caf5daf7971135679951324eba7b50e99251a 192.168.37.131:7005 slave 3adba62fdcc331ce231ca580cd2c8701e047bc6d 0 1478085158876 9 connected
- 1cd6482fd7038d78ad556b52b0cb9e2590ad5598 192.168.37.131:7001 myself,slave 80de7003738f74134a3403fc939fed253b7774f2 0 0 1 connected
- 3adba62fdcc331ce231ca580cd2c8701e047bc6d 192.168.37.131:7002 master - 0 1478085159889 9 connected 5461-10922
- cf23ca6d78cba3d3924065e1f7a394f6c51d4b28 192.168.37.131:7006 slave 8e1186475f87c928e8a146d3804d9a2697246ad0 0 1478085157867 6 connected
- 192.168.37.131:7001>
cluster info查询集群状态信息
- 192.168.37.131:7001> cluster info
- cluster_state:ok
- cluster_slots_assigned:16384
- cluster_slots_ok:16384
- cluster_slots_pfail:0
- cluster_slots_fail:0
- cluster_known_nodes:6
- cluster_size:3
- cluster_current_epoch:9
- cluster_my_epoch:8
- cluster_stats_messages_sent:12727
- cluster_stats_messages_received:10820
- 192.168.37.131:7001>
添加主节点
集群创建成功后可以向集群中添加节点,下面是添加一个master主节点。
首先,准备一个干净的
redis节点。按上面集群版修改
redis配置文件。开启该
redis节点。
查看
redis进程
- [root@localhost redis-cluster]# !ps
- ps aux | grep redis
- root 2924 0.6 0.1 33932 1800 ? Ssl Nov01 4:08 ./redis-server *:6379 [cluster]
- root 11980 0.0 0.2 33936 2216 ? Ssl 01:12 0:09 ./redis-server *:7001 [cluster]
- root 11982 0.0 0.2 33936 2244 ? Ssl 01:12 0:09 ./redis-server *:7002 [cluster]
- root 11984 0.0 0.2 33936 2220 ? Ssl 01:12 0:09 ./redis-server *:7003 [cluster]
- root 11986 0.0 0.2 33936 2216 ? Ssl 01:12 0:09 ./redis-server *:7004 [cluster]
- root 11988 0.0 0.2 33936 2228 ? Ssl 01:12 0:09 ./redis-server *:7005 [cluster]
- root 11990 0.0 0.2 33936 2212 ? Ssl 01:12 0:09 ./redis-server *:7006 [cluster]
- root 13913 0.0 0.1 33936 1952 ? Ssl 04:21 0:00 ./redis7/redis-server *:7007 [cluster]
- root 13917 0.0 0.0 4360 728 pts/3 S+ 04:21 0:00 grep redis
- [root@localhost redis-cluster]#
- [root@localhost redis-cluster]# ./redis-trib.rb add-node 192.168.37.131:7007 192.168.37.131:7001
- >>> Adding node 192.168.37.131:7007 to cluster 192.168.37.131:7001
- Connecting to node 192.168.37.131:7001: OK
- Connecting to node 192.168.37.131:7003: OK
- Connecting to node 192.168.37.131:7004: OK
- Connecting to node 192.168.37.131:7005: OK
- Connecting to node 192.168.37.131:7002: OK
- Connecting to node 192.168.37.131:7006: OK
- >>> Performing Cluster Check (using node 192.168.37.131:7001)
- S: 1cd6482fd7038d78ad556b52b0cb9e2590ad5598 192.168.37.131:7001
- slots: (0 slots) slave
- replicates 80de7003738f74134a3403fc939fed253b7774f2
- M: 8e1186475f87c928e8a146d3804d9a2697246ad0 192.168.37.131:7003
- slots:10923-16383 (5461 slots) master
- 1 additional replica(s)
- M: 80de7003738f74134a3403fc939fed253b7774f2 192.168.37.131:7004
- slots:0-5460 (5461 slots) master
- 1 additional replica(s)
- S: 652caf5daf7971135679951324eba7b50e99251a 192.168.37.131:7005
- slots: (0 slots) slave
- replicates 3adba62fdcc331ce231ca580cd2c8701e047bc6d
- M: 3adba62fdcc331ce231ca580cd2c8701e047bc6d 192.168.37.131:7002
- slots:5461-10922 (5462 slots) master
- 1 additional replica(s)
- S: cf23ca6d78cba3d3924065e1f7a394f6c51d4b28 192.168.37.131:7006
- slots: (0 slots) slave
- replicates 8e1186475f87c928e8a146d3804d9a2697246ad0
- [OK] All nodes agree about slots configuration.
- >>> Check for open slots...
- >>> Check slots coverage...
- [OK] All 16384 slots covered.
- Connecting to node 192.168.37.131:7007: OK
- >>> Send CLUSTER MEET to node 192.168.37.131:7007 to make it join the cluster.
- [OK] New node added correctly.
- [root@localhost redis-cluster]#
7007已添加到集群中:
- [root@localhost redis-cluster]# ./redis1/redis-cli -c -h 192.168.37.131 -p 7001
- 192.168.37.131:7001> cluster nodes
- 8e1186475f87c928e8a146d3804d9a2697246ad0 192.168.37.131:7003 master - 0 1478085870038 3 connected 10923-16383
- 80de7003738f74134a3403fc939fed253b7774f2 192.168.37.131:7004 master - 0 1478085868020 8 connected 0-5460
- 652caf5daf7971135679951324eba7b50e99251a 192.168.37.131:7005 slave 3adba62fdcc331ce231ca580cd2c8701e047bc6d 0 1478085874075 9 connected
- 1cd6482fd7038d78ad556b52b0cb9e2590ad5598 192.168.37.131:7001 myself,slave 80de7003738f74134a3403fc939fed253b7774f2 0 0 1 connected
- 3adba62fdcc331ce231ca580cd2c8701e047bc6d 192.168.37.131:7002 master - 0 1478085873064 9 connected 5461-10922
- cf23ca6d78cba3d3924065e1f7a394f6c51d4b28 192.168.37.131:7006 slave 8e1186475f87c928e8a146d3804d9a2697246ad0 0 1478085875086 6 connected
- 5d6c61ecff23bff3b0fb01a86c66d882f2d402a0 192.168.37.131:7007 master - 0 1478085872056 0 connected
- 192.168.37.131:7001>
hash槽重新分配
添加完主节点需要对主节点进行hash槽分配这样该主节才可以存储数据。
redis集群有
16384个槽,集群中的每个
master结点分配一些槽,通过查看集群结点可以看到槽占用情况。
给刚添加的
7007结点分配槽:
第一步:连接上集群
./redis-trib.rb reshard 192.168.37.131:7001(连接集群中任意一个可用结点都行)
- [root@localhost redis-cluster]# ./redis-trib.rb reshard 192.168.37.131:7001
- Connecting to node 192.168.37.131:7001: OK
- Connecting to node 192.168.37.131:7003: OK
- Connecting to node 192.168.37.131:7004: OK
- Connecting to node 192.168.37.131:7005: OK
- Connecting to node 192.168.37.131:7002: OK
- Connecting to node 192.168.37.131:7006: OK
- Connecting to node 192.168.37.131:7007: OK
- >>> Performing Cluster Check (using node 192.168.37.131:7001)
- S: 1cd6482fd7038d78ad556b52b0cb9e2590ad5598 192.168.37.131:7001
- slots: (0 slots) slave
- replicates 80de7003738f74134a3403fc939fed253b7774f2
- M: 8e1186475f87c928e8a146d3804d9a2697246ad0 192.168.37.131:7003
- slots:10923-16383 (5461 slots) master
- 1 additional replica(s)
- M: 80de7003738f74134a3403fc939fed253b7774f2 192.168.37.131:7004
- slots:0-5460 (5461 slots) master
- 1 additional replica(s)
- S: 652caf5daf7971135679951324eba7b50e99251a 192.168.37.131:7005
- slots: (0 slots) slave
- replicates 3adba62fdcc331ce231ca580cd2c8701e047bc6d
- M: 3adba62fdcc331ce231ca580cd2c8701e047bc6d 192.168.37.131:7002
- slots:5461-10922 (5462 slots) master
- 1 additional replica(s)
- S: cf23ca6d78cba3d3924065e1f7a394f6c51d4b28 192.168.37.131:7006
- slots: (0 slots) slave
- replicates 8e1186475f87c928e8a146d3804d9a2697246ad0
- M: 5d6c61ecff23bff3b0fb01a86c66d882f2d402a0 192.168.37.131:7007
- slots: (0 slots) master
- 0 additional replica(s)
- [OK] All nodes agree about slots configuration.
- >>> Check for open slots...
- >>> Check slots coverage...
- [OK] All 16384 slots covered.
- How many slots do you want to move (from 1 to 16384)?
- How many slots do you want to move (from 1 to 16384)? 1000
- What is the receiving node ID?
1000表示要分配
1000个槽
第三步:输入接收槽的结点
id
这里准备给
7007分配槽,通过
cluster nodes查看
7007结点
id为
5d6c61ecff23bff3b0fb01a86c66d882f2d402a0
输入:
5d6c61ecff23bff3b0fb01a86c66d882f2d402a0
- What is the receiving node ID? 5d6c61ecff23bff3b0fb01a86c66d882f2d402a0
- Please enter all the source node IDs.
- Type 'all' to use all the nodes as source nodes for the hash slots.
- Type 'done' once you entered all the source nodes IDs.
- Source node #1:
id
输入源结点
id,槽将从源结点中拿,分配后的槽在源结点中就不存在了。
输入
all表示从所有源结点中获取槽。
输入
done取消分配。
这里输入
all
- Source node #1:all
- 省略了很多
- Moving slot 11253 from 8e1186475f87c928e8a146d3804d9a2697246ad0
- Moving slot 11254 from 8e1186475f87c928e8a146d3804d9a2697246ad0
- Moving slot 11255 from 8e1186475f87c928e8a146d3804d9a2697246ad0
- Do you want to proceed with the proposed reshard plan (yes/no)?
yes开始移动槽到目标结点
id
- 省略了很多
- Moving slot 11253 from 192.168.37.131:7003 to 192.168.37.131:7007:
- Moving slot 11254 from 192.168.37.131:7003 to 192.168.37.131:7007:
- Moving slot 11255 from 192.168.37.131:7003 to 192.168.37.131:7007:
- [root@localhost redis-cluster]#
- [root@localhost redis-cluster]# ./redis1/redis-cli -c -h 192.168.37.131 -p 7001
- 192.168.37.131:7001> cluster nodes
- 8e1186475f87c928e8a146d3804d9a2697246ad0 192.168.37.131:7003 master - 0 1478086754466 3 connected 11256-16383
- 80de7003738f74134a3403fc939fed253b7774f2 192.168.37.131:7004 master - 0 1478086758509 8 connected 333-5460
- 652caf5daf7971135679951324eba7b50e99251a 192.168.37.131:7005 slave 3adba62fdcc331ce231ca580cd2c8701e047bc6d 0 1478086756490 9 connected
- 1cd6482fd7038d78ad556b52b0cb9e2590ad5598 192.168.37.131:7001 myself,slave 80de7003738f74134a3403fc939fed253b7774f2 0 0 1 connected
- 3adba62fdcc331ce231ca580cd2c8701e047bc6d 192.168.37.131:7002 master - 0 1478086757500 9 connected 5795-10922
- cf23ca6d78cba3d3924065e1f7a394f6c51d4b28 192.168.37.131:7006 slave 8e1186475f87c928e8a146d3804d9a2697246ad0 0 1478086755477 6 connected
- 5d6c61ecff23bff3b0fb01a86c66d882f2d402a0 192.168.37.131:7007 master - 0 1478086759518 10 connected 0-332 5461-5794 10923-11255
- 192.168.37.131:7001>
7007结点已经从三个主节点中获取了
slot。
添加从节点
集群创建成功后可以向集群中添加节点,下面是添加一个
slave从节点。
添加
7008从结点,将
7008作为
7007的从结点。
首先,准备一个干净的
redis节点。按上面集群版修改
redis配置文件。开启该
redis节点。查看
redis进程
- [root@localhost redis-cluster]# ps aux | grep redis
- root 2924 0.5 0.1 33932 1800 ? Ssl Nov01 <

- Redis cluster集群:原理及搭建
- redis系列08--redis-cluster集群搭建
- Redis学习笔记六——搭建redis集群(非分布式真正的cluster)
- 分布式缓存技术redis学习系列(四)——redis高级应用(集群搭建、集群分区原理、集群操作)
- 分布式缓存技术redis学习系列(四)——redis高级应用(集群搭建、集群分区原理、集群操作)
- mysql-cluster集群原理介绍和搭建步骤(四个data/sql节点)
- 分布式缓存技术redis学习系列(四)——redis高级应用(集群搭建、集群分区原理、集群操作)
- 使用redis4.0.1和redis-cluster搭建集群并编写重启shell脚本
- redis cluster 集群搭建
- Redis Cluster集群搭建与应用
- redis集群(Redis Cluster)原理和应用
- docker redis 集群(cluster)搭建
- 分布式缓存技术redis学习系列(四)——redis高级应用(集群搭建、集群分区原理、集群操作)
- redis单点、主从、集群cluster配置搭建与使用
- CentOS 6.5 -- Redis 4.0.2架构☞集群(cluster)的搭建
- 基于ubuntu搭建Redis(4.0) Cluster 高可用(HA)集群环境
- Redis 菜鸟笔记(三)集群原理、搭建
- redis集群搭建之一~使用utils/create-cluster方法
- Redis进阶实践之十一 Redis的Cluster集群搭建
- 分布式缓存技术redis学习系列(四)——redis高级应用(集群搭建、集群分区原理、集群操作)