MySpringboot+mybatis+bootstrap-paginator实现分页
2019-04-01 21:39
337 查看
MySpringboot+mybatis+bootstrap-paginator实现分页
第一步:pom.xml中导入相关依赖
<dependency>
<groupId>com.github.pagehelper</groupId>
<artifactId>pagehelper-spring-boot-starter</artifactId>
<version>1.2.3</version>
</dependency>

<dependency>
<groupId>org.springframework.boot</groupId>
<artifactId>spring-boot-starter-thymeleaf</artifactId>
</dependency>

<dependency>
<groupId>org.mybatis.spring.boot</groupId>
<artifactId>mybatis-spring-boot-starter</artifactId>
<version>2.0.0</version>
</dependency>
第二步:实体类页面代码
package com.example.shop.entity;
import …;
private Integer goodsId;

private String goodsName;

private BigDecimal goodsPrice;

private Integer marchNum;

private Integer cautionNum;

private Integer planNum;

private String barCode;

private BigDecimal salesProPrice;

private Date salesProDateS;

private Date salesProDateE;

private Integer allowAbate;

private Integer allowSale;

private Integer factoryId;

private Integer provideId;

public Integer getGoodsId() {
return goodsId;
}

public void setGoodsId(Integer goodsId) {
this.goodsId = goodsId;
}

public String getGoodsName() {
return goodsName;
}

public void setGoodsName(String goodsName) {
this.goodsName = goodsName;
}

public BigDecimal getGoodsPrice() {
return goodsPrice;
}

public void setGoodsPrice(BigDecimal goodsPrice) {
this.goodsPrice = goodsPrice;
}

public Integer getMarchNum() {
return marchNum;
}

public void setMarchNum(Integer marchNum) {
this.marchNum = marchNum;
}

public Integer getCautionNum() {
return cautionNum;
}

public void setCautionNum(Integer cautionNum) {
this.cautionNum = cautionNum;
}

public Integer getPlanNum() {
return planNum;
}

public void setPlanNum(Integer planNum) {
this.planNum = planNum;
}

public String getBarCode() {
return barCode;
}

public void setBarCode(String barCode) {
this.barCode = barCode;
}

public BigDecimal getSalesProPrice() {
return salesProPrice;
}

public void setSalesProPrice(BigDecimal salesProPrice) {
this.salesProPrice = salesProPrice;
}

public Date getSalesProDateS() {
return salesProDateS;
}

public void setSalesProDateS(Date salesProDateS) {
this.salesProDateS = salesProDateS;
}

public Date getSalesProDateE() {
return salesProDateE;
}

public void setSalesProDateE(Date salesProDateE) {
this.salesProDateE = salesProDateE;
}

public Integer getAllowAbate() {
return allowAbate;
}

public void setAllowAbate(Integer allowAbate) {
this.allowAbate = allowAbate;
}

public Integer getAllowSale() {
return allowSale;
}

public void setAllowSale(Integer allowSale) {
this.allowSale = allowSale;
}

public Integer getFactoryId() {
return factoryId;
}

public void setFactoryId(Integer factoryId) {
this.factoryId = factoryId;
}

public Integer getProvideId() {
return provideId;
}

public void setProvideId(Integer provideId) {
this.provideId = provideId;
}
}
第三步:Mapper 接口页面代码
package com.example.shop.mapper;
import …;
public interface GoodsInfoMapper {
public List<GoodsInfo> selectAll();
}
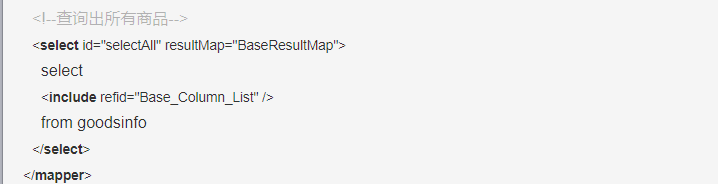
第四部:mapper.xml页面代码
第五步:service页面代码
package com.example.shop.service;
import …;
import javax.annotation.Resource;
import java.util.List;
@Service
public class GoodsInfoService {
@Resource
private GoodsInfoMapper goodsInfoMapper;

public List<GoodsInfo> findAll(){
return goodsInfoMapper.selectAll();
}
}
第六步:PaginationConstant 接口,用于保存初始页页码,和每页显示数据大小
package com.example.shop.util;
public interface PaginationConstant {
/**
* 当前面,默认为1
*/
public static final int CURRENT_NUM=1;

/**
* 每页显示条数,默认5条
*/
public static final int PAGE_SIZE=2;

}
第七步:controller页面代码
package com.example.shop.controller;
import …;
@Controller
@RequestMapping(value={"/goods"})
public class GoodsInfoController {
@Resource
private GoodsInfoService goodsInfoService;

@RequestMapping(value={"/findAll"})
public String findAll(Model model,Integer pageNum) {
if(ObjectUtils.isEmpty(pageNum)){
pageNum=PaginationConstant.CURRENT_NUM;
}
//设置分页(当前页,和每页显示数据条数)
PageHelper.startPage(pageNum, PaginationConstant.PAGE_SIZE);
//查找数据
List<GoodsInfo> goodsInfoList = goodsInfoService.findAll();
//将查找出的结果封装到PageInfo对象中,这个对象包含了 goodsInfoList集合和关于分页的方法,如下
//pageInfo.getPageNum();
//pageInfo.getPages(); 得到总页数
//pageInfo.getNextPage(); 得到下一页
//pageInfo.getPrePage(); 得到前一页
PageInfo<GoodsInfo> pageInfo=new PageInfo<>(goodsInfoList);
// model.addAttribute("goodsInfoList",goodsInfoList);
//用Model传递对象到GoodsInfo页面
model.addAttribute("pageInfo",pageInfo);
return "GoodsInfo";
}
}
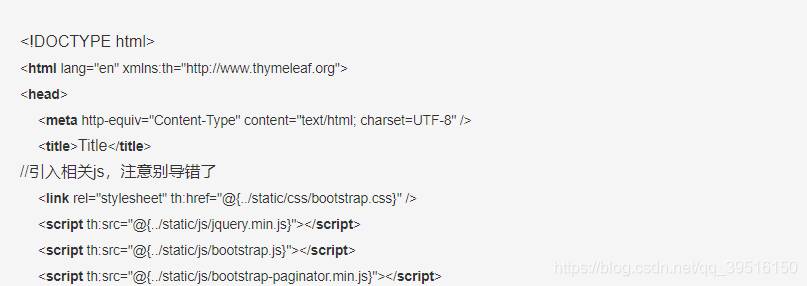
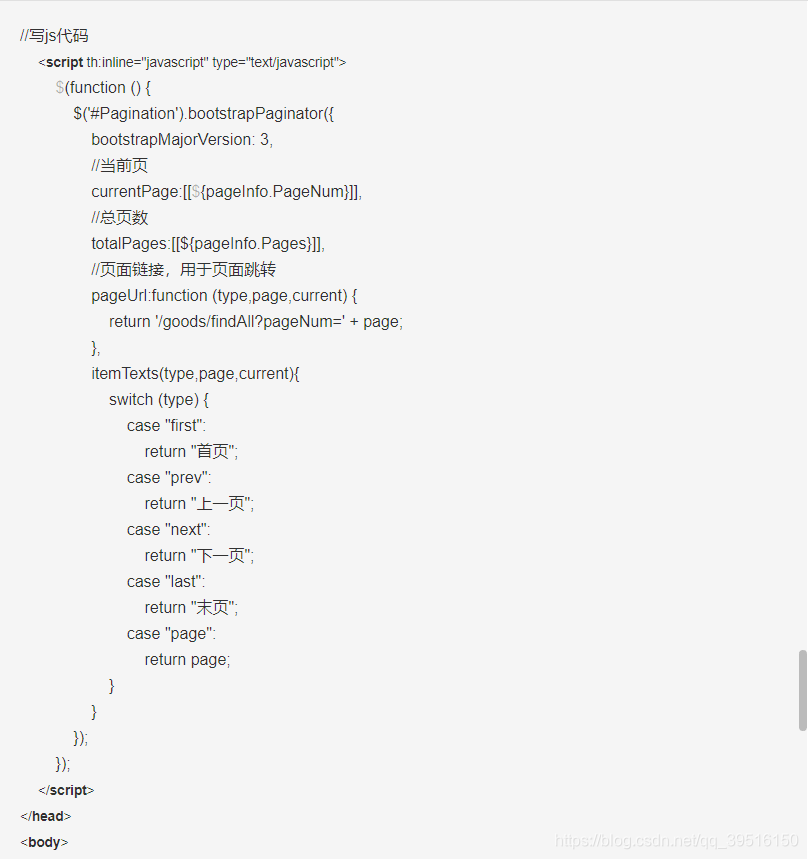
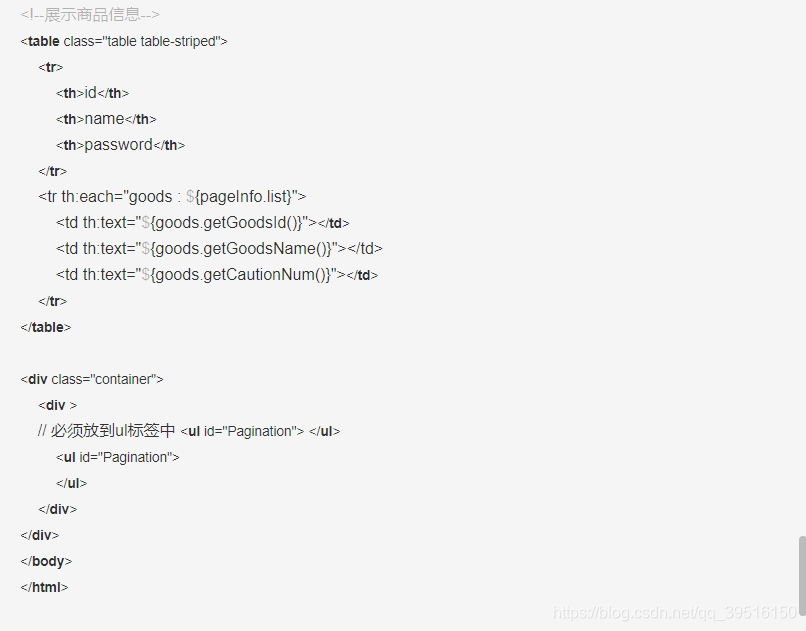
第八步:HTML页面代码
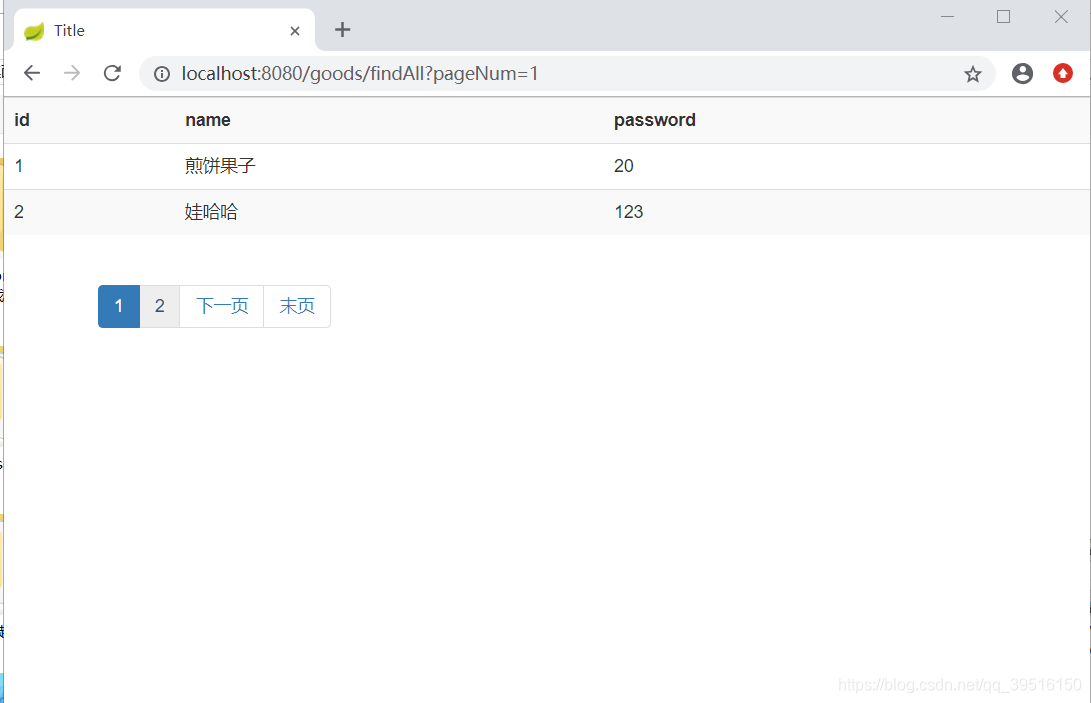
第九步:前端页面效果

相关文章推荐
- SpringBoot-使用Mybatis实现完整的CRUD和分页
- SpringBoot+Mybatis+PageHelper简化分页实现
- springboot+mybatis+vuejs+bootstrap实现增删改
- Spring Boot+Mybatis+Druid+PageHelper实现多数据源并分页的方法
- 详细步骤!!!idea+springboot+mybatis+jsp+bootstrap实现从mysql查询出数据并显示(源码)
- 微服务架构实战篇(三):Spring boot2.0 + Mybatis + PageHelper实现增删改查和分页查询功能
- angular+bootstrap+spring boot实现分页
- bootstrap+pageHelper+spring boot 实现分页
- SpringBoot+Mybatis+ Druid+PageHelper 实现多数据源并分页
- SpringBoot+Mybatis+Druid+PageHelper实现多数据源并分页方法
- 初学spring boot 记录下过程-整合mybatis实现分页查询(四)
- SpringBoot+Mybatis+ Druid+PageHelper 实现多数据源并分页
- SpringBoot+Mybatis+ Druid+PageHelper 实现多数据源并分页
- spring boot+mvc+mybatis(通用mapper)+druid+jsp+bootstrap实现后台权限管理系统源码
- Spring Boot:实现MyBatis分页
- Angular+Bootstrap+Spring Boot实现分页功能实例代码
- SpringBoot+Mybatis+ Druid+PageHelper 实现多数据源并分页
- SpringBoot+Mybatis+ Druid+PageHelper 实现多数据源并分页
- bootstrap + mybatis + maven + springmvc 实现分页效果