Android开发之滑动数值选择器NumberPicker用法示例
2019-03-28 11:01
661 查看
本文实例讲述了Android开发之滑动数值选择器NumberPicker用法。分享给大家供大家参考,具体如下:
简介:
NumberPicker: 用户既可以从键盘输值,也可以拖动来选择值
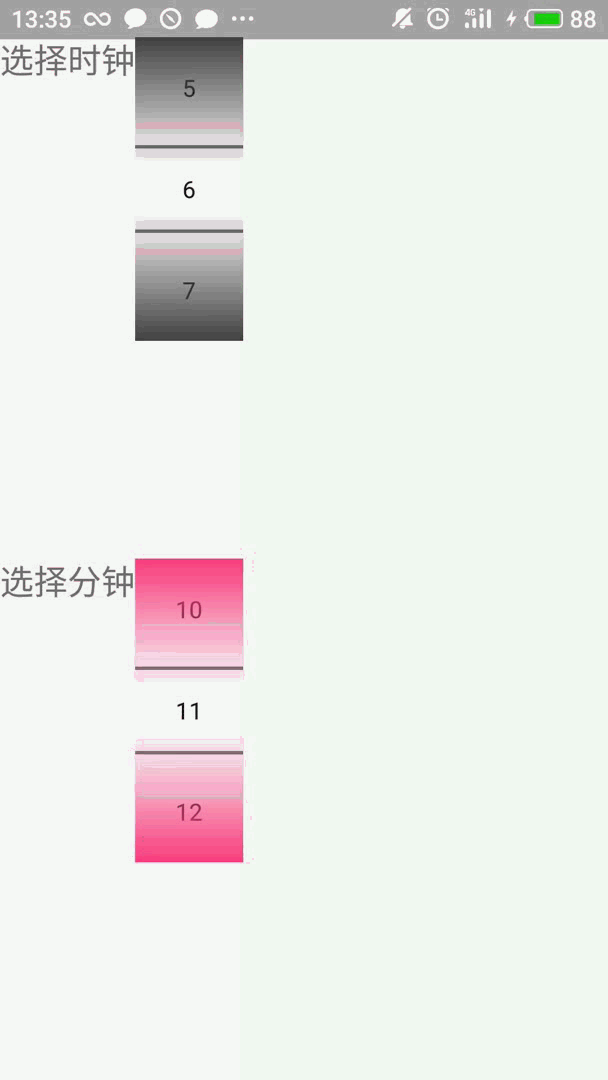
实际效果:
常用方法:
1. setMinValue() 设置组件支持的最小值
2. setMaxValue() 设置组建支持的最大值
3. setValue() 设置该组件的当前值
在布局文件中调用:
<?xml version="1.0" encoding="utf-8" ?>
<TableLayout xmlns:android="http://schemas.android.com/apk/res/android"
android:layout_width="match_parent"
android:layout_height="match_parent"
android:orientation="vertical">
<TableRow
android:layout_width="match_parent"
android:layout_height="0dp"
android:layout_weight="1"
android:orientation="vertical">
<TextView
android:text="选择时钟"
android:textSize="20dp"
android:layout_width="match_parent"
android:layout_height="wrap_content"/>
<NumberPicker
android:id="@+id/np1"
android:solidColor="@color/colorPrimaryDark"
android:layout_width="match_parent"
android:layout_height="wrap_content"
android:focusable="true"
android:focusableInTouchMode="true"/>
</TableRow>
<TableRow
android:layout_width="match_parent"
android:layout_height="0dp"
android:layout_weight="1"
android:orientation="vertical">
<TextView
android:text="选择分钟"
android:textSize="20dp"
android:layout_width="match_parent"
android:layout_height="wrap_content"/>
<NumberPicker
android:id="@+id/np2"
android:solidColor="@color/colorAccent"
android:layout_width="match_parent"
android:layout_height="wrap_content"
android:focusable="true"
android:focusableInTouchMode="true" />
</TableRow>
</TableLayout>
关于监听事件:
1. setOnValueChangedListener 调用监听事件
2. onValueChange 具体执行( int oldVal :之前详实的数值 , int newVal 改变或现时的数值)
具体实现方法:
public class MainActivity extends Activity {
private NumberPicker np1,np2;
//定义上下限具体值
private int min = 10,max = 50;
@Override
protected void onCreate(Bundle savedInstanceState) {
super.onCreate(savedInstanceState);
setContentView(R.layout.activity_main);
np1 = (NumberPicker) findViewById(R.id.np1);
//设置np1的最大值只和最小值
np1.setMinValue(0);
np1.setMaxValue(23);
//设置哪怕的当前值
np1.setValue(min);
np1.setOnValueChangedListener(new NumberPicker.OnValueChangeListener() {
@Override
public void onValueChange(NumberPicker picker, int oldVal, int newVal) {
min = newVal;
showSelectedPrice();
}
});
np2 = (NumberPicker) findViewById(R.id.np2);
//设置np1的最大值只和最小值
np2.setMinValue(0);
np2.setMaxValue(23);
//设置哪怕的当前值
np2.setValue(max);
np2.setOnValueChangedListener(new NumberPicker.OnValueChangeListener() {
@Override
public void onValueChange(NumberPicker picker, int oldVal, int newVal) {
min = newVal;
showSelectedPrice();
}
});
}
private void showSelectedPrice(){
Toast.makeText(MainActivity.this,"设定闹钟时间为:" + min + " : " + max,Toast.LENGTH_SHORT).show();
}
}
更多关于Android相关内容感兴趣的读者可查看本站专题:《Android开发入门与进阶教程》、《Android调试技巧与常见问题解决方法汇总》、《Android基本组件用法总结》、《Android视图View技巧总结》、《Android布局layout技巧总结》及《Android控件用法总结》
希望本文所述对大家Android程序设计有所帮助。
您可能感兴趣的文章:
- Android 中NumberPicker,DatePicker与DatePickerDialog中分割颜色的修改实例代码
- Android CalendarView,DatePicker,TimePicker,以及NumberPicker的使用
- Android中颜色选择器和改变字体颜色的实例教程
- Android PickerView滚动选择器的使用方法
- Android文件选择器ExFilePicker的使用方法
- Android自定义滚动选择器实例代码
- Android自定义可循环的滚动选择器CycleWheelView
- Android仿iphone自定义滚动选择器
- Android日期选择器实现年月日三级联动
- Android自定义wheelview实现滚动日期选择器
- Android评论图片可移动顺序选择器(推荐)

相关文章推荐
- 【Android UI设计与开发】第17期:滑动菜单栏(二)开源项目SlidingMenu的示例
- 【Android UI设计与开发】第17期:滑动菜单栏(二)开源项目SlidingMenu的示例
- 【android开发】滑动菜单栏(开源项目SlidingMenu的示例)( 下)
- 【Android UI设计与开发】第17期:滑动菜单栏(二)开源项目SlidingMenu的示例
- Android零基础入门第58节:数值选择器NumberPicker
- 【Android UI设计与开发】第17期:滑动菜单栏(二)开源项目SlidingMenu的示例
- 【Android UI设计与开发】9:滑动菜单栏(一)开源项目SlidingMenu的使用和示例
- Android开发中GridView用法示例
- 【Android开发】背景选择器selector用法心得
- 【Android UI设计与开发】第17期:滑动菜单栏(二)开源项目SlidingMenu的示例
- 【Android UI设计与开发】第17期:滑动菜单栏(二)开源项目SlidingMenu的示例
- 【Android UI设计与开发】9:滑动菜单栏(一)开源项目SlidingMenu的使用和示例
- (4.2.2.2)【android开源工具】【Android UI设计与开发】第17期:滑动菜单栏(二)开源项目SlidingMenu的示例
- Android零基础入门第58节:数值选择器NumberPicker
- 【Android UI设计与开发】9:滑动菜单栏(一)开源项目SlidingMenu的使用和示例-转
- 【Android UI设计与开发】第17期:滑动菜单栏(二)开源项目SlidingMenu的示例
- 【Android UI设计与开发】第17期:滑动菜单栏(二)开源项目SlidingMenu的示例
- Android开发高级组件之自动完成文本框(AutoCompleteTextView)用法示例【附源码下载】
- Android开发之开关按钮控件ToggleButton简单用法示例
- android开发教程之实现滑动关闭fragment示例