GitHub+Hexo搭建自己的Blog之(3)-主题配置(Next)
GitHub+Hexo搭建自己的Blog之-主题配置(Next)
前言
Blog的环境全部搭建完毕了,但是还没有内容,而且hexo默认的主题是不是感觉挺丑的,其实hexo给我们提供了很多主题模板,总有一款是你喜欢的,本篇文章将继续说一说如何配置主题,怎么创建博文,写好后又如何发布,一起来看吧!
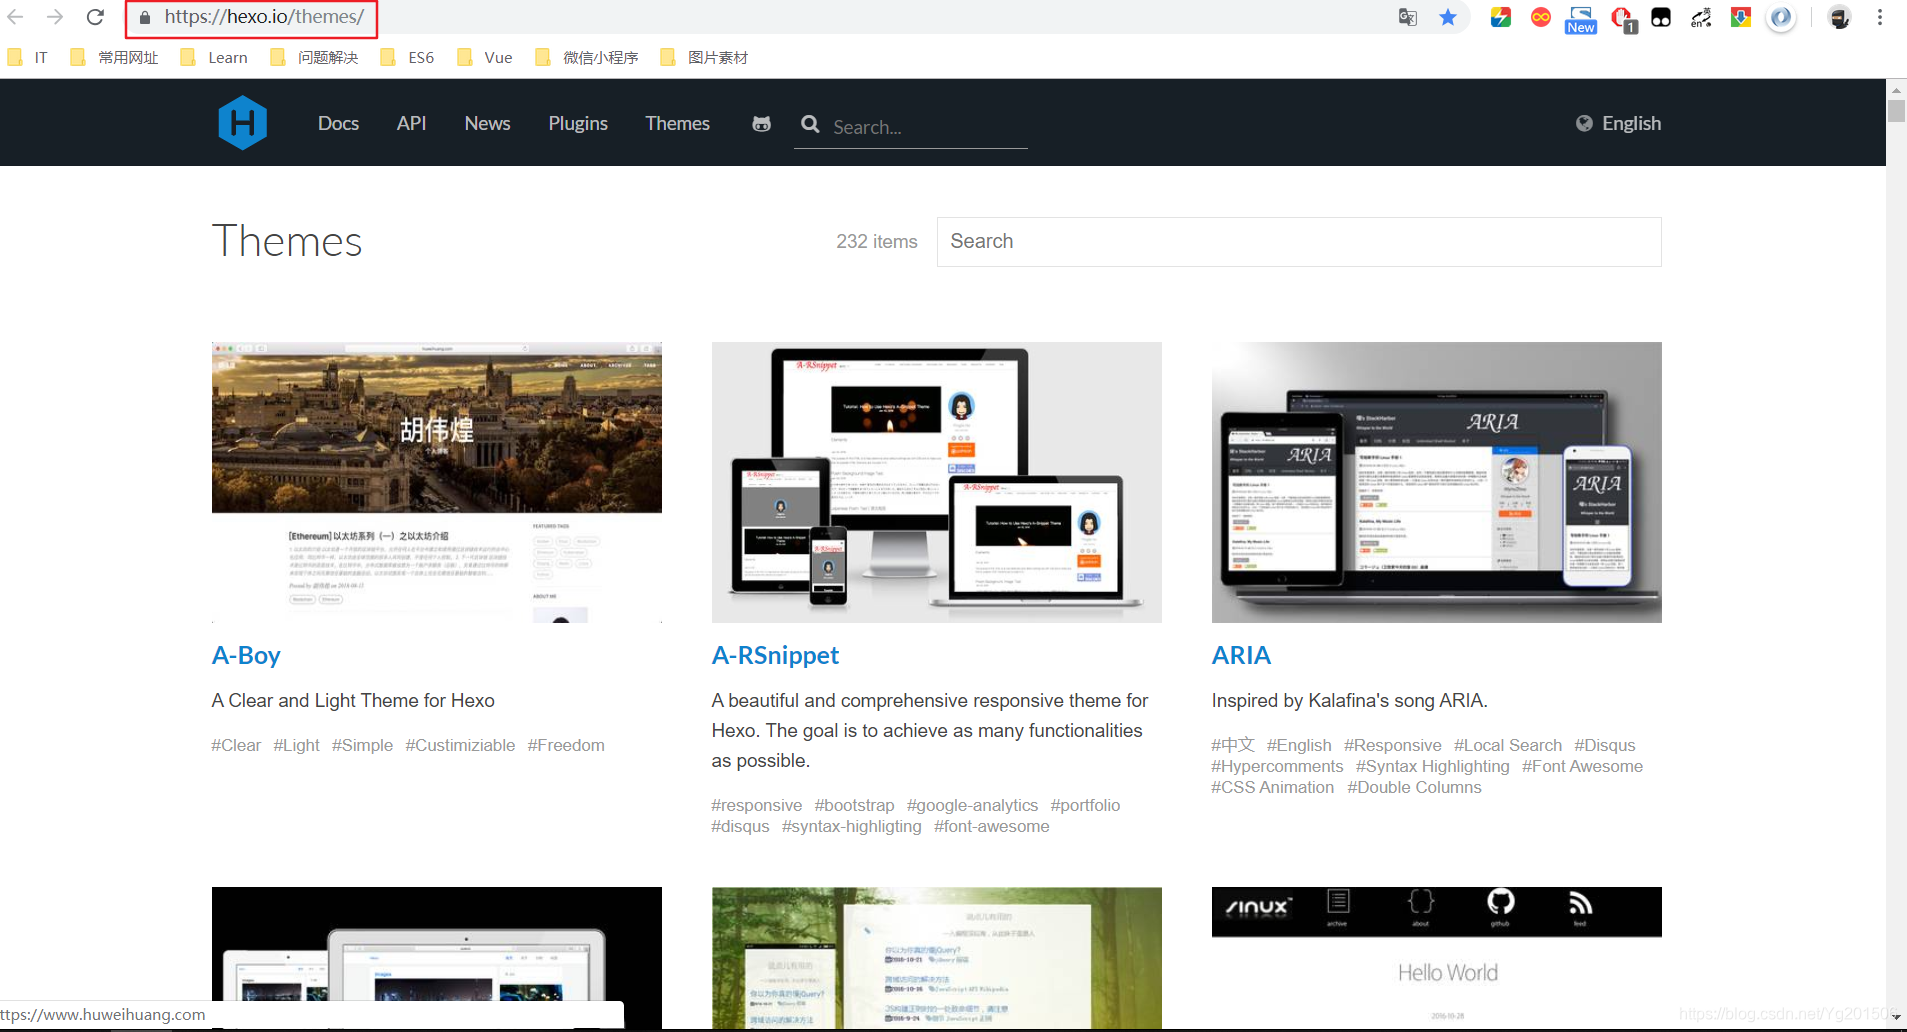
点我进入hexo官网挑选模板
文章总览
Hexo主目录作用

如图是我们hexo文件的主目录,由上往下文件的作用
- node_modules:是我们这个hexo整个项目的环境依赖,自动生成的,不用理会。
- public:存放的是整个项目的页面,样式,及逻辑代码。
- scaffolds:scaffolds是脚手架的意思,当你新建一篇文章(hexo new page ‘title’)的时候,hexo是根据这个目录下的文件进行构建的。不用关心。
- source:这个目录很重要,新建的文章都是在保存在这个目录下的_posts 。_posts 目录下是一个个 markdown 文件。初始里面有一个 hello-world.md 的文件,文章就在这个文件中编辑。_posts 目录下的md文件,会被编译成html文件,放到 public 文件夹下。
- themes:是网站的主题目录,Hexo有很好的主题扩展能力,开源主题也很丰富,该目录下每一个子目录就是一个主题。
- _config.yml:全局配置文件,我们Blog站点的很多信息都是在这个文件中配置的,比如网站的名字,副标题,网站描述信息,作者等等。
- package.json:这个文件里我们可以看到hexo所依赖的插件。
接下来详细说一说 _config.yml 文件的配置
## Docs: https://hexo.io/docs/configuration.html
## 进不去不要紧,直接点下边的链接下载主题
## Source: https://github.com/hexojs/hexo/

# Site 站点设置
title: 黑科大侠 #网站标题
subtitle:   #网站副标题(貌似没用,可能是我配置有问题导致不显示)
description:  #网站描述
author: yg201506  #作者
language:    #语言
timezone:    #网站时区。Hexo 默认使用您电脑的时区。时区列表。比如说:America/New_York, Japan, 和 UTC ,写个zh-CN代表中国,网站就以中文显示了。

# URL
## If your site is put in a subdirectory, set url as 'http://yoursite.com/child' and root as '/child/'
url: http://xxxxxx   #你的站点Url(我的:http://yg201506.github.io)
root: /                       #站点的根目录(我的:D:\html\hexo,其实随便放,看个人喜好)
permalink: :year/:month/:day/:title/   #文章的 永久链接 格式 (默认就行)
permalink_defaults:    #永久链接中各部分的默认值

# Directory
source_dir: source   #资源文件夹,这个文件夹用来存放内容
public_dir: public     #公共文件夹,这个文件夹用于存放生成的站点文件。
tag_dir: tags         # 标签文件夹
archive_dir: archives    #归档文件夹
category_dir: categories      #分类文件夹
code_dir: downloads/code     #Include code 文件夹
i18n_dir: :lang                #国际化(i18n)文件夹
skip_render:                #跳过指定文件的渲染

# Writing
new_post_name: :title.md # 新文章的文件名称
default_layout: post     #预设布局
titlecase: false # 把标题转换为 title case
external_link: true # 在新标签中打开链接
filename_case: 0     #把文件名称转换为 (1) 小写或 (2) 大写
render_drafts: false  #是否显示草稿
post_asset_folder: false  #是否启动 Asset 文件夹
relative_link: false      #把链接改为与根目录的相对位址
future: true                #显示未来的文章
highlight:                    #内容中代码块的设置
enable: true
line_number: true
auto_detect: false
tab_replace:

# Category & Tag
default_category: uncategorized
category_map:          #分类别名
tag_map:            #标签别名

# Date / Time format
## Hexo uses Moment.js to parse and display date
## You can customize the date format as defined in
## http://momentjs.com/docs/#/displaying/format/
date_format: YYYY-MM-DD         #日期格式(保持默认)
time_format: HH:mm:ss        #时间格式   (保持默认)

# Pagination
## Set per_page to 0 to disable pagination
per_page: 10    #分页数量
pagination_dir: page

# Extensions
## Plugins: https://hexo.io/plugins/
## Themes: https://hexo.io/themes/
theme: landscape   #主题名称

# Deployment
## Docs: https://hexo.io/docs/deployment.html
#  部署部分的设置
deploy:
type: git
repo: yg201506@github.com:yg201506/yg201506.github.io.git #这里我们之前部署到github时配置过的(填写http的链接也可以)
baranch: master
更换Next主题
本文介绍Next主题的配置用法,其他的主题用法大体步骤是类似的。
更多详情:点我了解更多
- 主题下载:进入到hexo文件目录下,打开powershell终端(cmd的命令也可以,最好以管理员的方式打开),键入命令:git clone https://github.com/theme-next/hexo-theme-next themes/next (表示在根目录下的themes里再建一个next的文件夹来存放名字为next的主题)下载完毕,我们打开themes文件夹,会发现多出一个next的文件夹。
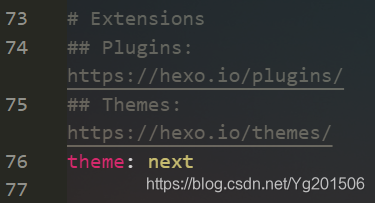
- 应用主题:打开根hexo目录下的 _config.yml 文件,修改themes的值为next
- 如图
- 预览:进入终端在根目录 hexo 下依次键入如下命令:
- hexo clean 先清理一下hexo的缓存
- hexo s 本地启动服务
- 打开浏览器:在地址栏键入 http://localhost:4000 预览,如图

Next配置
next主题应用成功之后,也是需要友好的配置一下,打开themes文件夹下的next文件会看到也有一个 _config.yml 的文件,有了之前的经验,我们知道这个就是next主题的全局配置文件了
_config.yml配置
截取了一部分,这里基本上是需要配置的,其他的基本是默认:
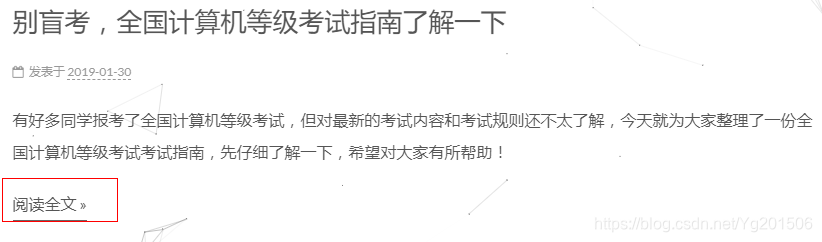
favicon: # 这里配置站点的站标
# small: /images/favicon-16x16-next.png
medium: /images/favicon-16x16-next.png
apple_touch_icon: /images/apple-touch-icon-next.png
safari_pinned_tab: /images/logo.svg
#android_manifest: /images/manifest.json
#ms_browserconfig: /images/browserconfig.xml

# Set default keywords (Use a comma to separate)
keywords: # 这里放置站点的关键字 "前端, HTML, CSS, javascript, Vue.js, Node.js, MySQL, 微信小程序"

# Set rss to false to disable feed link.
# Leave rss as empty to use site's feed link.
# Set rss to specific value if you have burned your feed already.
rss:

footer: # 网站的页脚设置
# Specify the date when the site was setup.
# If not defined, current year will be used.
since: # 网站的开始运行时间 比如设置2017 则网站底部显示 2017-2018

# Icon between year and copyright info.
icon: user

# If not defined, will be used `author` from Hexo main config.
# copyright:
# -------------------------------------------------------------
# Hexo link (Powered by Hexo).
# powered: true

# theme:
#   Theme & scheme info link (Theme - NexT.scheme).
#   enable: false
#   Version info of NexT after scheme info (vX.X.X).
#   version false
# -------------------------------------------------------------
# Any custom text can be defined here.
#custom_text: Hosted by <a target="_blank" href="https://pages.github.com">GitHub Pages</a>

# ---------------------------------------------------------------
# SEO Settings
# ---------------------------------------------------------------

# Canonical, set a canonical link tag in your hexo, you could use it for your SEO of blog.
# See: https://support.google.com/webmasters/answer/139066
# Tips: Before you open this tag, remember set up your URL in hexo _config.yml ( ex. url: http://yourdomain.com )
canonical: true

# Change headers hierarchy on site-subtitle (will be main site description) and on all post/pages titles for better SEO-optimization.
seo: false

# If true, will add site-subtitle to index page, added in main hexo config.
# subtitle: Subtitle
index_with_subtitle: false

# ---------------------------------------------------------------
# Menu Settings
# ---------------------------------------------------------------

# When running the site in a subdirectory (e.g. domain.tld/blog), remove the leading slash from link value (/archives -> archives).
# Usage: `Key: /link/ || icon`
# Key is the name of menu item. If translate for this menu will find in languages - this translate will be loaded; if not - Key name will be used. Key is case-senstive.
# Value before `||` delimeter is the target link.
# Value after `||` delimeter is the name of FontAwesome icon. If icon (with or without delimeter) is not specified, question icon will be loaded.
menu: # 菜单路径 注意:下边的 || 不能去掉 后边表示的是 对应的图标(如果你不需要,设置一两项即可)
home: / || home # 表示主页
tags: /tags/ || tags # 表示标签
categories: /categories/ || th # 表示分类
archives: /archives/ || archive #表示归档
about: /about/ || user #表示关于我
life: /life/ || heart
#schedule: /schedule/ || calendar
#sitemap: /sitemap.xml || sitemap
#commonweal: /404/ || heartbeat # 公益活动

# Enable/Disable menu icons.
menu_icons: # 这里是图标设置 和上边的 || 后面的一致
enable: true
home: home
tags: tags
categories: th
archives: archive
about: user
life: heart
## 注意:此处设置首页和归档是默认存在的,其他标签需再设置,后面单独说

# ---------------------------------------------------------------
# Scheme Settings 这里是next主题的样式排版设置
# ---------------------------------------------------------------

# Schemes next给提供了如下四个页面布局方式 只能选择其中的一个使用,具体样式,可自己动手试试,我这里选择的是Mist
# scheme: Muse
scheme: Mist
# scheme: Pisces
# scheme: Gemini

# ---------------------------------------------------------------
# Sidebar Settings 社交设置
# ---------------------------------------------------------------

# Social Links.
# Usage: `Key: permalink || icon`
# Key is the link label showing to end users.
# Value before `||` delimeter is the target permalink.
# Value after `||` delimeter is the name of FontAwesome icon. If icon (with or without delimeter) is not specified, globe icon will be loaded.
social: # 自己的社交链接 比如这里我设置了 Github  和  邮箱,下面还可以设置 微博之类的 自己动手设置试试
GitHub: https://github.com/yg201506 || github
E-Mail: number_nine@126.com || envelope
#Google: https://plus.google.com/yourname || google
#Twitter: https://twitter.com/yourname || twitter
#FB Page: https://www.facebook.com/yourname || facebook
#VK Group: https://vk.com/yourname || vk
#StackOverflow: https://stackoverflow.com/yourname || stack-overflow
#YouTube: https://youtube.com/yourname || youtube
#Instagram: https://instagram.com/yourname || instagram
#Skype: skype:yourname?call|chat || skype

social_icons: # 这里是设置上面社交链接 的对应图标的 对应的设为 true 即可
enable: true
Github: github
icons_only: false
transition: false

# Blog rolls  # 这里是设置一些相关链接 我这里设置了一些推荐阅读的网站,可自行设置
links_icon: link
links_title: 推荐阅读
# links_layout: block
links_layout: inline
links:
w3school: http://www.w3school.com.cn/
菜鸟教程: http://www.runoob.com/
廖雪峰官网: https://www.liaoxuefeng.com/

# Sidebar Avatar
# in theme directory(source/images): /images/avatar.gif
# in site  directory(source/uploads): /uploads/avatar.gif
avatar: /images/avatar.jpg  # 这里设置自己的头像

# Table Of Contents in the Sidebar # 文章自动显示的目录
toc:
enable: true

# Automatically add list number to toc. 文章是否显示序号,显示则设置为true
number: false  #是否显示小标题序列号

# If true, all words will placed on next lines if header width longer then sidebar width.
wrap: false

# Creative Commons 4.0 International License.
# http://creativecommons.org/
# Available: by | by-nc | by-nc-nd | by-nc-sa | by-nd | by-sa | zero
#creative_commons: by-nc-sa
#creative_commons:

sidebar:
# Sidebar Position, available value: left | right (only for Pisces | Gemini).
position: left
#position: right

# Sidebar Display, available value (only for Muse | Mist):
#  - post    expand on posts automatically. Default.
#  - always  expand for all pages automatically
#  - hide    expand only when click on the sidebar toggle icon.
#  - remove  Totally remove sidebar including sidebar toggle.
display: post
#display: always
#display: hide
#display: remove

# Sidebar offset from top menubar in pixels (only for Pisces | Gemini).
offset: 12

# Back to top in sidebar (only for Pisces | Gemini).
b2t: false

# Scroll percent label in b2t button.
scrollpercent: false

# Enable sidebar on narrow view (only for Muse | Mist).
onmobile: false

# ---------------------------------------------------------------
# Post Settings
# ---------------------------------------------------------------

#此处设置是否启用“<!-- more -->”标记,启用之后再首页达到如下效果(代码末尾效果图),即一篇文章不完全在首页显示(阅读全文)
# Automatically scroll page to section which is under <!-- more --> mark.
scroll_to_more: true

# Automatically saving scroll position on each post/page in cookies.
save_scroll: false

# Automatically excerpt description in homepage as preamble text.
excerpt_description: true

# Automatically Excerpt. Not recommend.
# Please use <!-- more --> in the post to control excerpt accurately.
auto_excerpt:
enable: true
length: 120

# Post meta display settings
post_meta:
item_text: true
created_at: true
updated_at: false
categories: true

# Post wordcount display settings
# Dependencies: https://github.com/willin/hexo-wordcount
post_wordcount:
item_text: true
wordcount: true
min2read: true
totalcount: true
separated_meta: true

# Wechat Subscriber 设置微信添加方式
wechat_subscriber:
enabled: true
qcode: /images/mywechat.jpg
description: 扫一扫添加微信好友

# Reward  # 设置打赏方式
reward_comment: 如果觉得文章不错,请我吃根辣条吧~~
wechatpay: /images/wxpay.png
alipay: /images/alipay.png
# bitcoin: /images/bitcoin.png

# Declare license on posts
post_copyright:
enable: false
license: CC BY-NC-SA 3.0
license_url: https://creativecommons.org/licenses/by-nc-sa/3.0/

# ---------------------------------------------------------------
# Misc Theme Settings
# ---------------------------------------------------------------

# Reduce padding / margin indents on devices with narrow width.
mobile_layout_economy: false

# Android Chrome header panel color ($black-deep).
android_chrome_color: "#222"

# Custom Logo.
# !!Only available for Default Scheme currently.
# Options:
#   enabled: [true/false] - Replace with specific image
#   image: url-of-image   - Images's url
custom_logo:
enabled: false
image:

# Code Highlight theme
# Available value:
#    normal | night | night eighties | night blue | night bright
# https://github.com/chriskempson/tomorrow-theme
highlight_theme: night eighties
创建其他页面
首页和归档是默认存在的,不需要我们自己创建,但是其他的几个诸如分类,标签,关于是要我们自己创建的
如图
- 创建分类:终端hexo根目录下键入命令 hexo new page categories 之后我们进入 hexo/source目录下发现多出一个名为 categories 的文件夹, 打开categories下的index.md,可以看到是这样的 如图

- 标签页面和关于页面的创建方法都是和分类的一样,重复上一步即可。
创建第一篇博文
我们一直在配置环境,还没有真正动手写博客,下面我们来创建第一篇博客。 - 仍然是用new命令创建:在终端hexo下键入命令 new hexo “文章标题”
注:此命令无“page” - 打开source文件夹下的_posts文件,就可以看到我们刚刚创建的 “文章名称”.md的 文件,用编辑器打开,就可以编写内容了,其中文章可以设置分类和标签,如图
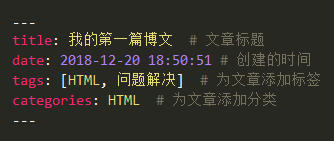
其中
tags: [HTML,问题解决]
表示这篇文章标签为“HTML”和“问题解决”,即多个标签表示方法,也可用
tags: #注意空格
- HTML
- 问题解决
提交到远程服务
下面把我们的博客提交一下,上一篇我们已经把Blog部署到了GitHub上,所以可以提交到github服务器上。
6. hexo clean 注意:每次提交前建议都执行一下该命令,清除一下
7. hexo g 生成本地静态文件
8. hexo s 启动本地服务,在本地预览
9. hexo d 本地预览无误后,提交到远仓
下面我们再打开网址 https://yg201506.github.io (此处更换你自己的io地址)就可以访问我们刚刚创建的博文了
总结
认真看这篇文章,没搞出来的效果想想哪里没有设置,当初我就是太马虎了,没有注重细节,想让Blog更个性化,可以参考点我查看更多炫酷设置,百度一下吧,我暂时帮你到这里了,接下来还有一篇会写一下怎么绑定个人的域名。更多内容也可关注我的公众号:随心下,谢谢支持。
更多精彩微信关注:随心下(Suixinxia007)


- github+hexo搭建自己的博客网站(四)主题之外的一些基本配置(百度/google统计配置,不蒜子网站访问量显示)
- Hexo+GitHub搭建静态博客平台(五)-NexT主题配置
- github+hexo搭建自己的博客网站(三)主题之外的一些基本配置(图片位置,文章目录功能)
- hexo+gitHub搭建个人独立博客 Next主题配置(二)
- 在Github上使用Hexo搭建博客并配置tranquilpeak主题(原)
- 【完全指南】如何在Github上使用Hexo搭建自己的Blog
- 在github上搭建blog(基于Node.js的Hexo+next)
- Hexo+GitHub搭建静态博客平台(三)-Next主题基本使用
- GitHub + Hexo + NexT 主题 免费搭建博客-参考链接收集
- github+hexo搭建自己的博客网站(六)进阶配置(搜索引擎收录,优化你的url,添加RSS)
- 个人博客搭建第一步:基础配置github+hexo+next
- Mac搭建Hexo博客及NexT主题配置优化
- github+hexo搭建自己的博客网站(二)更换主题yilia
- github+hexo搭建自己的博客网站(六)进阶配置(搜索引擎收录,优化你的url)
- 搭建自己的Blog (Github+Hexo)
- 利用Github Pages 和 Hexo快速搭建自己的Blog
- Hexo+GitHub+Next主题搭建个人博客
- github+hexo搭建自己的博客网站(五)进阶配置(畅言实现博客的评论)
- hexo框架-next主题-github搭建个人博客
- github+hexo搭建自己的博客网站(五)进阶配置(畅言实现博客的评论)