Spark RPC 框架源码分析(二)运行时序
前情提要:
一. Spark RPC 概述概述
上一篇我们已经说明了 Spark RPC 框架的一个简单例子,以及一些基本概念的说明。这一篇我们主要讲述其运行时序,从而揭露 Spark RPC 框架的运行原理。我们将分为两部分,分别从服务端和客户端来看。
所用 spark 版本:spark 2.1.0
二. Spark RPC 服务端
我们以上一篇 HelloworldServer 为线索,深入到 Spark RPC 框架来看看启动一个服务时都做了些什么。
HelloworldServer{
......
def main(args: Array[String]): Unit = {
//val host = args(0)
val host = "localhost"
val config = RpcEnvServerConfig(new RpcConf(), "hello-server", host, 52345)
val rpcEnv: RpcEnv = NettyRpcEnvFactory.create(config)
val helloEndpoint: RpcEndpoint = new HelloEndpoint(rpcEnv)
rpcEnv.setupEndpoint("hello-service", helloEndpoint)
rpcEnv.awaitTermination()
}
......
}

这段代码中有两个主要流程,我们分别来说
2.1 Spark RPC 服务端 NettyRpcEnvFactory.create(config)
首先是下面这条代码的运行流程:
val rpcEnv: RpcEnv = NettyRpcEnvFactory.create(config)
其实就是通过 NettyRpcEnvFactory 创建出一个 RPC Environment ,其具体类是 NettyRpcEnv 。
我们再来看看创建过程中会发生什么。
object NettyRpcEnvFactory extends RpcEnvFactory {
......
def create(config: RpcEnvConfig): RpcEnv = {
val conf = config.conf

// Use JavaSerializerInstance in multiple threads is safe. However, if we plan to support
// KryoSerializer in future, we have to use ThreadLocal to store SerializerInstance
val javaSerializerInstance =
new JavaSerializer(conf).newInstance().asInstanceOf[JavaSerializerInstance]
//根据配置以及地址,new 一个 NettyRpcEnv ,
val nettyEnv =
new NettyRpcEnv(conf, javaSerializerInstance, config.bindAddress)
//如果是服务端创建的,那么会启动服务。服务端和客户端都会通过这个方法创建一个 NettyRpcEnv ,但区别就在这里了。
if (!config.clientMode) {
val startNettyRpcEnv: Int => (NettyRpcEnv, Int) = { actualPort =>
//启动服务的方法,下一步就是调用这个方法了
nettyEnv.startServer(config.bindAddress, actualPort)
(nettyEnv, nettyEnv.address.port)
}
try {
Utils.startServiceOnPort(config.port, startNettyRpcEnv, conf, config.name)._1
} catch {
case NonFatal(e) =>
nettyEnv.shutdown()
throw e
}
}
nettyEnv
}
......
}
还没完,如果是服务端调用这段代码,那么主要的功能是创建 RPCEnv ,即 NettyRpcEnv(客户端在后面说) 。以及通过下面这行代码,
nettyEnv.startServer(config.bindAddress, actualPort)
去调用相应的方法启动服务端的服务。下面进入到这个方法中去看看。
class NettyRpcEnv(
val conf: RpcConf,
javaSerializerInstance: JavaSerializerInstance,
host: String) extends RpcEnv(conf) {
......
def startServer(bindAddress: String, port: Int): Unit = {
// here disable security
val bootstraps: java.util.List[TransportServerBootstrap] = java.util.Collections.emptyList()
//TransportContext 属于 spark.network 中的部分,负责 RPC 消息在网络中的传输
server = transportContext.createServer(bindAddress, port, bootstraps)
//在每个 RpcEndpoint 注册的时候都会注册一个默认的 RpcEndpointVerifier,它的作用是客户端调用的时候先用它来询问 Endpoint 是否存在。
dispatcher.registerRpcEndpoint(
RpcEndpointVerifier.NAME, new RpcEndpointVerifier(this, dispatcher))
}
......
}
执行完毕之后这个 create 方法就结束。这个流程主要就是开启一些服务,然后返回一个新的 NettyRpcEnv 。
2.2 Spark RPC 服务端 rpcEnv.setupEndpoint("hello-service", helloEndpoint)
这条代码会去调用 NettyRpcEnv 中相应的方法
class NettyRpcEnv(
val conf: RpcConf,
javaSerializerInstance: JavaSerializerInstance,
host: String) extends RpcEnv(conf) {
......
override def setupEndpoint(name: String, endpoint: RpcEndpoint): RpcEndpointRef = {
dispatcher.registerRpcEndpoint(name, endpoint)
}
......
}
我们看到,这个方法主要是调用 dispatcher 进行注册的。dispatcher 的功能上一节已经说了,
Dispatcher 的主要作用是保存注册的RpcEndpoint、分发相应的Message到RpcEndPoint中进行处理。Dispatcher 即是上图中 ThreadPool的角色。它同时也维系一个 threadpool,用来处理每次接受到的 InboxMessage 。而这里处理 InboxMessage 是通过 inbox 实现的。
,这里我们就说一说 dispatcher 的流程。
dispatcher
dispatcher 在 NettyRpcEnv 被创建的时候创建出来。
class NettyRpcEnv(
val conf: RpcConf,
javaSerializerInstance: JavaSerializerInstance,
host: String) extends RpcEnv(conf) {
......
//初始化时创建 dispatcher
private val dispatcher: Dispatcher = new Dispatcher(this)
......
}
dispatcher 类被创建的时候也有几个属性需要注意:
private[netty] class Dispatcher(nettyEnv: NettyRpcEnv) {
......
//每个 RpcEndpoint 其实都会被整合成一个 EndpointData 。并且每个 RpcEndpoint 都会有一个 inbox。
private class EndpointData(
val name: String,
val endpoint: RpcEndpoint,
val ref: NettyRpcEndpointRef) {
val inbox = new Inbox(ref, endpoint)
}

//一个阻塞队列,当有 RpcEndpoint 相关请求(InboxMessage)的时候,就会将请求塞到这个队列中,然后被线程池处理。
private val receivers = new LinkedBlockingQueue[EndpointData]

//初始化便创建出来的线程池,当上面的 receivers 队列中没内容时,会阻塞。当有 RpcEndpoint 相关请求(即 InboxMessage )的时候就会立刻执行。
//这里处理 InboxMessage 本质上是调用相应 RpcEndpoint 的 inbox 去处理。
private val threadpool: ThreadPoolExecutor = {
val numThreads = nettyEnv.conf.getInt("spark.rpc.netty.dispatcher.numThreads",
math.max(2, Runtime.getRuntime.availableProcessors()))
val pool = ThreadUtils.newDaemonFixedThreadPool(numThreads, "dispatcher-event-loop")
for (i <- 0 until numThreads) {
pool.execute(new MessageLoop)
}
pool
}
......
}
了解一些 Dispatcher 的逻辑流程后,我们来正式看看 Dispatcher 的 registerRpcEndpoint 方法。
顾名思义,这个方法就是将 RpcEndpoint 注册到 Dispatcher 中去。当有 Message 到来的时候,便会分发 Message 到相应的 RpcEndPoint 中进行处理。
private[netty] class Dispatcher(nettyEnv: NettyRpcEnv) {
......
def registerRpcEndpoint(name: String, endpoint: RpcEndpoint): NettyRpcEndpointRef = {
val addr = RpcEndpointAddress(nettyEnv.address, name)
//注册 RpcEndpoint 时需要的是 上面的 EndpointData ,其中就包含 endpointRef ,这个主要是供客户端使用的。
val endpointRef = new NettyRpcEndpointRef(nettyEnv.conf, addr, nettyEnv)
//多线程环境下,注册一个 RpcEndpoint 需要判断现在是否处于 stop 状态。
synchronized {
if (stopped) {
throw new IllegalStateException("RpcEnv has been stopped")
}
//新建 EndpointData 并存储到一个 ConcurrentMap 中。
if (endpoints.putIfAbsent(name, new EndpointData(name, endpoint, endpointRef)) != null) {
throw new IllegalArgumentException(s"There is already an RpcEndpoint called $name")
}
val data = endpoints.get(name)
endpointRefs.put(data.endpoint, data.ref)
//将 这个 EndpointData 加入到 receivers 队列中,此时 dispatcher 中的 threadpool 会去处理这个加进来的 EndpointData
//处理过程是调用它的 inbox 的 process()方法。然后 inbox 会等待消息到来。
receivers.offer(data) // for the OnStart message
}
endpointRef
}
......
}
Spark RPC 服务端逻辑小结:我们说明了 Spark RPC 服务端启动的逻辑流程,分为两个部分,第一个是 Spark RPC env ,即 NettyRpcEnv 的创建过程,第二个则是 RpcEndpoint 注册到 dispatcher 的流程。
1. NettyRpcEnvFactory 创建 NettyRpcEnv
- 根据地址创建 NettyRpcEnv。
- NettyRpcEnv 开始启动服务,包括 TransportContext 根据地址开启监听服务,向 Dispacther 注册一个 RpcEndpointVerifier 等待。
2. Dispatcher 注册 RpcEndpoint
- Dispatcher 初始化时便创建一个线程池并阻塞等待 receivers 队列中加入新的 EndpointData
- 一旦新加入 EndpointData 便会调用该 EndpointData 的 inbox 去处理消息。比如 OnStart 消息,或是 RPCMessage 等等。
三.Spark RPC 客户端
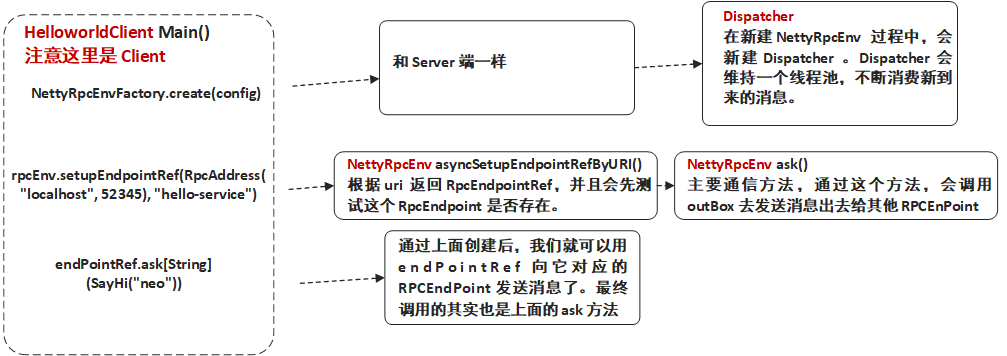
依旧是以上一节 Spark RPC 客户端 HelloWorld 的为线索,我们来逐层深入 Spark RPC 客户端 HelloworldClient 的 asyncCall() 方法。
object HelloworldClient {
......
def asyncCall() = {
val rpcConf = new RpcConf()
val config = RpcEnvClientConfig(rpcConf, "hello-client")
val rpcEnv: RpcEnv = NettyRpcEnvFactory.create(config)
val endPointRef: RpcEndpointRef = rpcEnv.setupEndpointRef(RpcAddress("localhost", 52345), "hello-service")
val future: Future[String] = endPointRef.ask[String](SayHi("neo"))
future.onComplete {
case scala.util.Success(value) => println(s"Got the result = $value")
case scala.util.Failure(e) => println(s"Got error: $e")
}
Await.result(future, Duration.apply("30s"))
rpcEnv.shutdown()
}
......
}
创建 Spark RPC 客户端 Env(即 NettyRpcEnvFactory ) 部分和 Spark RPC 服务端是一样的,只是不会开启监听服务,这里就不详细展开。
我们从这一句开始看,这也是 Spark RPC 客户端和服务端区别的地方所在。
val endPointRef: RpcEndpointRef = rpcEnv.setupEndpointRef(RpcAddress("localhost", 52345), "hello-service")
setupEndpointRef()
上面的的 setupEndpointRef 最终会去调用下面 setupEndpointRef() 这个方法,这个方法中又进行一次跳转,跳转去 setupEndpointRefByURI 这个方法中 。需要注意的是这两个方法都是 RpcEnv 里面的,而 RpcEnv 是抽象类,它里面只实现部分方法,而 NettyRpcEnv 继承了它,实现了全部方法。
abstract class RpcEnv(conf: RpcConf) {
......
def setupEndpointRef(address: RpcAddress, endpointName: String): RpcEndpointRef = {
//会跳转去调用下面的方法
setupEndpointRefByURI(RpcEndpointAddress(address, endpointName).toString)
}

def setupEndpointRefByURI(uri: String): RpcEndpointRef = {
//其中 asyncSetupEndpointRefByURI() 返回的是 Future[RpcEndpointRef]。 这里就是阻塞,等待返回一个 RpcEndpointRef。
// defaultLookupTimeout.awaitResult 底层调用 Await.result 阻塞 直到结果返回或返回异常
defaultLookupTimeout.awaitResult(asyncSetupEndpointRefByURI(uri))
}
......
}
这里最主要的代码其实就一句,
defaultLookupTimeout.awaitResult(asyncSetupEndpointRefByURI(uri))
这一段可以分为两部分, 第一部分的 defaultLookupTimeout.awaitResult 其实底层是调用 Await.result 阻塞等待一个异步操作,直到结果返回。
而asyncSetupEndpointRefByURI(uri) 则是根据给定的 uri 去返回一个 RpcEndpointRef ,它是在 NettyRpcEnv 中实现的:
class NettyRpcEnv(
val conf: RpcConf,
javaSerializerInstance: JavaSerializerInstance,
host: String) extends RpcEnv(conf) {
......
def asyncSetupEndpointRefByURI(uri: String): Future[RpcEndpointRef] = {
//获取地址
val addr = RpcEndpointAddress(uri)
//根据地址等信息新建一个 NettyRpcEndpointRef 。
val RpcendpointRef = new NettyRpcEndpointRef(conf, addr, this)
//每个新建的 RpcendpointRef 都有先有一个对应的verifier 去检查服务端存不存在对应的 Rpcendpoint 。
val verifier = new NettyRpcEndpointRef(
conf, RpcEndpointAddress(addr.rpcAddress, RpcEndpointVerifier.NAME), this)
//向服务端发送请求判断是否存在对应的 Rpcendpoint。
verifier.ask[Boolean](RpcEndpointVerifier.createCheckExistence(endpointRef.name)).flatMap { find =>
if (find) {
Future.successful(endpointRef)
} else {
Future.failed(new RpcEndpointNotFoundException(uri))
}
}(ThreadUtils.sameThread)
}
......
}
asyncSetupEndpointRefByURI() 这个方法实现两个功能,第一个就是新建一个 RpcEndpointRef 。第二个是新建一个 verifier ,这个 verifier 的作用就是先给服务端发送一个请求判断是否存在 RpcEndpointRef 对应的 RpcEndpoint 。
这段代码中最重要的就是 verifiter.ask[Boolean](...) 了。如果有找到之后就会调用 Future.successful 这个方法,反之则会 通过 Future.failed 抛出一个异常。
ask 可以算是比较核心的一个方法,我们可以到 ask 方法中去看看。
class NettyRpcEnv{
......
private[netty] def ask[T: ClassTag](message: RequestMessage, timeout: RpcTimeout): Future[T] = {
val promise = Promise[Any]()
val remoteAddr = message.receiver.address
//
def onFailure(e: Throwable): Unit = {
//      println("555");
if (!promise.tryFailure(e)) {
log.warn(s"Ignored failure: $e")
}
}

def onSuccess(reply: Any): Unit = reply match {
case RpcFailure(e) => onFailure(e)
case rpcReply =>
println("666");
if (!promise.trySuccess(rpcReply)) {
log.warn(s"Ignored message: $reply")
}
}

try {
if (remoteAddr == address) {
val p = Promise[Any]()
p.future.onComplete {
case Success(response) => onSuccess(response)
case Failure(e) => onFailure(e)
}(ThreadUtils.sameThread)
dispatcher.postLocalMessage(message, p)
} else {
//跳转到这里执行
//封装一个 RpcOutboxMessage ,同时 onSuccess 方法也是在这里注册的。
val rpcMessage = RpcOutboxMessage(serialize(message),
onFailure,
(client, response) => onSuccess(deserialize[Any](client, response)))
postToOutbox(message.receiver, rpcMessage)
promise.future.onFailure {
case _: TimeoutException =>  println("111");rpcMessage.onTimeout()
//          case _ => println("222");
}(ThreadUtils.sameThread)
}

val timeoutCancelable = timeoutScheduler.schedule(new Runnable {
override def run(): Unit = {
//          println("333");
onFailure(new TimeoutException(s"Cannot receive any reply in ${timeout.duration}"))
}
}, timeout.duration.toNanos, TimeUnit.NANOSECONDS)
//promise 对应的 future onComplete时会去调用,但当 successful 的时候,上面的 run 并不会被调用。
promise.future.onComplete { v =>
//        println("4444");
timeoutCancelable.cancel(true)
}(ThreadUtils.sameThread)

} catch {
case NonFatal(e) =>
onFailure(e)
}

promise.future.mapTo[T].recover(timeout.addMessageIfTimeout)(ThreadUtils.sameThread)
}
......
}
这里涉及到使用一些 scala 多线程的高级用法,包括 Promise 和 Future。如果想要对这些有更加深入的了解,可以参考这篇文章。
这个函数的作用从名字中就可以看得出,其实就是将要 发送的消息封装成一个 RpcOutboxMessage ,然后交给 OutBox 去发送,OutBox 和前面所说的 InBox 对应,对应 Actor 模型中的 MailBox(信箱)。用于发送和接收消息。
其中使用到了 Future 和 Promise 进行异步并发以及错误处理,比如当发送时间超时的时候 Promise 就会返回一个 TimeoutException ,而我们就可以设置自己的 onFailure 函数去处理这些异常。
OK,注册完 RpcEndpointRef 后我们便可以用它来向服务端发送消息了,而其实 RpcEndpointRef 发送消息还是调用 ask 方法,就是上面的那个 ask 方法。上面也有介绍,本质上就是通过 OutBox 进行处理。
我们来梳理一下客户端的发送流程。
客户端逻辑小结:客户端和服务端比较类似,都是需要创建一个 NettyRpcEnv 。不同的是接下来客户端创建的是 RpcEndpointRef ,并用之向服务端对应的 RpcEndpoint 发送消息。
1. NettyRpcEnvFactory 创建 NettyRpcEnv
- 根据地址创建 NettyRpcEnv。 根据地址开启监听服务,向 Dispacther 注册一个 RpcEndpointVerifier 等待。
2. 创建 RpcEndpointRef
- 创建一个新的 RpcEndpointRef
- 创建对应的 verifier ,使用 verifier 向服务端发送请求,判断对应的 RpcEndpoint 是否存在。若存在,返回该 RpcEndpointRef ,否则抛出异常。
3. RpcEndpointRef 使用同步或者异步的方式发送请求。
OK,以上就是 Spark RPC 时序的源码分析。下一篇会将一个实际的例子,Spark 的心跳机制和代码。喜欢的话就关注一波吧
推荐阅读 :
从分治算法到 MapReduce
Actor并发编程模型浅析
大数据存储的进化史 --从 RAID 到 Hadoop Hdfs
一个故事告诉你什么才是好的程序员

- Hama框架学习(一) 从源码角度分析job的提交和运行过程
- 5.Spark Streaming流计算框架的运行流程源码分析2
- 分析CSLA.Net 4.* 开源框架的源码,深入理解框架内部运行机制
- (版本定制)第5课:基于案例分析Spark Streaming流计算框架的运行源码
- 5.Spark Streaming流计算框架的运行流程源码分析
- 基于案例一节课贯通Spark Streaming流计算框架的运行源码
- Android Sqlite框架 GreenDao的源码分析笔记
- Fragment运行机制源码分析(一)
- ④NuPlayer播放框架之Renderer源码分析
- 简单RCP框架源码分析
- Linux驱动修炼之道-SPI驱动框架源码分析(中)
- Java协程框架--Kilim源码分析
- Disruptor 框架源码分析
- 简单RCP框架源码分析
- 源码分析微信热修复框架Tinker的类加载过程 .
- 网络框架okHttp源码分析
- 【转载】高性能网络I/O框架-netmap源码分析(3)
- Linux驱动修炼之道-DMA框架源码分析
- 应用框架的设计与实现——.NET平台(6 源码分析)
- min3d框架源码分析(二)