SpringBoot | 第三十一章:MongoDB的集成和使用
前言
上一章节,简单讲解了如何集成
Spring-data-jpa。本章节,我们来看看如何集成NoSQL的Mongodb。mongodb是最早热门非关系数据库的之一,使用也比较普遍。最适合来存储一些非结构数据了,适合对大量或者无固定格式的数据进行存储,比如:日志、缓存等。
一点知识
以下部分关于Mongodb
介绍,来自网站:https://www.mongodb.com/cn 、纯洁的微笑
MongoDB简介
MongoDB(来自于英文单词“Humongous”,中文含义为“庞大”)是可以应用于各种规模的企业、各个行业以及各类应用程序的开源数据库。作为一个适用于敏捷开发的数据库,
MongoDB的数据模式可以随着应用程序的发展而灵活地更新。与此同时,它也为开发人员 提供了传统数据库的功能:二级索引,完整的查询系统以及严格一致性等等。
MongoDB能够使企业更加具有敏捷性和可扩展性,各种规模的企业都可以通过使用MongoDB来创建新的应用,提高与客户之间的工作效率,加快产品上市时间,以及降低企业成本。
MongoDB
是专为可扩展性,高性能和高可用性而设计的数据库。它可以从单服务器部署扩展到大型、复杂的多数据中心架构。利用内存计算的优势,
MongoDB能够提供高性能的数据读写操作。
MongoDB的本地复制和自动故障转移功能使您的应用程序具有企业级的可靠性和操作灵活性。
简单来说,
MongoDB是一个基于分布式文件存储的数据库,它是一个介于关系数据库和非关系数据库之间的产品,其主要目标是在键/值存储方式(提供了高性能和高度伸缩性)和传统的RDBMS系统(具有丰富的功能)之间架起一座桥梁,它集两者的优势于一身。
MongoDB支持的数据结构非常松散,是类似
json的bson格式,因此可以存储比较复杂的数据类型,也因为他的存储格式也使得它所存储的数据在Nodejs程序应用中使用非常流畅。
传统的关系数据库一般由数据库(database)、表(table)、记录(record)三个层次概念组成,MongoDB是由数据库(database)、集合(collection)、文档对象(document)三个层次组成。MongoDB对于关系型数据库里的表,但是集合中没有列、行和关系概念,这体现了模式自由的特点。
MongoDB中的一条记录就是一个文档,是一个数据结构,由字段和值对组成。MongoDB文档与JSON对象类似。字段的值有可能包括其它文档、数组以及文档数组。MongoDB支持OS X、Linux及Windows等操作系统,并提供了Python,PHP,Ruby,Java及C++语言的驱动程序,社区中也提供了对Erlang及.NET等平台的驱动程序。
MongoDB的适合对大量或者无固定格式的数据进行存储,比如:日志、缓存等。对事物支持较弱,不适用复杂的多文档(多表)的级联查询。
SpringBoot集成MongoDB
得力于
SpringBoot方便性,集成MongoDB也是很简单的。可通过三种方式进行访问,分别是:原生Db对象、MongoTemplate以及MongoRepository。原生的方式需要连接其语法规则,这里就不阐述了,毕竟不熟悉。还是使用封装好的吧,开箱急用!
准备工作
本文示例的MongoDB版本为:4.0.3。
可视化工具为:studio-3t-x64。
至于
MongoDB如何安装,大家简单百度下就好了,很简单。下载个
msi,直接安装即可。
下载地址:https://fastdl.mongodb.org/win32/mongodb-win32-x86_64-2008plus-ssl-4.0.3-signed.msi
0.加入POM依赖。
<dependency>
<groupId>org.springframework.boot</groupId>
<artifactId>spring-boot-starter-data-mongodb</artifactId>
</dependency>
<dependency>
<groupId>org.springframework.boot</groupId>
<artifactId>spring-boot-starter-web</artifactId>
</dependency>
1.创建实体。
/**
* 通知消息对象
* @author oKong
*
*/
@Document(collection="notify_msg")//集合名
@Data
@Builder
@NoArgsConstructor
@AllArgsConstructor
public class NotifyMsg implements Serializable{

/**
*
*/
private static final long serialVersionUID = -8985545025018238754L;

@Id
String id;

/**
* 消息类型
*/
@Indexed
String notifyType;

/**
* 消息单号
*/
@Indexed
String notifyNo;

/**
* 消息通知日期
*/
String notifyDate;

/**
* 消息体
*/
@Field("notifyMsg")//可指定存储时的字段名
String notifyMsg;

/**
* 创建时间
*/
@CreatedDate
Date gmtCreate;
}
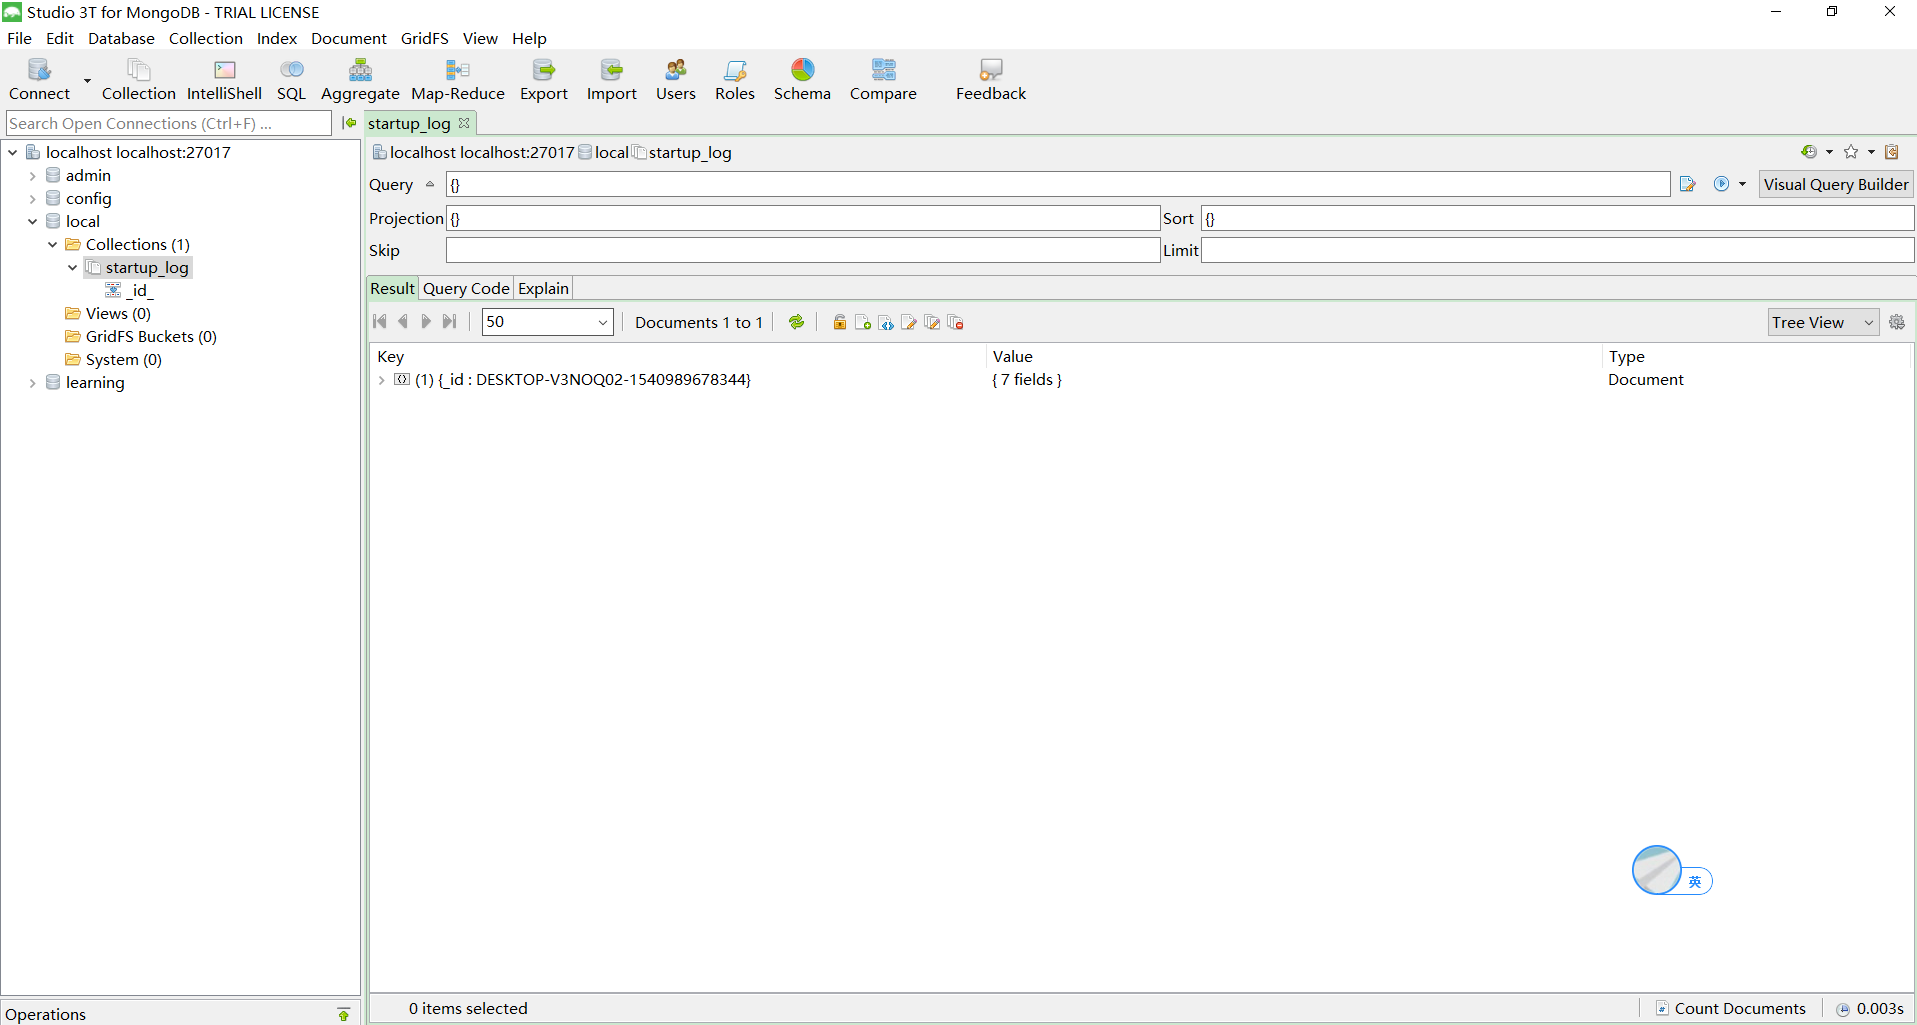
这里注意:@Document(collection="notify_msg") 表示:操作的集合为:notify_msg
。
这个可手动使用工具创建下。
另外,针对@CreatedDate
注解,也和之前的jpa
用法一直,创建时会自动赋值,需要在启动类中添加@EnableMongoAuditing
注解使其生效!
同时,可使用@Field
注解,可指定存储的键值名称,默认就是类字段名。如设置@Field("notify_Msg")后,效果如下:

2.配置文件中填写连接地址。
#mongodb
# 单机模式 mongodb://name:pass@ip:port/database
# 集群模式 mongodb://user:pwd@ip1:port1,ip2:port2/database
spring.data.mongodb.uri=mongodb://127.0.0.1:27017/learning
注意,这里填写格式
- 单机模式:mongodb://name:pwd@ip:port/database
- 集群模式:mongodb://name:pwd@ip1:port1,ip2:port2/database
3.启动类编写。
/**
* mongodb 集成示例
* @author oKong
*
*/
@SpringBootApplication
@EnableMongoAuditing
//@EnableMongoRepositories(basePackages="cn.lqdev")//当有些dao不在default page下时 可通过此方法进行注册扫描包
@Slf4j
public class MongodbApplication {

public static void main(String[] args) throws Exception {
SpringApplication.run(MongodbApplication.class, args);
log.info("spring-boot-mongodb-chapter31启动!");
}
}
注意:当使用MongoRepositories
时,可能有些MongoRepositories
类不在默认的包路径(启动类路径)下,可使用@EnableMongoRepositories
的basePackages
需要扫描的路径信息。若都在默认的包路径下,可以不加此注解的。
MongoTemplate方式
以下示例下
MongoTemplate方式进行数据操作。
0.创建一个接口类:
/**
* 接口服务
* @author oKong
*
*/
public interface NotifyMsgService {

/**
* 保存数据
* @author 作者:oKong
*/
NotifyMsg saveNotifyMsg(NotifyMsg msg);

/**
* 根据消息号查找
* @author 作者:oKong
*/
NotifyMsg findNotifyMsgByNo(String notifyNo);

/**
* 根据消息日期查找
* @author 作者:oKong
*/
List<NotifyMsg> findNotifyMsgByDate(String notifyDate);

/**
* 根据id进行删除 返回删除的对象
* @author 作者:oKong
*/
NotifyMsg delNotifyMsgById(String id);

}
1.接口实现类,引入
MongoTemplate。
/**
* MongoTemplate 访问实现
* @author oKong
*
*/
@Service
public class NotifyMsgServiceImpl implements NotifyMsgService{

@Autowired
MongoTemplate mongoTemplate;

@Override
public NotifyMsg saveNotifyMsg(NotifyMsg msg) {
//使用 save和insert都可以进行插入
//区别:当存在"_id"时
//insert 插入已经存在的id时 会异常
//save 则会进行更新
//简单来说 save 就是不存在插入 存在更新
mongoTemplate.insert(msg);
mongoTemplate.save(msg);

return msg;
}

@Override
public NotifyMsg findNotifyMsgByNo(String notifyNo) {
//根据Criteria 改造查询条件
Query query = new Query(Criteria.where("notifyNo").is(notifyNo));
return mongoTemplate.findOne(query, NotifyMsg.class);
}

@Override
public List<NotifyMsg> findNotifyMsgByDate(String notifyDate) {
//查找 notifyDate 根据Criteria 改造查询条件
Query query = new Query(Criteria.where("notifyDate").is(notifyDate));
return mongoTemplate.find(query, NotifyMsg.class);
}

@Override
public NotifyMsg delNotifyMsgById(String id) {
//查找 id 根据Criteria 改造查询条件
Query query = new Query(Criteria.where("id").is(id));
return mongoTemplate.findAndRemove(query, NotifyMsg.class);
}

}
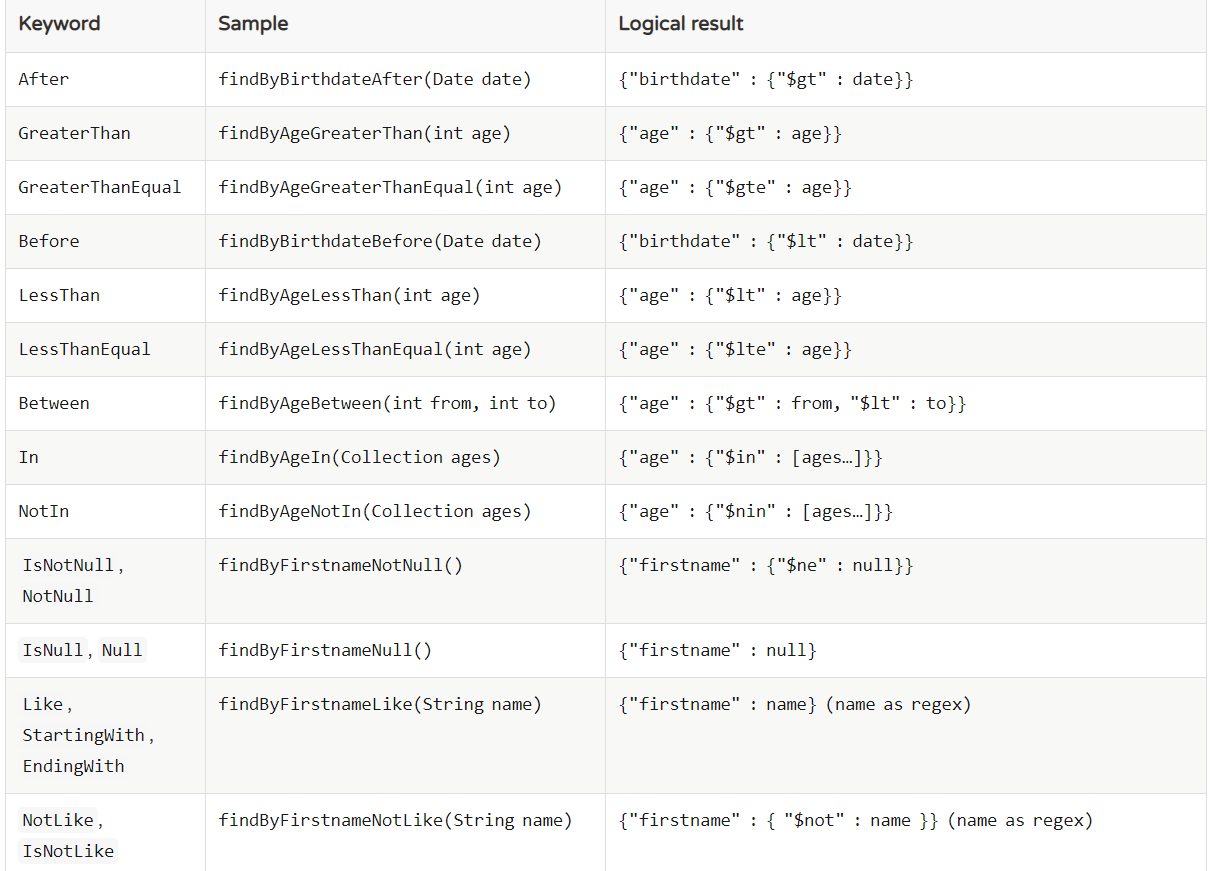
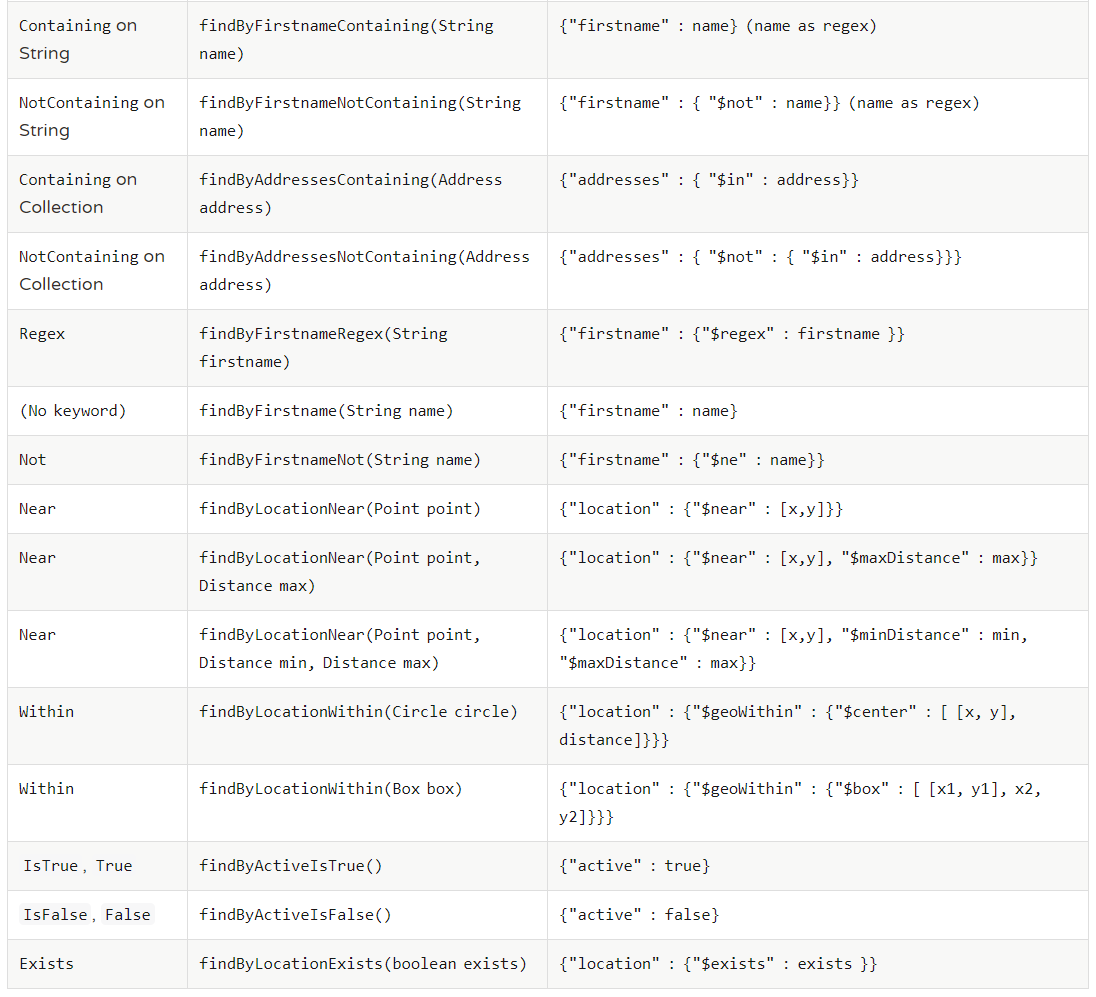
针对查询,可以使用org.springframework.data.mongodb.core.query.Criteria
对象进行构造查询条件。其提供的方法如下:
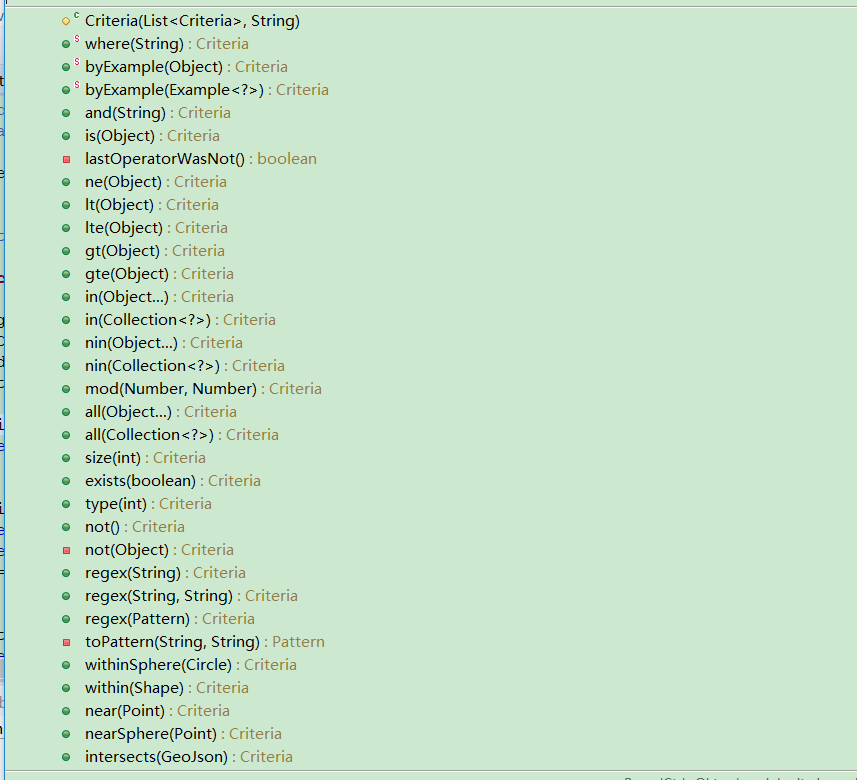
具体使用时,可根据实际情况进行组合查询条件。
针对save
和insert
也需要注意下:
- 在无
_id
情况下,两者都能进行新增操作。 - 存在
_id
,同时记录库里不存在,两者都是进行插入操作。 - 存在
_id
,同时库里也存在记录,save
相当于进行更新操作。而insert
直接就异常了。
2.创建示例控制层。
/**
* mongoTemplate 示例
* @author oKong
*
*/
@RestController
@RequestMapping("/template")
@Slf4j
public class MongoTemplateController {

@Autowired
NotifyMsgService notifyMsgService;

@PostMapping("/add")
public NotifyMsg add(NotifyMsg msg) {
log.info("mongoTemplate方式新增:{}", msg);
return notifyMsgService.saveNotifyMsg(msg);
}

@PostMapping("del/{id}")
public NotifyMsg del(@PathVariable String id) {
log.info("mongoTemplate方式删除:{}", id);
return notifyMsgService.delNotifyMsgById(id);
}

@GetMapping("/find/{no}")
public NotifyMsg findNotifyMsgByNo(@PathVariable String no){
log.info("mongoTemplate方式查找:notifyNo-{}", no);
return notifyMsgService.findNotifyMsgByNo(no);
}

@GetMapping("/find/list/{date}")
public List<NotifyMsg> findNotifyMsgByDate(@PathVariable String date){
log.info("mongoTemplate方式查找:notifyDate-{}", date);
return notifyMsgService.findNotifyMsgByDate(date);
}
}
3.启动应用,使用
Postman进行访问。
- 新增:http://127.0.0.1:8080//template/add
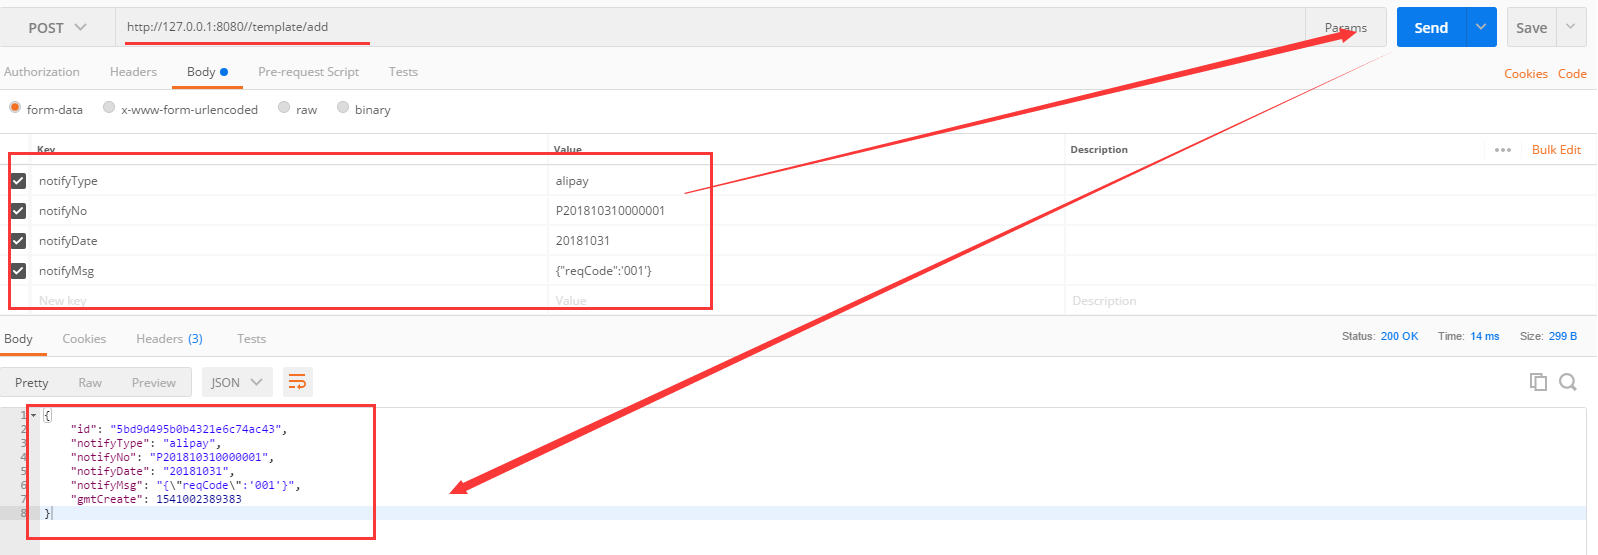
可以看见,已经返回对应的信息,同时数据库也可看见记录了。

其他的都是类似的,大家可自行访问下:
- 根据日期返回列表信息:http://127.0.0.1:8080//template/find/list/具体日期
- 根据ID删除:http://127.0.0.1:8080/template/del/具体ID值
- 根据消息号查询:http://127.0.0.1:8080//template/find/具体消息号
MongoRepository方式
以上还需要自己编写一些类啥的,现在是
jpa的方式进行操作数据,优雅,简单。
0.创建资源类
/**
* MongoRepository 示例
* @author oKong
*
*/
public interface NotifyMsgDao extends MongoRepository<NotifyMsg, String>{

/*
* 根据消息号进行查询
*/
NotifyMsg findByNotifyNo(String notifyNo);

/**
* 根据日期查询 自定义查询
* @author 作者:oKong
*/
//需要注意 查询的语法结构 ,同时这里和`jpa`不一样的地方是,第一个索引值从0 开始。。
@Query("{'notifyDate':?0}")
Page<NotifyMsg> queryBySql(String notifyDate,Pageable pageable);
}
这里需要注意一个地方:和上一章节的自定义sql不同之处是,参数索引值从0
开始。
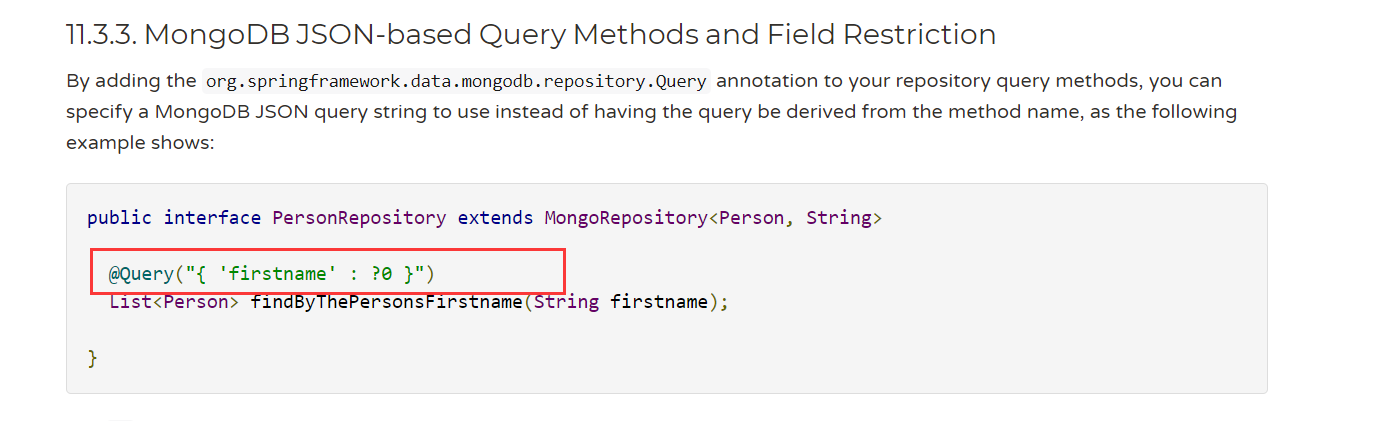
同时,要注意查询的语法。具体用法,可查看:https://docs.spring.io/spring-data/mongodb/docs/1.10.14.RELEASE/reference/html/#mongodb.repositories.queries 这里简单截图下:
1.编写示例控制层。
/**
* MongoRepository 示例
* @author oKong
*
*/
@RestController
@RequestMapping("/repository")
@Slf4j
public class MongoRepositoryController {

@Autowired
NotifyMsgDao notifyMsgDao;

@PostMapping("/add")
public NotifyMsg add(NotifyMsg msg) {
log.info("repository方式新增:{}", msg);
return notifyMsgDao.save(msg);
}

@GetMapping("/find/sql/{date}")
public Page<NotifyMsg> queryBySql(@PathVariable String date){
Pageable pageable = new PageRequest(0, 10);
log.info("repository方式分页sql查找日期:{}", date);
return notifyMsgDao.queryBySql(date, pageable);
}

@GetMapping("/find/{no}")
public NotifyMsg findByNotifyNo(@PathVariable String no) {
log.info("repository方式查找单号:{}", no);
return notifyMsgDao.findByNotifyNo(no);
}

}
2.启动应用,使用
Postman,访问具体的方法,就可以看见相关结果了。
- 新增:http://127.0.0.1:8080/repository/add

- 根据消息日期查询:http://127.0.0.1:8080/repository/find/sql/具体日期

- 根据消息号查询:http://127.0.0.1:8080//template/find/具体消息号
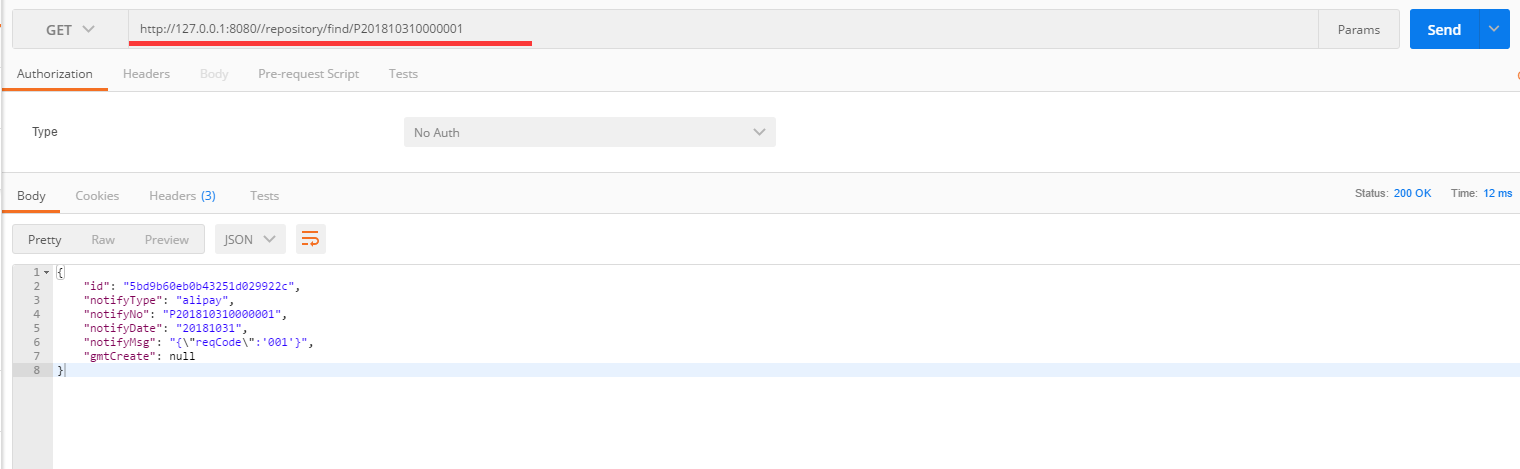
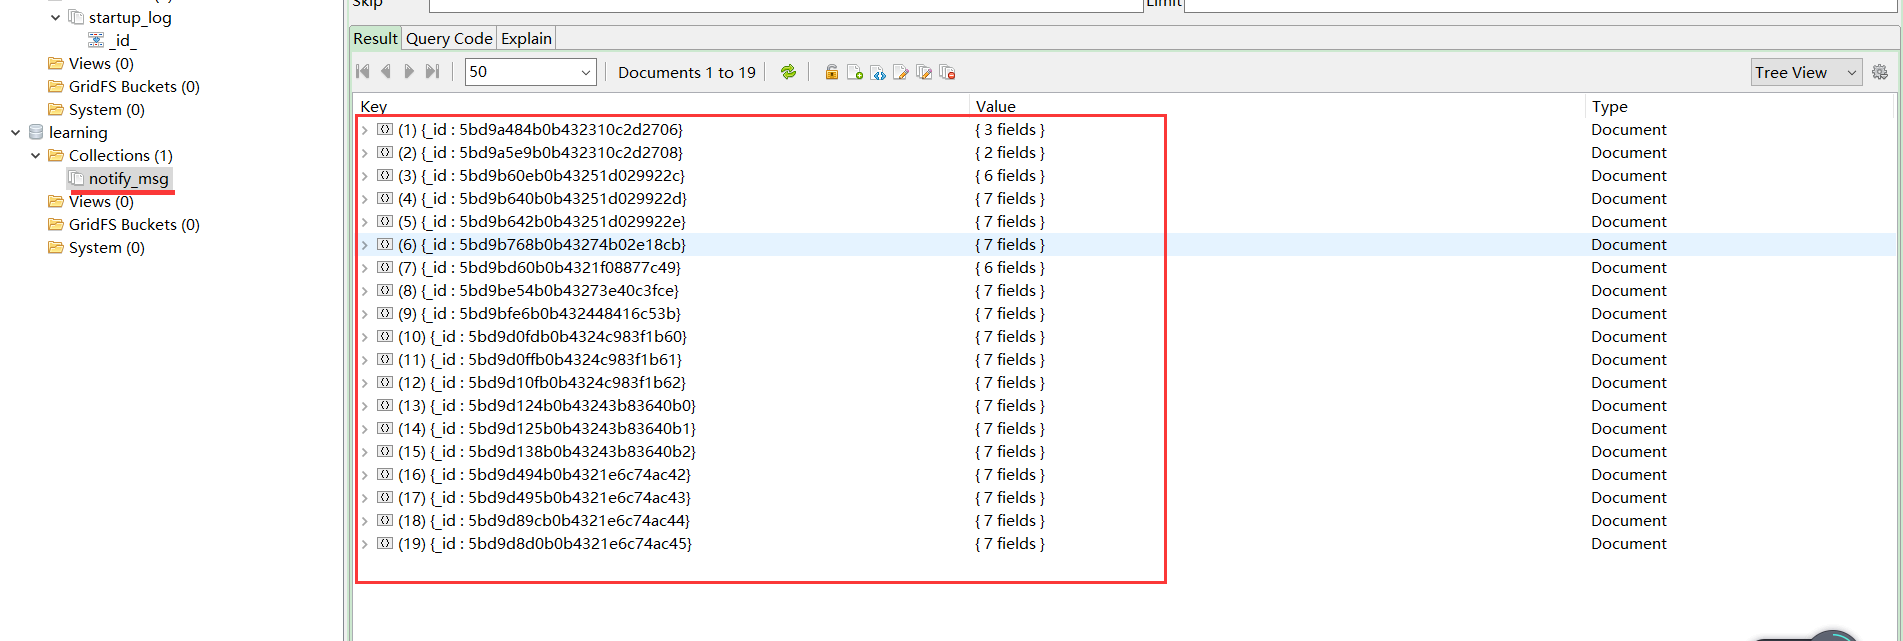
也可直接利用可视化工具,直接查看数据信息
参考资料
https://docs.spring.io/spring-data/mongodb/docs/1.10.14.RELEASE/reference/html
https://docs.spring.io/spring-boot/docs/1.5.15.RELEASE/reference/htmlsingle/#boot-features-mongodb
http://www.ityouknow.com/springboot/2017/05/08/springboot-mongodb.html
总结
本章节主要介绍了
Mongodb的集成和简单的使用。相关更加详细的用法,可取官网查阅下,若使用MongoRepository模式,基本和上章节讲的Spring-data-jpa用法差不多,有些细微差别,就是自定义查询sql上了,毕竟一个是关系型数据库,一个是NoSql数据库,查询的语法还有略有不同的。而使用MongoRepository还是MongoTemplate,就看个人喜好了。自从接触了jpa后,是倾向于前者的,毕竟真的比较简单呀!想多复杂用法的大家自定查阅官网信息吧。
最后
目前互联网上很多大佬都有
SpringBoot系列教程,如有雷同,请多多包涵了。原创不易,码字不易,还希望大家多多支持。若文中有所错误之处,还望提出,谢谢。
老生常谈
- 个人QQ:
499452441
- 微信公众号:
lqdevOps

个人博客:http://blog.lqdev.cn
完整示例:https://github.com/xie19900123/spring-boot-learning/tree/master/chapter-31
原文地址:http://blog.lqdev.cn/2018/11/01/springboot/chapter-thirty-one/

- springboot Mongodb的集成与使用实例详解
- 转载:Spring Boot (十一):Spring boot中mongodb的使用
- jersey的简单介绍及与spring-boot的集成使用
- 关于Spring boot 与 redis 的集成,以及Spring中redis的使用
- SpringBoot | 第三十三章:Spring web Servcies集成和使用
- Spring Boot 集成 Spring Security 使用自定义的安全数据源
- Spring Boot 中使用 MongoDB 增删改查
- 排忧解难之使用Spring Boot与Redis集成报错 NoClassDefFoundError...RedisConnectionFactory
- springboot(十八):使用Spring Boot集成FastDFS
- spring-boot集成activeMQ(一)-使用默认的ActiveMQ
- Spring Boot(1)集成MyBatis的简单使用
- Spring boot中mongodb的使用
- 使用IDEA在Spring Boot上集成JSP
- SpringBoot中MongoDB注解概念及使用
- 使用SpringBoot搭建小型项目,集成mybatis,redis,swagger2,并部署在外部容器中。
- springboot(十一):Spring boot中mongodb的使用
- 使用Overcast搭建spring boot应用集成测试环境
- 使用Spring Boot集成FastDFS的示例代码
- 使用maven集成docker构建和部署Spring Boot 应用
- Springboot集成sqlite数据库,并使用jpa、Hibernate操作sqlite