了解微服务以及Springboot整合mybaits+thymeleaf模板Demo经验
手机查看代码块可能显示不全
Demo源码已经git
地址:https://gitee.com/lizhaojie/event.git
前言:
首先肯定大家最想知道的还是Spring boot到底是干啥的?其实我也是初学者,虽然接触时间不长,但是也想把自己的理解和大家做一个交流。
简单来说,Springboot就是一个更加灵活,配置起来更简单,广泛应用于微服务的一个开源框架。那大家肯定还会问,到底什么是微服务呢?接下来我就先给大家通俗的讲解一下我理解的微服务,其中还会给大家讲一下分布式的一些概念。
想必大家都去食堂吃过饭,食堂有很多的不同饮食的窗口,每个窗口在食堂这个大厅内部各自负责自己的生意。其实我们就可以把这一个个窗口看作是一个个小的服务。我们想吃什么可以直接去看对应的窗口就好了,菜品就相当于我们编程所说API。但是这样还有一个问题就是如果重庆小面的窗口发生了意外,比如打翻了锅,过着出现了拥挤,那旁边的麻辣香锅窗口一定会受一些影响。还有一个问题,假如西苑的同学想吃东苑风味餐厅的重庆小面,那该怎么办,我想大家想到的就是在西苑再开一家重庆小面,而不是再开一个风味餐厅吧。那么如果不考虑占地问题,最好的就是将餐厅的热门窗口都分散在校园的最需要他们的不同地方吧。所以总的来说,微服务就是把食堂的各个窗口分散开,缓解了整个食堂的压力。这一个个窗口就是我们说的微服务。
还有一个概念和微服务比较相似,那就是分布式,这个也是听起来很高端,那到底什么是分布式呢。直观来说分布式就是一个业务分拆多个子业务,部署在不同的服务器上。达到我们所说的分布,通过缩短单个任务的执行时间来提升效率。从某一个角度来看,我认为分布式是属于微服务的。微服务与分布式的细微差别是,微服务的应用不一定是分散在多个服务器上,他也可以是同一个服务器。
那了解了微服务,话题回到我们所说的springboot,为什么说springboot可以广泛应用到微服务架构上面呢,首先springboot设计的目的是为了简化Spring应用初期工程的搭建以及开发过程。相信学习过Spring+Struts2+Hibernate, Spring+SpringMVC+Mybaits框架的同学,都能感受到前期 xml配置的复杂。 从一定的角度上说,springboot是基于习惯大于配置的思想,通过定义的注解替代了Spring应用中的.xml配置文件,基于普遍习惯的配置思想,使得项目的搭建、开发和部署变得简单。并且整合封装了一些第三方框架,例如HIbernate,Mybaits,redis等,说到底其实并没有增添新的东西。
再来说微服务,他是将一个项目将会被分成很多个子项目,项目之间独立部署并通过协议进行数据交互。因此,利用SpringBoot这种轻便灵活的框架可以使得编码、配置、部署、监控变得简单自如。是把笨重的大型项目分开,提高效率,灵活轻便就是首先考虑的。
接下来我们就通过一个我最近写的小demo来了解一下SpringBoot这个小家伙。
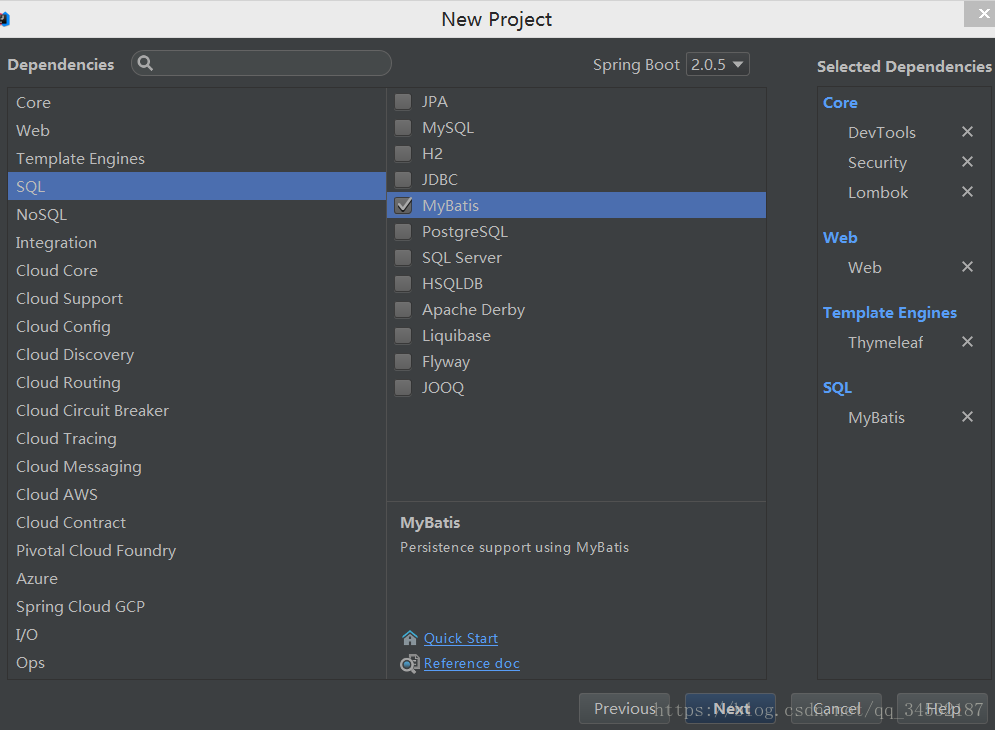
首先,以IDEA为例,新建项目,选择Spring Initializr,NEXT

添加一些初始的依赖,不选也没关系,后面我们还要在pom里面去配置。添加好以后Next
建好项目以后,我们先去配置一下依赖。下面我把我配置的pom文件代码贴上来,里面我用到的jar包都做了注释,特殊的包括了利用org.mybatis.generator插件逆向工程生成Mapper.xml和实体类,还有利用Swagger2来书写规范完整的API文档的框架的依赖,用log4j2来管理日志,以及前端用到的boostrap和jquery的webjars的依赖包都有详细的注释。
<?xml version="1.0" encoding="UTF-8"?>
<project xmlns="http://maven.apache.org/POM/4.0.0" xmlns:xsi="http://www.w3.org/2001/XMLSchema-instance"
xsi:schemaLocation="http://maven.apache.org/POM/4.0.0 http://maven.apache.org/xsd/maven-4.0.0.xsd">
<modelVersion>4.0.0</modelVersion>
<groupId>com.jerry</groupId>
<artifactId>mock-spring</artifactId>
<version>0.0.1-SNAPSHOT</version>
<packaging>jar</packaging>
<name>mock-spring</name>
<description>Demo project for Spring Boot</description>

<!--要成为一个spring boot项目
首先就必须在pom.xml中继承spring-boot-starter-parent,同时指定其版本-->
<!--配置parent-->
<parent>
<groupId>org.springframework.boot</groupId>
<artifactId>spring-boot-starter-parent</artifactId>
<version>2.0.3.RELEASE</version>
<relativePath/> <!-- lookup parent from repository -->
</parent>

<!--配置参数 例如jdk版本-->
<properties>
<project.build.sourceEncoding>UTF-8</project.build.sourceEncoding>
<project.reporting.outputEncoding>UTF-8</project.reporting.outputEncoding>
<java.version>1.8</java.version>
</properties>

<!--配置依赖即用来配置spring boot自动引入的各个jar包的版本-->
<dependencies>

<!--thymeleafController-->
<!--Springboot默认是不支持JSP的,默认使用thymeleaf模板引擎-->
<dependency>
<groupId>org.springframework.boot</groupId>
<artifactId>spring-boot-starter-thymeleaf</artifactId>
</dependency>

<!--lombok-->
<!-- Lombok 是一种 Java 实用工具,可用来帮助开发人员消除 Java 的冗长
尤其是对于简单的 Java 对象(POJO)。它通过注解实现这一目的
由于 Lombok 采取的注解形式的,
在编译后,自动生成相应的方法,为了不让 ide 疯了,需要下载插件了支持它-->
<dependency>
<groupId>org.projectlombok</groupId>
<artifactId>lombok</artifactId>
<optional>true</optional>
</dependency>

<!--单元测试的jar包-->
<dependency>
<groupId>org.springframework.boot</groupId>
<artifactId>spring-boot-starter-test</artifactId>
<scope>test</scope>
</dependency>

<!-- https://mvnrepository.com/artifact/io.springfox/springfox-swagger2 -->
<!--自动生成文档和测试接口的ui,隔离前后端,很方便,后期慢慢解释-->
<dependency>
<groupId>io.springfox</groupId>
<artifactId>springfox-swagger2</artifactId>
<version>2.9.2</version>
</dependency>

<!-- https://mvnrepository.com/artifact/io.springfox/springfox-swagger-ui -->
<dependency>
<groupId>io.springfox</groupId>
<artifactId>springfox-swagger-ui</artifactId>
<version>2.9.2</version>
</dependency>

<!--springboot的热部署-->
<!--提高开发者的开发效率,无需手动重启Spring Boot应用。-->
<dependency>
<groupId>org.springframework.boot</groupId>
<artifactId>spring-boot-devtools</artifactId>
<scope>runtime</scope>
</dependency>

<!--配置web容器-->
<dependency>
<groupId>org.springframework.boot</groupId>
<artifactId>spring-boot-starter-web</artifactId>
</dependency>
<!--添加bootstrap依赖-->
<dependency>
<groupId>org.webjars</groupId>
<artifactId>bootstrap</artifactId>
<version>3.3.5</version>
</dependency>
<dependency>
<groupId>org.webjars</groupId>
<artifactId>jquery</artifactId>
<version>3.1.1</version>
</dependency>
<!--解除html严格语法限制-->
<dependency>
<groupId>net.sourceforge.nekohtml</groupId>
<artifactId>nekohtml</artifactId>
</dependency>

<!-- 阿里巴巴连接池druid -->
<dependency>
<groupId>com.alibaba</groupId>
<artifactId>druid</artifactId>
<version>1.0.9</version>
</dependency>

<!--配置mybaits-->
<dependency>
<groupId>org.mybatis.spring.boot</groupId>
<artifactId>mybatis-spring-boot-starter</artifactId>
<version>1.1.1</version>
</dependency>

<!--配置mysql驱动jar包-->
<dependency>
<groupId>mysql</groupId>
<artifactId>mysql-connector-java</artifactId>
<version>5.1.6</version>
</dependency>

<!--配置mybaits自动生成代码的依赖-->
<dependency>
<groupId>org.mybatis.generator</groupId>
<artifactId>mybatis-generator-core</artifactId>
<version>1.3.5</version>
</dependency>
<!-- mybatis分页功能 -->
<!-- https://mvnrepository.com/artifact/com.github.pagehelper/pagehelper -->
<dependency>
<groupId>com.github.pagehelper</groupId>
<artifactId>pagehelper</artifactId>
<version>4.1.6</version>
</dependency>

<!--排除spring boot对spring-boot-starter-logging的依赖,
并增加依赖包spring-boot-starter-log4j.jar-->
<!--这里我们使用log4j2进行日志输出-->
<!--这样写可以忽略springboot自带的日志框架.-->
<dependency>
<groupId>org.springframework.boot</groupId>
<artifactId>spring-boot-starter</artifactId>
<exclusions>
<exclusion>
<groupId>org.springframework.boot</groupId>
<artifactId>spring-boot-starter-logging</artifactId>
</exclusion>
</exclusions>
</dependency>
<!-- 引入log4j2依赖 ,
因为我的parent配置的版本太高没有log4j的jar,所以我选择了log4j2-->
<dependency>
<groupId>org.springframework.boot</groupId>
<artifactId>spring-boot-starter-log4j2</artifactId>
</dependency>
<!--因为log4j2弃用了配置属性文件的方式,采用了yml和xml文件配置的方式
添加能够使用log4j2.yml配置的依赖-->
<dependency>
<groupId>com.fasterxml.jackson.core</groupId>
<artifactId>jackson-databind</artifactId>
</dependency>
<dependency>
<groupId>com.fasterxml.jackson.dataformat</groupId>
<artifactId>jackson-dataformat-yaml</artifactId>
</dependency>
</dependencies>

<build>
<!--配置插件-->
<plugins>
<!--这里给大家演示mybaits逆向生成mapper和pojo类的插件
生成一些简单的sql语句-->
<plugin>
<groupId>org.mybatis.generator</groupId>
<artifactId>mybatis-generator-maven-plugin</artifactId>
<version>1.3.2</version>
<configuration>
<configurationFile>src/main/resources/generatorConfig.xml</configurationFile>
<verbose>true</verbose>
<overwrite>true</overwrite>
</configuration&g
295b9
t;
<executions>
<execution>
<id>Generate MyBatis Artifacts</id>
<goals>
<goal>generate</goal>
</goals>
</execution>
</executions>
<dependencies>
<dependency>
<groupId>org.mybatis.generator</groupId>
<artifactId>mybatis-generator-core</artifactId>
<version>1.3.2</version>
</dependency>
</dependencies>
</plugin>
<!--maven插件-->
<plugin>
<groupId>org.springframework.boot</groupId>
<artifactId>spring-boot-maven-plugin</artifactId>
</plugin>
</plugins>

<!--我们用到的资源文件-->
<!--其中**/*这样的写法,是为了保证各级子目录下的资源文件被打包-->
<resources>
<resource>
<directory>src/main/java</directory>
<includes>
<include>**/*.xml</include>
</includes>
</resource>
</resources>
</build>

</project>
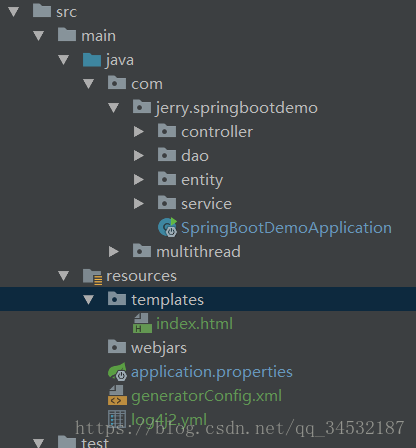
因为用的是Springboot+mybaits这一套,使用了逆向工程工具。接下来就去配置一下。resources文件下新建generatorConfig.xml文件。在这之前按照SpringMVC那一套建好文件目录。
在generatorConfig中配置以下代码,生成文件和数据库的配置都有注释可供参考。
<?xml version="1.0" encoding="UTF-8"?>
<!DOCTYPE generatorConfiguration
PUBLIC "-//mybatis.org//DTD MyBatis Generator Configuration 1.0//EN"
"http://mybatis.org/dtd/mybatis-generator-config_1_0.dtd">

<generatorConfiguration>
<classPathEntry location="C:\Users\l\.m2\repository\mysql\mysql-connector-java\5.1.6\mysql-connector-java-5.1.6.jar" />
<context  id="mysqlTables"   targetRuntime="MyBatis3">
<commentGenerator>
<property name="suppressDate" value="true"/>
<property name="suppressAllComments" value="true" />
</commentGenerator>
<jdbcConnection driverClass="com.mysql.jdbc.Driver"
connectionURL="jdbc:mysql://localhost:3306/springbootdb?serverTimezone=UTC" userId="root"
password="jerry8199">
</jdbcConnection>
<!--指定生成的类型为java类型,避免数据库中number等类型字段 -->
<javaTypeResolver>
<property name="forceBigDecimals"  value="false"/>
</javaTypeResolver>

<!--自动生成的实体的存放包路径 -->
<javaModelGenerator  targetPackage="com.jerry.springbootdemo.entity"
targetProject="src/main/java">
<property  name="enableSubPackages"  value="true"/>
<property  name="trimStrings"  value="true"/>
</javaModelGenerator>
<!--自动生成的*Mapper.xml文件存放路径 -->
<sqlMapGenerator  targetPackage="com.jerry.springbootdemo.dao"
targetProject="src/main/java">
<property  name="enableSubPackages"  value="true"/>
</sqlMapGenerator>
<!--自动生成的*Mapper.java存放路径 -->
<javaClientGenerator type="XMLMAPPER"
targetPackage="com.jerry.springbootdemo.dao"  targetProject="src/main/java">
<property  name="enableSubPackages"  value="true"/>
</javaClientGenerator>

<table  tableName="hero"  domainObjectName="Hero"
enableCountByExample="false"   enableUpdateByExample="false"
enableDeleteByExample="false"  enableSelectByExample="false"
selectByExampleQueryId="false">
<generatedKey  column="ID"  sqlStatement="selectuuid_short()"
identity="false"/>

</table>

</context>

</generatorConfiguration>
接下来再说一下application. properties这个属性文件的配置方式,内容自定义,都有注释
#服务器端口号
server.port=8877
#数据库配置
spring.datasource.url=jdbc:mysql://localhost:3306/springbootdb?useUnicode=true&characterEncoding=utf8
spring.datasource.username=root
spring.datasource.password=jerry8199
spring.datasource.driver-class-name=com.mysql.jdbc.Driver
#mybaits的配置
mybatis.typeAliasesPackage=org.spring.springboot.domain
mybatis.mapperLocations=classpath:mapper/*.xml
#thymeleaf的配置
#配置文件中修改映射时视图的前后缀
#(前缀prefix是”classpath:/templates/”,后缀suffix是”.html” )
#禁用模板引擎的缓存,要不然看不到实时页面,其实感觉使用了热部署就没必要禁用缓存了
spring.thymeleaf.cache=false
spring.thymeleaf.prefix=classpath:/templates/
spring.thymeleaf.suffix=.html
接下来我们去配置一下swagger
首先来看一下Spring Boot的入口函数
打开SpringBootDemoApplication
首先加上注解@EnableSwagger2
加上扫描包的注解
按照如下代码配置
package com.jerry.springbootdemo;

import org.mybatis.spring.annotation.MapperScan;
import org.springframework.boot.SpringApplication;
import org.springframework.boot.autoconfigure.SpringBootApplication;
import org.springframework.context.annotation.Bean;
import springfox.documentation.builders.ApiInfoBuilder;
import springfox.documentation.builders.PathSelectors;
import springfox.documentation.builders.RequestHandlerSelectors;
import springfox.documentation.service.ApiInfo;
import springfox.documentation.spi.DocumentationType;
import springfox.documentation.spring.web.plugins.Docket;
import springfox.documentation.swagger2.annotations.EnableSwagger2;

import java.util.Random;
@EnableSwagger2
@MapperScan("com.jerry.springbootdemo.dao")
@SpringBootApplication
public class SpringBootDemoApplication {

public static void main(String[] args) {
SpringApplication.run(SpringBootDemoApplication.class, args);
}

@Bean
public Random random(){
return  new Random();
}

@Bean
public Docket createRestApi(){
// System.out.println(this.getClass().getSimpleName().split("Application")[0].toLowerCase());
return new Docket(DocumentationType.SWAGGER_2)
.apiInfo(apiInfo())
.select()
.apis(RequestHandlerSelectors.basePackage("com.jerry.springbootdemo.controller"))
.paths(PathSelectors.any())
.build();
}

private ApiInfo apiInfo(){
return new ApiInfoBuilder().title("Spring Boot中使用Swagger构建Rest Api version Member")
.version("1.0").build();
}
}
剩下的就是去写MVC了
实体类
package com.jerry.springbootdemo.entity;

public class Hero {
private Integer id;

private String heroName;

private String resource;

private String background;

private Integer attackPower;

private Integer defentPower;

private Integer faceScore;

public Integer getId() {
return id;
}

public void setId(Integer id) {
this.id = id;
}

public String getHeroName() {
return heroName;
}

public void setHeroName(String heroName) {
this.heroName = heroName == null ? null : heroName.trim();
}

public String getResource() {
return resource;
}

public void setResource(String resource) {
this.resource = resource == null ? null : resource.trim();
}

public String getBackground() {
return background;
}

public void setBackground(String background) {
this.background = background == null ? null : background.trim();
}

public Integer getAttackPower() {
return attackPower;
}

public void setAttackPower(Integer attackPower) {
this.attackPower = attackPower;
}

public Integer getDefentPower() {
return defentPower;
}

public void setDefentPower(Integer defentPower) {
this.defentPower = defentPower;
}

public Integer getFaceScore() {
return faceScore;
}

public void setFaceScore(Integer faceScore) {
this.faceScore = faceScore;
}
}
HeroMapper和HeroMapper.xml是自动生成的不多说了,贴代码
package com.jerry.springbootdemo.dao;

import com.jerry.springbootdemo.entity.Hero;
import org.springframework.stereotype.Repository;

import java.util.List;

@Repository
public interface HeroMapper {
int deleteByPrimaryKey(Integer id);

int insert(Hero record);

int insertSelective(Hero record);

Hero selectByPrimaryKey(Integer id);

List<Hero> getAllHeros();

int updateByPrimaryKeySelective(Hero record);

int updateByPrimaryKey(Hero record);
}
<?xml version="1.0" encoding="UTF-8" ?>
<!DOCTYPE mapper PUBLIC "-//mybatis.org//DTD Mapper 3.0//EN" "http://mybatis.org/dtd/mybatis-3-mapper.dtd" >
<mapper namespace="com.jerry.springbootdemo.dao.HeroMapper" >
<resultMap id="BaseResultMap" type="com.jerry.springbootdemo.entity.Hero" >
<id column="id" property="id" jdbcType="INTEGER" />
<result column="hero_name" property="heroName" jdbcType="VARCHAR" />
<result column="resource" property="resource" jdbcType="VARCHAR" />
<result column="background" property="background" jdbcType="VARCHAR" />
<result column="attack_power" property="attackPower" jdbcType="INTEGER" />
<result column="defent_power" property="defentPower" jdbcType="INTEGER" />
<result column="Face_score" property="faceScore" jdbcType="INTEGER" />
</resultMap>
<sql id="Base_Column_List" >
id, hero_name, resource, background, attack_power, defent_power, Face_score
</sql>
<select id="selectByPrimaryKey" resultMap="BaseResultMap" parameterType="java.lang.Integer" >
select
<include refid="Base_Column_List" />
from hero
where id = #{id,jdbcType=INTEGER}
</select>
<select id="getAllHeros"  resultMap="BaseResultMap">
SELECT * FROM hero
</select>
<delete id="deleteByPrimaryKey" parameterType="java.lang.Integer" >
delete from hero
where id = #{id,jdbcType=INTEGER}
</delete>
<insert id="insert" parameterType="com.jerry.springbootdemo.entity.Hero" >
<selectKey resultType="java.lang.Integer" keyProperty="id" order="BEFORE" >
selectuuid_short()
</selectKey>
insert into hero (id, hero_name, resource,
background, attack_power, defent_power,
Face_score)
values (#{id,jdbcType=INTEGER}, #{heroName,jdbcType=VARCHAR}, #{resource,jdbcType=VARCHAR},
#{background,jdbcType=VARCHAR}, #{attackPower,jdbcType=INTEGER}, #{defentPower,jdbcType=INTEGER},
#{faceScore,jdbcType=INTEGER})
</insert>
<insert id="insertSelective" parameterType="com.jerry.springbootdemo.entity.Hero" >
<selectKey resultType="java.lang.Integer" keyProperty="id" order="BEFORE" >
selectuuid_short()
</selectKey>
insert into hero
<trim prefix="(" suffix=")" suffixOverrides="," >
id,
<if test="heroName != null" >
hero_name,
</if>
<if test="resource != null" >
resource,
</if>
<if test="background != null" >
background,
</if>
<if test="attackPower != null" >
attack_power,
</if>
<if test="defentPower != null" >
defent_power,
</if>
<if test="faceScore != null" >
Face_score,
</if>
</trim>
<trim prefix="values (" suffix=")" suffixOverrides="," >
#{id,jdbcType=INTEGER},
<if test="heroName != null" >
#{heroName,jdbcType=VARCHAR},
</if>
<if test="resource != null" >
#{resource,jdbcType=VARCHAR},
</if>
<if test="background != null" >
#{background,jdbcType=VARCHAR},
</if>
<if test="attackPower != null" >
#{attackPower,jdbcType=INTEGER},
</if>
<if test="defentPower != null" >
#{defentPower,jdbcType=INTEGER},
</if>
<if test="faceScore != null" >
#{faceScore,jdbcType=INTEGER},
</if>
</trim>
</insert>
<update id="updateByPrimaryKeySelective" parameterType="com.jerry.springbootdemo.entity.Hero" >
update hero
<set >
<if test="heroName != null" >
hero_name = #{heroName,jdbcType=VARCHAR},
</if>
<if test="resource != null" >
resource = #{resource,jdbcType=VARCHAR},
</if>
<if test="background != null" >
background = #{background,jdbcType=VARCHAR},
</if>
<if test="attackPower != null" >
attack_power = #{attackPower,jdbcType=INTEGER},
</if>
<if test="defentPower != null" >
defent_power = #{defentPower,jdbcType=INTEGER},
</if>
<if test="faceScore != null" >
Face_score = #{faceScore,jdbcType=INTEGER},
</if>
</set>
where id = #{id,jdbcType=INTEGER}
</update>
<update id="updateByPrimaryKey" parameterType="com.jerry.springbootdemo.entity.Hero" >
update hero
set hero_name = #{heroName,jdbcType=VARCHAR},
resource = #{resource,jdbcType=VARCHAR},
background = #{background,jdbcType=VARCHAR},
attack_power = #{attackPower,jdbcType=INTEGER},
defent_power = #{defentPower,jdbcType=INTEGER},
Face_score = #{faceScore,jdbcType=INTEGER}
where id = #{id,jdbcType=INTEGER}
</update>

</mapper>
Service层
接口类
package com.jerry.springbootdemo.service;

import com.jerry.springbootdemo.entity.Hero;

import java.util.List;

public interface IHeroService {
public Hero getHeroById(int id);

boolean addHero(Hero record);

List<Hero> getAllheros();

}
实现类
package com.jerry.springbootdemo.service.serviceimpl;

import com.jerry.springbootdemo.dao.HeroMapper;
import com.jerry.springbootdemo.entity.Hero;
import com.jerry.springbootdemo.service.IHeroService;
import org.springframework.stereotype.Service;
import org.springframework.transaction.annotation.Transactional;

import javax.annotation.Resource;
import java.util.List;

@Service("HeroService")
public class HeroServiceimpl implements IHeroService {

@Resource
private HeroMapper heroMapper;
@Override
@Transactional
public Hero getHeroById(int id) {
return heroMapper.selectByPrimaryKey(id);
}

@Override
@Transactional
public boolean addHero(Hero record) {
boolean result=false;
try{
heroMapper.insertSelective(record);
result=true;
}catch (Exception e){
e.printStackTrace();
}
return  result;
}

@Override
@Transactional
public List<Hero> getAllheros() {
return heroMapper.getAllHeros();
}

}
Controller层
测试了返回json字符串和直接返回页面两种
package com.jerry.springbootdemo.controller;

import com.github.pagehelper.PageHelper;
import com.github.pagehelper.PageInfo;
import com.jerry.springbootdemo.dao.HeroMapper;
import com.jerry.springbootdemo.entity.Hero;
import com.jerry.springbootdemo.service.serviceimpl.HeroServiceimpl;
import org.slf4j.Logger;
import org.slf4j.LoggerFactory;
import org.springframework.stereotype.Controller;
import org.springframework.ui.Model;
import org.springframework.web.bind.annotation.*;

import javax.annotation.Resource;
import java.util.List;
import java.util.Map;
//controller注解不能使用@RestController,要用@Controller,
//因为@RestController =@Controller+@ResponeBody,会直接返回josn数据
@Controller
@RequestMapping(value="templates")
public class thymeleafController {
@Resource
private HeroServiceimpl heroService;
@Resource
private HeroMapper heromapper;
public final static Logger logger = LoggerFactory.getLogger(thymeleafController.class);

@RequestMapping(value = "/getUserById", method = RequestMethod.GET)
public @ResponseBody Hero getUserInfo(Integer id){
Hero hero = heromapper.selectByPrimaryKey(1);
logger.debug("this is debug info");
logger.info("this is info info");
logger.warn("this is warn info");
logger.error("this is error info");
return hero;
}
@RequestMapping(value = "/thymeleaf")
public  String ThymeleaPage(Model model){
List<Hero> heroes = heromapper.getAllHeros();
model.addAttribute("pageInfo", heroes);
return "index";
}
@GetMapping(value = "/json")
public @ResponseBody List<Hero> getUserInfo(){
List<Hero> heroes = heromapper.getAllHeros();
return heroes;
}

}
前端页面用的boostrap框架的东西。这里我用的是springboot比较支持的thymeleaf模板引擎,化静为动还是蛮爽的,类似EL表达式,大家慢慢学习就知道了。以后还会练习RESTful的样子,到时候再给大家分享。
<!DOCTYPE html>
<html>
<head>
<meta charset="UTF-8">
<title>Hello World</title>
<link rel="stylesheet" href="/webjars/bootstrap/3.3.5/css/bootstrap.min.css" />
<script src="/webjars/jquery/3.1.1/jquery.min.js"></script>
<script src="/webjars/bootstrap/3.3.5/js/bootstrap.min.js"></script>
</head>
<body>
<div class="container"><br/>
<div class="alert alert-success">
<a href="#" class="close" data-dismiss="alert" aria-label="close">x</a>
Hello, <strong>Jerry!</strong>
</div>
<div>
<table class="table table-striped">
<tr>
<th>id</th>
<th>name</th>
<th>resource</th>
<th>background</th>
<th>attack</th>
<th>defent</th>
<th>face</th>
</tr>
<tr th:each="hero : ${pageInfo}">
<td th:text="${hero.id}"></td>
<td th:text="${hero.heroName}"></td>
<td th:text="${hero.resource}"></td>
<td th:text="${hero.background}"></td>
<td th:text="${hero.attackPower}"></td>
<td th:text="${hero.defentPower}"></td>
<td th:text="${hero.faceScore}"></td>
</tr>
</table>
</div>
</div>
</body>
</html>
log4j2配置的东西有注释。
Configuration:
status: warn

Properties: # 定义变量
Property:
- name: log.path
value: d:\\tmp\\logs
- name: project.name
value: spring-boot-log

Appenders:
Console:  #输出到控制台
name: CONSOLE
target: SYSTEM_OUT
ThresholdFilter:
level: trace
onMatch: ACCEPT
onMismatch: DENY
PatternLayout:
pattern: "%d{yyyy-MM-dd HH:mm:ss,SSS}:%4p %t (%F:%L) - %m%n"

# 输出到文件,超过128MB归档
RollingFile:
- name: ROLLING_FILE
ignoreExceptions: false
fileName: ${log.path}/${project.name}.log
filePattern: "${log.path}/$${date:yyyy-MM}/${project.name}-%d{yyyy-MM-dd}-%i.log.gz"
PatternLayout:
pattern: "%d{yyyy-MM-dd HH:mm:ss,SSS}:%4p %t (%F:%L) - %m%n"
Policies:
SizeBasedTriggeringPolicy:
size: "128 MB"
DefaultRolloverStrategy:
max: 1000

Loggers:
Root:
level: info
AppenderRef:
- ref: CONSOLE
- ref: ROLLING_FILE
Logger: # 为com.xjj包配置特殊的Log级别,方便调试
- name: com.test.dao
additivity: false
level: debug
AppenderRef:
- ref: CONSOLE
- ref: ROLLING_FILE
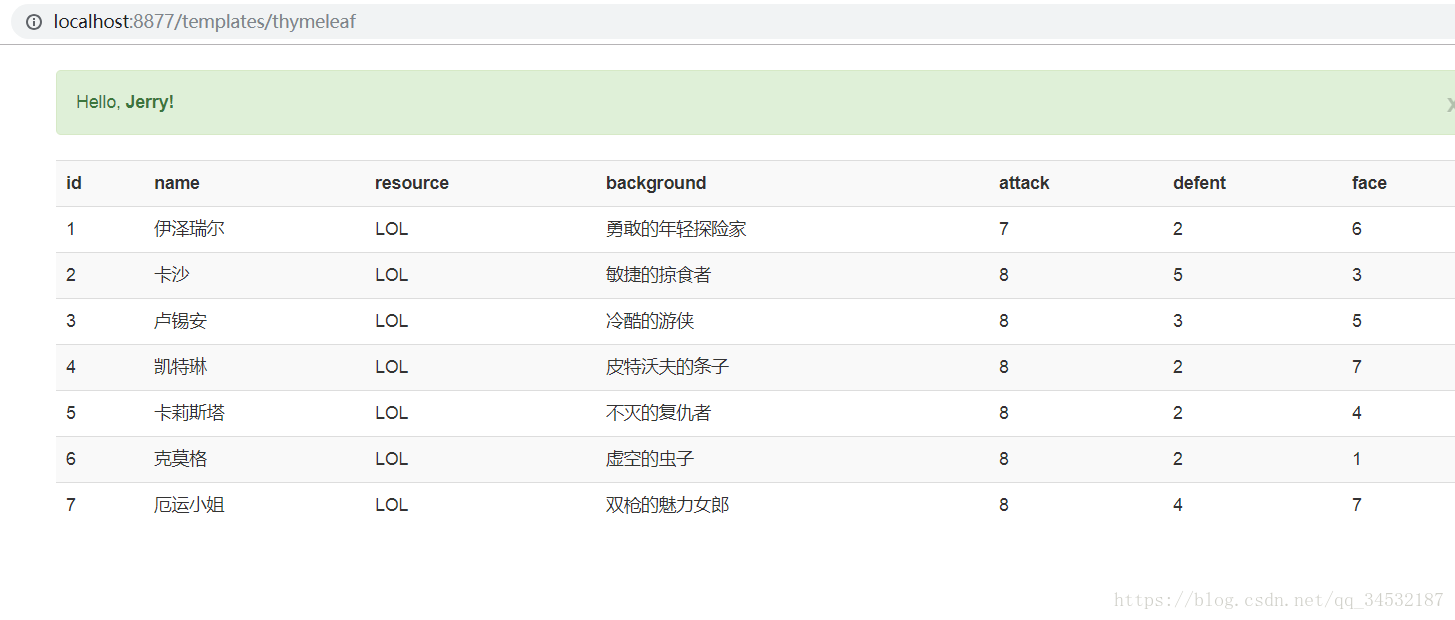
运行成功图片
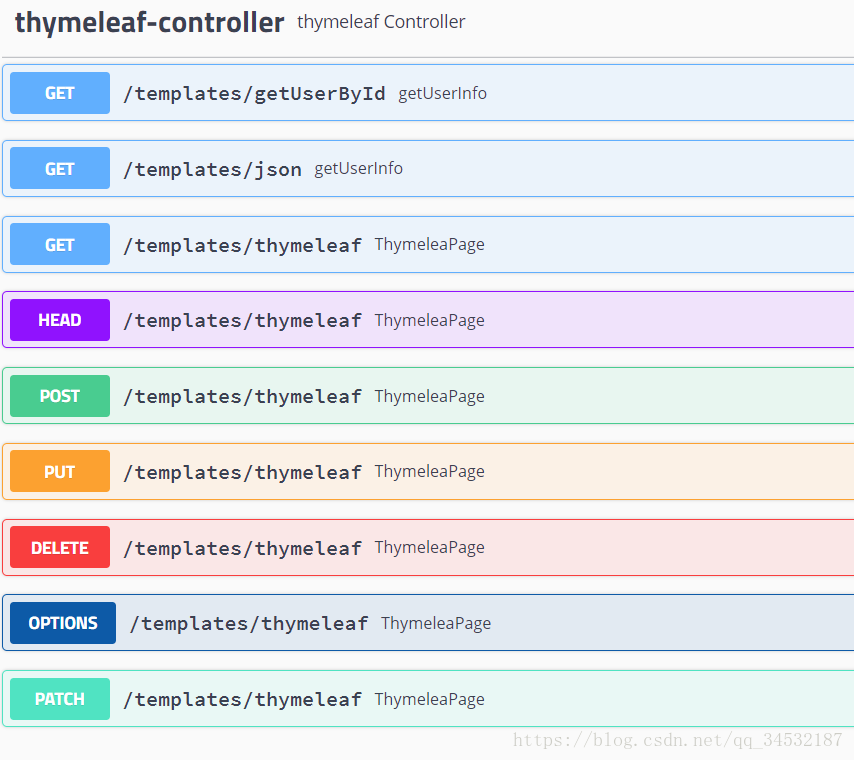
我们可以在localhost:端口号/swagger-ui.html中看api
项目成功截图
到这里就讲解完啦,没有很细致。大家有问题可以给我留言大家一起交流。

- JavaEE开发之SpringBoot整合MyBatis以及Thymeleaf模板引擎
- JavaEE开发之SpringBoot整合MyBatis以及Thymeleaf模板引擎
- Spring Boot整合Thymeleaf模板引擎
- Springboot系列:Springboot与Thymeleaf模板引擎整合基础教程(附源码)
- Springboot系列:Springboot与Thymeleaf模板引擎整合基础教程(附源码)
- Spring boot整合mybatis实现Restful服务demo
- 使用myeclipse搭建SpringBoot框架,整合thymeleaf模板和mybatis
- spring-boot--整合thymeleaf模板
- Springboot系列:Springboot与Thymeleaf模板引擎整合基础教程(附源码)
- Springboot系列:Springboot与Thymeleaf模板引擎整合基础教程(附源码)
- Springboot系列:Springboot与Thymeleaf模板引擎整合基础教程(附源码)
- Spring Boot整合模板引擎freemarker以及servlet
- SpringBoot整合模板引擎Thymeleaf
- spring boot整合jpa构建微服务以及服务调用
- Springboot系列:Springboot与Thymeleaf模板引擎整合基础教程(附源码)
- (二)springboot整合thymeleaf模板
- (二)springboot整合thymeleaf模板
- Springboot系列:Springboot与Thymeleaf模板引擎整合基础教程(附源码)
- Springboot系列:Springboot与Thymeleaf模板引擎整合基础教程(附源码)
- Springboot系列:Springboot与Thymeleaf模板引擎整合基础教程(附源码)