mysql-MMM高可用群集的在centos7上的搭建
MMM(Master to Master replication manager for Mysql,Mysql主主复制管理器)是一套支持双主故障切换和双主日常管理的脚本程序。MMM使用perl语言开发,主要用来监控和管理Mysql Master to Master (双主)复制,虽然叫做双主复制,但是业务上同一时刻只允许对一个主进行写入,另一台备选主上提供部分读服务,以加速在主主切换时备选主的预热,可以说MMM这套脚本程序一方面实现了故障切换的功能,另一方面其内部附加的工具脚本也可以实现多个slave的read负载均衡。
实验环境:centos7
IP规划 master1:192.168.100.101;
master2:192.168.100.102;
slave1:192.168.100.111;
slave2:192.168.100.112;
mmm监控:192.168.100.120;
1) 在4台mysql服务器上安装mariadb及其环境包,yum源文件
wget -O /etc/yum.repos.d/CentOS-Base.repo http://mirrors.aliyun.com/repo/Centos-7.repo
yum install -y epel-release
yum clean al
b68
l && yum makecache
yum install mariadb-server mariadb –y
2) 编辑mariadb配置文件,sever id 1,2为主服务器 3,4为从服务器
vim /etc/my.cnf
[mysqld]
log_error=/var/lib/mysql/mysql.err #错误日志
log=/var/lib/mysql/mysql_log.log #通用日志
log_slow_queries=/var/lib/mysql/slow_query_log.log
#慢日志
binlog-ignore-db=mysql,information_schema
character_set_server=utf8
log_bin=mysql_bin #二进制日志
server_id=1 #主服务器为1,2 从服务器为3,4
log_slave_updates=true
sync_binlog=1
auto_increment_increment=2
auto_increment_offset=1
3) 开启mariadb服务,配置主主复制
进入两台主服务器server id=1及server id=2数据库
先在id=2的主服务器中输入命令show master status;
再进入id=1的主服务器输入命令GRANT REPLICATION SLAVE ON . TO 'replication'@'192.168.100.%' IDENTIFIED BY '123456'; //授权给管理用户replication密码为123456
FLUSH PRIVILEGES; //刷新
change master to master_host='192.168.100.102',master_user='replication',master_password='123456',master_log_file='mysql_bin.000004',master_log_pos=245; //交换对方的主机地址,密码,二进制文件
start slave; //启动
在id2中做同样操作
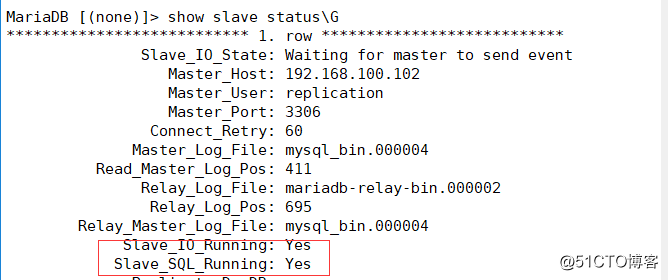
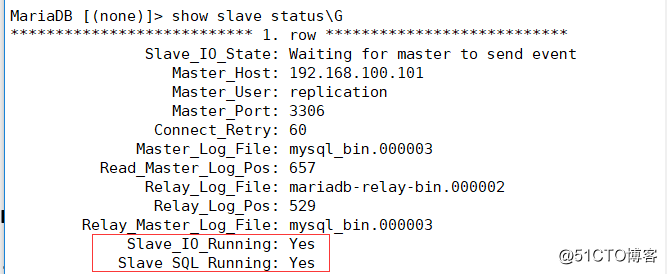
主主复制成功
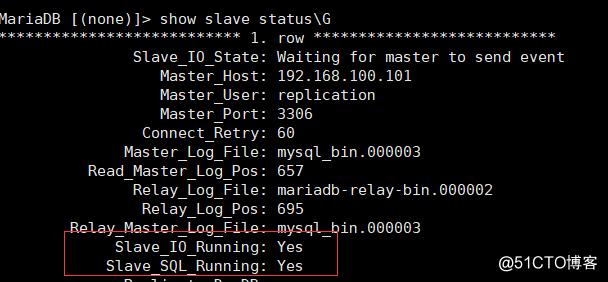
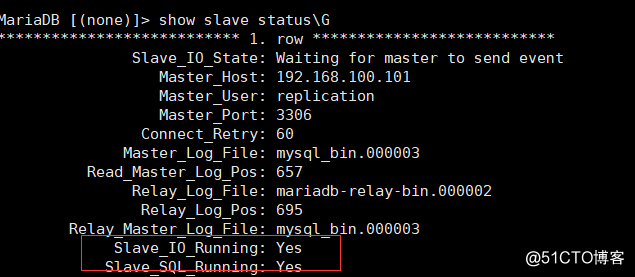
4) 配置从服务器
change master to master_host='192.168.100.101',master_user='replication',master_password='123456',master_log_file='mysql_bin.000003',master_log_pos=491;
5)在每台主机安装MMM
yum install -y mysql-mmm*
在主服务器上编辑mmm配置文件
cd /etc/mysql-mmm/
vim mmm_common.conf
ctive_master_role writer
<host default>cluster_interface eth33
pid_path /run/mysql-mmm-agent.pid
bin_path /usr/libexec/mysql-mmm/
replication_user replication
replication_password 123456
agent_user mmm_agent
agent_password 123456
</host>
<host db1>
ip 192.168.100.101
mode master
peer db2
</host>
<host db2>
ip 192.168.100.102
mode master
peer db1
</host>
<host db3>
ip 192.168.100.111
mode slave
</host>
<host db4>
ip 192.168.100.112
mode slave
</host>
<role writer>
hosts db1, db2
ips 192.168.100.250
mode exclusive
</role>
<role reader>
hosts db3, db4
ips 192.168.100.251, 192.168.100.252
mode balanced
</role>
scp mmm_common.conf root@192.168.100.102:/etc/mysql-mmm/
scp mmm_common.conf root@192.168.100.111:/etc/mysql-mmm/
scp mmm_common.conf root@192.168.252.112:/etc/mysql-mmm/
把编辑好的配置文件发送给另外3台服务器
6)代理服务器
wget -O /etc/yum.repos.d/CentOS-Base.repo http://mirrors.aliyun.com/repo/Centos-7.repo
yum install -y epel-release
yum install -y mysql-mmm*
主服务器同步
3344
配置文件
scp mmm_common.conf root@192.168.100.120:/etc/mysql-mmm/
代理服务器继续编辑配置文件
vim /etc/mysql-mmm/mmm_mon.conf
<monitor>
ip 127.0.0.1
pid_path /run/mysql-mmm-monitor.pid
bin_path /usr/libexec/mysql-mmm
status_path /var/lib/mysql-mmm/mmm_mond.status
ping_ips 192.168.100.101,192.168.100.102,192.168.100.111,192.168.100.112
auto_set_online 5
# The kill_host_bin does not exist by default, though the monitor will
# throw a warning about it missing.  See the section 5.10 "Kill Host
# Functionality" in the PDF documentation.
#
# kill_host_bin     /usr/libexec/mysql-mmm/monitor/kill_host
#
</monitor>
<host default>
monitor_user mmm_monitor
monitor_password 123456
</host>
主服务器授权给代理服务器,代理和监控的权限
GRANT super,REPLICATION client,process ON . TO 'mmm_agent'@'192.168.100.%' IDENTIFIED BY '123456';
GRANT REPLICATION client ON . TO 'mmm_monitor'@'192.168.100.%' IDENTIFIED BY '123456';
FLUSH PRIVILEGES;
每台服务器都重新编辑mmm_agent.conf
vim mmm_agent.conf
include mmm_common.conf
#The 'this' variable refers to this server. Proper operation requires
#that 'this' server (db1 by default), as well as all other servers, have the
#proper IP addresses set in mmm_common.conf.
this db1
服务端开启代理服务
systemctl start mysql-mmm-agent.service
代理服务器开启监控服务
systemctl start mysql-mmm-monitor.service
检查监控状态
mmm_control show

MMM群集搭建完成

- 搭建 mysql-mmm 高可用群集
- MySQL高可用群集------配置MMM高可用架构
- 部署MySQL-MMM高可用群集
- 详解MySQL高可用MMM搭建方案及架构原理
- 详解MySQL高可用MMM搭建方案及架构原理
- mysql 群集架构mmm高可用群集及服务器上线
- MySQL高可用之mysql-mmm环境搭建
- Centos7 下 mysql5.7-mmm 高可用群集
- MySQL高可用群集--MMM高可用架构
- MySQL-MMM高可用群集(本篇使用MariaDB代替MySQL进行实验部署)
- MySQL-MMM高可用集群搭建(可用)
- 搭建mysql-mmm高可用mysql集群
- MySQL-MMM高可用群集
- CentOS 7上部署MySQL-MMM高可用群集
- mysql+amoeba+mysqlmmm高可用群集
- MySQL高可用方案:基于MHA实现的自动故障转移群集
- CentOS7下解决yum install mysql-server没有可用包
- Mysql+Heartbeat+Drbd搭建mysql的高可用
- MySQL双主高可用架构之MMM实战
- 搭建mysql集群+keepalived高可用