Spring基础系列-AOP源码分析
原创作品,可以转载,但是请标注出处地址:https://www.cnblogs.com/V1haoge/p/9560803.html
一、概述
Spring的两大特性:IOC和AOP。
AOP是面向切面编程,Spring内置了自己实现的基于动态代理技术的AOP,同时还支持成熟的AspectJ框架,我们这里主要讲述的还是内置的基于动态代理的AOP实现。因为面对一些普通的需求,Spring内置的AOP已经绰绰有余。
AOP一般用于增强原来的代码的功能,这种增强体现在辅助方面,比如安全、日志、事务等。
二、术语
1、连接点(JoinPoint)
连接点就是具体的代码中的切入点,指的是具体的一处代码位置。
2、切点(PointCut)
切点是对一系列代表同种功能(目的)的切入点(连接点)的统称,切点不是一个点,而是代表某一功能的一系列连接点的集合。
3、通知(Advice)
通知就是我们要在切点执行的操作,就是我们要实现的目的,是要实现的功能的代码实现。一般通知又称为增强,所谓增强就是对原来功能的基础上添加新功能,进行功能增强。
4、切面(Aspect)
切面是通知和切点的综合体,定义好了一个切面,那么我们就知道,这个AOP要实现的功能是什么,需要切入到程序中的那些地方。抽象层次中,切面是代码功能的横切面,这个横切面的位置就是切点、这个切面的功能就是通知。
5、织入(Weaving)
织入就是切面作用到目标代码中的方式,Spring内置的AOP采用的是动态代理的方式来织入,还可以采用编译器织入和加载期织入,后两者分别需要特定的编译器和类加载器来完成,后两种方式是AspectJ所支持的织入方式。
6、引介(Introduction)
引介是另一种类型的增强,它可以为类添加一些属性和方法。它和通知是并列的两种不同的增强。
7、目标对象(Target)
目标对象就是我们想要织入的对象,一般不会是一个,通常是一批符合条件的对象。
8、代理(Proxy)
代理就好理解了,Spring内置的AOP就是通过动态代理的方式实现织入的,创建目标对象的代理类,在代理类中执行通知的内容,然后在合适的位置调用目标对象的方法,来达到织入的目的。
三、Spring AOP概述
Spring AOP是基于动态代理技术实现的切面编程,代理技术包括JDK动态代理和CGLIB动态代理,前者基于接口实现,后者基于类实现。
1、Spring中使用AOP技术的方式:
1)定义切面类,使用@Aspect注解
2)在切面类中定义切点方法,使用@PointCut注解
3)在切面类中定义通知方法,使用@Before、@After、@Around等注解
4)在通知方法的注解中使用切点方法
5)在切面类上加设注解@Component
6)启动AOP功能,两种方式:原始的XML配置方式和注解方式
XMl方式:<aop:aspectj-autoproxy/>
注解方式:@EnableAspectJAutoProxy
配置方式:spring.auto.proxy=true
2、Spring AOP支持的增强类型
通知增强:Advice
前置通知:MethodBeforeAdvice-在连接点之前执行
后置通知:AfterReturningAdvice-在连接点正常执行完后执行,如果还未到连接点就异常,不会执行
环绕通知:AroundAdvice-在连接点前后执行
异常通知:AfterThrowingAdvice-在连接点抛出异常后执行
finally通知:AfterAdvice-最终执行,无论是否异常,方法执行结束都会执行
引介增强:IntroductionInterceptor->DelegatingIntroductionInterceptor
前五种很好理解,重点是最后一种引介增强,这种增强并不是针对方法的增强,而是针对类的增强,它会为目标添加属性和方法,比如它可以为目标类添加一个接口的实现。目标类原本没有实现某个接口,但是我们可以使用引介增强的方式为目标类创建一个实现该接口的代理,在这个代理中可以使用接口的功能来作用于目标对象。
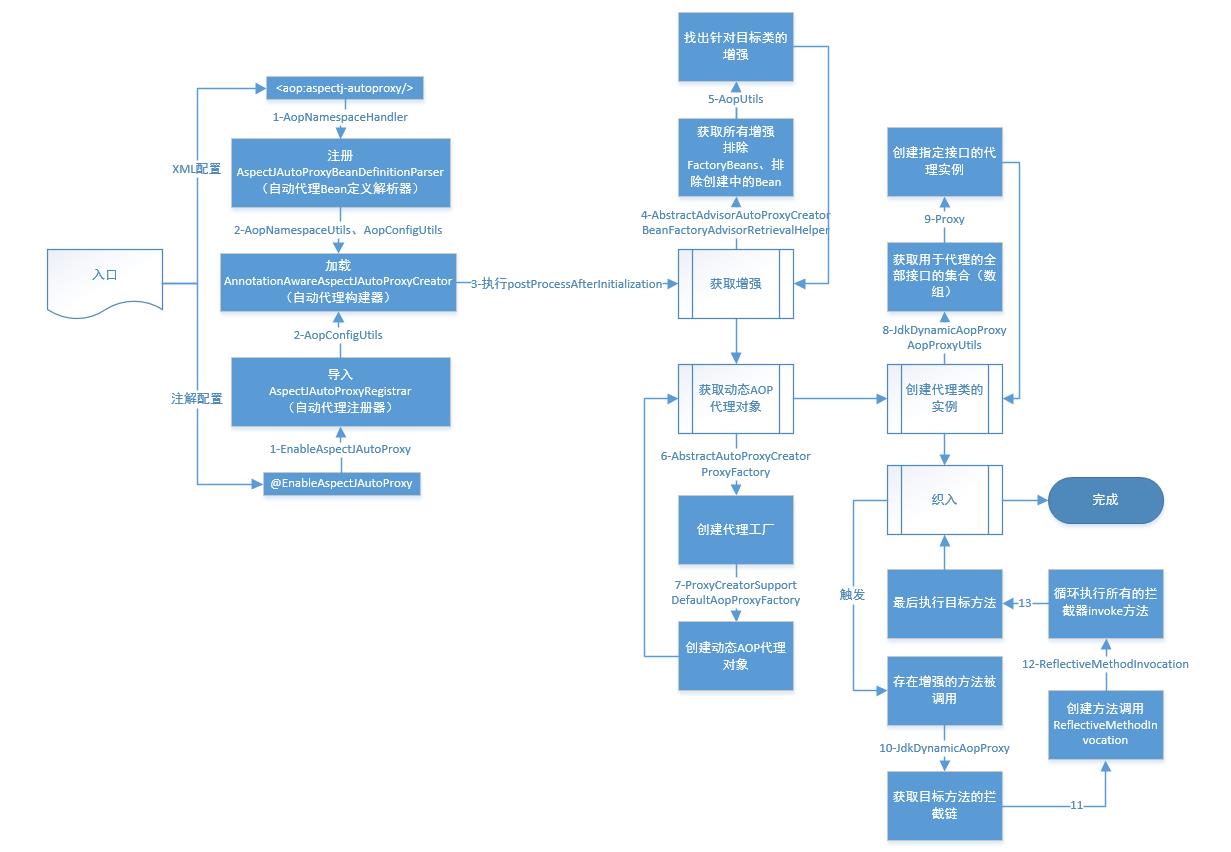
3、原理图:(右键打开看大图)
四、源码分析
1、入口
1.1 入口一:<aop:aspectj-autoproxy/>
源码1-来自:AopNamespaceHandler
1     @Override
2     public void init() {
3         // In 2.0 XSD as well as in 2.1 XSD.
4         registerBeanDefinitionParser("config", new ConfigBeanDefinitionParser());
5         registerBeanDefinitionParser("aspectj-autoproxy", new AspectJAutoProxyBeanDefinitionParser());
6         registerBeanDefinitionDecorator("scoped-proxy", new ScopedProxyBeanDefinitionDecorator());
7
8         // Only in 2.0 XSD: moved to context namespace as of 2.1
9         registerBeanDefinitionParser("spring-configured", new SpringConfiguredBeanDefinitionParser());
10     }
上面源码就是针对XML配置中<aop:XXX/>配置的解析,红色部分正是针对<aop:aspectj-autoproxy/>的解析,如果配置了aspectj-autoproxy,则注册Bean定义解析器:AspectJAutoProxyBeanDefinitionParser。
AspectJAutoProxyBeanDefinitionParser是一个实现了BeanDefinitionParser接口的类,专门用于解析切面自动代理的Bean定义的解析工作,重点在其parse方法。
源码2-来自:AspectJAutoProxyBeanDefinitionParser
1 class AspectJAutoProxyBeanDefinitionParser implements BeanDefinitionParser {
2
3     @Override
4     @Nullable
5     public BeanDefinition parse(Element element, ParserContext parserContext) {
6         // 1-注册AnnotationAwareAspectJAutoProxyCreator
7         AopNamespaceUtils.registerAspectJAnnotationAutoProxyCreatorIfNecessary(parserContext, element);
8         // 2-扩展BeanDefinition
9         extendBeanDefinition(element, parserContext);
10         return null;
11     }
12
13     private void extendBeanDefinition(Element element, ParserContext parserContext) {
14         // 获取BeanName为internalAutoProxyCreator的BeanDefinition,其实就是之前注册的自动代理构建器
15         BeanDefinition beanDef =
16                 parserContext.getRegistry().getBeanDefinition(AopConfigUtils.AUTO_PROXY_CREATOR_BEAN_NAME);
17         if (element.hasChildNodes()) {
18             // 如果当前元素有子节点,则给上面获取的Bean定义添加子节点中明确定义的类型值(填充BeanDefinition)
19             addIncludePatterns(element, parserContext, beanDef);
20         }
21     }
22
23     private void addIncludePatterns(Element element, ParserContext parserContext, BeanDefinition beanDef) {
24         ManagedList<TypedStringValue> includePatterns = new ManagedList<>();
25         NodeList childNodes = element.getChildNodes();//获取子节点
26         for (int i = 0; i < childNodes.getLength(); i++) {
27             // 遍历子节点,获取子节点中name属性值,封装到TypeStringValue中
28             // 在上下文中提取子节点includeElement的元数据保存到TypedStringValue的source属性中
29             // 最后封装好的TypeStringValue保存到includePatterns列表中
30             Node node = childNodes.item(i);
31             if (node instanceof Element) {
32                 Element includeElement = (Element) node;
33                 TypedStringValue valueHolder = new TypedStringValue(includeElement.getAttribute("name"));
34                 valueHolder.setSource(parserContext.extractSource(includeElement));
35                 includePatterns.add(valueHolder);
36             }
37         }
38         if (!includePatterns.isEmpty()) {
39             // 从解析上下文parserContext中提取指定节点element的元数据保存到includePatterns的source属性中,
40             // 然后将includePatterns保存到BeanDefinition的propertyValues属性中
41             includePatterns.setSource(parserContext.extractSource(element));
42             beanDef.getPropertyValues().add("includePatterns", includePatterns);
43         }
44     }
45
46 }
上面代码中有两个重点,首先就是registerAspectJAnnotationAutoProxyCreatorIfNecessary方法调用,用于注册AnnotationAwareAspectJAutoProxyCreator构建器;另一点就是在构建器注册完成后,为其填充一些必要内容,这些内容为XML配置中子节点的配置内容,具体内容参照源码,这里重点看看第一步,注册构建器的源码:
源码3-来自:AopNamespaceUtils
1     public static void registerAspectJAnnotationAutoProxyCreatorIfNecessary(
2             ParserContext parserContext, Element sourceElement) {
3         // 1-注册或升级AnnotationAwareAspectJAutoProxyCreator
4         // parserContext.getRegistry()获取到的是BeanDefinitionRegistry注册器,第二个参数是提取的指定元素的元数据
5         BeanDefinition beanDefinition = AopConfigUtils.registerAspectJAnnotationAutoProxyCreatorIfNecessary(
6                 parserContext.getRegistry(), parserContext.extractSource(sourceElement));
7         // 2-校验并设置是否适用基于CGLIB的动态代理实现AOP,和是否要暴露代理类
8         useClassProxyingIfNecessary(parserContext.getRegistry(), sourceElement);
9         // 3-注册成组件
10         registerComponentIfNecessary(beanDefinition, parserContext);
11     }
12
13     private static void useClassProxyingIfNecessary(BeanDefinitionRegistry registry, @Nullable Element sourceElement) {
14         if (sourceElement != null) {
15             boolean proxyTargetClass = Boolean.parseBoolean(sourceElement.getAttribute(PROXY_TARGET_CLASS_ATTRIBUTE));//获取XML中设置的proxy-target-class属性的值,解析为Boolean值
16             if (proxyTargetClass) {
17                 // 如果为true,则强制自动代理构建器使用基于类的动态代理CGLIB,需要将属性设置到自动代理构建器的BeanDefinition中
18                 AopConfigUtils.forceAutoProxyCreatorToUseClassProxying(registry);
19             }
20             boolean exposeProxy = Boolean.parseBoolean(sourceElement.getAttribute(EXPOSE_PROXY_ATTRIBUTE));//获取XML中配置的expose-proxy属性的值,同样解析为Boolean值
21             if (exposeProxy) {
22                 // 如果为true,强制自动代理构建器暴露代理类,需要将属性设置到自动代理构建器的BeanDefinition中
23                 AopConfigUtils.forceAutoProxyCreatorToExposeProxy(registry);
24             }
25         }
26     }
27
28     private static void registerComponentIfNecessary(@Nullable BeanDefinition beanDefinition, ParserContext parserContext) {
29         if (beanDefinition != null) {
30             // 将自动代理构建器包装成为一个Bean组件定义。
31             // Bean组件定义是将一个BeanDefinition中包含的所有的属性的值(可能为一个BeanDefinition或者BeanReference)全部封装起来成为一个组件包,然后将其注册到解析上下文中
32             BeanComponentDefinition componentDefinition =
33                     new BeanComponentDefinition(beanDefinition, AopConfigUtils.AUTO_PROXY_CREATOR_BEAN_NAME);
34             parserContext.registerComponent(componentDefinition);
35         }
36     }
registerAspectJAnnotationAutoProxyCreatorIfNecessary方法中主要做了三件事情:
1-注册构建器
2-配置属性
3-组件注册
针对第2和第3,在源码注释中解释的很清楚啦,主要看看第一步,继续进行构建器的注册:
源码4-来自:AopConfigUtils
1     public static void forceAutoProxyCreatorToUseClassProxying(BeanDefinitionRegistry registry) {
2         if (registry.containsBeanDefinition(AUTO_PROXY_CREATOR_BEAN_NAME)) {
3             //如果构建器已经加载,获取其BeanDefinition,添加属性proxyTargetClass,值为true
4             BeanDefinition definition = registry.getBeanDefinition(AUTO_PROXY_CREATOR_BEAN_NAME);
5             definition.getPropertyValues().add("proxyTargetClass", Boolean.TRUE);
6         }
7     }
8
9     public static void forceAutoProxyCreatorToExposeProxy(BeanDefinitionRegistry registry) {
10         if (registry.containsBeanDefinition(AUTO_PROXY_CREATOR_BEAN_NAME)) {
11             //如果构建器已经加载,获取其BeanDefinition,添加属性exposeProxy,值为true
12             BeanDefinition definition = registry.getBeanDefinition(AUTO_PROXY_CREATOR_BEAN_NAME);
13             definition.getPropertyValues().add("exposeProxy", Boolean.TRUE);
14         }
15     }
16
17     @Nullable
18     private static BeanDefinition registerOrEscalateApcAsRequired(Class<?> cls, BeanDefinitionRegistry registry,
19             @Nullable Object source) {
20
21         Assert.notNull(registry, "BeanDefinitionRegistry must not be null");
22
23         if (registry.containsBeanDefinition(AUTO_PROXY_CREATOR_BEAN_NAME)) {
24             // 1-如果internalAutoProxyCreator已经被注册那么比较新旧自动代理构建器类在列表中的优先级,如果已注册的构建器优先级低,则替换为给定的新构建器
25             BeanDefinition apcDefinition = registry.getBeanDefinition(AUTO_PROXY_CREATOR_BEAN_NAME);
26             if (!cls.getName().equals(apcDefinition.getBeanClassName())) {
27                 int currentPriority = findPriorityForClass(apcDefinition.getBeanClassName());
28                 int requiredPriority = findPriorityForClass(cls);
29                 if (currentPriority < requiredPriority) {
30                     apcDefinition.setBeanClassName(cls.getName());
31                 }
32             }
33             return null;
34         }
35         // 尚未注册internalAutoProxyCreator的情况下,将给定的构建器包装成RootBeanDefinition,然后注册这个BeanDefinition
36         RootBeanDefinition beanDefinition = new RootBeanDefinition(cls);
37         // 把元数据保存到BeanDefinition中
38         beanDefinition.setSource(source);
39         // 设置为最高优先值
40         beanDefinition.getPropertyValues().add("order", Ordered.HIGHEST_PRECEDENCE);
41         // 设置为基础角色
42         beanDefinition.setRole(BeanDefinition.ROLE_INFRASTRUCTURE);
43         // 2-以internalAutoProxyCreator为beanName注册当前BeanDefinition(AnnotationAwareAspectJAutoProxyCreator类)
44         registry.registerBeanDefinition(AUTO_PROXY_CREATOR_BEAN_NAME, beanDefinition);
45         return beanDefinition;
46     }
源码4中前两个方法时源码3中第二步里面配置属性时调用的方法,在此给出。
源码4的1-中是在已存在一个自动代理构建器的情况下,将其与新的给定的AnnotationAwareAspectJAutoProxyCreator构建器的优先级进行比对,取优先极高的。
最后的registerBeanDefinition方法用于注册BeanDefinition。至此,自动代理构建器加载完毕。
1.2 入口二:@EnableAspectJAutoProxy
源码5-来自:EnableAspectJAutoProxy
1 @Target(ElementType.TYPE)
2 @Retention(RetentionPolicy.RUNTIME)
3 @Documented
4 @Import(AspectJAutoProxyRegistrar.class)
5 public @interface EnableAspectJAutoProxy {
6
7     /**
8      * Indicate whether subclass-based (CGLIB) proxies are to be created as opposed
9      * to standard Java interface-based proxies. The default is {@code false}.
10      */
11     boolean proxyTargetClass() default false;
12
13     /**
14      * Indicate that the proxy should be exposed by the AOP framework as a {@code ThreadLocal}
15      * for retrieval via the {@link org.springframework.aop.framework.AopContext} class.
16      * Off by default, i.e. no guarantees that {@code AopContext} access will work.
17      * @since 4.3.1
18      */
19     boolean exposeProxy() default false;
20
21 }
源码中重点关注@Import(AspectJAutoProxyRegistrar.class),很明显这个注解导入了一个新类:AspectJAutoProxyRegistrar。
使用@Import注解导入的方式可以将一个类注册到BeanFactory中。
源码6-来自AspectJAutoProxyRegistrar
1 class AspectJAutoProxyRegistrar implements ImportBeanDefinitionRegistrar {
2
3     @Override
4     public void registerBeanDefinitions(
5             AnnotationMetadata importingClassMetadata, BeanDefinitionRegistry registry) {
6         // 1-注册或升级自动代理构建器
7         AopConfigUtils.registerAspectJAnnotationAutoProxyCreatorIfNecessary(registry);
8         // 2-封装注解属性,并根据属性进行配置
9         AnnotationAttributes enableAspectJAutoProxy =
10                 AnnotationConfigUtils.attributesFor(importingClassMetadata, EnableAspectJAutoProxy.class);
11         if (enableAspectJAutoProxy != null) {
12             if (enableAspectJAutoProxy.getBoolean("proxyTargetClass")) {
13                 AopConfigUtils.forceAutoProxyCreatorToUseClassProxying(registry);
14             }
15             if (enableAspectJAutoProxy.getBoolean("exposeProxy")) {
16                 AopConfigUtils.forceAutoProxyCreatorToExposeProxy(registry);
17             }
18         }
19     }
20
21 }
我们可以从源码5中看到注解@EnableAspectJAutoProxy内部有两个属性设置proxyTargetClass和exposeProxy,这个之前的入口一中源码3里面的2-中的设置是一样的,即我们在XML启动AOP的时候也可以设置这两个值。
proxyTargetClass属性表示是否适用基于类的的动态代理CGLIB来创建代理类。true表示使用,false表示不使用,默认是false。
exposeProxy属性表示是否暴露生成的代理类,暴露就是可手动调用,最常见的情况如,在一个类中使用this调用带有@Transactional注解的方法,你会发现事务是不生效的,这时候我们就可以将生成的代理暴露出来手动调用代理类来保证事务生效:
如下例子中:
1 public interface TestService {
2     void testMethod1();
3     void testMethod2();
4 }
1 public class TestServiceImpl {
2
3     @Transactional
4     public void testMethod1(){
5         //some transaction operate
6     }
7
8     public void testMethod2(){
9         this.testMethod1();
10     }
11 }
在testMethod2中以this.testMethod1()方式调用带事务注解的testMethod1方法时,其事务是不生效的。修改方式就是将exposeProxy设置为true,然后修改调用方式为:
1 ((TestService)AopContext.currnetProxy()).testMethod1();
源码6中1-调用的是AopConfigUtils中的方法:
源码7-来自:AopConfigUtils
1     @Nullable
2     public static BeanDefinition registerAspectJAnnotationAutoProxyCreatorIfNecessary(BeanDefinitionRegistry registry) {
3         return registerAspectJAnnotationAutoProxyCreatorIfNecessary(registry, null);
4     }
然后它再调用的就是源码4中的源码了,到这里调用的就是公共部分啦。那么这一部分也就到此为止了,其余见源码4之后的部分。
到此两个主要的入口都分析完毕,入口的主要作用就是注册或者升级自动代理构建器,因为之后AOP的操作基本都要依靠这个构建器来完成。
2、创建AOP代理
我们的重点就是构建器AnnotationAwareAspectJAutoProxyCreator,分析下其继承结构,你会发现它实现了BeanPostProcessor接口。
BeanPostProcessor接口有两个方法:
postProcessBeforeInitialization:Bean实例初始化前调用
postProcessAfterInitialization:Bean实例初始化之后调用
然后我们在其继承体系中寻找实现这两个方法的类,一番寻找后发现:AbstractAutoProxyCreator
源码8-来自:AbstractAutoProxyCreator
1     @Override
2     public Object postProcessAfterInitialization(@Nullable Object bean, String beanName) throws BeansException {
3         if (bean != null) {
4             // 1-生成缓存key
5             Object cacheKey = getCacheKey(bean.getClass(), beanName);
6             // 校验该key是否已存在于earlyProxyReferences缓存
7             if (!this.earlyProxyReferences.contains(cacheKey)) {
8                 // 2-执行创建代理对象
9                 return wrapIfNecessary(bean, beanName, cacheKey);
10             }
11         }
12         return bean;
13     }
我们发现了这个方法的实现,这个方法会在构建器Bean初始化之后被调用。我们看看它做了啥?
重点就是wrapIfNecessary方法,这个方法用于代理对象的生成。
源码9-来自:AbstractAutoProxyCreator
1     protected Object wrapIfNecessary(Object bean, String beanName, Object cacheKey) {
2         if (StringUtils.hasLength(beanName) && this.targetSourcedBeans.contains(beanName)) {
3             // 已经处理过,直接返回
4             return bean;
5         }
6         if (Boolean.FALSE.equals(this.advisedBeans.get(cacheKey))) {
7             // 如果不需要增强,直接返回
8             return bean;
9         }
10         if (isInfrastructureClass(bean.getClass()) || shouldSkip(bean.getClass(), beanName)) {
11            // 检测目标类是否是AOP的基础设施类,基础设施类包括Advice、Pointcut、Advisor、AopInfrastructureBean,或者是否需要跳过代理,如果是则将其设置为无需增强
12             this.advisedBeans.put(cacheKey, Boolean.FALSE);
13             return bean;
14         }
15
16         // Create proxy if we have advice.
17         // 1-获取针对当前Bean的增强
18         Object[] specificInterceptors = getAdvicesAndAdvisorsForBean(bean.getClass(), beanName, null);
19         if (specificInterceptors != DO_NOT_PROXY) {
20             // 如果获取到增强则执行下面的创建代理
21             this.advisedBeans.put(cacheKey, Boolean.TRUE);
22             // 2-创建代理
23             Object proxy = createProxy(
24                     bean.getClass(), beanName, specificInterceptors, new SingletonTargetSource(bean));
25             // 缓存代理类
26             this.proxyTypes.put(cacheKey, proxy.getClass());
27             return proxy;
28         }
29         // 如果未获取到增强,则设置跳过代理
30         this.advisedBeans.put(cacheKey, Boolean.FALSE);
31         return bean;
32     }
上面的源码中除了进行一些必要的校验之外,主要的逻辑是获取针对当前Bean的增强和创建代理这两步。
首先来看下如何获取增强
源码10-来自:AbstractAdvisorAutoProxyCreator
1     //获取通知(增强)
2     @Override
3     @Nullable
4     protected Object[] getAdvicesAndAdvisorsForBean(
5             Class<?> beanClass, String beanName, @Nullable TargetSource targetSource) {
6
7         List<Advisor> advisors = findEligibleAdvisors(beanClass, beanName);
8         if (advisors.isEmpty()) {
9             return DO_NOT_PROXY;
10         }
11         return advisors.toArray();
12     }
源码11-来自:AbstractAdvisorAutoProxyCreator
1    protected List<Advisor> findEligibleAdvisors(Class<?> beanClass, String beanName) {
2         // 1-先获取所有的增强器列表
3         List<Advisor> candidateAdvisors = findCandidateAdvisors();
4         // 2-获取应用到当前目标类的增强器列表
5         List<Advisor> eligibleAdvisors = findAdvisorsThatCanApply(candidateAdvisors, beanClass, beanName);
6         //在这个方法中进行了一个操作,那就是在通知链的首位添加了一个ExposeInvocationInteceptor,这个普通拦截器的作用是为了暴露方法调用,将会第一个被调用,并将MethodInvocation添加到ThreadLocal中
7         extendAdvisors(eligibleAdvisors);
8         if (!eligibleAdvisors.isEmpty()) {
9             eligibleAdvisors = sortAdvisors(eligibleAdvisors);//排序
10         }
11         return eligibleAdvisors;
12     }
上面的源码我们重点关注findCandidateAdvisors方法和findAdvisorsThatCanApply方法,分别用于找出BeanFactory中所有的可用的增强器,和从可用增强器中找出作用于目标类的增强器。
另外,此处还有一个排序方法,那么这个排序的作用何在呢?此处排序是为了后面通知链的执行顺序而进行的,具体内容,容后详述。
至于extendAdvistors方法,这个方法的目的就是为了将ExposeInvocationInterceptor拦截器添加到通知连中,并放在首位,在通知链被调用的时候会被优先执行,将MethodInvocation放到ThreadLocal中。
最后返回的eligibleAdvisors其实就已经是完整的通知链了,然后一步步返回,进行代理的创建。
源码12-来自:AbstractAdvisorAutoProxyCreator
1     protected List<Advisor> findCandidateAdvisors() {
2         Assert.state(this.advisorRetrievalHelper != null, "No BeanFactoryAdvisorRetrievalHelper available");
3         return this.advisorRetrievalHelper.findAdvisorBeans();
4     }
源码13-来自:BeanFactoryAdvisorRetrievalHelper
1     public List<Advisor> findAdvisorBeans() {
2         // Determine list of advisor bean names, if not cached already.
3         String[] advisorNames = null;
4         synchronized (this) {
5             advisorNames = this.cachedAdvisorBeanNames;
6             if (advisorNames == null) {
7                 // Do not initialize FactoryBeans here: We need to leave all regular beans
8                 // uninitialized to let the auto-proxy creator apply to them!
9                 // 1-获取当前BeanFactory及其继承体系中的容器中所有的Advisor类型的Bean的BeanName数组,排除掉FactoryBeans
10                 advisorNames = BeanFactoryUtils.beanNamesForTypeIncludingAncestors(
11                         this.beanFactory, Advisor.class, true, false);
12                 this.cachedAdvisorBeanNames = advisorNames;
13             }
14         }
15         if (advisorNames.length == 0) {
16             return new LinkedList<>();
17         }
18
19         List<Advisor> advisors = new LinkedList<>();
20         for (String name : advisorNames) {
21             if (isEligibleBean(name)) {
22                 // 2-再排除创建中的Bean
23                 if (this.beanFactory.isCurrentlyInCreation(name)) {
24                     if (logger.isDebugEnabled()) {
25                         logger.debug("Skipping currently created advisor '" + name + "'");
26                     }
27                 }
28                 else {
29                     try {
30                         // 3-把剩下的Bean添加到通知(增强器)列表中
31                         advisors.add(this.beanFactory.getBean(name, Advisor.class));
32                     }
33                     catch (BeanCreationException ex) {
34                         Throwable rootCause = ex.getMostSpecificCause();
35                         if (rootCause instanceof BeanCurrentlyInCreationException) {
36                             BeanCreationException bce = (BeanCreationException) rootCause;
37                             String bceBeanName = bce.getBeanName();
38                             if (bceBeanName != null && this.beanFactory.isCurrentlyInCreation(bceBeanName)) {
39                                 if (logger.isDebugEnabled()) {
40                                     logger.debug("Skipping advisor '" + name +
41                                             "' with dependency on currently created bean: " + ex.getMessage());
42                                 }
43                                 // Ignore: indicates a reference back to the bean we're trying to advise.
44                                 // We want to find advisors other than the currently created bean itself.
45                                 continue;
46                             }
47                         }
48                         throw ex;
49                     }
50                 }
51             }
52         }
53         return advisors;
54     }
这段源码看起来挺复杂,我们去掉一些不必要的内容,总结起来,总共三件事:
1-获取容器中所有的Advisor,排除FactoryBeans
2-再排除创建中的Bean
3-将剩余的Advisor通过getBean创建Bean实例并添加到列表中返回
至于再下一步的逻辑就不再探寻啦。
然后是源码11中的2-findAdvisorsThatCanApply方法
源码14-来自:AbstractAdvisorAutoProxyCreator
1     protected List<Advisor> findAdvisorsThatCanApply(
2             List<Advisor> candidateAdvisors, Class<?> beanClass, String beanName) {
3
4         // 将代理的目标Bean的beanName设置到ThreadLocal中
5         ProxyCreationContext.setCurrentProxiedBeanName(beanName);
6         try {
7             // 1-在候选增强器中找出可作用于目标Bean的增强器
8             return AopUtils.findAdvisorsThatCanApply(candidateAdvisors, beanClass);
9         }
10         finally {
11             ProxyCreationContext.setCurrentProxiedBeanName(null);
12         }
13     }
重点操作就是AopUtils.findAdvisorsThatCanApply(candidateAdvisors, beanClass);用于找出能作用于目标Bean的增强器列表
源码15-来自:AopUtils
1     public static List<Advisor> findAdvisorsThatCanApply(List<Advisor> candidateAdvisors, Class<?> clazz) {
2         if (candidateAdvisors.isEmpty()) {
3             return candidateAdvisors;
4         }
5         List<Advisor> eligibleAdvisors = new LinkedList<>();
6         for (Advisor candidate : candidateAdvisors) {
7             if (candidate instanceof IntroductionAdvisor && canApply(candidate, clazz)) {
8                 // 1-首先添加引介增强
9                 eligibleAdvisors.add(candidate);
10             }
11         }
12         boolean hasIntroductions = !eligibleAdvisors.isEmpty();
13         for (Advisor candidate : candidateAdvisors) {
14             if (candidate instanceof IntroductionAdvisor) {
15                 // already processed
16                 //跳过引介增强
17                 continue;
18             }
19             //校验其余增强器是否能应用到目标Bean
20             if (canApply(candidate, clazz, hasIntroductions)) {
21                 // 2-添加通知增强
22                 eligibleAdvisors.add(candidate);
23             }
24         }
25         return eligibleAdvisors;
26     }
源码中可以看出来,这里针对了两种类型的增强器(引介增强和通知增强)分别进行了处理,首先处理了引介增强,然后是通知增强。
这里有两个canApply方法,第一个用于判断引介增强是否能作用到目标类,第二个用于判断通知增强是否能作用到目标类。
其实第一个是通过调用第二个实现的。
我觉得我们可以简单看看其实现逻辑:
源码16-来源:AopUtils
//用于校验引介增强
public static boolean canApply(Advisor advisor, Class<?> targetClass) {
return canApply(advisor, targetClass, false);
}

//用于校验通知增强
public static boolean canApply(Advisor advisor, Class<?> targetClass, boolean hasIntroductions) {
if (advisor instanceof IntroductionAdvisor) {
return ((IntroductionAdvisor) advisor).getClassFilter().matches(targetClass);// 针对引介增强的类级匹配校验
}
else if (advisor instanceof PointcutAdvisor) {
PointcutAdvisor pca = (PointcutAdvisor) advisor;
return canApply(pca.getPointcut(), targetClass, hasIntroductions);// 针对通知增强的匹配校验
}
else {
// It doesn't have a pointcut so we assume it applies.
return true;
}
}

    // 针对通知增强的匹配校验
public static boolean canApply(Pointcut pc, Class<?> targetClass, boolean hasIntroductions) {
Assert.notNull(pc, "Pointcut must not be null");
if (!pc.getClassFilter().matches(targetClass)) {
return false;// 针对通知增强的类级匹配校验,如果类级校验不通过,直接驳回
}

MethodMatcher methodMatcher = pc.getMethodMatcher();// 获取方法匹配器
if (methodMatcher == MethodMatcher.TRUE) {// 获取方法匹配器匹配的是所有方法,这里直接返回true,不必要做校验
// No need to iterate the methods if we're matching any method anyway...
return true;
}

IntroductionAwareMethodMatcher introductionAwareMethodMatcher = null;
if (methodMatcher instanceof IntroductionAwareMethodMatcher) {
introductionAwareMethodMatcher = (IntroductionAwareMethodMatcher) methodMatcher;
}

Set<Class<?>> classes = new LinkedHashSet<>();
if (!Proxy.isProxyClass(targetClass)) {
classes.add(ClassUtils.getUserClass(targetClass));
}
classes.addAll(ClassUtils.getAllInterfacesForClassAsSet(targetClass));

for (Class<?> clazz : classes) {
Method[] methods = ReflectionUtils.getAllDeclaredMethods(clazz);
for (Method method : methods) {
if (introductionAwareMethodMatcher != null ?
introductionAwareMethodMatcher.matches(method, targetClass, hasIntroductions) :
methodMatcher.matches(method, targetClass)) {
            // 方法匹配校验
return true;
}
}
}

return false;
}
上面的源码中用于判断增强是否与给定的类匹配,用了多个matches方法,包括ClassFilter的matches方法,IntroductionAwareMethodMatcher的matches方法和MethodMatcher中的matches方法。
第一个matches匹配的是类,第二、三个matches匹配的是方法。其中引介增强针对的是类,所以其校验仅仅使用类级匹配进行校验,但是通知增强针对的是类中的方法,需要进行类和方法的双重匹配校验。
然后返回到源码9中,我们开始生成代理:
源码17-来自:AbstractAutoProxyCreator
1     protected Object createProxy(Class<?> beanClass, @Nullable String beanName,
2             @Nullable Object[] specificInterceptors, TargetSource targetSource) {
3
4         if (this.beanFactory instanceof ConfigurableListableBeanFactory) {
5             //暴露目标类,将其保存到BeanDefinition中
6             AutoProxyUtils.exposeTargetClass((ConfigurableListableBeanFactory) this.beanFactory, beanName, beanClass);
7         }
8
9         //创建一个新的代理工厂,并为其拷贝当前类中的相关配置属性
10         ProxyFactory proxyFactory = new ProxyFactory();
11         proxyFactory.copyFrom(this);
12
13         if (!proxyFactory.isProxyTargetClass()) {
14             //校验proxyTargetClass设置,如果设置不是直接代理目标类,则采用默认的JDK动态代理指定接口
15             if (shouldProxyTargetClass(beanClass, beanName)) {
16                 //校验该Bean的BeanDefinition中的preserveTargetClass属性,是否被代理工厂设置为true,如果设置为true,则表示代理工厂希望代理类可以强转为目标类
17                 proxyFactory.setProxyTargetClass(true);
18             }
19             else {
20                 //否则表示基于接口创建代理
21                 evaluateProxyInterfaces(beanClass, proxyFactory);
22             }
23         }
24
25         //将拦截器封装成通知
26         Advisor[] advisors = buildAdvisors(beanName, specificInterceptors);
27         proxyFactory.addAdvisors(advisors);//加入增强器
28         proxyFactory.setTargetSource(targetSource);//设置要代理的类
29         customizeProxyFactory(proxyFactory);//子类定制代理
30         //用于控制代理工厂被配置之后,是否还允许修改通知,默认为false(表示不允许修改)
31         proxyFactory.setFrozen(this.freezeProxy);
32         if (advisorsPreFiltered()) {
33             proxyFactory.setPreFiltered(true);
34         }
35         //创建代理
36         return proxyFactory.getProxy(getProxyClassLoader());
37     }
源码中执行了一大串的工作,都在为最后的创建代理做准备:
源码18-来自:ProxyFactory
1     public Object getProxy(@Nullable ClassLoader classLoader) {
2         //创建AOP代理,并获取代理对象
3         return createAopProxy().getProxy(classLoader);
4     }
源码19-来自:ProxyCreatorSupport
1     protected final synchronized AopProxy createAopProxy() {
2         if (!this.active) {
3             activate();//激活开关
4         }
5         // 获取AOP代理工厂,使用AOP代理工厂创建AOP代理
6         return getAopProxyFactory().createAopProxy(this);
7     }
8
9     private void activate() {
10         this.active = true;
11         // 回调监听器的activated方法
12         for (AdvisedSupportListener listener : this.listeners) {
13             listener.activated(this);
14         }
15     }
16
17     public AopProxyFactory getAopProxyFactory() {
18         return this.aopProxyFactory;
19     }
重点在createAopProxy方法:
源码20-来自:DefaultAopProxyFactory
1     @Override
2     public AopProxy createAopProxy(AdvisedSupport config) throws AopConfigException {
3         if (config.isOptimize() || config.isProxyTargetClass() || hasNoUserSuppliedProxyInterfaces(config)) {
4             // 如果代理需要执行优化或者proxyTargetClass=true或者不存在代理接口
5             Class<?> targetClass = config.getTargetClass();
6             if (targetClass == null) {
7                 throw new AopConfigException("TargetSource cannot determine target class: " +
8                         "Either an interface or a target is required for proxy creation.");
9             }
10             if (targetClass.isInterface() || Proxy.isProxyClass(targetClass)) {
11                 //如果目标类是接口或者是动态生成的代理类,则使用JDK动态代理
12                 return new JdkDynamicAopProxy(config);
13             }
14             //创建CGLIB动态AOP代理对象
15             return new ObjenesisCglibAopProxy(config);
16         }
17         else {
18             //创建JDK动态AOP代理对象
19             return new JdkDynamicAopProxy(config);
20         }
21     }
至此,代理对象生成,至于是使用JDK动态代理,还是Cglib动态代理,机理如下:
如果目标类实现了接口,默认使用JDK动态代理
如果目标类实现了接口,可以强制使用Cglib动态代理
如果目标没有实现接口,必须采用Cglib动态代理
至于如何强制使用Cglib动态代理:
首先需要添加CGLIB库,然后设置proxyTargetClass置为true,进行强制使用基于类的CGLIB动态代理。
JDK动态代理和Cglib动态代理的区别:
JDK动态代理只能基于接口生成代理,方式是通过实现JDK提供的InvocationHandler接口中的invoke方法来实现针对目标类指定方法的代理调用。
CGLIB可以基于类生成代理,方式是通过对目标类生成一个子类,覆盖其中的方法。
返回到源码18中,创建了AOP代理之后,执行其getProxy方法:(我们看下JDK动态代理的实现)
源码21-来自:JdkDynamicAopProxy
1     @Override
2     public Object getProxy(@Nullable ClassLoader classLoader) {
3         if (logger.isDebugEnabled()) {
4             logger.debug("Creating JDK dynamic proxy: target source is " + this.advised.getTargetSource());
5         }
6         // 1-获取用于代理的全部接口的集合(数组)
7         Class<?>[] proxiedInterfaces = AopProxyUtils.completeProxiedInterfaces(this.advised, true);
8         // 2-查找接口集合中可能定义的equals方法获取hashCode方法
9         findDefinedEqualsAndHashCodeMethods(proxiedInterfaces);
10         // 3-创建指定接口的代理实例
11         return Proxy.newProxyInstance(classLoader, proxiedInterfaces, this);
12     }
上面的代理主要做了三件事情:
1-首先获取用于代理的全部接口集;
2-然后查找该接口集中有无定义equals和hashCode方法;
3-最后执行代理实例的创建。
首先看下第一件事情:completeProxiedInterfaces
源码22-来自:AopProxyUtils
1     // 获取用于代理的接口的集合
2     static Class<?>[] completeProxiedInterfaces(AdvisedSupport advised, boolean decoratingProxy) {
3         // 获取配置中所有的接口
4         Class<?>[] specifiedInterfaces = advised.getProxiedInterfaces();
5         if (specifiedInterfaces.length == 0) {
6             // No user-specified interfaces: check whether target class is an interface.
7             Class<?> targetClass = advised.getTargetClass();
8             if (targetClass != null) {
9                 if (targetClass.isInterface()) {
10                     advised.setInterfaces(targetClass);
11                 }
12                 else if (Proxy.isProxyClass(targetClass)) {
13                     advised.setInterfaces(targetClass.getInterfaces());
14                 }
15                 specifiedInterfaces = advised.getProxiedInterfaces();
16             }
17         }
18         // 将SpringProxy、Advised、DecoratingProxy三个接口添加到接口集中
19         boolean addSpringProxy = !advised.isInterfaceProxied(SpringProxy.class);
20         boolean addAdvised = !advised.isOpaque() && !advised.isInterfaceProxied(Advised.class);
21         boolean addDecoratingProxy = (decoratingProxy && !advised.isInterfaceProxied(DecoratingProxy.class));
22         int nonUserIfcCount = 0;
23         if (addSpringProxy) {
24             nonUserIfcCount++;
25         }
26         if (addAdvised) {
27             nonUserIfcCount++;
28         }
29         if (addDecoratingProxy) {
30             nonUserIfcCount++;
31         }
32         Class<?>[] proxiedInterfaces = new Class<?>[specifiedInterfaces.length + nonUserIfcCount];
33         System.arraycopy(specifiedInterfaces, 0, proxiedInterfaces, 0, specifiedInterfaces.length);
34         int index = specifiedInterfaces.length;
35         if (addSpringProxy) {
36             proxiedInterfaces[index] = SpringProxy.class;
37             index++;
38         }
39         if (addAdvised) {
40             proxiedInterfaces[index] = Advised.class;
41             index++;
42         }
43         if (addDecoratingProxy) {
44             proxiedInterfaces[index] = DecoratingProxy.class;
45         }
46         return proxiedInterfaces;
47     }
下面我们再看看之前的第二步:findDefinedEqualsAndHashCodeMethods
源码23-来自:JdkDynamicAopProxy
1     private void findDefinedEqualsAndHashCodeMethods(Class<?>[] proxiedInterfaces) {
2         for (Class<?> proxiedInterface : proxiedInterfaces) {
3             Method[] methods = proxiedInterface.getDeclaredMethods();
4             for (Method method : methods) {
5                 // 遍历每一个接口,再获取其中的方法进行遍历,逐个校验其是否是equals方法,或者hashCode方法,只有当二者都被定义之后校验才会结束,否则一直进行下去
6                 if (AopUtils.isEqualsMethod(method)) {
7                     this.equalsDefined = true;
8                 }
9                 if (AopUtils.isHashCodeMethod(method)) {
10                     this.hashCodeDefined = true;
11                 }
12                 if (this.equalsDefined && this.hashCodeDefined) {
13                     return;
14                 }
15             }
16         }
17     }
最后就是我们的重点步骤:Proxy.newProxyInstance(classLoader, proxiedInterfaces, this),这个操作大家都不会陌生,这是JDK动态代理创建代理类的通用方式。这个方法的参数列表中最后一个是一个大家都很熟悉的家伙:InvocationHandler,我们都知道JDK动态代理的执行逻辑都是在一个实现了InvocationHandler接口中的invoke方法中,这里传入this,表示当前实例,代表当前实例所属类应该实现了InvocationHandler接口,之前已经成功创建了JDK动态代理对象,那么当我们发生对指定目标方法的调用时,就会触发JdkDynamicAopProxy中的invoke方法:
源码24-来自:JdkDynamicAopProxy
1 final class JdkDynamicAopProxy implements AopProxy, InvocationHandler, Serializable {
2     ...
3 }
这也就是说,这个类中必然实现了invoke方法:
源码25-来自:JdkDynamicAopProxy
1     @Override
2     @Nullable
3     public Object invoke(Object proxy, Method method, Object[] args) throws Throwable {
4         MethodInvocation invocation;
5         Object oldProxy = null;
6         boolean setProxyContext = false;
7
8         TargetSource targetSource = this.advised.targetSource;
9         Object target = null;
10
11         try {
12             if (!this.equalsDefined && AopUtils.isEqualsMethod(method)) {
13                 // The target does not implement the equals(Object) method itself.
14                 // 目标类体系中未实现equals方法,但是代理的目标方法却是equals方法
15                 return equals(args[0]);
16             }
17             else if (!this.hashCodeDefined && AopUtils.isHashCodeMethod(method)) {
18                 // The target does not implement the hashCode() method itself.
19                 // 目标类体系中未实现hashCode方法,但是代理的目标方法却是hashCode方法
20                 return hashCode();
21             }
22             else if (method.getDeclaringClass() == DecoratingProxy.class) {
23                 // There is only getDecoratedClass() declared -> dispatch to proxy config.
24                 return AopProxyUtils.ultimateTargetClass(this.advised);
25             }
26             // isAssignableFrom方法的意义:调用方如果是参数方的同类(接口)或者父类(接口),则返回true
27             else if (!this.advised.opaque && method.getDeclaringClass().isInterface() &&
28                     method.getDeclaringClass().isAssignableFrom(Advised.class)) {
29                 // Service invocations on ProxyConfig with the proxy config...
30                 // 直接反射调用目标方法
31                 return AopUtils.invokeJoinpointUsingReflection(this.advised, method, args);
32             }
33
34             Object retVal;
35
36             if (this.advised.exposeProxy) {
37                 // Make invocation available if necessary.
38                 // 如果设置了exposeProxy=true,那么就代理保存起来备用
39                 oldProxy = AopContext.setCurrentProxy(proxy);
40                 setProxyContext = true;
41             }
42
43             // Get as late as possible to minimize the time we "own" the target,
44             // in case it comes from a pool.
45             target = targetSource.getTarget();
46             Class<?> targetClass = (target != null ? target.getClass() : null);
47
48             // Get the interception chain for this method.
49             // 1-获取目标方法的拦截链
50             List<Object> chain = this.advised.getInterceptorsAndDynamicInterceptionAdvice(method, targetClass);
51
52             // Check whether we have any advice. If we don't, we can fallback on direct
53             // reflective invocation of the target, and avoid creating a MethodInvocation.
54             if (chain.isEmpty()) {
55                 // We can skip creating a MethodInvocation: just invoke the target directly
56                 // Note that the final invoker must be an InvokerInterceptor so we know it does
57                 // nothing but a reflective operation on the target, and no hot swapping or fancy proxying.
58                 // 如果目标类没有拦截器链,则直接反射调用目标方法
59                 Object[] argsToUse = AopProxyUtils.adaptArgumentsIfNecessary(method, args);
60                 retVal = AopUtils.invokeJoinpointUsingReflection(target, method, argsToUse);
61             }
62             else {
63                 // We need to create a method invocation...
64                 // 2-创建一个方法调用,并执行,ReflectiveMethodInvocation是Spring封装的
65                 invocation = new ReflectiveMethodInvocation(proxy, target, method, args, targetClass, chain);
66                 // Proceed to the joinpoint through the interceptor chain.
67                 // 3-执行拦截器链,在ReflectiveMethodInvocation中维护了拦截器调用的计数器,保证拦截器的逐个调用,完成所有拦截器调用之后会反射调用目标方法。
68                 retVal = invocation.proceed();
69             }
70
71             // Massage return value if necessary.
72             Class<?> returnType = method.getReturnType();
73             if (retVal != null && retVal == target &&
74                     returnType != Object.class && returnType.isInstance(proxy) &&
75                     !RawTargetAccess.class.isAssignableFrom(method.getDeclaringClass())) {
76                 // Special case: it returned "this" and the return type of the method
77                 // is type-compatible. Note that we can't help if the target sets
78                 // a reference to itself in another returned object.
79                 retVal = proxy;
80             }
81             else if (retVal == null && returnType != Void.TYPE && returnType.isPrimitive()) {
82                 throw new AopInvocationException(
83                         "Null return value from advice does not match primitive return type for: " + method);
84             }
85             return retVal;
86         }
87         finally {
88             if (target != null && !targetSource.isStatic()) {
89                 // Must have come from TargetSource.
90                 targetSource.releaseTarget(target);
91             }
92             if (setProxyContext) {
93                 // Restore old proxy.
94                 AopContext.setCurrentProxy(oldProxy);
95             }
96         }
97     }
上面的源码并非发现织入的痕迹,让我们接着看看ReflectiveMethodInvocation类的proceed方法:
源码26-来自:ReflectiveMethodInvocation
1 @Override
2     @Nullable
3     public Object proceed() throws Throwable {
4         // We start with an index of -1 and increment early.
5         // 完成所有增强之后执行目标切点方法
6         if (this.currentInterceptorIndex == this.interceptorsAndDynamicMethodMatchers.size() - 1) {
7             // 直接调用目标方法
8             return invokeJoinpoint();
9         }
10
11         // 获取下一个要执行的拦截器
12         Object interceptorOrInterceptionAdvice =
13                 this.interceptorsAndDynamicMethodMatchers.get(++this.currentInterceptorIndex);
14         if (interceptorOrInterceptionAdvice instanceof InterceptorAndDynamicMethodMatcher) {
15             // Evaluate dynamic method matcher here: static part will already have
16             // been evaluated and found to match.
17             InterceptorAndDynamicMethodMatcher dm =
18                     (InterceptorAndDynamicMethodMatcher) interceptorOrInterceptionAdvice;
19             if (dm.methodMatcher.matches(this.method, this.targetClass, this.arguments)) {
20                 // 动态匹配成功,则执行拦截器逻辑
21                 return dm.interceptor.invoke(this);
22             }
23             else {
24                 // Dynamic matching failed.
25                 // Skip this interceptor and invoke the next in the chain.
26                 // 动态匹配失败,跳过当前拦截器,递归执行下一个拦截器
27                 return proceed();
28             }
29         }
30         else {
31             // It's an interceptor, so we just invoke it: The pointcut will have
32             // been evaluated statically before this object was constructed.
33             // 普通的拦截器,直接调用即可
34             return ((MethodInterceptor) interceptorOrInterceptionAdvice).invoke(this);
35         }
36     }
拦截器的调用执行invoke方法,并将this(当前实例)作为参数,来保证调用链的顺利执行,具体的逻辑那就在每个拦截器的invoke方法之中了,执行完拦截器的逻辑之后,就可以执行目标方法的逻辑了。
这正是织入的实现。
我们从织入的逻辑中并未发现有对拦截器执行顺序进行控制的逻辑,那么那些前置、后置、环绕、异常等的执行位置是怎么实现的呢?
3、织入实现原理
虽然在ReflectiveMethodInvocation的proceed方法中看到目标方法是最后才被执行,那么那些后置、环绕、异常的通知是怎么实现的呢,如果我们打开各种通知实现的invoke方法中,就会发现一些东西:
我们查看五种通知后发现
源码27-来自:AspectJAfterReturningAdvice、AspectJAfterAdvice、AspectJAroundAdvice、AspectJMethodBeforeAdvice、AspectJAfterThrowingAdvice
1     // AspectJAfterReturningAdvice:后置通知
2     @Override
3     public void afterReturning(@Nullable Object returnValue, Method method, Object[] args, @Nullable Object target) throws Throwable {
4         if (shouldInvokeOnReturnValueOf(method, returnValue)) {
5             invokeAdviceMethod(getJoinPointMatch(), returnValue, null);
6         }
7     }
8
9     // AspectJAfterAdvice:后置终点通知
10     @Override
11     public Object invoke(MethodInvocation mi) throws Throwable {
12         try {
13             return mi.proceed();
14         }
15         finally {
16             invokeAdviceMethod(getJoinPointMatch(), null, null);
17         }
18     }
19
20     // AspectJAroundAdvice:环绕通知
21     @Override
22     public Object invoke(MethodInvocation mi) throws Throwable {
23         if (!(mi instanceof ProxyMethodInvocation)) {
24             throw new IllegalStateException("MethodInvocation is not a Spring ProxyMethodInvocation: " + mi);
25         }
26         ProxyMethodInvocation pmi = (ProxyMethodInvocation) mi;
27         ProceedingJoinPoint pjp = lazyGetProceedingJoinPoint(pmi);
28         JoinPointMatch jpm = getJoinPointMatch(pmi);
29         return invokeAdviceMethod(pjp, jpm, null, null);
30     }
31
32     // AspectJMethodBeforeAdvice:前置通知
33     @Override
34     public void before(Method method, Object[] args, @Nullable Object target) throws Throwable {
35         invokeAdviceMethod(getJoinPointMatch(), null, null);
36     }
37
38     // AspectJAfterThrowingAdvice:异常通知
39     @Override
40     public Object invoke(MethodInvocation mi) throws Throwable {
41         try {
42             return mi.proceed();
43         }
44         catch (Throwable ex) {
45             if (shouldInvokeOnThrowing(ex)) {
46                 invokeAdviceMethod(getJoinPointMatch(), null, ex);
47             }
48             throw ex;
49         }
50     }
我们发现这五个通知里面的invoke方法中都调用了invokeAdviceMethod方法,这个方法是在AbstractAspectJAdvice抽象类中定义的。
源码28-来自:AbstractAspectJAdvice
1     protected Object invokeAdviceMethod(
2             @Nullable JoinPointMatch jpMatch, @Nullable Object returnValue, @Nullable Throwable ex)
3             throws Throwable {
4         // 执行参数绑定,然后使用参数调用通知方法
5         return invokeAdviceMethodWithGivenArgs(argBinding(getJoinPoint(), jpMatch, returnValue, ex));
6     }
此处有三个方法调用:
getJoinPoint方法,用户获取当前的连接点实例
argBinging方法,用于进行参数绑定操作
invokeAdviceMethodWithGivenArgs方法执行通知方法
首先看看getJointPoint方法:
源码29-来自:AbstractAspectJAdvice
1     protected JoinPoint getJoinPoint() {
2         // 获取当前的连接点实例
3         return currentJoinPoint();
4     }
5
6     public static JoinPoint currentJoinPoint() {
7         // 首先尝试从ExposeInvocationInterceptor拦截器中获取当前的方法调用
8         MethodInvocation mi = ExposeInvocationInterceptor.currentInvocation();
9         if (!(mi instanceof ProxyMethodInvocation)) {
10             throw new IllegalStateException("MethodInvocation is not a Spring ProxyMethodInvocation: " + mi);
11         }
12         ProxyMethodInvocation pmi = (ProxyMethodInvocation) mi;
13         // 然后从方法调用之中获取连接点实例jp
14         JoinPoint jp = (JoinPoint) pmi.getUserAttribute(JOIN_POINT_KEY);
15         if (jp == null) {
16             // 如果未获取到连接点实例,并设置到方法调用之中
17             jp = new MethodInvocationProceedingJoinPoint(pmi);
18             pmi.setUserAttribute(JOIN_POINT_KEY, jp);
19         }
20         return jp;
21     }
上面逻辑很简单,就是从方法调用上下文中获取连接点,并返回,需要注意的是,此处一般情况是需要走if(jp == null)中的逻辑的,意思就是这里一般会是首次为方法调用设置连接点的地方,这也正是懒实例化的实现-在真正需要使用的时候才进行创建。
下面看看源码28中第二个方法:参数绑定
源码30-来自:AbstractAspectJAdvice
1     protected Object[] argBinding(JoinPoint jp, @Nullable JoinPointMatch jpMatch,
2             @Nullable Object returnValue, @Nullable Throwable ex) {
3
4         // 提前估测参数绑定
5         // 最后就是将所有通知中候选的参数的名称和类型保存到了切点对应属性之中备用
6         calculateArgumentBindings();
7
8         // AMC start
9         Object[] adviceInvocationArgs = new Object[this.parameterTypes.length];
10         int numBound = 0;
11
12         if (this.joinPointArgumentIndex != -1) {
13             adviceInvocationArgs[this.joinPointArgumentIndex] = jp;
14             numBound++;
15         }
16         else if (this.joinPointStaticPartArgumentIndex != -1) {
17             adviceInvocationArgs[this.joinPointStaticPartArgumentIndex] = jp.getStaticPart();
18             numBound++;
19         }
20
21         if (!CollectionUtils.isEmpty(this.argumentBindings)) {
22             // binding from pointcut match
23             // 1-通过切点匹配进行参数绑定
24             if (jpMatch != null) {
25                 PointcutParameter[] parameterBindings = jpMatch.getParameterBindings();
26                 for (PointcutParameter parameter : parameterBindings) {
27                     String name = parameter.getName();
28                     Integer index = this.argumentBindings.get(name);
29                     adviceInvocationArgs[index] = parameter.getBinding();
30                     numBound++;
31                 }
32             }
33             // binding from returning clause
34             // 2-通过返回名称进行参数绑定
35             if (this.returningName != null) {
36                 Integer index = this.argumentBindings.get(this.returningName);
37                 adviceInvocationArgs[index] = returnValue;
38                 numBound++;
39             }
40             // binding from thrown exception
41             // 3-通过异常返回进行参数绑定
42             if (this.throwingName != null) {
43                 Integer index = this.argumentBindings.get(this.throwingName);
44                 adviceInvocationArgs[index] = ex;
45                 numBound++;
46             }
47         }
48
49         if (numBound != this.parameterTypes.length) {
50             throw new IllegalStateException("Required to bind " + this.parameterTypes.length +
51                     " arguments, but only bound " + numBound + " (JoinPointMatch " +
52                     (jpMatch == null ? "was NOT" : "WAS") + " bound in invocation)");
53         }
54
55         // 这里会将通知方法中的所有参数进行绑定,因为他们都是候选者,除了一些特殊的不需绑定的之外(只三种切点类型)
56         return adviceInvocationArgs;
57     }
参数绑定的重点在于第一步,估测参数绑定,这一步会将所有通知中候选的参数的名称和类型保存到了切点对应属性之中备用,我们来看看:
源码31-来自AbstractAspectJAdvice
1     public final synchronized void calculateArgumentBindings() {
2         // The simple case... nothing to bind.
3         if (this.argumentsIntrospected || this.parameterTypes.length == 0) {
4             // 无参可绑的情况,直接返回
5             return;
6         }
7
8         // 获取参数类型的数量numUnboundArgs(未绑参数数量)
9         int numUnboundArgs = this.parameterTypes.length;
10         Class<?>[] parameterTypes = this.aspectJAdviceMethod.getParameterTypes();
11         // 排除parameterTypes中JoinPoint类型、ProceedingJoinPoint类型、JoinPoint.StaticPart类型的参数
12         // JoinPoint类型的参数可作为非环绕通知的首个参数
13         // ProceedingJoinPoint类型的参数可作为环绕通知的首个参数
14         // JoinPoint.StaticPart类型的参数也可以作为某些通知的首个参数
15         // 谨记,以上三种类型的参数只能作为对应通知的首个参数,当然也可以和其他参数共存,但位置必须位于首个,原因也很简单,因为此处判断的时候完全就是在拿首个参数类型来完成的。
16         // 这三个参数是可以直接使用的,无需进行参数绑定操作,所以在这里排除掉
17         if (maybeBindJoinPoint(parameterTypes[0]) || maybeBindProceedingJoinPoint(parameterTypes[0]) ||
18                 maybeBindJoinPointStaticPart(parameterTypes[0])) {
19             // 上述三种参数不需要绑定
20             numUnboundArgs--;
21         }
22
23         if (numUnboundArgs > 0) {
24             // need to bind arguments by name as returned from the pointcut match
25             // 排除以上类型之后,如果还有剩余,则需要根据从切入点匹配返回的名称绑定参数
26             // 我们要明白:切点表达式完全就是用来匹配用的,哪怕其中有参数,也是为了匹配指定参数用的,他不带有任何传参功能,传参功能只有通知方法才有
27             // 所以这里的剩余参数个数,其实就是通知方法剩余参数,这里是依据参数名称来进行参数绑定
28             bindArgumentsByName(numUnboundArgs);
29         }
30
31         this.argumentsIntrospected = true;
32     }
这个方法中主要就是排除了三大类位于首位的切点参数类型,这三类型参数不需要进行绑定。然后对剩余的参数进行绑定操作:
源码32-来自AbstractAspectJAdvice
1     // 通过name来绑定参数
2     private void bindArgumentsByName(int numArgumentsExpectingToBind) {
3         if (this.argumentNames == null) {
4             // 创建参数名称发现器,并获取指定通知方法的参数名称
5             this.argumentNames = createParameterNameDiscoverer().getParameterNames(this.aspectJAdviceMethod);
6         }
7         if (this.argumentNames != null) {
8             // We have been able to determine the arg names.
9             // 只要确认通知使用有参数的就行
10             bindExplicitArguments(numArgumentsExpectingToBind);
11     }
12         else {
13             throw new IllegalStateException("Advice method [" + this.aspectJAdviceMethod.getName() + "] " +
14                     "requires " + numArgumentsExpectingToBind + " arguments to be bound by name, but " +
15                     "the argument names were not specified and could not be discovered.");
16         }
17     }
这一步,我们需要先创建参数名称发现器,然后发现器来获取当前通知方法的参数名的数组argumentNames。
这个数组的作用仅仅是用来判空,只要其有值,即通知方法有参数,那么就需要执行绑定操作。
首先来看看创建发现器的源码:
源码33-来自AbstractAspectJAdvice
1     protected ParameterNameDiscoverer createParameterNameDiscoverer() {
2         // We need to discover them, or if that fails, guess,
3         // and if we can't guess with 100% accuracy, fail.
4         // DefaultParameterNameDiscoverer是参数名称发现器的默认实现,他其实是一个
5         DefaultParameterNameDiscoverer discoverer = new DefaultParameterNameDiscoverer();
6         AspectJAdviceParameterNameDiscoverer adviceParameterNameDiscoverer =
7                 new AspectJAdviceParameterNameDiscoverer(this.pointcut.getExpression());// 切点的表达式
8         // 如果返回通知后绑定返回值,则returningName为非null
9         adviceParameterNameDiscoverer.setReturningName(this.returningName);
10         // 如果在抛出通知后绑定了抛出的值,则throwingName为非null
11         adviceParameterNameDiscoverer.setThrowingName(this.throwingName);
12         // Last in chain, so if we're called and we fail, that's bad...
13         // 设置在未能推导出通知参数名称的情况下是否抛出IllegalArgumentException和AmbiguousBindingException异常
14         adviceParameterNameDiscoverer.setRaiseExceptions(true);
15         // 将配置好的发现器添加到DefaultParameterNameDiscoverer中并返回
16         discoverer.addDiscoverer(adviceParameterNameDiscoverer);
17         return discoverer;
18     }
源码中AspectJAdviceParameterNameDiscoverer为真正执行发现操作的发现器。
源码34-来自AspectJAdviceParameterNameDiscoverer
1     @Override
2     @Nullable
3     public String[] getParameterNames(Method method) {
4         // 参数类型
5         this.argumentTypes = method.getParameterTypes();
6         // 初始化未绑定参数个数
7         this.numberOfRemainingUnboundArguments = this.argumentTypes.length;
8         // 初始化已绑定参数名称数组
9         this.parameterNameBindings = new String[this.numberOfRemainingUnboundArguments];
10
11         int minimumNumberUnboundArgs = 0;// 初始化最少未绑参数个数
12         // 针对后置通知和异常通知进行特殊处理,需要将返回值进行绑定
13         if (this.returningName != null) {
14             // 如果通知类型为后置通知
15             minimumNumberUnboundArgs++;
16         }
17         if (this.throwingName != null) {
18             // 如果通知类型为异常通知
19             minimumNumberUnboundArgs++;
20         }
21         if (this.numberOfRemainingUnboundArguments < minimumNumberUnboundArgs) {
22             throw new IllegalStateException(
23                     "Not enough arguments in method to satisfy binding of returning and throwing variables");
24         }
25
26         try {
27             //分成八步进行操作
28             int algorithmicStep = STEP_JOIN_POINT_BINDING;
29             while ((this.numberOfRemainingUnboundArguments > 0) && algorithmicStep < STEP_FINISHED) {
30                 switch (algorithmicStep++) {
31                     case STEP_JOIN_POINT_BINDING:
32                         // 1-连接点参数绑定
33                         // 连接点参数绑定格式为:thisJoinPoint -> 0
34                         if (!maybeBindThisJoinPoint()) {
35                             // 连接点参数绑定格式为:thisJoinPointStaticPart -> 0
36                             maybeBindThisJoinPointStaticPart();
37                         }
38                         break;
39                     case STEP_THROWING_BINDING:
40                         // 2-异常返回参数绑定
41                         // 异常参数绑定格式为:throwingName -> throwableIndex
42                         // throwableIndex为通知参数列表中接收异常的参数的位置
43                         maybeBindThrowingVariable();
44                         break;
45                     case STEP_ANNOTATION_BINDING:
46                         // 3-注解参数绑定
47                         // 格式:varName -> annotationIndex
48                         maybeBindAnnotationsFromPointcutExpression();
49                         break;
50                     case STEP_RETURNING_BINDING:
51                         // 4-返回参数绑定
52                         // 绑定返回值时,只有在未绑定参数只剩余1个的情况下才能绑定,否则不予绑定
53                         // 当只剩余一个未绑定的情况下,将返回值与剩余的那个位置的下标进行绑定即可
54                         maybeBindReturningVariable();
55                         break;
56                     case STEP_PRIMITIVE_ARGS_BINDING:
57                         // 5-原始类型参数绑定
58                         // 只有在有1个原始类型参数,且只有一个候选位置时才执行绑定操作
59                         maybeBindPrimitiveArgsFromPointcutExpression();
60                         break;
61                     case STEP_THIS_TARGET_ARGS_BINDING:
62                         // 6-切点表达式参数绑定
63                         // 只有只存在一个变量名称的时候才能执行绑定
64                         maybeBindThisOrTargetOrArgsFromPointcutExpression();
65                         break;
66                     case STEP_REFERENCE_PCUT_BINDING:
67                         // 7-引用切点绑定
68                         // 只有只存在一个变量名称的时候才能执行绑定
69                         maybeBindReferencePointcutParameter();
70                         break;
71                     default:
72                         throw new IllegalStateException("Unknown algorithmic step: " + (algorithmicStep - 1));
73                 }
74             }
75         }
76         catch (AmbiguousBindingException ambigEx) {
77             if (this.raiseExceptions) {
78                 throw ambigEx;
79             }
80             else {
81                 return null;
82             }
83         }
84         catch (IllegalArgumentException ex) {
85             if (this.raiseExceptions) {
86                 throw ex;
87             }
88             else {
89                 return null;
90             }
91         }
92
93         if (this.numberOfRemainingUnboundArguments == 0) {
94             return this.parameterNameBindings;
95         }
96         else {
97             if (this.raiseExceptions) {
98                 throw new IllegalStateException("Failed to bind all argument names: " +
99                         this.numberOfRemainingUnboundArguments + " argument(s) could not be bound");
100             }
101             else {
102                 // convention for failing is to return null, allowing participation in a chain of responsibility
103                 return null;
104             }
105         }
106     }
源码中针对各种情况进行了参数绑定操作,采用switch...case链式结构完成功能。虽然这一步最终目的是返回parameterNameBindings值,而且在源码32中看起来只是用于判空,好像用处不大,其实大错特错,这个parameterNameBindings在这里绑定完成之后,在以后会有大用,判空只是它的一个小功能罢了。
至于针对每种参数类型的绑定逻辑就不再细究了。下面看看源码32中bindExplicitArguments方法
源码35-来自:AbstractAspectJAdvice
1     private void bindExplicitArguments(int numArgumentsLeftToBind) {
2         Assert.state(this.argumentNames != null, "No argument names available");
3         this.argumentBindings = new HashMap<>();
4
5         // 获取通知方法的参数个数
6         int numExpectedArgumentNames = this.aspectJAdviceMethod.getParameterCount();
7         if (this.argumentNames.length != numExpectedArgumentNames) {
8             // 参数个数不匹配
9             throw new IllegalStateException("Expecting to find " + numExpectedArgumentNames +
10                     " arguments to bind by name in advice, but actually found " +
11                     this.argumentNames.length + " arguments.");
12         }
13
14         // So we match in number...
15         // 获取parameterTypes中剩余的参数偏移量,将其绑定到argumentBindings中,numArgumentsLeftToBind正是之前排除三大首位切点参数之后的剩余参数量
16         int argumentIndexOffset = this.parameterTypes.length - numArgumentsLeftToBind;
17         for (int i = argumentIndexOffset; i < this.argumentNames.length; i++) {
18             // 参数绑定的格式:name-> index
19             this.argumentBindings.put(this.argumentNames[i], i);
20         }
21
22         // Check that returning and throwing were in the argument names list if
23         // specified, and find the discovered argument types.
24         if (this.returningName != null) {
25             if (!this.argumentBindings.containsKey(this.returningName)) {
26                 throw new IllegalStateException("Returning argument name '" + this.returningName +
27                         "' was not bound in advice arguments");
28             }
29             else {
30                 // 获取其对应的index值,将其另外绑定到discoveredReturningType和discoveredReturningGenericType中
31                 Integer index = this.argumentBindings.get(this.returningName);
32                 this.discoveredReturningType = this.aspectJAdviceMethod.getParameterTypes()[index];
33                 this.discoveredReturningGenericType = this.aspectJAdviceMethod.getGenericParameterTypes()[index];
34             }
35         }
36         if (this.throwingName != null) {
37             if (!this.argumentBindings.containsKey(this.throwingName)) {
38                 throw new IllegalStateException("Throwing argument name '" + this.throwingName +
39                         "' was not bound in advice arguments");
40             }
41             else {
42                 // 获取其对应的index值,并将其另外绑定到discoveredThrowingType中
43                 Integer index = this.argumentBindings.get(this.throwingName);
44                 this.discoveredThrowingType = this.aspectJAdviceMethod.getParameterTypes()[index];
45             }
46         }
47
48         // configure the pointcut expression accordingly.
49         // 相应地配置切入点表达式。
50         configurePointcutParameters(this.argumentNames, argumentIndexOffset);
51     }
源码36-来自:AbstractAspectJAdvice
1     private void configurePointcutParameters(String[] argumentNames, int argumentIndexOffset) {
2         int numParametersToRemove = argumentIndexOffset;
3         if (this.returningName != null) {
4             numParametersToRemove++;
5         }
6         if (this.throwingName != null) {
7             numParametersToRemove++;
8         }
9         // 之前将所有要移除的参数数量累加出来,需要移除首位的三种切点参数、returningName参数和throwingName参数
10         // 剩余的参数就是切点表达式中可以出现的候选参数,这里初始化一个切点参数名数组pointcutParameterNames,将这些参数囊括进来
11         // 另外再初始化两个数组,分别用于存放这些剩余参数的参数类型(pointcutParameterTypes)和通知方法所有参数类型(methodParameterTypes)
12         String[] pointcutParameterNames = new String[argumentNames.length - numParametersToRemove];
13         Class<?>[] pointcutParameterTypes = new Class<?>[pointcutParameterNames.length];
14         Class<?>[] methodParameterTypes = this.aspectJAdviceMethod.getParameterTypes();
15
16         int index = 0;
17         for (int i = 0; i < argumentNames.length; i++) {
18             if (i < argumentIndexOffset) {
19                 // 小于偏移量的参数为移除的三大切点类型参数
20                 continue;
21             }
22             if (argumentNames[i].equals(this.returningName) ||
23                 argumentNames[i].equals(this.throwingName)) {
24                 // 这里在对returningName和throwingName参数进行排除
25                 continue;
26             }
27             // 剩余的就是通知中的切点表达式候选参数,将这些参数的参数名逐个保存到切点参数名数组中
28             // 将这些参数的参数类型逐个保存到切点参数类型数组中
29             pointcutParameterNames[index] = argumentNames[i];
30             pointcutParameterTypes[index] = methodParameterTypes[i];
31             index++;
32         }
33
34         // 然后,分别将两个数组设置到切点的对应属性中
35         this.pointcut.setParameterNames(pointcutParameterNames);// 設置参数名称
36         this.pointcut.setParameterTypes(pointcutParameterTypes);// 设置参数类型
37     }
到此为止我们看到了参数绑定操作的最终结果,将除了首位三大切点类型参数、returningName参数和throwingName参数之外的通知的剩余参数都作为候选参数,将其名称和类型分别放置到一个数组中,再设置到切点之中。
逻辑到这里我们可以回到源码30中,执行剩余的逻辑,将所有参数迁移到adviceInvocationArgs中进行绑定,绑定的逻辑还是一样,都是以数组的方式保存。
然后再回到源码28中,执行invokeAdviceMethodWithGivenArgs方法
1     protected Object invokeAdviceMethodWithGivenArgs(Object[] args) throws Throwable {
2         Object[] actualArgs = args;
3         if (this.aspectJAdviceMethod.getParameterCount() == 0) {
4             actualArgs = null;
5         }
6         try {
7             ReflectionUtils.makeAccessible(this.aspectJAdviceMethod);
8             // TODO AopUtils.invokeJoinpointUsingReflection
9             return this.aspectJAdviceMethod.invoke(this.aspectInstanceFactory.getAspectInstance(), actualArgs);
10         }
11         catch (IllegalArgumentException ex) {
12             throw new AopInvocationException("Mismatch on arguments to advice method [" +
13                     this.aspectJAdviceMethod + "]; pointcut expression [" +
14                     this.pointcut.getPointcutExpression() + "]", ex);
15         }
16         catch (InvocationTargetException ex) {
17             throw ex.getTargetException();
18         }
19     }
逻辑很简单,就是依据给定的参数来反射调用通知的方法逻辑。
至此我们分析完JDK动态代理实现AOP切面编程的整个逻辑。其实这里针对AOP的织入原理还是没有很明确的体现出来,为此我专门开了一文:Spring基础系列--AOP织入逻辑跟踪,可以带你详细了解Spring AOP代理织入的实现。

- Spring AOP 源码分析系列文章导读
- Spring AOP 源码分析 - 创建代理对象
- Springboot系列:Springboot与Thymeleaf模板引擎整合基础教程(附源码)
- Spring原理与源码分析系列(三)- Spring IoC容器启动过程分析(下)
- Spring AOP源码分析(生成代理对象)
- Spring源码分析之Aop中拦截器,适配器,通知之间的关系
- Spring源码分析:AOP源码解析(上篇)
- Spring 源码分析(三) —— AOP(一)AOP原理
- Spring基础系列--AOP织入逻辑跟踪
- Springboot系列:Springboot与Thymeleaf模板引擎整合基础教程(附源码)
- Springboot系列:Springboot与Thymeleaf模板引擎整合基础教程(附源码)
- 理解Spring AOP 原理(三)Spring AOP 源码分析
- 做一个合格的程序猿之浅析Spring AOP源码(十五) 分析JdkDynamicAopProxy的invoke方法
- Spring源码分析【0】-框架的基础:继承和接口调用链
- 【Spring源码分析】AOP源码解析(上篇)
- Springboot系列:Springboot与Thymeleaf模板引擎整合基础教程(附源码)
- Springboot系列:Springboot与Thymeleaf模板引擎整合基础教程(附源码)
- Springboot系列:Springboot与Thymeleaf模板引擎整合基础教程(附源码)
- Springboot系列:Springboot与Thymeleaf模板引擎整合基础教程(附源码)
- Springboot系列:Springboot与Thymeleaf模板引擎整合基础教程(附源码)