Spring boot 实现单个或批量文件上传功能
2018-08-17 13:48
1166 查看
一:添加依赖:
<!-- thymeleaf模板插件 -->
<dependency>
<groupId>org.springframework.boot</groupId>
<artifactId>spring-boot-starter-thymeleaf</artifactId>
</dependency>
<!-- jsp依赖 -->
<dependency>
<groupId>javax.servlet</groupId>
<artifactId>jstl</artifactId>
</dependency>
<dependency>
<groupId>org.apache.tomcat.embed</groupId>
<artifactId>tomcat-embed-jasper</artifactId>
<!--<scope>provided</scope>-->
</dependency>
二:application.xml配置文件路径:
#配置上传文件地址
image.location.path=f:/image/
#配置文件大小限制
spring.http.multipart.maxFileSize=100Mb
spring.http.multipart.maxRequestSize=100Mb
#静态页面的访问配置
spring.thymeleaf.cache=false
spring.thymeleaf.prefix=classpath:/templates/
spring.thymeleaf.check-template-location=true
spring.thymeleaf.suffix=.html
spring.thymeleaf.encoding=UTF-8
spring.thymeleaf.content-type=text/html
spring.thymeleaf.mode=HTML5
三:编写静态页面(src/main/resources下建文件夹static(static存放静态文件,比如 css、js、image…)和templates(存放静态页面)两个是同级目录),先在templates 中新建一个 uploadimg.html。
<!DOCTYPE html>
<html>
<head>
<title>uploadimg.html</title>
<meta name="keywords" content="keyword1,keyword2,keyword3"></meta>
<meta name="description" content="this is my page"></meta>
<meta name="content-type" content="text/html; charset=UTF-8"></meta>
<!--<link rel="stylesheet" type="text/css" href="./styles.css" rel="external nofollow" >-->
</head>
<body>
<form enctype="multipart/form-data" method="post" action="/dc/fileUpload">
图片<input type="file" name="file"/>
<input type="submit" value="上传"/>
</form>
</body>
</html>
四:编写Controller层:
package com.hot.analysis.controller.file;
import java.io.BufferedInputStream;
import java.io.File;
import java.io.FileInputStream;
import java.io.IOException;
import java.io.OutputStream;
import java.util.Date;
import java.util.Random;
import javax.servlet.http.HttpServletRequest;
import javax.servlet.http.HttpServletResponse;
import org.springframework.beans.factory.annotation.Value;
import org.springframework.web.bind.annotation.PostMapping;
import org.springframework.web.bind.annotation.RequestMapping;
import org.springframework.web.bind.annotation.ResponseBody;
import org.springframework.web.bind.annotation.RestController;
import org.springframework.web.multipart.MultipartFile;
import org.springframework.web.servlet.ModelAndView;
import com.hot.analysis.exception.MyException;
@RestController
public class FileUploadController {
//获取配置文件的路径
@Value("${image.location.path}")
private String resourceDir;
/**
* 实现文件上传
* */
@RequestMapping(value = "/index")
public ModelAndView toIndex() {
ModelAndView mv = new ModelAndView("uploadimg");
return mv;
}
//单个文件上传
@RequestMapping("/dc/fileUpload")
@ResponseBody
public String fileUpload( MultipartFile file){
// 获取上传文件路径
String uploadPath = file.getOriginalFilename();
// 获取上传文件的后缀
String fileSuffix = uploadPath.substring(uploadPath.lastIndexOf(".") + 1, uploadPath.length());
if (fileSuffix.equals("apk")) {
uploadPath = resourceDir;
} else {
// 上传目录地址
// String uploadpath="E:/hot-manage/image/";//windows路径
uploadPath =resourceDir;// liux路劲
}
// 上传文件名
String fileName = new Date().getTime() + new Random().nextInt(100) + "." + fileSuffix;
File savefile = new File(uploadPath + fileName);
if (!savefile.getParentFile().exists()) {
savefile.getParentFile().mkdirs();
}
try {
file.transferTo(savefile);
} catch (IllegalStateException e) {
e.printStackTrace();
} catch (IOException e) {
e.printStackTrace();
}
if (fileSuffix.equals("apk")) {
return "/apk/" + fileName;
} else {
return "/image/" + fileName;
}
}
// 批量上传
@PostMapping("/dc/moreFileUpload")
public String bacthFileUpload(MultipartFile[] file) throws MyException {
StringBuffer buffer = new StringBuffer();
for (MultipartFile multipartFile : file) {
String str = fileUpload(multipartFile);
buffer.append(str);
buffer.append(",");
}
String all = buffer.substring(0, buffer.length() - 1);
return all;
}
// 删除文件
@PostMapping("/dc/deleteFile")
public String delFile(String path) {
String resultInfo = null;
int lastIndexOf = path.lastIndexOf("/");
String sb = path.substring(lastIndexOf + 1, path.length());
sb = "f:/image/" + sb;
File file = new File(sb);
if (file.exists()) {
if (file.delete()) {
resultInfo = "1-删除成功";
} else {
resultInfo = "0-删除失败";
}
} else {
resultInfo = "文件不存在!";
}
return resultInfo;
}
//文件下载相关代码
@RequestMapping("/download")
public String downloadFile(HttpServletRequest request, HttpServletResponse response) {
String fileName = "aim_test.txt";// 设置文件名,根据业务需要替换成要下载的文件名
if (fileName != null) {
//设置文件路径
String realPath = "D://aim//";
File file = new File(realPath , fileName);
if (file.exists()) {
response.setContentType("application/force-download");// 设置强制下载不打开
response.addHeader("Content-Disposition", "attachment;fileName=" + fileName);// 设置文件名
byte[] buffer = new byte[1024];
FileInputStream fis = null;
BufferedInputStream bis = null;
try {
fis = new FileInputStream(file);
bis = new BufferedInputStream(fis);
OutputStream os = response.getOutputStream();
int i = bis.read(buffer);
while (i != -1) {
os.write(buffer, 0, i);
i = bis.read(buffer);
}
System.out.println("success");
} catch (Exception e) {
e.printStackTrace();
} finally {
if (bis != null) {
try {
bis.close();
} catch (IOException e) {
e.printStackTrace();
}
}
if (fis != null) {
try {
fis.close();
} catch (IOException e) {
e.printStackTrace();
}
}
}
}
}
return null;
}
}
测试:
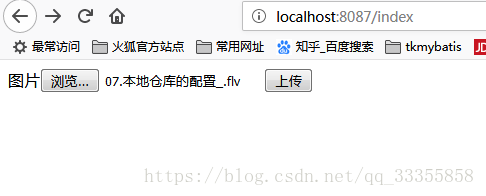
成功返回路径:
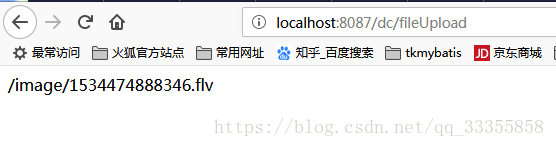
查看文件夹:

总结
以上所述是小编给大家介绍的Spring boot 实现单个或批量文件上传功能,希望对大家有所帮助,如果大家有任何疑问请给我留言,小编会及时回复大家的。在此也非常感谢大家对脚本之家网站的支持!
您可能感兴趣的文章:

相关文章推荐
- java Springboot实现多文件上传功能
- SpringMVC+Ajax实现文件批量上传和下载功能实例代码
- 使用html+ajax+formdata+SpringMVC实现单个文件,和多个文件上传功能
- springboot实现文件上传和下载功能
- Spring boot实现文件上传功能
- 使用html+ajax+formdata+SpringMVC实现单个文件,和多个文件上传功能
- Springboot+easyUI filebox实现单个文件上传
- 基于SpringBoot上传任意文件功能的实现
- Spring Boot + thymeleaf 实现文件上传下载功能
- SpringBoot+Vue.js实现前后端分离的文件上传功能
- SpringBoot+layui实现文件上传功能
- JS实现批量上传文件并显示进度功能
- spring boot实现文件上传下载以及多文件上传
- WebUploader+SpringMVC实现文件上传功能
- Ajax配合Spring实现文件上传功能代码
- Spring实现文件上传功能
- struts2实现文件上传(单个、批量文件上传)
- 文件批量上传的工具,要实现暂停继续、断点续传等功能(使用QtNetwork和QHttpMultiPart,和定时器检查超时)
- spring boot 使用MultipartFile实现文件上传报错。
- spring 文件上传功能实现