Spring Boot整合Swagger2
2018-08-01 00:54
776 查看
版权声明:本文为博主原创文章,未经允许不得转载。 https://blog.csdn.net/qq_31142553/article/details/81294825
手写Api文档的几个痛点:
- 文档需要更新的时候,需要再次发送一份给前端,也就是文档更新交流不及时。
- 接口返回结果不明确
- 不能直接在线测试接口,通常需要使用工具,比如postman
- 接口文档太多,不好管理
Swagger也就是为了解决这个问题,当然也不能说Swagger就一定是完美的,当然也有缺点,最明显的就是代码移入性比较强。
一、引入maven依赖
[code]<!-- swagger2 -->
<dependency>
<groupId>io.springfox</groupId>
<artifactId>springfox-swagger-ui</artifactId>
<version>2.8.0</version>
</dependency>
<dependency>
<groupId>io.springfox</groupId>
<artifactId>springfox-swagger2</artifactId>
<version>2.8.0</version>
</dependency>
二、Swagger配置类
[code]/**
* Swagger2配置文件
* 用@Configuration注解该类,等价于XML中配置beans;用@Bean标注方法等价于XML中配置bean。
* @author z_hh
* @time 2018年8月1日
*/
@Configuration
@EnableSwagger2
public class Swagger2 {
/**
* swagger2的配置文件,这里可以配置swagger2的一些基本的内容,比如扫描的包等等
* @return Docket
*/
@Bean
public Docket createRestApi() {
return new Docket(DocumentationType.SWAGGER_2)
.apiInfo(apiInfo())
.select()
// controller的包路径
.apis(RequestHandlerSelectors.basePackage("cn.zhh.swagger2"))
.paths(PathSelectors.any())
.build();
}

// 构建 api文档的详细信息函数,注意这里的注解引用的是哪个
private ApiInfo apiInfo() {
return new ApiInfoBuilder()
//页面标题
.title("Spring Boot测试使用Swagger2构建RESTful API")
//创建人
.contact(new Contact("Jc丶Zz的博客", "https://blog.csdn.net/qq_31142553", ""))
//版本号
.version("1.0")
//描述
.description("API 描述")
.build();
}

}
三、在Controller里面使用注解
[code]@RestController
@RequestMapping("/api/open/students")
@Api("学生相关接口")
public class StudentController {

Map<Integer, Student> students = new HashMap<>();

@PostMapping
@ApiOperation(value = "新增", notes = "增加一条学生信息")
@ApiImplicitParam(name = "student", value = "学生对象", dataTypeClass = cn.zhh.swagger2.Student.class, required = true)
public Map<String, Object> add(@RequestBody Student student) {
Integer id = student.getId();
if (Objects.isNull(id)) {
return new HashMap() {{
put("success", false);
put("message", "id不能为空!");
}};
}

students.put(id, student);
return new HashMap() {{
put("success", true );
put("content", "新增成功!");
}};
}

@GetMapping("/{id}")
@ApiOperation(value = "根据id查询学生信息", notes = "查询数据库中某个的学生信息")
@ApiImplicitParam(name = "id", value = "学生ID", paramType = "path", required = true, dataType = "Integer")
public Map<String, Object> get(@PathVariable Integer id) {
if (students.containsKey(id)) {
return new HashMap() {{
put("success", true);
put("message", students.get(id));
}};
}
return new HashMap() {{
put("success", false);
put("message", "数据不存在!");
}};
}
}
对应的学生类
[code]/**
* 学生实体
* @author z_hh
* @time 2018年8月1日
*/
public class Student implements Serializable {

/**
*
*/
private static final long serialVersionUID = -6913673650612146588L;

// id
private Integer id;

// 姓名
private String name;

// 性别:1男 2女
private Integer sex;

// 手机号码
private String mobile;

// 生日
private Date birthday;

// 住址
private String address;

// 省略getter、setter方法
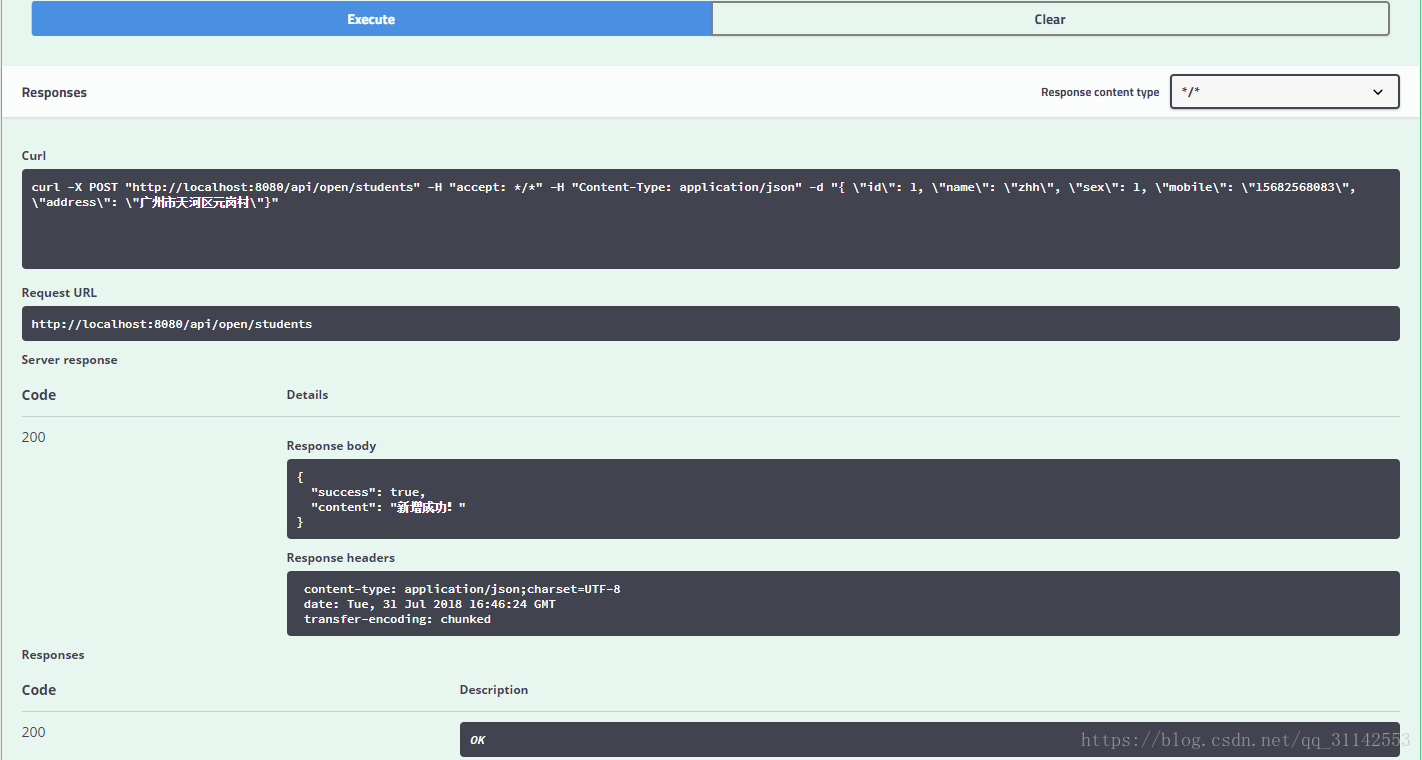
四、启动项目,打开http://localhost:8080/swagger-ui.html

查看接口详情和测试


 五、注解
五、注解
swagger通过注解表明该接口会生成文档,包括接口名、请求方法、参数、返回信息的等等。
- @Api:修饰整个类,描述Controller的作用
- @ApiOperation:描述一个类的一个方法,或者说一个接口
- @ApiParam:单个参数描述
- @ApiModel:用对象来接收参数
- @ApiProperty:用对象接收参数时,描述对象的一个字段
- @ApiResponse:HTTP响应其中1个描述
- @ApiResponses:HTTP响应整体描述
- @ApiIgnore:使用该注解忽略这个API
- @ApiError :发生错误返回的信息
- @ApiImplicitParam:一个请求参数
- @ApiImplicitParams:多个请求参数

相关文章推荐
- Spring Boot 整合Spring Security 和Swagger2 遇到的问题小结
- 2018 最新 spring boot 整合 swagger2 (swagger2 版本 2.8.0)
- Swagger(一) SpringBoot整合Swagger2简单的例子
- Spring Boot 整合mybatis 与 swagger2
- Springboot整合swagger2项目的部署问题
- SpringBoot整合Swagger2
- Spring Boot学习笔记 - 整合Swagger2自动生成RESTful API文档
- SpringBoot整合Swagger2
- SpringBoot实战之12 整合restful工具swagger2
- SpringBoot(七):SpringBoot整合Swagger2
- Spring Boot整合Swagger2
- spring boot 整合Swagger2
- 个人推荐:SpringBoot整合Swagger2
- SpringBoot整合Swagger2
- Spring Boot整合Swagger2的完整步骤详解
- Swagger(一) SpringBoot整合Swagger2简单的例子
- SpringBoot整合系列-整合Swagger2
- Swagger(一) SpringBoot整合Swagger2简单的例子
- spring boot整合Swagger2的示例代码
- SpringBoot(七):SpringBoot整合Swagger2