SpringBoot整合JPA
1什么是JPA?
JPA顾名思义就是Java Persistence API的意思,是JDK 5.0注解或XML描述对象-关系表的映射关系,并将运行期的实体对象持久化到数据库中。
2 JPA的优势
2.1标准化
JPA 是 JCP 组织发布的 Java EE 标准之一,因此任何声称符合 JPA 标准的框架都遵循同样的架构,提供相同的访问API,这保证了基于JPA开发的企业应用能够经过少量的修改就能够在不同的JPA框架下运行。
2.2容器级特性的支持
JPA框架中支持大数据集、事务、并发等容器级事务,这使得 JPA 超越了简单持久化框架的局限,在企业应用发挥更大的作用。
2.3简单方便
JPA的主要目标之一就是提供更加简单的编程模型:在JPA框架下创建实体和创建Java 类一样简单,没有任何的约束和限制,只需要使用 javax.persistence.Entity进行注释,JPA的框架和接口也都非常简单,没有太多特别的规则和设计模式的要求,开发者可以很容易的掌握。JPA基于非侵入式原则设计,因此可以很容易的和其它框架或者容器集成。
2.4查询能力
JPA的查询语言是面向对象而非面向数据库的,它以面向对象的自然语法构造查询语句,可以看成是Hibernate HQL的等价物。JPA定义了独特的JPQL(Java Persistence Query Language),JPQL是EJB QL的一种扩展,它是针对实体的一种查询语言,操作对象是实体,而不是关系数据库的表,而且能够支持批量更新和修改、JOIN、GROUP BY、HAVING 等通常只有 SQL 才能够提供的高级查询特性,甚至还能够支持子查询。
2.4高级特性
JPA 中能够支持面向对象的高级特性,如类之间的继承、多态和类之间的复杂关系,这样的支持能够让开发者最大限度的使用面向对象的模型设计企业应用,而不需要自行处理这些特性在关系数据库的持久化。
3 JPA的实现
目前JPA主要实现由hibernate和openJPA等
4 什么是SpringData?
Spring Data是一个用于简化数据库访问,并支持云服务的开源框架。其主要目标是使得数据库的访问变得方便快捷,并支持map-reduce框架和云计算数据服务。此外,它还支持基于关系型数据库的数据服务,如Oracle RAC等。对于拥有海量数据的项目,可以用Spring Data来简化项目的开发,就如Spring Framework对JDBC、ORM的支持一样,Spring Data会让数据的访问变得更加方便。
5 什么是Spring DATA JPA?
可以极大的简化JPA的写法,可以在几乎不用写实现的情况下,实现对数据的访问和操作。除了CRUD外,还包括如分页、排序等一些常用的功能。
首先我们需要清楚的是Spring Data是一个开源框架,在这个框架中Spring Data JPA只是这个框架中的一个模块,所以名称才叫Spring Data JPA。如果单独使用JPA开发,你会发现这个代码量和使用JDBC开发一样有点烦人,所以Spring Data JPA的出现就是为了简化JPA的写法,让你只需要编写一个接口继承一个类就能实现CRUD操作了。
6 SpringBoot+JPA整合
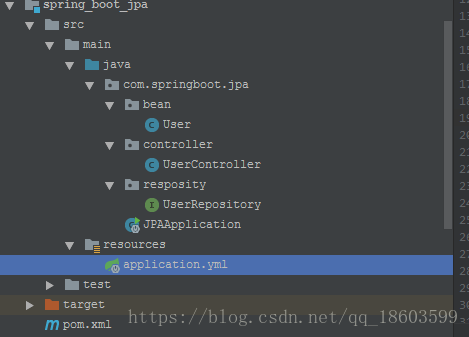
直接看项目结构:
首先看一下对应的pom.xml的配置文件内容:
[code]<?xml version="1.0" encoding="UTF-8"?>
<project xmlns="http://maven.apache.org/POM/4.0.0"
xmlns:xsi="http://www.w3.org/2001/XMLSchema-instance"
xsi:schemaLocation="http://maven.apache.org/POM/4.0.0 http://maven.apache.org/xsd/maven-4.0.0.xsd">
<parent>
<groupId>org.springframework.boot</groupId>
<artifactId>spring-boot-starter-parent</artifactId>
<version>1.5.2.RELEASE</version>
</parent>

<properties>
<project.build.sourceEncoding>UTF-8</project.build.sourceEncoding>
<project.reporting.outputEncoding>UTF-8</project.reporting.outputEncoding>
<java.version>1.8</java.version>
</properties>

<modelVersion>4.0.0</modelVersion>

<artifactId>spring_boot_jpa</artifactId>
<dependencies>

<!--集成JPA-->
<dependency>
<groupId>org.springframework.boot</groupId>
<artifactId>spring-boot-starter-data-jpa</artifactId>
</dependency>

<dependency>
<groupId>mysql</groupId>
<artifactId>mysql-connector-java</artifactId>
<version>5.1.36</version>
<scope>runtime</scope>
</dependency>

<!--阿里巴巴数据源-->
<dependency>
<groupId>com.alibaba</groupId>
<artifactId>druid</artifactId>
<version>1.1.5</version>
</dependency>

<!--支持web开发-->
<dependency>
<groupId>org.springframework.boot</groupId>
<artifactId>spring-boot-starter-web</artifactId>
</dependency>
</dependencies>

</project>
定义一个javabean:通过JPA注解来绑定和表的关系
[code]package com.springboot.jpa.bean;

import lombok.AllArgsConstructor;
import lombok.Getter;
import lombok.Setter;
import lombok.ToString;

import javax.persistence.*;
import java.math.BigDecimal;

/**
* @Author 18011618
* @Date 9:49 2018/7/9
* @Function 使用JPA注解
*/
@Table(name = "user")
@Entity
@Getter
@Setter
@ToString
public class User {

public User(Long id, String username) {
super();
this.id = id;
this.username = username;
}

public User() {
super();
}

@Id
@GeneratedValue(strategy = GenerationType.AUTO)
private Long id;

@Column(name = "username")
private String username;

}
这里定义了相关的JPA注
[code]@Table(name = "user"):name是用来绑定实体类和对应的数据表,如果数据表和实体类是一致的话,可以不要写name
@Column(name = "username"):绑定属性的列和数据表的字段,一致可以省略不写

@Id

@GeneratedValue(strategy = GenerationType.AUTO):标识数据表的主键且自增
定义数据访问层接口:
[code]package com.springboot.jpa.resposity;

import com.springboot.jpa.bean.User;
import org.springframework.data.jpa.repository.JpaRepository;
import org.springframework.data.repository.CrudRepository;
import org.springframework.stereotype.Repository;

/**
* @Author 18011618
* @Date 9:50 2018/7/9
* @Function 定义数据访问接口
*/
@Repository
public interface UserRepository extends JpaRepository<User, Long> {

}
只定义空接口,为了能通过ioc让spring来管理,没有实现,接口的实现都是通过反射自己生成sql语句的.
这里需要扩展讲解一下相关的Repository:
Repository 接口是 Spring Data 的一个核心接口,它不提供任何方法,开发者需要在自己定义的接口中声明需要的方法 :
public interface Repository<T, ID extends Serializable> { }
有这么几点需要强调下:
1. Repository是一个空接口,即是一个标记接口;
2. 若我们定义的接口继承了Repository,则该接口会被IOC容器识别为一个Repository Bean纳入到IOC容器中,进而可以在该接口中定义满足一定规范的方法。
3. 实际上也可以通过@RepositoryDefinition,注解来替代继承Repository接口。
4. 查询方法以find | read | get开头;
5. 涉及查询条件时,条件的属性用条件关键字连接,要注意的是条件属性以首字母大写。
6.使用@Query注解可以自定义JPQL语句实现更灵活的查询
CrudRepository接口
--T save(T entity);//保存单个实体
--Iterable<T> save(Iterable<? extends T> entities);//保存集合
--T findOne(ID id);//根据id查找实体
--boolean exists(ID id);//根据id判断实体是否存在
--Iterable<T> findAll();//查询所有实体,不用或慎用!
--long count();//查询实体数量
--void delete(ID id);//根据Id删除实体
--void delete(T entity);//删除一个实体
--void delete(Iterable<? extends T> entities);//删除一个实体的集合
--void deleteAll();//删除所有实体,不用或慎用!
PagingAndSortingRepository接口
--Iterable<T> findAll(Sort sort); //排序
--Page<T> findAll(Pageable pageable); //分页查询(含排序功能)
JpaRepository 接口:
查找所有实体,排序、查找所有实体,执行缓存与数据库同步
JpaSpecificationExecutor 接口:
不属于Repository体系,实现一组 JPA Criteria 查询相关的方法,封装 JPA Criteria 查询条件。通常使用匿名内部类的方式来创建该接口的对象。
在这里为了方便演示就不写service,实际开发中必须要写service层,直接写一个测试的controller,调用数据访问层接口
看controller对应的内容:
[code]package com.springboot.jpa.controller;

import com.springboot.jpa.bean.User;
import com.springboot.jpa.future.UserFuture;
import com.springboot.jpa.resposity.UserRepository;
import org.springframework.beans.factory.annotation.Autowired;
import org.springframework.stereotype.Controller;
import org.springframework.web.bind.annotation.PathVariable;
import org.springframework.web.bind.annotation.RequestMapping;
import org.springframework.web.bind.annotation.RequestParam;
import org.springframework.web.bind.annotation.ResponseBody;
import org.springframework.web.servlet.ModelAndView;

import java.util.Map;
import java.util.concurrent.CompletableFuture;

/**
* @Author 18011618
* @Description 用户提供服务的controller
* @Date 9:51 2018/7/9
* @Modify By
*/
@Controller
public class UserController {

@Autowired
private UserRepository userRepository; //数据访问层接口

@RequestMapping("/findUser/{id}")
@ResponseBody
public User findUserById(@PathVariable long id){

return this.userRepository.findOne(id);
}

}
看一下对应的配置文件:applicaiton.yaml
[code]spring:
datasource:
driver-class-name: com.mysql.jdbc.Driver #加载数据库的驱动
filters: stat,wall,log4j #过滤类型
initialSize: 5 #资源池初始化大小
maxActive: 20 #资源池最大激活数
maxOpenPreparedStatements: 20
maxWait: 60000 #最大等待时间
minEvictableIdleTimeMillis: 300000
minIdle: 1 #最小空闲数量
password: 123123
poolPreparedStatements: true
testOnBorrow: false
testOnReturn: false
testWhileIdle: true
timeBetweenEvictionRunsMillis: 60000
type: com.alibaba.druid.pool.DruidDataSource
url: jdbc:mysql://localhost:3306/emp
username: root
validationQuery: select 'x'
logSlowSql: true
jpa:
hibernate:
ddl-auto: update
show-sql: false
#   thymeleaf:
#     cache: 'false  '
#     encoding: UTF-8
#     prefix: classpath:/templates/
#     suffix: .html

server:
port: 8888
最后写一个启动应用类
[code]package com.springboot.jpa;

import org.springframework.boot.SpringApplication;
import org.springframework.boot.autoconfigure.SpringBootApplication;

/**
* @Author 18011618
* @Description
* @Date 18:58 2018/7/16
* @Modify By
*/
@SpringBootApplication
public class JPAApplication {
public static void main(String[] args) {
SpringApplication.run(JPAApplication.class,args);
}
}
最后把对应的sql语句也给一下,方便测试:
[code]SET FOREIGN_KEY_CHECKS=0;

-- ----------------------------
-- Table structure for `user`
-- ----------------------------
DROP TABLE IF EXISTS `user`;
CREATE TABLE `user` (
`id` int(11) NOT NULL AUTO_INCREMENT,
`username` varchar(255) DEFAULT NULL,
UNIQUE KEY `id_x` (`id`) USING BTREE
) ENGINE=InnoDB AUTO_INCREMENT=5 DEFAULT CHARSET=utf8;

-- ----------------------------
-- Records of user
-- ----------------------------
INSERT INTO `user` VALUES ('1', 'jiahp');
INSERT INTO `user` VALUES ('2', 'wangli');
INSERT INTO `user` VALUES ('3', 'guoyanbin');
INSERT INTO `user` VALUES ('4', 'yaodong');
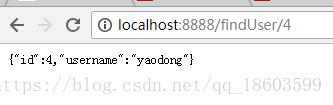
最后启动应用类,在浏览器端输入 http://localhost:8888/findUser/1 可以看到如下结果
到此为止就实现了和JPA的整合,当然代码很简单,配置也很简单,如果需要对JPA的配置进行扩展或者自定义,可以按照下面这样定义一个configuration:
[code]package com.springboot.jpa.config;

import org.springframework.boot.autoconfigure.domain.EntityScan;
import org.springframework.context.annotation.Configuration;
import org.springframework.dao.annotation.PersistenceExceptionTranslationPostProcessor;
import org.springframework.data.jpa.repository.config.EnableJpaRepositories;
import org.springframework.transaction.annotation.EnableTransactionManagement;

/**
* @Author 18011618
* @Description JPA的配置类
* @Date 9:35 2018/7/20
* @Modify By
*/
@Configuration
@EnableTransactionManagement(proxyTargetClass = true)
@EnableJpaRepositories(basePackages = "com.springboot.jpa.resposity")
@EntityScan(basePackages = "com.springboot.jpa.bean")
public class JpaConfiguration {
PersistenceExceptionTranslationPostProcessor oersistenceExceptionTranslationPostProcessor(){
return new PersistenceExceptionTranslationPostProcessor();
}
}
主要指定以下内容:
1 启动JAP事务管理
2 启动数据访问层接口包的扫描地址
3 指定JPA实体扫描的地址
尽管上面的代码没有写这个配置类,也是可以成功运行,那是因为spring内部对JPA有默认的配置实现.
阅读更多
- 转载:spring boot-jpa整合QueryDSL来简化复杂操作
- spring boot 整合spring data jpa
- Idea下Spring Boot、thymeleaf、Jpa项目整合实例
- Spring Boot整合jpa,Shiro进行权限管理
- springBoot入门总结(三)整合SpringDataJPA
- spring boot 框架spring date jpa整合shiro
- 企业级 SpringBoot 教程 (四)SpringBoot 整合JPA
- SpringBoot+spring-date-jpa+Hibernate 整合mysql 与sqlserver 配置文件信息
- 第二十四章:SpringBoot项目整合JPA多数据源配置
- Spring Boot(二):整合 JPA 及 事务控制
- SpringBoot非官方教程 | 第四篇:SpringBoot 整合JPA
- Spring Boot + Spring Data JPA 项目整合开发记录(持续更新)
- SpringBoot 整合JPA
- springboot 入门教程(6)--- 整合Spring data JPA实现CRUD(附源码)
- springboot整合jpa
- Spring Boot 揭秘与实战(二) 数据存储篇 - JPA整合
- spring boot 整合redis,jpa
- spring-boot、spring-data-jpa、hibernate整合
- SpringBoot整合jpa
- springboot整合spring data jpa