Spring Cloud中声明式服务调用Feign (11)
转自 https://blog.csdn.net/u012702547/article/details/77823434这个系列我感觉真的太好了,可以一步一步的了解spring cloud 的搭建以及更深层次的东西,对想学这门技术的朋友真的入门特别的快,感谢这位大哥的分享,我也会持续的更新过来。-------------------------------------------------------------------------------------------------------------------------------------------------------------
前面几篇文章我们详细的介绍了Ribbon、RestTemplate、Hystrix组件,这些组件是我们Spring Cloud中非常基础的组件,小伙伴们在使用的过程中可能也发现了这些东西都是同时出现的,而且配置也都非常相似,每次开发都有很多相同的代码,因此,Spring Cloud基于Netflix Feign整合了Ribbon和Hystrix,让我们的开发工作变得更加简单,就像Spring Boot是对Spring+SpringMVC的简化一样。Spring Cloud Feign不仅在配置上大大简化了开发工作,同时还提供了一种声明式的Web服务客户端定义方式。
在前面几篇文章中,我们为了简化RestTemplate操作,将之封装在一个BookService中,但同时我们也发现BookService中的方法几乎都是模板式的,写起来很枯燥,Spring Cloud Feign对此进行了进一步的封装,简化了我们的封装操作。接下来我们就来看看Spring Cloud Feign的使用。本文是Spring Cloud系列的第十六篇文章,了解前十五篇文章内容有助于更好的理解本文:1.使用Spring Cloud搭建服务注册中心
2.使用Spring Cloud搭建高可用服务注册中心
3.Spring Cloud中服务的发现与消费
4.Eureka中的核心概念
5.什么是客户端负载均衡
6.Spring RestTemplate中几种常见的请求方式
7.RestTemplate的逆袭之路,从发送请求到负载均衡
8.Spring Cloud中负载均衡器概览
9.Spring Cloud中的负载均衡策略
10.Spring Cloud中的断路器Hystrix
11.Spring Cloud自定义Hystrix请求命令
12.Spring Cloud中Hystrix的服务降级与异常处理
13.Spring Cloud中Hystrix的请求缓存
14.Spring Cloud中Hystrix的请求合并
15.Spring Cloud中Hystrix仪表盘与Turbine集群监控
Spring Cloud Feign入门
环境搭建
OK,首先我们通过下面六步来创建一个Spring Cloud Feign工程,先来体验下Spring Cloud Feign带给我们的便利。
第一步:创建普通Spring Boot工程
首先我们来创建一个普通的Spring Boot工程,取名为feign-consumer。
第二步:添加依赖
这里要添加的依赖主要是spring-cloud-starter-eureka和spring-cloud-starter-feign,如下:
<parent>
<groupId>org.springframework.boot</groupId>
<artifactId>spring-boot-starter-parent</artifactId>
<version>1.5.7.RELEASE</version>
<relativePath/> <!-- lookup parent from repository -->
</parent>
<properties>
<spring-cloud.version>Dalston.SR3</spring-cloud.version>
</properties>
<dependencies>
<!-- 其他依赖 -->
<!-- 自己添加的依赖 -->
<dependency>
<groupId>org.springframework.cloud</groupId>
<artifactId>spring-cloud-starter-eureka</artifactId>
</dependency>
<dependency>
<groupId>org.springframework.cloud</groupId>
<artifactId>spring-cloud-starter-feign</artifactId>
</dependency>
</dependencies>
<dependencyManagement>
<dependencies>
<dependency>
<groupId>org.springframework.cloud</groupId>
<artifactId>spring-cloud-dependencies</artifactId>
<version>${spring-cloud.version}</version>
<type>pom</type>
<scope>import</scope>
</dependency>
</dependencies>
</dependencyManagement>
第三步:添加注解
然后在工程的入口类上添加@EnableFeignClients注解表示开启Spring Cloud Feign的支持功能,如下:@SpringBootApplication
@EnableDiscoveryClient
@EnableFeignClients
public class FeignConsumerApplication {
public static void main(String[] args) {
SpringApplication.run(FeignConsumerApplication.class, args);
}
}第四步:声明服务
定义一个HelloService接口,通过@FeignClient注解来指定服务名进而绑定服务,然后再通过SpringMVC中提供的注解来绑定服务提供者提供的接口,如下:@FeignClient("hello-service")
public interface HelloService {
@RequestMapping("/hello")
String hello();
}这相当于绑定了一个名叫hello-service(这里hello-service大小写无所谓)的服务提供者提供的/hello接口。我们来看一下我服务提供者提供的接口,如下:
@RequestMapping(value = "/hello", method = RequestMethod.GET)
public String hello() {
return "hello";
}
第五步:Controller中调用服务
接着来创建一个Controller来调用上面的服务,如下:@RestController
public class FeignConsumerController {
@Autowired
HelloService helloService;
@RequestMapping("/hello")
public String hello() {
return helloService.hello();
}
}第六步:属性配置
最后,我们需要在application.properties中指定服务注册中心,并配置端口号等,如下:spring.application.name=feign-consumer server.port=2005 eureka.client.service-url.defaultZone=http://localhost:1111/eureka/
测试
做完上面的操作之后,依次启动eureka-server、provider和feign-consumer,然后访问如下地址:http://localhost:2005/hello,访问结果如下: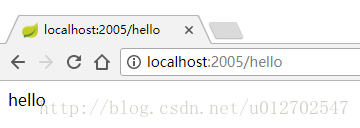 Ribbon和Hystrix的功能都有,只是我们使用Feign实现起来更简单,Feign使用了一种更加优雅的方式来调用服务提供者的接口,避免了我们写模板式的RestTemplate代码。
参数传递
上面我们看了一个简单的调用案例,这个例子中没有涉及到参数的传递,那么接下来我们就来看看参数的传递要如何实现。首先我先给我的服务提供者添加三个测试接口,如下:
@RequestMapping(value = "/hello1", method = RequestMethod.GET)
public String hello1(@RequestParam String name) {
return "hello " + name + "!";
}

@RequestMapping(value = "/hello2", method = RequestMethod.GET)
public Book hello2(@RequestHeader String name, @RequestHeader String author, @RequestHeader Integer price) throws UnsupportedEncodingException {
Book book = new Book();
book.setName(URLDecoder.decode(name,"UTF-8"));
book.setAuthor(URLDecoder.decode(author,"UTF-8"));
book.setPrice(price);
System.out.println(book);
return book;
}

@RequestMapping(value = "/hello3", method = RequestMethod.POST)
public String hello3(@RequestBody Book book) {
return "书名为:" + book.getName() + ";作者为:" + book.getAuthor();
}
hello1接口主要是接收一个String类型的参数,参数通过key-value的形式传来,然后返回一个String类型的数据;hello2接口接收到参数携带在请求头中,请求头中传递中文会乱码,所以要先编码,再解码(当然如果传递的是英文就不用这么麻烦),然后返回一个Book对象;hello3则接收一个Book对象,返回一个字符串。测试接口写好之后,我们再来看看feign-consumer工程中的HelloService接口要怎么写,如下:
@FeignClient("hello-service")
public interface HelloService {
@RequestMapping("/hello")
String hello();

@RequestMapping(value = "/hello1", method = RequestMethod.GET)
String hello(@RequestParam("name") String name);

@RequestMapping(value = "/hello2", method = RequestMethod.GET)
Book hello(@RequestHeader("name") String name, @RequestHeader("author") String author, @RequestHeader("price") Integer price);

@RequestMapping(value = "/hello3", method = RequestMethod.POST)
String hello(@RequestBody Book book);
}
这里有一个细节需要小伙伴们注意,在SpringMVC中,@RequestParam和@RequestHeader注解,如果我们不指定value,则默认采用参数的名字作为其value,但是在Feign中,这个value必须明确指定,否则会报错。最后添加测试接口,如下:
@RestController
public class FeignConsumerController {
@Autowired
HelloService helloService;

@RequestMapping("/hello")
public String hello() {
return helloService.hello();
}

@RequestMapping("/hello1")
public String hello1() {
return helloService.hello("张三");
}

@RequestMapping(value = "/hello2")
public Book hello2() throws UnsupportedEncodingException {
Book book = helloService.hello(URLEncoder.encode("三国演义","UTF-8"), URLEncoder.encode("罗贯中","UTF-8"), 33);
System.out.println(book);
return book;
}

@RequestMapping("/hello3")
public String hello3() {
Book book = new Book();
book.setName("红楼梦");
book.setPrice(44);
book.setAuthor("曹雪芹");
return helloService.hello(book);
}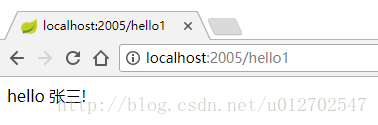
}运行结果如下:http://localhost:2005/hello1:
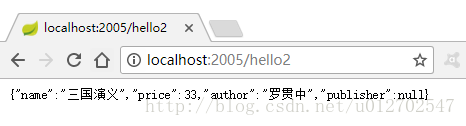
 http://localhost:2005/hello2:
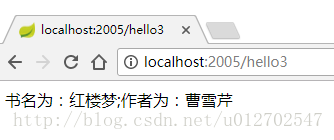
 http://localhost:2005/hello3:
 OK,关于Feign入门我们就先说到这里,有问题欢迎留言讨论。
阅读更多
OK,关于Feign入门我们就先说到这里,有问题欢迎留言讨论。
阅读更多

- 笔记:Spring Cloud Feign 声明式服务调用
- 干货分享微服务spring-cloud(5.声明式服务调用feign)
- Spring Cloud 入门教程(六): 用声明式REST客户端Feign调用远端HTTP服务
- Spring Cloud中声明式服务调用Feign
- Spring Cloud Feign 声明式服务调用
- 【Spring Cloud】--声明式服务调用Feign
- 第九章 Spring Cloud Feign声明式调用服务
- SpringCloud之声明式服务调用Spring Cloud Feign实例
- 【图文经典版】声明式调用服务SpringCloud之Feign实例讲解
- SpringCloud零基础上手(四)——服务发现以及Feign(声明式RESTful服务调用)
- spring cloud Feign(声明式服务调用)
- Spring Cloud 声明式服务调用 Feign
- 使用Spring Cloud Feign作为HTTP客户端调用远程HTTP服务
- Spring Cloud(三)服务间调用Feign
- SpringCloud 通过Feign 调用其他服务下载文件
- Spring Cloud(十一)声名式服务调用:Feign的使用 (上)
- 使用Spring Cloud Feign作为HTTP客户端调用远程HTTP服务
- SpringCloud使用Feign进行服务调用
- Spring Cloud Learning | 第四篇:声明式服务调用(Fegin)
- 关于Dalston.SR3版本的spring cloud,用feign客户端调用服务hystrix不能生效的问题